background image


MODEL:


PDi A-Series


Document Number:


PD196-392R2 


Quick Start Guide 

Page 6 of 10 


PDi Communication Systems, Inc. 

 40 Greenwood Ln 

 Springboro, Ohio 45066 USA 


www.pdiarm.com

 and 

www.mymedTV.com


 Phone 800.628.9870 


DVD Connection (Module) 

The A Series televisions are made to accept the PDi DVD module PD251-043-1. This mounts on the back of the television with 
access to the DVD from the side or bottom of the TV. Detailed installation instructions are available with the DVD module. 

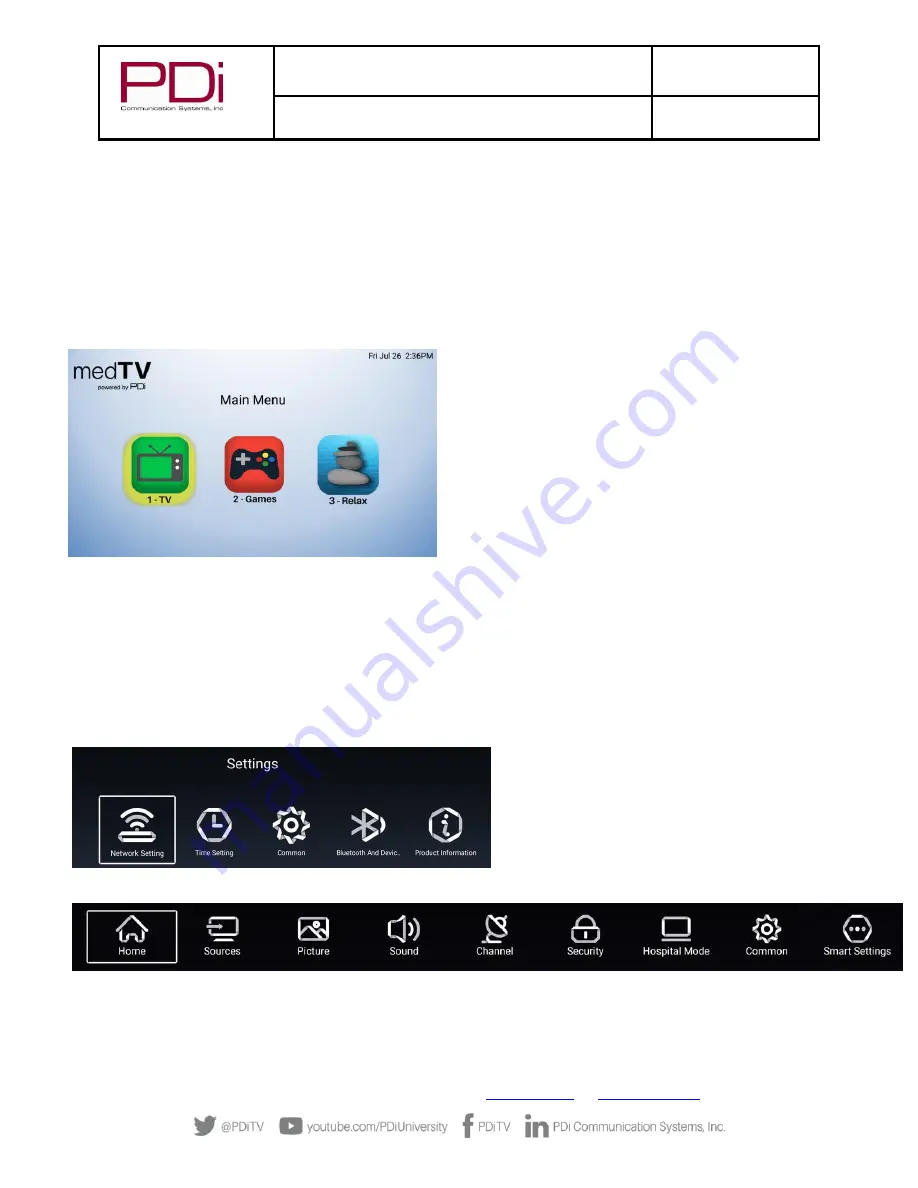
Main Menu Screen (medTV experience) 


If medTV enhanced entertainment with TV, Games, and Relaxation was selected in the setup wizard, then when the television 
is powered on the Main Menu screen will appear.  medTV is designed to be compatible with as many pillow speakers as 
possible. 

Press “

1

 or navigate and select the green TV icon to watch TV. 


Press “

2

” 

or navigate and select the red games icon to play 8 

preinstalled, pillow speaker compatible games.   
 

Press “

3

” 

or navigate and select the blue relax icon to enjoy 3 

preinstalled relaxation apps 
 
To return to the Main Menu, use home/guide/menu or 
back/last/exit.  You can also press TV/AV and select HOME or use 
the * key on the setup remote to go back. 

Programming 

This section explains how to setup the features of the PDI A-Series LED TV. The following instructions assume you have a PDi 
programming remote (PD108-420), have correctly mounted the TV, and connected power and RF signal. The A-

series TV’s run 

an Android operating system.  Therefore, they have 2 configuration menus: one that applies to the entire system and a 
separate menu just for television. Most of the settings are found in the television menus. 
 
Access the menus by pressing SETUP on the PDi setup remote. If the main menu is being shown, pressing SETUP brings up the 
system configuration menu:   


If a television channel is being shown, pressing SETUP brings up the television setup menu: 


Summary of Contents for medTV SMART A Series

Page 1: ...QUICK START GUIDE Document Number PD196 392R2 mymedTV com PDi A Series Televisions A24 A32 A42 A43 A55 ...

Page 2: ...nce when the equipment is operated in residential or commercial installation If this equipment does cause harmful interference to radio or television reception which can be determined by turning the equipment off and on the user is encouraged to try to correct the interference by one or more of the following measures Reorient or relocate the receiving antenna Increase the separation between the eq...

Page 3: ...plug into the outlet contact your electrician to replace your obsolete outlet 10 Protect the power cord from being walked on or pinched particularly at plugs convenience receptacles and the point where they exit from the product 11 Attachments only use attachments accessories specified by the manufacturer 12 Use only with the cart stand tripod bracket or table specified by the manufacturer or sold...

Page 4: ...e sources de chaleur telles que radiateurs registres de chaleur poêles ou tout autre appareil y compris les amplificateurs qui produit de la chaleur 9 NE PAS neutraliser le dispositif de sécurité de la fiche polarisée ou de terre Ce produit est équipé d une prise de terre à trois fils une fiche ayant une troisième broche mise à la terre Cette fiche ne peut s insérer que dans une prise de courant a...

Page 5: ... on the back side This TV is designed to work with either a digital pillow speaker that generates digital style control codes or a single button analog switch style pillow speaker A rear panel mounted switch allows use of different brands of pillow speakers and supports the major codesets Zenith Philips and RCA medTV Enhanced Entertainment with Games and Relaxation is compatible with any pillow sp...

Page 6: ...gate and select the red games icon to play 8 preinstalled pillow speaker compatible games Press 3 or navigate and select the blue relax icon to enjoy 3 preinstalled relaxation apps To return to the Main Menu use home guide menu or back last exit You can also press TV AV and select HOME or use the key on the setup remote to go back Programming This section explains how to setup the features of the ...

Page 7: ...using the remote control The Service Level can be changed to any of the 3 levels or to disabled at any time by entering the TV SETUP menu and changing the Service Level menu items To set Service Level open TV Setup Menu select Channel 1 Navigate or to Service Level Press Ok or 2 Press or to select Free Basic Premium or Disable 3 Press SETUP to exit return to the previous menu or proceed to Auto Pr...

Page 8: ...nels or all aliased channels Press Ok or 3 Navigate to the OK button and press OK on the remote to complete the Auto Alias Additional Channel Settings Please see the user manual available at https www pdiarm com document library access for instructions on additional channel configurations and settings Sound Programming Internal Speaker Enable Disable The TV s internal speakers can be enable or dis...

Page 9: ...nu select Hospital Mode 1 Navigate or to USB Cloning Firmware Splash Update Press Ok or 2 Navigate to Save to USB Press OK or 3 A message box will appear with the default clone file name Navigate to the confirm button and press OK on the remote 4 A second message box will appear asking you to wait while the clone file is saved to the USB drive This message will automatically disappear when the clo...

Page 10: ...ioning operator error failure or malfunction of any data communications system Such conditions will be determined by PDi at its sole unfettered discretion Service and repair of accessories apparatus attachments or any other devices which are not PDi products or options Defacing of product revision control and PDi labeling label alterations serial number missing serial number no longer discernible ...

Reviews: