background image

Turn on the Feeder & Set the Time

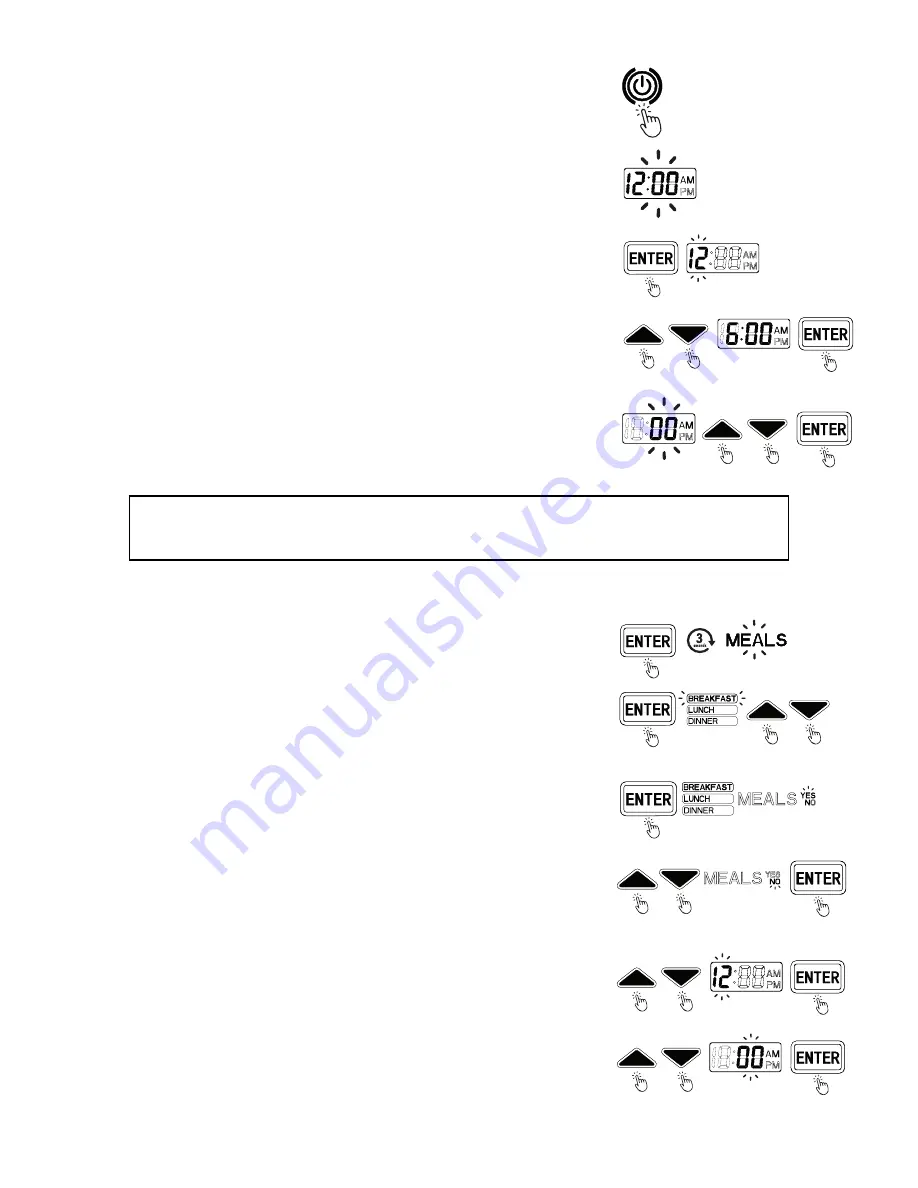
1.   Lift the green cover on the control panel and press the power button.

If you have trouble with the display cover, try pressing the slightly raised 

green square on the cutout around the display panel and lifting up.

2.  When the device is switched on, the time will automatically begin to flash

12:00 AM. This will happen every time the device is powered off and 

back on.

3.  Press the ENTER button once to set the current time. On the LCD display,

you should see the hour (12:) start flashing.

4.  Use the up and down arrow buttons to set the hour. The time will

automatically change between AM and PM as you navigate. Make sure you 

select the correct hour (e.g., 6 AM or 6 PM), or else your feeding schedule 

may not work correctly. Press the ENTER button again to confirm.

5.  The minutes (:00) should start flashing. Use the up and down arrows to

set the minutes. When the time displayed on the device is correct, press

the ENTER button one last time to confirm the time and end the process.

4

Setting Meals & Meal Sizes

1.   Press the ENTER button and hold it down for three (3) seconds. The word

MEALS should begin flashing on the LCD display.

2.  Press ENTER again and the word BREAKFAST should start flashing. 

Use the up and down arrows to cycle through BREAKFAST, LUNCH,  

and DINNER. 

3.  Use ENTER to confirm the meal you want to change or set. The meal name

(e.g., BREAKFAST) will stop flashing, and the word YES will start flashing. 

a.  If you want to set a time for your pet to be fed for this meal, hit  

ENTER to confirm while YES is flashing and proceed to Step 4.

b.  If you want the feeder to skip this meal entirely, hit the up or down

arrow so that the word NO begins to flash, then press ENTER to 

confirm. You will be returned to the meal settings menu (meal name 

will be flashing).

4.  Now that you have selected a meal to edit, the hour on the time display

should begin to flash. Use the up and down arrows to select the hour for 

this meal to be served to your pet. (Again make sure to check the AM/PM 

display to select the correct hour). Press ENTER to confirm.

5.  The minutes should now be flashing. Use the up and down arrows to

select the correct minute for the meal to be served, then press ENTER 

to confirm.

NOTE: Whenever the device is powered off, the time will reset to 12:00 AM, and you will need to reset the 

time using this process when the device is turned back on. However, the feeder will not reset your feeding 

schedules upon powering down.

Summary of Contents for PAW6MLWF

Page 1: ...6 MEAL AUTOMATIC PET FEEDER USER GUIDE PAW6MLWF ...

Page 2: ... does not conform to the guidelines described in this User Guide may void the limited warranty Please read all directions before using the product and retain this guide for reference This product is intended for household use only This product is covered by a limited one year warranty Coverage is subject to limits and exclusions See warranty for details Package Contents 6 compartment food storage ...

Page 3: ...ng lid 3 Release knob 4 LCD display screen 5 Storage tray Control Panel See below 6 On Off button 7 Enter button 8 Up arrow button 9 Down arrow button 10 Start button 11 Speaker 12 Battery compartment A 13 Battery compartment B 2 2 3 1 4 5 12 13 11 10 9 8 7 6 ...

Page 4: ...nt covers and make sure the latches snap securely into place 5 Install the lid by fitting the protruding shaft on the feeder compartment into the corresponding circular opening on the underside of the lid You may have to spin the lid a little to get the shaft to settle into place 6 Turn the green knob on the lid from the unlock position to the lock position to securely fasten it in place 1 2 3 Sma...

Page 5: ...n flashing on the LCD display 2 Press ENTER again and the word BREAKFAST should start flashing Use the up and down arrows to cycle through BREAKFAST LUNCH and DINNER 3 Use ENTER to confirm the meal you want to change or set The meal name e g BREAKFAST will stop flashing and the word YES will start flashing a If you want to set a time for your pet to be fed for this meal hit ENTER to confirm while ...

Page 6: ... compartments to be opened Press ENTER to confirm 7 Repeat steps 2 6 until you have programmed times and sizes for all the meals you want to be scheduled Press and hold the ENTER button until the device beeps twice to confirm and set your programmed meal settings The names of the meals you have programmed will be displayed on the left side of the screen 8 To manually advance the feeder press and h...

Page 7: ...fully before attempting to operate this device Improper usage could result in your pet s not being fed properly or not being fed at all Improper use or mishandling could also result in permanent damage to your device 3 Only use this feeder indoors in a dry place and on solid even ground 4 Do not place the feeder in a closet in a narrow confined space or too close to a wall or other obstructing item...

Page 8: ...d in a shady place Specifications Dimensions 12 5 x 12 5 x 4 320 x 320 x 98mm Weight 33 5 oz 950g Material ABS Plastic Working Voltage 6V Wattage 1 2W Battery Type Four 4 Alkaline C Batteries not included Battery Capacity 2800mAh Questions or problems Contact us support pawplepets com 1 833 665 2184 PAWPLE the PAWPLE logo PETS ARE PEOPLE TOO and the BAR CODE DEVICES are trademarks of C A IP Holding...

Reviews: