17
GB/IE/NI
m
IMPORTANT!
u
You must fully assemble the product before
using it for the first time!
m
WARNING!
Always pull the power plug before
making adjustments to the product .
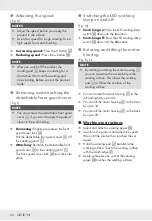
Unfolding the shaft
(Fig . C)
Unlocking:
Set the folding hinge lock
[
11]
to
the position .
Hold the shaft
[
13]
and unfold the front
part until the folding hinge lock
[
11]
is fully
engaged .
Locking:
Set the folding hinge lock
[
11]
to
the position .
Attaching the telescopic
extension shaft
(Fig . D)
NOTE
u
The telescopic extension shaft
[
22]
is suitable
for rooms with high ceilings .
Unlocking:
Fold up the lock lever
[
21]
.
Insert the telescopic extension shaft
[
22]
into
the connector
[
14]
(on the main handle
[
20]
) .
Adjust the length .
NOTE
u
The maximum length is indicated on the
telescopic extension shaft
[
22]
.
u
Pulling the telescopic extension shaft out
of the main handle
[
20]
: The
Max
marking
must remain hidden inside the main
handle or be aligned with the edge of the
connector
[
14]
.
u
Do not pull the telescopic extension shaft
out further .
Locking:
Fold down the lock lever
[
21]
.
Connecting the vacuum hose
(Fig . E, F, G)
m
WARNING!
Always wear a dust mask when
sanding . Using this product generates a
large amount of dust . Harmful dust may
be generated when sanding surfaces
coated with lead-based paint .
NOTES
u
Attach an external dust extraction
unit (e .g . vacuum cleaner) to the hose
adaptor
[
29]
[
30]
(at the end of the vacuum
hose
[
28]
) . In this way, you protect yourself
as well as persons in the vicinity from dust
and you keep the workplace clean .
u
You may connect the vacuum hose
[
28]
to
the connector
[
14]
on the main handle
[
20]
or
to the connector
[
24]
on the rear handle
[
23]
.
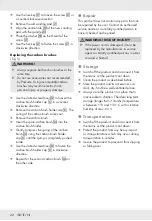
Insert the hose coupler
[
26]
into the
connector
[
14]
/
[
24]
, until it is fully engaged .
Summary of Contents for PWDS 920 B2
Page 3: ...A B 1 2 12 3 4 6 11 5 9 10 13 14 15 8 7 C 13 11 Max D 21 22 14 20 E 14 24 29 28 26 20 23...
Page 5: ...J 1 2 33 7 K 17 16 18 19 L 4 3 1 1 M 12 N 30 30 5 0 30 90 5...
Page 6: ...P Q 180 R 31 37 2 37 38 40 39 S 32 34 6...
Page 28: ...26 GB IE NI EC declaration of conformity...
Page 50: ...48 FR BE D claration de conformit CE...
Page 72: ...70 NL BE EG verklaring van overeenstemming...


