background image

Bulletin 61-60

7

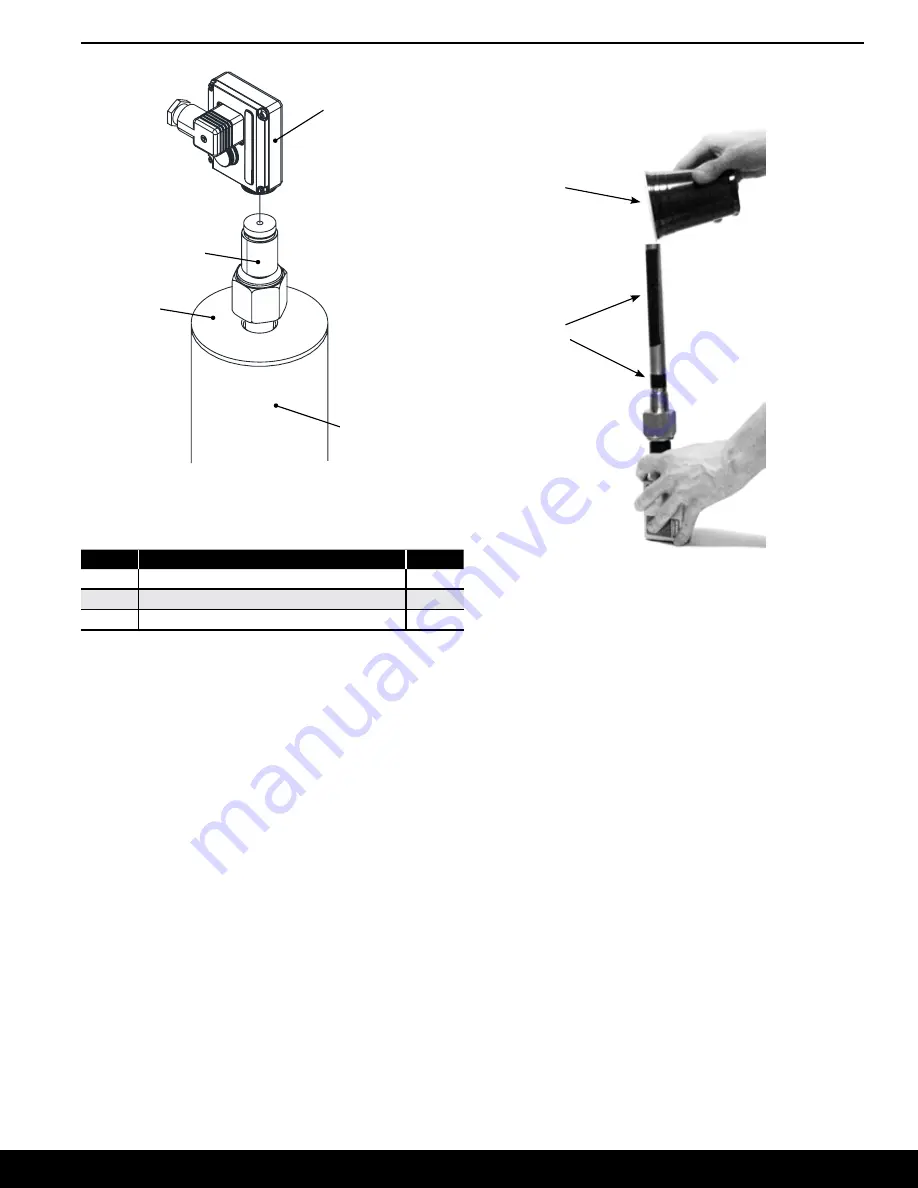
Explosion View: 

Probe Replacement Kits

Item

Kit Description

Kit

1

Electronic Head, Assembly

209329

1

Electronic Head, Assembly with Bar Graph

209330

2

Column Cap, Pipe (3" or 4" Diameter Column)

205873

Calibrating On-Site

All replacement electronics, or probe assemblies reset to the 
factory setting are pre-calibrated to ammonia with a sensor tube 
length of 1500 mm/59” and a signal  damping of 15 seconds. When 
installed on all other lengths it has to be re-calibrated on site.

Calibrating for ammonia on site:

HBLT probes straight from the factory are pre-calibrated to the 
manufactured probe length, so there is no need to re-calibrate. 
Probe assembles that have been reset to the factory settings must 
follow the 

adjusting the minimum and maximum calibration 

points 

instructions described earlier in this document. 

The benefit of ammonia is water can be used as a substitute. 
Ammonia and water have the same properties with the respect to 
capacitive measurements. This is very convenient as water is much 
easier and safer than dealing with ammonia. 

For the low level calibration, stick the bottom of the probe into a 
small container. Fill the water level to the desired low level height 
and follow calibration instruction for minimum level described 
earlier in this document under the calibration section.

When it comes to calibrating the height level it is much more 
difficult, because finding a container/tube long enough, especially 
for length greater than 1397 mm (55"), is not quite so easy.  A work 
around to this problem can be solved by following these steps.

1.  Turn the HBLT probe upside down.

1

Probe

2

3" or 4" Dia. 
Column

Tape

Water

2.  Tape all hole on the sleeve, otherwise known as reference pipe, 

to prevent any water from leaking out. The 4-20 mA output 
signal is not inverted despite the upside down position.

3.  Fill the pipe with water according to your calibration needs. 

With the sleeve full of water at the high level desired calibration 
can be carried out by following the maximum calibration 
instructions described earlier in this document under the 
calibration section.

Calibrating a replacement probe head for ammonia on site :

Follow the procedures below to re-calibrate a replacement 
electronic heads:

1.  Install the HBLT electronic head to the existing probe and 

connect power.

2.  To calibrate the minimum level the column or vessel needs to 

be free of liquid. Follow the minimum calibration instructions 
described earlier in this document.

3.  To calibrate the maximum level the column or vessel needs to 

be fully submerged by ammonia liquid. Follow the maximum 
calibration instructions described earlier in this document.

4.  If methods 2 & 3 cannot be carried out use the on-site method, 

but before proceeding with this method the column/standpipe 
or vessel needs to be isolated and  free of refrigerant.

Calibrating for refrigerants other than ammonia on-site:

When calibrating for refrigerants other than ammonia utilize the 
on-site calibration instructions. Calibrate the probe for ammonia 
and then change the refrigerant by following the 

set of refrigerant


instructions described earlier in this document. If using the 
upside down method for calibrating the HBLT probe; make sure to 
remove all tape and clean/dry the probe prior to installation.

Summary of Contents for HBLT-A1

Page 1: ...ccumulators or other similar pressure vessels Available in various lengths and factory calibrated for ammonia R717 Product Features Suitable for ammonia CO2 and halocarbon refrigerants Plug and Play no calibration required when installed on ammonia systems Service Friendly electronic head and probe can be separated without emptying the vessel Improved Calibration range signal output can be adapted...

Page 2: ...d along the height of the pipe column to determine the level of the liquid when setting the HBLT A1 probe as well as to check its performance during operation of the system These are an essential part of any well designed pressure vessel system and the use of an electronic liquid level control does not eliminate this need The pipe connection at the top of the pipe column equalizing the vapor space...

Page 3: ...5mm 1 Receiver Min 75mm 3 Min 100mm 4 Column Cap Sight Glass Pipe Column Weld Weld Liquid level Switch Notes Column caps are only available in 75mm and 100mm 3 and 4 diameters Mounting Instruction It is required to use Teflon tape paste on NPT connections or sealing ring on BSP connections Add Teflon tape paste to the threads Mount the liquid level transmitter on the vessel and tighten to a torque...

Page 4: ...g will be changed HBLT A1 HBLT A1 BSP Calibration Levels Milliamperes Vs Level Milliamperes Percent Full 4 0 0 6 12 5 8 25 0 10 37 5 12 50 0 14 62 5 16 75 0 18 87 0 20 100 0 Signal Damping Signal damping is factory set to 15 seconds This setting can be altered by activating the calibration switch The setting range is 1 to 120 seconds Settings can be made while the system is operating Procedure 1 C...

Page 5: ...he calibration push button and keep it activated in approximately 5 seconds until green LED stops flashing 3 Activate within the next 10 seconds the calibration push button two times with 1 second in between and keep it activated If calibration push button is not activated within 10 seconds it will automatically leave calibration mode and return to normal operation 4 Observe the output mA signal d...

Page 6: ...n Probe Lengths Measuring Range mm inch mm inch 280 11 02 207 8 15 500 19 69 427 16 81 800 31 50 727 28 62 1000 39 37 927 36 50 1200 47 24 1127 44 37 1500 59 06 1427 56 18 1700 66 93 1627 64 05 2200 86 61 2127 83 74 3000 118 10 2927 115 24 HBLT A1 HBLT A1 BSP Parts List Item Part Description 1 Electronic Head 2 Connection DIN 3 LED Green 4 Calibration Push Button 5 LED Level Bar Graph 6 Cover Cali...

Page 7: ...m can be solved by following these steps 1 Turn the HBLT probe upside down 1 Probe 2 3 or 4 Dia Column Tape Water 2 Tape all hole on the sleeve otherwise known as reference pipe to prevent any water from leaking out The 4 20 mA output signal is not inverted despite the upside down position 3 Fill the pipe with water according to your calibration needs With the sleeve full of water at the high leve...

Page 8: ...ties Division Defective products or parts thereof returned to the factory with transportation charges prepaid and found to be defective by factory inspection will be replaced or repaired at Refrigerating Specialties option free of charge F O B factory Warranty does not cover products which have been altered or repaired in the field damaged in transit or have suffered accidents misuse or abuse Prod...

Reviews: