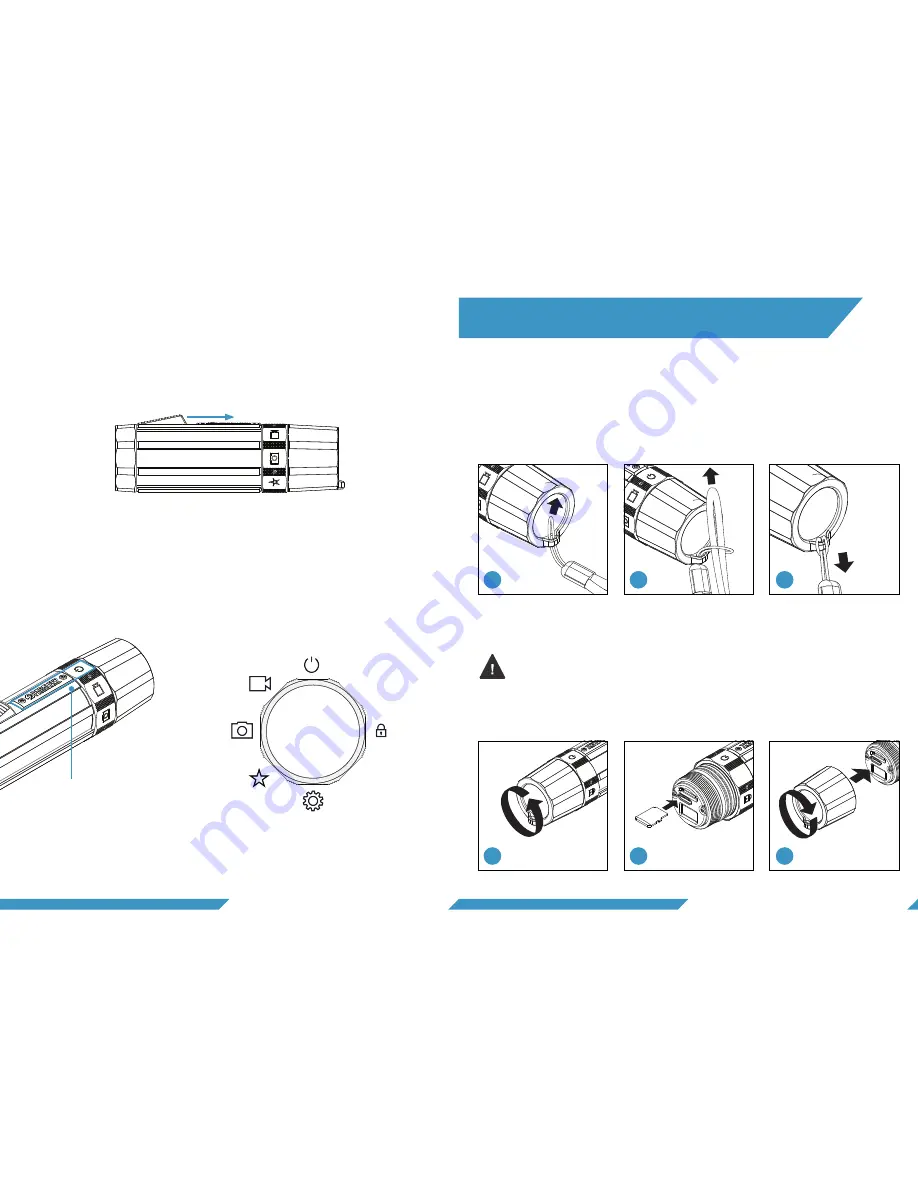
background image

6

7

1.3.2 Selector Ring 

To switch between modes, rotate the selector ring. The icon 
aligned with the logo plate is the selected mode. Make sure the 
selector ring is placed correctly (the selector ring will snap to 
each position).

Power

Video

Photo &

Snap record

Custom

Settings

Locked

1.3 BUTTONS

1) Put the small cord of the strap through the eyelet on the 
camera. 2) Put the other end of the strap through the loop.
3) Tighten the strap.

Turn off the camera before inserting the micro SD card. Use only 
class U3 or V30 SD cards of a well-known brand. A capacity of 
32 GB or more is recommended. (Max. 128 GB) (NOT included)

1) Unscrew the end cap. 2) Insert the micro SD card (logo side up). 
3) Screw the end cap on – do not cross thread the cap!

2.1  ATTACH WRIST STRAP

2.2  INSERT MICRO SD CARD

2.


GETTING STARTED

1.3.1 Activation Switch 

Pull back the activation switch once and release quickly to 
‘click’. Hold the activation switch for 1 second or more to ‘hold’.

1

2

3

1

2

3

You can select mode by 
rotating the ring and align the 
mode with the logo plate.

Summary of Contents for DIVE CAMERA

Page 1: ...Together with our users we design and develop high quality products and solutions built for a purpose facebook com paralenz www paralenz com PARALENZ DIVE CAMERA USER MANUAL WWW PARALENZ COM V3 PDC 1...

Page 2: ...6 5 2 Frames per second 6 6 Custom settings 6 6 1 Custom video 6 6 2 Slow motion 6 6 3 Time lapse 6 6 4 Photo burst 6 6 5 Visual overlay 6 7 Advanced settings 6 7 1 Format micro SD card 6 7 2 Which ve...

Page 3: ...k ring Lens Activation switch Eyelet Lens end cap window O Rings Micro SD card slot OLED user interface display 1 OVERVIEW 1 6 3 2 5 4 7 Intended use The Paralenz Dive Camera is intended to be used un...

Page 4: ...ghten the strap Turn off the camera before inserting the micro SD card Use only class U3 or V30 SD cards of a well known brand A capacity of 32 GB or more is recommended Max 128 GB NOT included 1 Unsc...

Page 5: ...n off the camera The display says GOODBYE When the display turns black the camera has turned off You may use a variety of de vices to charge your camera Use a charger with 2 0 A output or higher for t...

Page 6: ...ideo mode is selected If you use flashlights or floodlights when diving turn off DCC Click three times to turn off on the DCC The screen will show the DCC status For more information on DCC go to sect...

Page 7: ...mat Photos taken 1 Select the photo snap record mode on the selector ring 2 Hold and keep holding the activation switch to record 3 Release the activation switch to stop the recording 4 2 RECORD A SNA...

Page 8: ...different modes assigned to it video slow motion time lapse and photo burst Go to settings to see how to switch between different custom modes See chapter 6 Camera settings 5 3 TAKE A PHOTO BURST 5 1...

Page 9: ...nu hold to choose or enter the selected setting The settings screen categories are as follows To change WiFi status go to settings WiFi Hold to turn WiFi on off To set the Kelvin K value of the white...

Page 10: ...OM SETTINGS 6 4 2 Which DCC setting to use If the water is blue we recommend you use DCC blue If the water is green we recommend you use DCC green Toggle either DCC or WB on off by clicking three time...

Page 11: ...and hold to assign it to the custom mode The settings in custom video are the same as in normal video 6 6 3 Time lapse To activate time lapse mode just select the activate screen and hold to assign i...

Page 12: ...Photo burst To activate photo burst mode select the activate screen and hold to assign it to the custom mode In settings you can se lect how many images are taken per amount of time 6 6 5 Visual over...

Page 13: ...7 MOUNTS There are two mounts in the box The Universal Mount and the Mask Mount The Universal Mount enables you to use most of the existing accessories on the market The Mask Mount is designed to fit...

Page 14: ...cant or petroleum based grease 8 1 2 How do I prevent the camera from flooding The triple O rings are tested to 200 m 656 ft 21 ATM so as long as you properly maintain the O rings and don t open the c...

Page 15: ...new lens 4 Insert the new lens while rotating slightly For other spare parts please contact support paralenz com 4 9 REPLACING PARTS 9 2 REPLACING THE O RINGS ON THE LENS If the O rings are damaged y...

Page 16: ...The app will give a notification when a new update is available Download the app via App Store Google Play You can also download all firmware updates on www paralenz com support To install the firmwar...

Page 17: ...e oven or hair dryer Do not store your battery with metal objects If the battery terminals come in contact with metal objects the battery may shortout and cause a fire Reformatting the SD card will de...

Page 18: ...not expressly approved by the part responsible for compliance could void the user s authority to operate the equipment c NOTE This equipment has been tested and found to comply with the limits for a C...

Page 19: ...wing two con ditions 1 this device may not cause interference and 2 this device must accept any interference including interference that may cause undesired operation of the device b Cet appareil est...

Page 20: ...computer If the front lens on the Paralenz Dive Camera should break take care to avoid injury Keep out of reach of children Waterproof to 200 M 656 FT 21 ATM Video resolution 4k 30 fps 1080p 100 fps 7...

Page 21: ...ence improper use or accidents The warranty period begins from the date of purchase The warranty does not cover commercial or rental use In case you experience any fault with the Paralenz Dive Camera...

Page 22: ...For more information visit WWW PARALENZ COM...

Reviews: