


14
Reference & Installation Manual
4.4.2 Bypass Zones
S
ECTIONS
[101]
TO
[148]: O
PTION
[2]
Only zones with option [2] enabled can be Manually Bypassed
(see section 13.5.3 on page 39). Fire Zones cannot be bypassed.
All zones are set as Bypass Zones by default.
4.4.3 Stay Zones
S
ECTIONS
[101]
TO
[148]: O
PTION
[3]
Only zones with option [3] enabled will be bypassed when the
system is Stay or Instant armed (see section 16.1.2 on page 45).
All other zones will remain activated. Fire Zones cannot be set as
Stay Zones.
4.4.4 Force Zones
S
ECTIONS
[101]
TO
[148]: O
PTION
[4]
Only zones with option [4] enabled can be bypassed when the
system is Force armed (see section 16.1.6 on page 45). Fire Zones
cannot be set as Force Zones.
4.4.5 Alarm Types
S
ECTIONS
[101]
TO
[148]: O
PTIONS
[5] & [6]
[5]
[6]
Zone Alarm Type
Off
Off
Steady Audible Alarm
Off
On
Pulsed Audible Alarm
On
Off
Silent Alarm
On
On
Generates a report only
•
A Steady Audible Alarm transmits the appropriate report code
(if programmed) and generates an alarm providing a steady
output for any bells or sirens connected to the control panel.
•
A Pulsed Audible Alarm transmits the appropriate report code
and generates an alarm providing a pulsed output (see Figure
16 on page 13) for any bells or sirens connected to the panel.
•
A Silent Alarm transmits the appropriate report code and
generates an alarm without activating any bells or sirens (e.g.
keypad indicates an alarm and the system must be disarmed).
•
A Report Only sends the report code to the monitoring station.
Unlike a silent alarm, no access codes are required to cancel
the alarm. Fire Zones cannot be set to Report Only.
4.4.6 Intellizone
S
ECTIONS
[101]
TO
[148]: O
PTION
[7]
If an alarm condition occurs on a zone with option [7] enabled, the
control panel will trigger the Intellizone Delay and will seek
confirmation of the alarm before generating an alarm. An alarm will
only be generated if one of the following conditions occurs during
the Intellizone Delay:
1)
An alarm condition occurs on any other Intellizone during the
Intellizone Delay.
2)
The zone in alarm has restored and re-occurred during the
Intellizone Delay.
3)
The zone in alarm remains in alarm for the entire Intellizone
Delay.
To program the Intellizone Delay, key in the desired 3-digit delay
value (010 to 255 seconds) into section [200]. Fire Zones cannot
be set as Intellizones.
4.4.7 Delay Alarm Transmission
S
ECTIONS
[101]
TO
[148]: O
PTION
[8]
When an alarm condition occurs on a zone with option [8] enabled,
the control panel will generate an alarm, but will not report the
alarm to the monitoring station until the end of the Alarm
Transmission Delay. During this period, disarming the system will
cancel any report originating from this zone. To program the Alarm
Transmission Delay, key in the desired 3-digit delay value (001 to
255 seconds, 000 = instant) into section [256]. This feature is
commonly used with Entry Delay zones in order to reduce the
occurrence of false alarms created by new users who may not
disarm the system in time.
4.5 Zone Labels
S
ECTIONS
[451]
TO
[498]
The existing zone labels that are displayed on an LCD (DGP2-
641BL) or Grafica (DNE-K07) keypad’s screen can be modified to
suit the installation’s needs. When zone labels are modified, the
label is changed throughout the system. Each label can contain a
maximum of 16 characters. To modify the zone labels, enter the
desired section and then enter the label. For instructions on how to
enter letters and special characters, refer to Tables 3 to 9 for LCD
keypads, or Grafica’s Online Manual for Grafica keypads. A
complete Grafica user manual is available on our website at
www.paradox.ca.
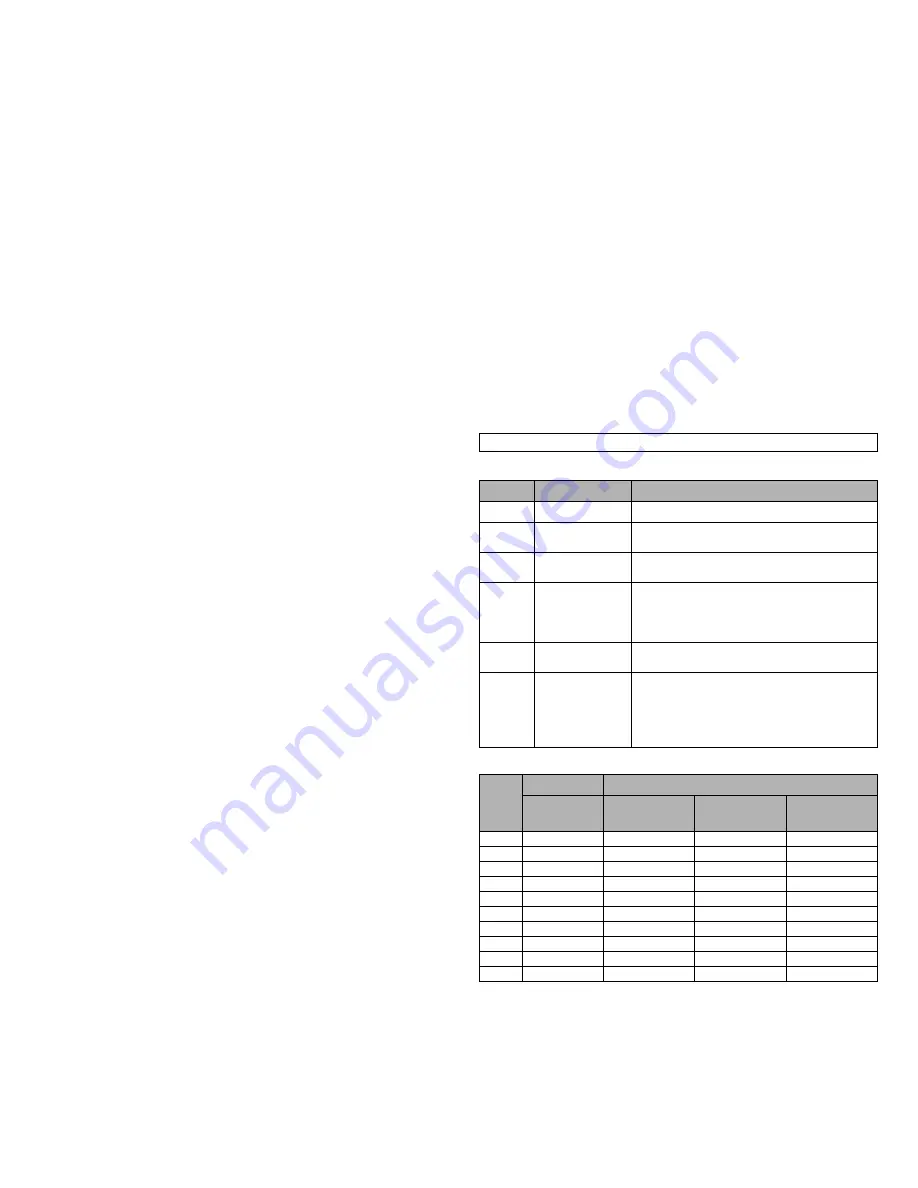
Table 3: Keys
Table 4:
Numeric and Alphanumeric Keys
Zone Labels: Sections [451] to [498] represent Zones 01 to 48.
Press
Feature
Description
[
STAY
]
Insert Space
Inserts a blank space in the cursor’s position
[
FORCE
]
Delete
Deletes the character or blank space found
at the cursor’s position
[
ARM
]
Delete Until the
End
Deletes all characters and spaces to the
right of the cursor and at the cursor's position
[
DISARM
]
Numeric or
Alphanumeric
Toggles from numeric keys to alphanumeric
keys and vice versa (see Table 4 on
page 14, Table 5 on page 15 or Table 6 on
page 15)
[
BYP
]
Lower or Upper
Case
Toggles the case setting from lower to upper
case and vice versa
[
MEM
]
Special
Characters
The cursor will turn into a flashing black
square. Enter the 3-digit number that
represents the desired symbol (see Table 7
on page 15, Table 8 on page 15 or Table 9
on page 15)
Key
Numeric
Alphanumeric
Press key
one time
Press key
one time
Press key
two times
Press key
three times
[0]
0
---
---
---
[1]
1
A
B
C
[2]
2
D
E
F
[3]
3
G
H
I
[4]
4
J
K
L
[5]
5
M
N
O
[6]
6
P
Q
R
[7]
7
S
T
U
[8]
8
V
W
X
[9]
9
Y
Z
Summary of Contents for Digiplex DGP-848
Page 2: ......


