background image

14 

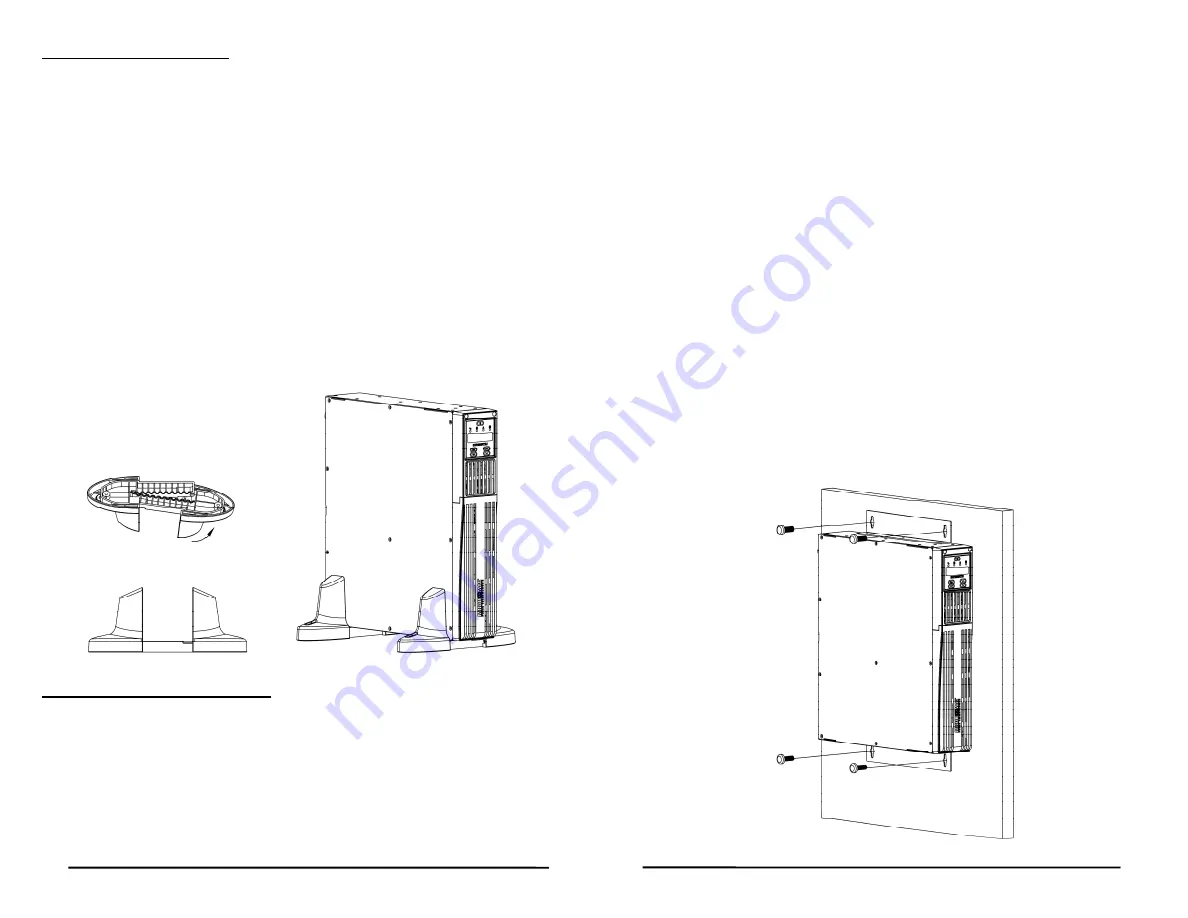
TOWER CONFIGURATION 

The tower configuration allows the user to install the UPS in the upright 
position next to a tower computer.  The tower brackets are provided with 
the UPS.   

WARNING: 

Use two or more people when installing the UPS, the 

UPS is extremely heavy.     
1.  Once the location of the UPS has been determined, place the UPS on a 

flat surface, remove the rackmount brackets from the UPS and then 
place the tower brackets in the desired location. 

2.  The LCD panel can be rotated to read in the upright position.  Use a 

small flat blade screwdriver on the right-hand side of the LCD panel and 
gently pop out the LCD panel.    Rotate the LCD panel so that it reads in 
the upright position and then reinstall it back into the front panel.     

WARNING:  

The UPS must be installed in the proper upright position.  If 

the UPS is not installed in the proper upright position the batteries will be 
damaged.  Once the UPS is placed in the tower brackets, looking at the 
front panel the YELLOW Battery Disconnected label on the top cover of the 
UPS MUST be on your left-hand side.     
3.  Slide the UPS into the tower brackets. Make sure that the UPS is stable. 
4.  The Tower Configuration is complete. See Connecting your Equipment. 


WALLMOUNT CONFIGURATION


The wallmount configuration


allows the user to mount the UPS on the wall.   

There is a wallmount bracket kit available for the UPS.    The kit includes two 
wall mounting brackets, ten retaining screws, and the wallmount template.  

WARNING: 

Use two or more people when installing the UPS, the UPS is 

extremely heavy.  The UPS's side panels have mounting bracket screw 
holes for attaching the wall mounting brackets. 
1.  Once the location of the UPS has been determined, place the UPS on a 

flat surface and remove the rackmount brackets from the UPS. 

15 

2.  The LCD panel can be rotated to read in the upright position.    Use a small 

flat blade screwdriver on the right-hand side of the LCD panel and gently 
pop out the LCD panel.    Rotate the LCD panel so that it reads in the upright 
position and then reinstall it back into the front panel.   

WARNING:  

The UPS must be installed in the proper upright position.  If the 

UPS is not installed in the proper upright position the batteries will be damaged.   
Once the UPS is placed on the wall, looking at the front panel the YELLOW 
Battery Disconnected label on the top cover of the UPS MUST be on your left-
hand side.     
3.  Align the mounting brackets with the mounting bracket screw holes on the 

side panels of the UPS and attach with the six retaining screws. 

4.  Attach a sheet of ¾” plywood into structural material (wood or metal wall 

studs).  

WARNING:

    The plywood must be a minimum of ¾” thick and the 

wall studs must be a minimum of 1.5” wide and 3.5” thick. 

5.  Use the template to mark the screw hole position on the sheet of plywood.   

CAUTION

, you should always wear protective gear for your hands and eyes 

when operating power tools. 

6.  Attach the four retaining screws to the sheet of plywood and make sure that 

all the retaining screws are secure.  Then clean the area of any loose 
material.  Do not tighten the retaining screws all the way; leave 
approximately 3/8" of the retaining screws sticking out.     

7. Use 

CAUTION,


the UPS is extremely heavy.  

Position the UPS, so that 

the mounting bracket keyed holes line up with the four retaining screws.  
Slide the UPS down until its resting securely on the four retaining screws.   

8.  Tighten the four retaining screws to secure the UPS to the plywood.     
9.  The Wallmount Configuration is complete. See Connecting your Equipment. 


Summary of Contents for MinuteMan EXR Series

Page 1: ...Para Systems Inc 1455 LeMay Dr Carrollton TX 75007 Phone 1 972 446 7363 Fax 1 972 446 9011 Internet minutemanups com UPS Sizing sizemyups com PN 34000537 R2 User s Manual...

Page 2: ...ls and Indicators 6 3 Installation 11 4 Operation 17 5 Configurable Parameters Settings 21 6 Obtaining Service 22 7 Troubleshooting 23 8 Replacing the Battery 24 9 Specifications 27 10 Limited product...

Page 3: ...0 C 25 C or 68 F 77 F for at least one hour to avoid moisture condensing inside the UPS 3 CAUTION This UPS series is ONLY intended to be installed in an indoor temperature controlled environment that...

Page 4: ...authority to operate the equipment NOTE These UPSs are shipped with the batteries disconnected The batteries must be connected before putting these UPSs into service Refer to Section 3 Installation f...

Page 5: ...ing in the AC normal Boost and Buck modes 6 The Multi function On Off Test button is used to turn the UPS on or off or to perform a self test 7 The Fault icon illuminates when the UPS detects an inter...

Page 6: ...ts the changes to the Configuration back to the factory default settings Must be in the Standby mode 7 Service Mode The UPS must be in the Standby mode to enter the Service mode Enter the password def...

Page 7: ...be installed in an indoor temperature controlled environment that is free of conductive contaminants DO NOT operate the UPS in extremely dusty and or unclean areas locations near heating devices water...

Page 8: ...FIG 1 FIG 2 13 RACKMOUNT CONFIGURATION This UPS series comes with mounting brackets for the standard 19 46 5cm rack pre installed on the UPS The mounting brackets to fit a 23 59 2cm rack and Rail Kit...

Page 9: ...n of the UPS has been determined place the UPS on a flat surface and remove the rackmount brackets from the UPS 15 2 The LCD panel can be rotated to read in the upright position Use a small flat blade...

Page 10: ...PTIONAL The Power Monitoring Software and interface cables can be used with the UPS Use only the interface cables that come with these UPSs Connect the interface cable Serial or USB to the appropriate...

Page 11: ...ilenced during a general fault alarm SERVICE MODE The UPS has a Service mode function activated through the LCD screen The Service mode items are Output Voltage Adjustment Load Shedding Function Passw...

Page 12: ...overloaded UPS will shutdown This alarm and error message will remain on until the excess load is removed or the UPS s self protection circuit shuts the UPS down If the UPS shuts down because of an O...

Page 13: ...6 Return the unit by insured prepaid carrier to Para Systems Inc MINUTEMAN UPS 1809 W Frankford Road Suite 150 Carrollton TX 75007 ATTN RMA _______ 23 Chapter 7 Troubleshooting Symptom Error Message C...

Page 14: ...the battery terminals 6 Determine if the battery is inadvertently grounded If the battery is remove the source of the grounding Contact with any part of a grounded battery can result in an electrical...

Page 15: ...Acceptable Input voltage 0 165VAC 0 300VAC Voltage Range 80 164VAC 150 271VAC Frequency Limits 50 or 60 Hz 6Hz autosensing Low Voltage Transfer Point 80V 150V resets to Utility Power at 85V 157V or h...

Page 16: ...overs faulty parts Para Systems products that are depot repaired or replaced pursuant to this warranty shall only be warranted for the unexpired portion of the warranty applying to the original produc...

Page 17: ...Manufacturer s Name Para Systems Inc MINUTEMAN UPS Manufacturer s Address 1455 LeMay Drive Carrollton Texas 75007 USA Type of Equipment Uninterruptible Power Supplies UPS Model No EXR750RT2U Y EXR1000...

Reviews: