background image


34 

7. Input computer password and click “Install Software”.   


8. Click “Continue Installation” on the prompt window popping out.   
9. The system will finish driver installation automatically.   
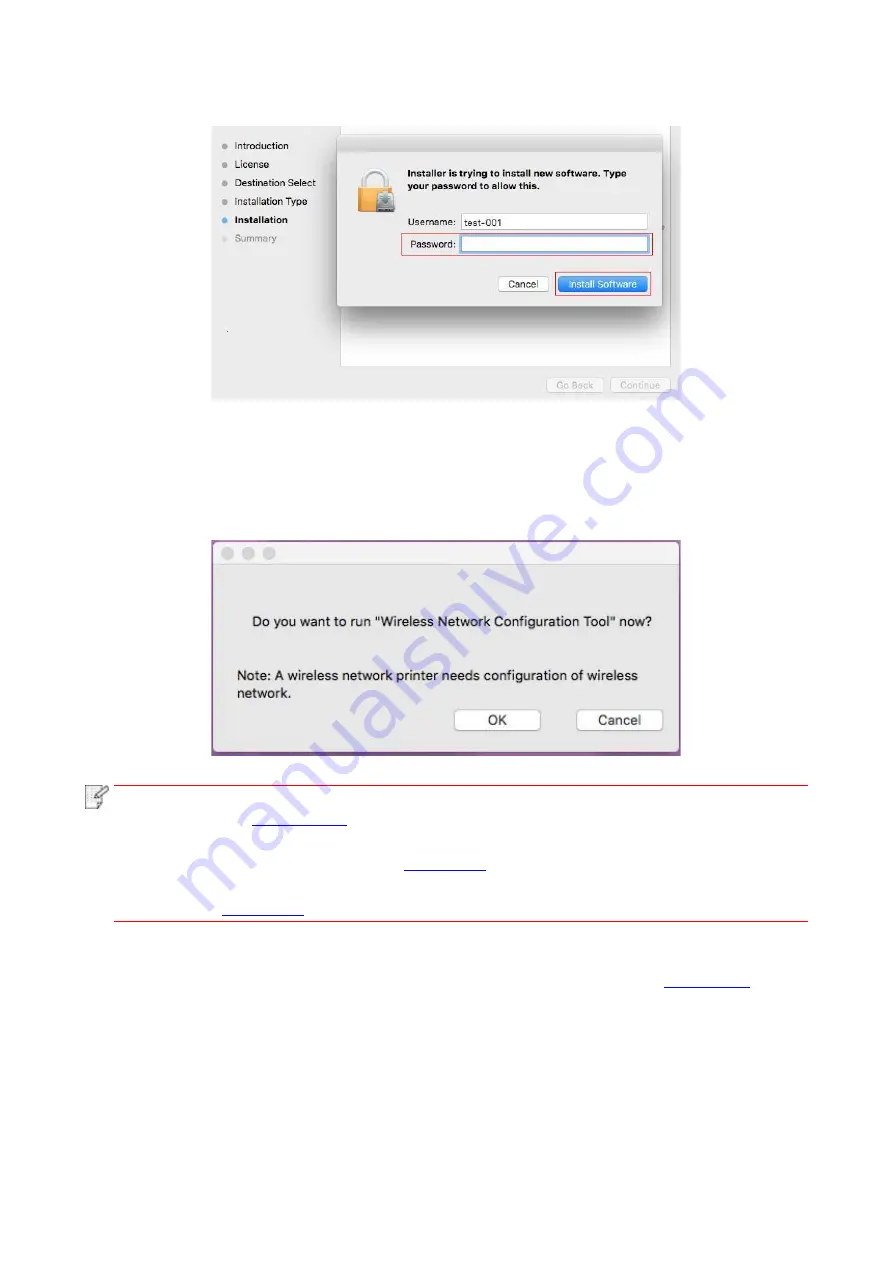
• If using a USB cable to connect a computer with a WiFi model printer, a wireless network 
configuration prompt window will pop up during driver installation, as shown in following picture. 


Note:


• click “Yes”, you can configure printer’s wireless network via wireless network configuration 
tool (refer to 

Chapter 5.1.1

 for how to make configuration).When configuration is completed, 

unplug USB cable, and then on the pop-

up “Add Printer” interface, you may add the 

network-connected printer(refer to 

Chapter 3.3

 for how to add printer). 

• Click “No”, you can add a USB-connected printer on the pop-up “Add Printer” interface 
(refer t

Chapter 3.3 

for how to add printer). 


If using a USB cable to connect a computer with a non-

WiFi model printer, a “Add Printer” interface 

will pop up during the driver installation and you can add a printer here (refer to 

Chapter 3.3 

for how 

to add printer). 


Summary of Contents for P3020 Series

Page 1: ...Pantum P3020 P3320 Series Monochrome Laser Printer User Guide It is recommended that you read this Guide carefully before using the printer ...

Page 2: ...cs Co Ltd It is prohibited to copy translate modify and transmit this User Guide by any means or in any form without the prior written consent of Zhuhai Pantum Electronics Co Ltd Version V1 0 Disclaimer For a better user experience Zhuhai Pantum Electronics Co Ltd reserves the right to make changes to the User Guide The information contained herein is subject to change without notice Users are res...

Page 3: ...adiation leakage among laser components The laser components shall complies with the requirements of U S Code of Federal Regulations 21 CFR 1040 IEC 60825 1 The following label is attached to the laser components inside the printer Safety Warning Please note the following safety warnings before using the printer Warning There is high voltage electrode inside the printer Before cleaning the printer...

Page 4: ...nto the equipment 12 Do not disassemble the equipment so as to avoid the risk of electric shock Necessary repairs may only be carried out by professional maintenance personnel Opening or removing the cover could result in an electric shock or other potential hazards Incorrect disassembly and assembly could also result in an electric shock during future use 13 If any one of the following occurs dis...

Page 5: ... the radiator and your body This transmitter must not be co located or operating in conjunction with any other antenna or transmitter 27 This equipment has been tested and found to comply with the limits for a Class B digital device pursuant to Part 15 of the FCC Rules These limits are designed to provide reasonable protection against harmful interference in a residential installation This equipme...

Page 6: ...directives 2014 30 EU and 2014 35 EU on the approximation and harmonization of the laws of the Member States relating to electromagnetic compatibility and safety of electrical equipment designed for use within certain voltage limits Radio Equipment directive 2014 53 EU only for models with WiFi function The manufacturer of this product is Zhuhai Pantum Electronics Co Ltd No 3883 Zhuhai Avenue Zhuh...

Page 7: ...of driver unistallation 32 3 2 macOS system driver installation 33 3 2 1 Driver installation 33 3 3 Add printer to macOS system 35 3 3 1 Add up the printer via USB 35 3 3 2 Add up the printer via wireless connection applicable to WiFi models 35 4 Wired network setup applicable to wired network models 36 4 1 Set IP Address 36 4 1 1 Automatic Setting 36 4 1 2 Manual Setting 36 5 Wireless network set...

Page 8: ...m 56 9 General Settings 57 9 1 System Setting 57 9 1 1 Language Setting 57 9 1 2 Sleep Time Setting 58 9 1 3 Toner Save 59 9 1 4 Mute printing 59 9 1 5 Restore Factory Settings 60 9 1 6 Print a Page for Clean Fix 60 9 1 7 Auto shut off setting 61 9 2 Network Settings 62 9 3 Network Information 62 9 4 Print information report 63 10 Routine Maintenance 64 10 1 Cleaning the Printer 64 10 2 Toner cart...

Page 9: ...VIII 11 3 Common Troubleshooting 80 11 3 1 Common Problems 80 11 3 2 Image Defects 81 12 Menu Structure 84 13 Product Specifications 85 13 1 Overview of the Specifications 85 ...

Page 10: ...series P3320D series P3320DWS series Interface type USB NET WiFi Print Language GDI PDL Control Panel LED LCD Print Speed A4 30ppm 33ppm Letter 32ppm 35ppm Automatic Two Sided Printing NFC function Mute printing Support Blank Unsupport This product series is subject to additions or changes without prior notice ...

Page 11: ...2 1 2 Supplied Accessories Name Parts Toner cartridge Drum component USB Interface Cable Power Cord CD Quick Setup Guide Pantum Warranty Note The Pantum Warranty may not be attached in some regions ...

Page 12: ...ng mode Press and hold this button for more than 2s to turn the printer power off 7 Automatic Feeder Tray For placing mediums that are printed in auto feed tray 8 Paper deflector of manual feed tray Slide paper deflector to adapt to paper width 9 NFC Near Field Communication label Touch this label on mobile device to download or start Pantum printer App and connect WiFi Directly 10 Paper width def...

Page 13: ...able 3 Power Interface For connecting product to power with power cord 4 Rear Cover For paper release when it gets jammed 5 Duplex Printing Unit For paper feed at duplex printing and paper release when paper gets jammed at duplex printing Note Printer appearance may differ because of various models and functions so the schematic diagram is only for your reference ...

Page 14: ...according to ISO 19752 standard Super large volume catridge About 11000 Pages Based on ISO 19752 standard Note The model is subject to increase without notice Consumables capacity may vary with different using types The Company does not recommend using consumables other than the original consumables provided as any damages caused by non original consumables are not covered by the scope of warranty...

Page 15: ... control panel 5 OK Confirm the selection on screen 6 UP Scroll through the menus and options For menu items need to input change the numeric value by cycle accumulating 7 Down Scroll through the menus and options For menu item needs to be input shift the entry positions from left to right for example IP address entry 8 Back Return to the previous menu 9 WiFi key save toner key Short press WiFi bu...

Page 16: ...key for more than 2s to cancel the current printing operation when paper feed fails or it is lack of paper Press this button for more than 2s to print information page at idle state 1 5 2 Indicator function of control panel 1 5 2 1 Indicator status display of LCD control panel Display meanings of WiFi save toner indicator are as follows No Display of WiFi save toner indicator Status Status descrip...

Page 17: ...or normally on Printer errors such as paper error paper out paper jam paper feed failure opened front cover 1 5 2 2 Indicator status display of LED control panel Display meanings of drum component paper status indicators are as follows No Display of drum component paper status indicators Status Status description 1 Die out Sleep mode 2 Green indicator normally on Normal drum paper out failure 3 Re...

Page 18: ...ep mode 2 Green indicator normally on Printer is ready 3 Green indicator blinks Warming up printing print cancelling 4 Red indicator normally on Printer errors such as opened front cover 5 Orange indicator normally on Toner cartridge error uninstalled ink cartridge unmatching ink cartridge invalid toner cartridge 6 Orange indicator blinks Low toner warning ...

Page 19: ...ed to use special paper extensively which may affect the service life of the printer The print media that does not meet the guidelines listed in this User Guide may result in poor print quality increased paper jam and excessive wear of the printer Properties such as weight composition texture and humidity are important factors affecting the printer performance and output quality Please note the fo...

Page 20: ...t all the labels in the market can meet corresponding requirements Use wrinkled blistered or damaged label papers Envelope Envelopes should be loaded evenly Use wrinkled nicked stuck or damaged envelopes Use envelopes with clips snaps windows or coated linings Use envelopes with self adhesive stickers or other synthetic materials Transparent Film Only use transparent films approved for use in lase...

Page 21: ...tor to the slot suitable for paper size in order to match paper length and width Note Do not overly squeeze the paper length guide and paper width guide otherwise it could easily lead to deformation of paper 3 Before loading paper please unfold the stacked paper to avoid a paper jam or feed error and then load the paper into the tray print side down The automatic feeder tray can be loaded up to 25...

Page 22: ...output tray we recommend that you immediately remove the printed paper from the printer If more than 250 pages 80 g m are put inside the auto feed tray at one time paper jam or paper feed failure will be led to If carrying out single sided printing please make sure that the side to be printed the blank side is face down 2 3 2 Install manual feed tray 1 Raise the output tray to avoid the printed pa...

Page 23: ...ay 3 Slide the paper deflector of manual feed tray to match the two sides of paper Do not use excessive force otherwise paper will be made jammed or skewed 4 Put a flat printing medium into the manual feed tray with both hands ...

Page 24: ...er is put inside printing will be resumed automatically too quick action may make paper caught up in the printer which will easily result in paper jam Note After printing please take out printed papers output from printer immediately Stacked papers or envelops will lead to paper jam or wrapped paper 2 4 Non printable Area The shaded area indicates the non printable area Usage Paper Size Top and bo...

Page 25: ...B cable 1 Connect the printer to computer via USB cable power the printer and computer on 2 Place the attached installation CD in the computer CD ROM Windows XP system automatically run the installation procedure Windows 7 Vista Server 2008 system Pop up Autoplay interface click Autorun exe to run the installation procedure Windows 8 system When the DVD RW driver window pops up from the right top ...

Page 26: ...ve installed the driver correctly 3 1 1 2 Method II Connect the printer via wireless network applicable to WiFi models Please check if the printer is connected with wireless network when installing the printer driver software If disconnected please install it with reference to Chapter 3 1 1 2 1 If connected please install it with reference to Chapter 3 1 1 2 2 Note You can print Network configurat...

Page 27: ... Computer desktop click anywhere in the pop up window then click Autorun exe to run the installation program Windows 10 system When the DVD RW driver window pops up from the lower right corner of Computer desktop click anywhere in the pop up window then click Autorun exe to run the installation program Note Some computers may be unable to auto play the CD beacase of system configuration Please dou...

Page 28: ...19 Click One click installation button if your software has searched only one printer and enter into installation process to complete automatic network configuration and driver installation ...

Page 29: ...th the host ID please check the option Install the printer in the list with host ID 6 After the installation click Print Test Page button If your printer prints the test page successfully it means that you have installed the driver correctly II Connect computer to router via network cable 1 Connect computer to router via network cable 2 Connect the printer to computer via USB cable then power the ...

Page 30: ...r installation interface 5 Please click on the One click installation button in Method III and install driver software Note You can put your mouse cursor in the One click installation button to check the popup information in order to confirm if the current printer is the one you need to install through IP address before you click the button You can check the printer IP address through Network conf...

Page 31: ...elect Configure the print via USB and install on the printer list interface and check the USB printer option Click the Confirm button and the wireless network configuration interface will pop up Input the wireless SSID and password that you need then click Confirm button and enter into installation process The process may need some time and the duration is related to your computer configuration pl...

Page 32: ... Connect computer to the WiFi Direct network of the printer please refer to Chapter 5 2 2 for setup method 3 Place the attached installation CD in the computer CD ROM Windows XP system automatically run the installation procedure Windows 7 Vista Server 2008 system Pop up Autoplay interface click Autorun exe to run the installation procedure Windows 8 system When the DVD RW driver window pops up fr...

Page 33: ... network 1 The printer is already connected to wireless network you can print the Network configuration page to check See Chapter 9 4 to for how to print 2 Connect the computer to printer network 3 Place the attached installation CD in the computer CD ROM Windows XP system automatically run the installation procedure Windows 7 Vista Server 2008 system Pop up Autoplay interface click Autorun exe to...

Page 34: ... and enter into driver installation interface 5 Click the One click installation button in Method III to install driver software Note You can put your mouse cursor in the One click installation button to check the popup information in order to confirm if the current printer is the one you need to install through IP address before you click the button You can check the printer IP address through Ne...

Page 35: ...26 If the software has searched several printers the printer list interface will pop up Please select the printer you need according to your printer wired network IP address or host ID ...

Page 36: ...er and computer on 2 Place the attached installation CD in the computer CD ROM Windows XP system automatically run the installation procedure Windows 7 Vista Server 2008 system Pop up Autoplay interface click Autorun exe to run the installation procedure Windows 8 system When the DVD RW driver window pops up from the right top corner of Computer desktop click anywhere in the pop up window then cli...

Page 37: ...ndows XP system automatically run the installation procedure Windows 7 Vista Server 2008 system Pop up Autoplay interface click Autorun exe to run the installation procedure Windows 8 system When the DVD RW driver window pops up from the right top corner of Computer desktop click anywhere in the pop up window then click Autorun exe to run the installation program Windows 10 system When the DVD RW ...

Page 38: ...e the printer s wireless network on the wireless setup window popped out and operate according to the prompts to set up the printer to wireless network please refer to Chapter 5 1 1 for setup method 9 The installation software will search the printer automatically after wireless network is configured successfully The search process may need some time ...

Page 39: ...ter configuration please wait patiently 12 After the installation click Print Test Page button If your printer prints the test page successfully it means that you have installed the driver correctly 3 1 2 2 2 Installation in WiFi Direct mode 1 Turn the power of printer and computer on 2 Connect computer to the WiFi Direct network of the printer please refer to Chapter 5 2 2 for setup method 3 Plac...

Page 40: ...r into driver installation interface 5 Click on the Manual installation at the bottom of driver installation interface and enter into manual intallation interface 6 Please select installation language and printer model 7 Select Wireless network connection and click on Install 8 Select No the printer has been connected to wireless network on the wireless setup window popping out and then click Next...

Page 41: ... name Please refer to Chapter 9 4 11 The software installs the driver automatically and the installation process may need some time The duration is related to your computer configuration please wait patiently 12 After the installation click Print Test Page button If your printer prints the test page successfully it means that you have installed the driver correctly 3 1 3 Method of driver unistalla...

Page 42: ...p page to view it Please refer to Chapter 9 4 3 2 1 Driver installation macOS 10 11 is taken as the example in the following operation The information on your computer screen may differ because of multiple operating systems 1 Turn the power of printer and computer on 2 Insert the CD companying with printer in the CD driver of your computer and double click Pantum XXX Series installation package XX...

Page 43: ...twork via wireless network configuration tool refer to Chapter 5 1 1 for how to make configuration When configuration is completed unplug USB cable and then on the pop up Add Printer interface you may add the network connected printer refer to Chapter 3 3 for how to add printer Click No you can add a USB connected printer on the pop up Add Printer interface refer to Chapter 3 3 for how to add prin...

Page 44: ...wer of printer and computer on 2 Make sure the wireless network connection between computer and printer is set up Note In case of basic structure mode connect wireless network printer to the access point wireless router Please refer to Chapter 5 1 for connection method In case of WiFi Direct mode connect wireless client to wireless network printer directly Please refer to 5 2 WiFi Direct mode Chap...

Page 45: ... address under the influence of network environment You can check the IP address of printer by printing Network setup page out please refer to Chapter 9 4 for printing method or check network information by viewing the control panel of printer please refer to Chapter 9 3 for viewing methods If the IP address is not listed please check network environment and then try again after waiting for severa...

Page 46: ...cting to a wireless network printer 5 1 Basic structure mode You can connect a computer to your printer via access point wireless router as the medium Important Before wireless network installation you must learn about the service set identifier SSID and password of your access point in order to use them during wireless network setup If they cannot be determined please consult your network adminis...

Page 47: ...nder menu bar 2 Use USB cable to connect and configure Select Yes I have an USB cable that can be used for installation in the following interface Click Next 2 1 The computer has been connected to wireless network 1 The currently wireless network currently connected to computer is selected as wireless network configuration tool by default Complete configuration according to interface prompt Note T...

Page 48: ... network and can contain numbers and letters at the same time 3 WPA WPA2 It is the pre shared key PSK of WiFi protected access which connects wireless device and access point via TKIP or AES encryption WPS Personal The working length of WPA WPA2 is within the PSK of 8 63 characters The display password is not ticked by default if it is ticked all passwords input can be seen in clear text 2 2 The c...

Page 49: ...ut using the access point wireless router 5 2 1 Preliminary preparations 1 Printer with the WiFi Direct feature 2 Wireless client including computer and mobile device with wireless network feature 5 2 2 WiFi Direct connection 1 Turn on printer power 2 Enable WiFi Direct function of the printer Short press WiFi button on the panel to enable WiFi Direct function of the printer Note Short press WiFi ...

Page 50: ...network Inspect if the firewall software blocks communication If the computer and printer are connected in the same network but they cannot be searched the communication might be blocked by firewall software Please refer to the user guide of firewall software to turn firewall off and then try to search the printer again Inspect if the IP address assignment of printer is correct You can inspect IP ...

Page 51: ... the IP Address of printer please refer to Chapter 9 4 Note Windows users are suggested to use Microsoft Internet Explorer 8 0 or higher version or Firefox 1 0 or higher version Mac users are suggested to use Safari 4 0 or higher version No matter what kind of browser you are suing please ensure that JavaScript and Cookies are always enabled Please ensure compatibility with HTTP 1 0 and HTTP 1 1 w...

Page 52: ...l link address local IPv6 address set up by oneself addresses beginning with FE80 Stateful address IPv6 address set up by DHCPv6 server if there is no DHCPv6 server in network the Stateful Address cannot be assigned Stateless address IPv6 address set up by network router automatically please refer to Chapter 9 4 and print Network setup page view IPv6 address 6 2 2 Wireless setup You can set up the...

Page 53: ...hen click Apply III Set up email notification 1 Click Settings Machine settings E mail Notification 2 Click button and select the email addresses you want to add in the list of contacts popping out You can also tick address X such as address 1 and input the email addresses you want to add 3 Tick the email addresses and notification contents you want to notify and then click Apply 6 2 3 2 Sleep tim...

Page 54: ...ic Two Sided Printing Collate Print Reverse Print N in 1 Poster Print for Windows Operation System only Zoom Print Custom Size Note Windows 7 is taken as example in the above description You can realize poster printing feature by selecting 2x2 poster printing in multipage You can enable printing preference and click the help button to view detailed function description Please refer to Chapter 7 9 ...

Page 55: ...n select Printing preference and then change setup and save it macOS 1 Click File menu Print 2 Change setup in the window popping out 1 Click File menu Print 2 Change setup in the window popping out and click to save the preset Select preset every time before printing or print according to default setup Note Priority of App setup is senior to printer setup 7 3 Cancel printing The current printing ...

Page 56: ...n loading paper see Chapter 2 For the type of media to be printed with the automatic feeder tray see Chapter2 1 7 4 2 Printing with manual feed tray When you put papers in the manual feed tray the printer will enter manual feed mode Note Manual feed mode means that papers will be fed from the manual feed tray first if there are papers being put inside it Generally the manual feeder tray is used to...

Page 57: ...t support poster printing Please refer to Chapter 2 for paper loading and type of mediums that can be printed via auto feed tray 7 5 1 Duplex printing unit setup For the purpose of achieving the best printing result you can set up the paper size of duplex printing unit As for duplex printing of A4 and 16K papers the slide should be adjusted to the A4 position as for Letter Legal Folio and Oficio d...

Page 58: ...4 or Letter position to finish setting up 4 Install the duplex unit in the printer 7 5 2 How to carry out auto duplex printing 1 Open the print job to be printed from the application such as a Notepad 2 Select Print from the File menu ...

Page 59: ...50 3 Select printer of the corresponding model 4 Single click Preferences for printing setup 5 Select the Duplex in Basic tab and then select Long Edge or Short Edge ...

Page 60: ... Click Print to realize auto duplex printing 7 6 Fine mode printing The Fine mode is applicable to engineering drawings and fine lines printing Set up fine mode in the basic page of printer preference After setup fine printing mode can be realized ...

Page 61: ...because of multiple operating systems 1 Enter the Start menu Control Panel view Devices and Printers 2 Right click printer and select Printer properties in the pull down menu 3 Enter the Secondary Settings option 4 Tick Mute printing and click Ok to finish setup 5 Open the printing work from the App select a printer of the corresponding model and then set up printing according to needs 6 Click Pri...

Page 62: ...ers 2 Right click printer select Printer properties in drop down list 3 Enter Secondary Settings option and set Auto shu off setting 4 Click OK to finish setting Note For printer provided with LCD control panel users may set auto off function through control panel keys Please refer to Chapter 9 1 7 Individual countries or regions do not support auto off setting ...

Page 63: ... Open Help Document You can open the Printing preferences and click Help button for Windows Operation System only The help document contains the user guide where you can find the information on print settings ...

Page 64: ...inter model Download and install 2 You can use Google Play Store Apps to search Pantum Mobile Printing Download and install 8 1 1 3 Preliminary preparations 1 A printer that has wireless network function 2 Android mobile device 8 1 1 4 How to use Pantum 1 Turn on printer power 2 For an Android mobile device tap the PANTUM icon on the main screen to enter the first interface of PANTUM 3 Select the ...

Page 65: ...Preliminary preparations 1 A printer that has wireless network function 2 iOS mobile device 8 2 1 4 How to use Pantum 1 Turn on printer power 2 For an iOS mobile device tap the PANTUM icon on the main screen to enter the first interface of PANTUM 3 Select the connection method according to your habit to connect the printer 4 Select the function you want and then do relevant settings to meet your f...

Page 66: ... Chapter mainly introduces some general settings 9 1 System Setting 9 1 1 Language Setting Language Setting is used to select the language to be displayed on the control panel 1 Press Menu to enter the Menu Settings interface 2 Press OK to select the 1 System Setting option 3 Press OK key to select 1 Language Set option to set language as shown in the below figure ...

Page 67: ...enu to enter the Menu Settings interface 2 Press OK to select the 1 System Setting option 3 Press direction key or to select 2 Sleep time Set option and press OK key to set the corresponding sleep time Note In sleep mode the printer can be woken up by pressing any key or sending printing work Sleep time of network printer can be set with the embedded Web server Please refer to Chapter 6 2 3 2 ...

Page 68: ...ct the System Setting option 3 Press direction key or and select Toner Save option and press OK key to turn on off this mode 9 1 4 Mute printing Set mute mode to realize low speed printing with low noise When mute mode is on printing will be in a low speed This mode is off by default 1 Press Menu to enter the Menu Settings interface 2 Press OK to select the System Setting option 3 Press direction ...

Page 69: ...y and wait for factory settings of the printer to recover The printer will restart itself automatically after finishing recovering factory settings 9 1 6 Print a Page for Clean Fix Print a Page for Clean Fix function can clean the toner paper powder and other inpurities so as to realize better printing effect The printer will start up Print a Page for Clean Fix function automatically after the pri...

Page 70: ...K to set off condition and off delay Note Set auto off condition Shutdown under no port state default configuration no port is connected WiFi function deactivated printer is under standby or sleep mode Shutdown under idle state the printer is under standby or sleep mode If auto off condition is satisfied printer will be off at the preset time After printer is off power consumption is 0 5W or lower...

Page 71: ...way press direction key to circularly accumulate values from 0 9 press direction key to circularlly input the position from left to right press OK key to save setting and press Return key to return to the previous menu 9 3 Network Information You can check the network status through Network Information 1 Press Menu to enter the Menu Settings interface 2 Press direction key or and select Network In...

Page 72: ...ion key or and select Prt Info Rept option 3 Press OK key to enter information report print You can print product report according to needs Product reports that can be printed include demonstration page information page menu structure page network setup page WiFi hotspot list page PCL font list page and PS font list page Note The product report above is the most complete version and may be differe...

Page 73: ...e 10 1 Cleaning the Printer Note Please use mild detergents Some parts of the printer may still be hot for a short period after use When opening the front cover or rear cover to clean the parts inside the printer please do not touch the parts in the shaded area as shown in the following picture 1 Use a soft cloth to wipe the outside of the printer clean ...

Page 74: ...k Note When removing the toner cartridge put the toner cartridge in a protective bag or wrap it with thick paper to avoid direct light damaging the toner cartridge 3 Clean the inside of the printer by gently wiping the shaded area as shown in picture with adry and lint free cloth ...

Page 75: ...66 4 Wipe the LSU lens of printer gently with dry lint cloth 5 Open the auto feed tray and wipe the pickup roller gently with dry lint cloth ...

Page 76: ...h please wash it with clear water immediately or see a doctor if feeling unwell Toner cartridge should be placed out of reach of children 2 Service life of toner cartridge The service life of toner cartridge is depending on the toner quantity needed by printing For printers with LED control panel normally on orange toner cartridge indicator means that the service life of toner cartridge has expire...

Page 77: ...rtridge please pay attention while taking it out to avoid spattering Please place the toner cartridge taken out on paper to avoid large scale spattering of toner When installing do not touch the surface of the toner cartridge so as to avoid scratching it Toner cartridge replacement steps 1 Power off the printer 2 Open the front cover and take the laser toner cartridge out along the track ...

Page 78: ...take the toner cartridge out 4 Open the package of the new toner cartridge and hold the toner cartridge handle to shake it left and right for 5 6 times so that the toner inside can be uniformly dispersed 5 Pull the seal out and take the toner protection cover out 6 Install the drum component along the inner track to finish installing toner cartridge ...

Page 79: ...stalled and install it inside the printer along the inner track of printer to finish installing 8 Close the front cover Drum component replacement steps 1 Power off the printer 2 Open the front cover and take the laser toner cartridge out along the track ...

Page 80: ... the package of new drum component take the protection device of drum component and put the drum component on a horizontal table 5 Install the drum component along the inner track to finish installing toner cartridge 6 Take the drum component with toner cartridge installed and install it inside the printer along the inner track of printer to finish installing 7 Close the front cover ...

Page 81: ...nd the printer is powered on All of the protective parts are removed The toner cartridge is installed correctly The paper is correctly loaded into the tray The interface cable between the printer and the computer is connected correctly The correct printer driver has been selected and installed properly The computer port is properly configured and is connected to the correct printer port 11 1 Clean...

Page 82: ...nside the printer and close the front cover then the printer will recover printing automatically 11 1 2 Paper jam of manual feed tray 1 Gently pull the jammed paper out 2 After taking papers jammed out open and close the front cover and the printer will recover printing ...

Page 83: ...3 Middle jam Note When papers jammed in the middle are taken out please pay attention and do not touch the shaded area shown below in order to avoid burn 1 Pull paper tray out 2 Gently pull the jammed paper out ...

Page 84: ...r 5 Take the laser toner cartridge out along the track For the purpose of preventing printing quality from affecting by the exposure of photosensitive drum please put the laser toner cartridge inside the protection bag or warp it with thick paper ...

Page 85: ...er toner cartridge again and close the front cover then the printer will recover printing 11 1 4 Paper Jam in the Fuser Unit Note When papers jammed in fuser unit are taken out please pay attention and do not touch the shaded area shown below in order to avoid burns 1 Open the rear cover ...

Page 86: ...pen the fuser door using the handles on both sides 3 Gently pull the jammed paper out 4 After taking papers jammed out close the back cover and open the front cover and then the printer will recover printing ...

Page 87: ...n the printer will recover printing automatically Note After all papers jammed are taken out according to the above steps close the front cover and tidy the papers in paper tray then the printer will recover to print automatically If the printer still does not start printing please check that all the jammed paper inside the printer has been cleared If you cannot remove the jammed paper yourself pl...

Page 88: ...river Make sure the network cable of USB cable is connected correctly Failed to install the driver Check whether the print spooler service is enabled Check the power supply and the connection of the printer The driver cannot be used if the IP address of the printer has been changed Modify the port IP address of the printer driver If the above method does not work please reinstall the printer drive...

Page 89: ... media range The feed roller is dirty Too many papers in paper tray Please install printing medium correctly please print with manual feed tray if special printing medium is used to print Please use the print media within the specification range Clean the feed roller Take the excessive papers out from paper tray please print with manual feed tray if special printing medium is used to print Paper J...

Page 90: ...is dirty It is suggested to replace the original toner cartridge Please use the print media within the specification range Clean the paper path White spots The print media does not meet the usage specifications for example the media is damp or too rough or has been used previously The paper path is dirty The drum inside toner cartridge is damaged Please use the print media within the specification...

Page 91: ...r cartridge Clean the paper path inside the printer Cyclical traces appear Dirty toner cartridge Damaged inner parts of toner cartridge The fuser component is damaged Clean or replace toner cartridge Please contact customer services center to replace to a new fuser assembly Skewed pages The print media has been loaded incorrectly The paper path of the printer is dirty Ensure the correct loading of...

Page 92: ...ications for example the media is damp or too rough or has been used previously The inside of the printer is dirty Toner cartridge is damaged The parts inside the printer are damaged Please use printing medium within the specification scope and use manual feed tray for printing in case of special medium Clean the inside of the printer It is suggested to replace the original toner cartridge Horizon...

Page 93: ...this printer on the panel menu you may know and set various functions The steps of printing are as follows 1 Press Menu to enter the menu setting interface 2 Press or to select Prt Info Rept 3 Press OK and then or to select Menu Struc Pg 4 Press OK to print ...

Page 94: ... 32 Print humidity range 20 RH 80 RH Power Voltage 110V Model AC100 127V 50Hz 60Hz 9A 220V Model AC220 240V 50Hz 60Hz 4 5A Noise acoustic pressure level Printing 52dB A Standby 30dB A Mute mode 46 dB A Enter network standby time 1 minute Power Consumption Network standby 1 3W Standby 50W Shutdown 0 5W TEC Chinese energy efficency rating Operating system Microsoft Windows XP Windows Vista Windows 7...

Page 95: ......

Reviews: