background image


36


5.1.1.2. Setup methods of wireless network setup tools   

1. Take the wireless network setup tool in computer.   

1) 

Windows system:


Click the “Start menu” – “All programs” - “Pantum”

  Product name 

– 

“Wireless network setup tool”.   
2) 

macOS system:

 Click "Go" - "Applications" - "Pantum" - "Utilities" - "Wireless Network 

Configuration Tool" on the computer Finder menu bar.   

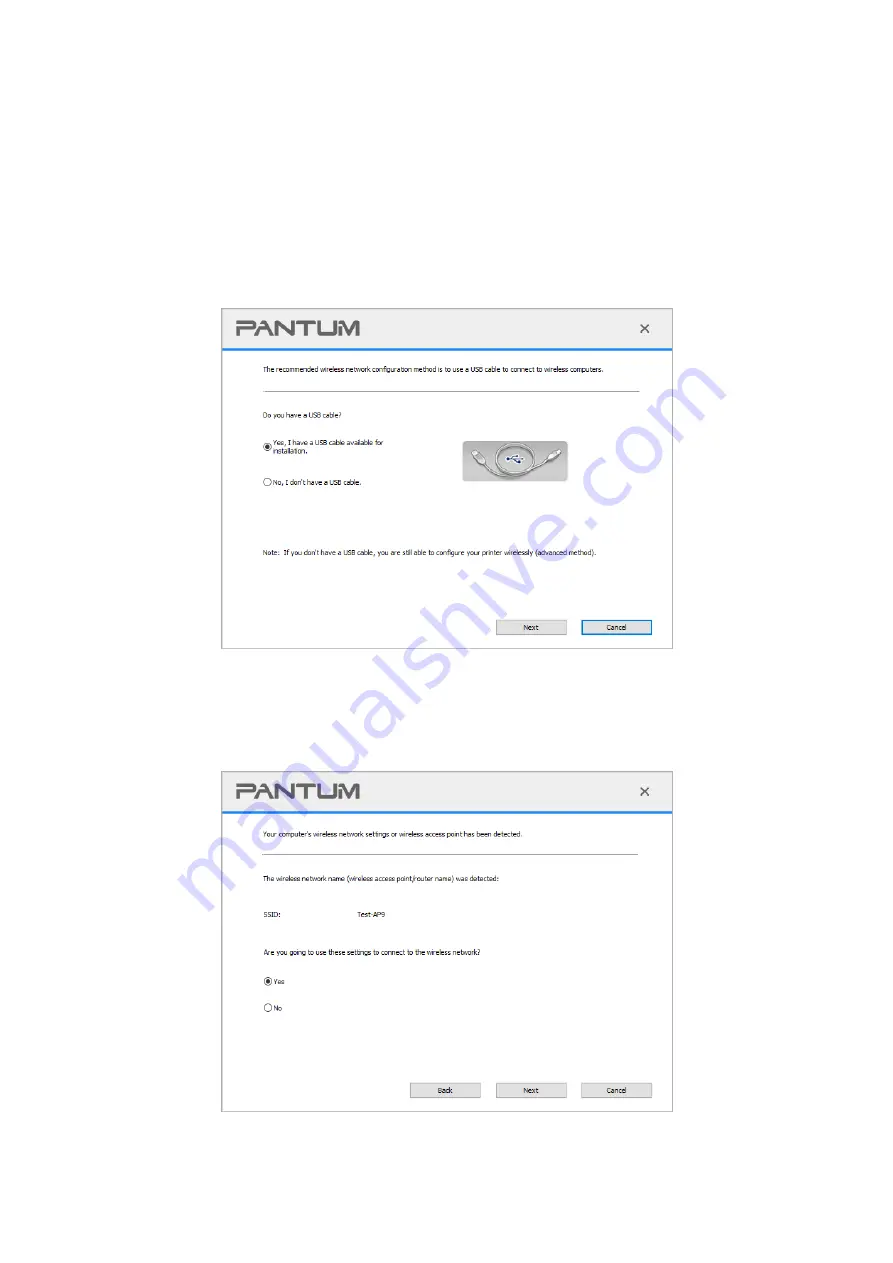
2. Use USB cable to connect and configure. Select "Yes, I have an USB cable that can be used for 

installation" in the following interface. Click "Next".   


2.1 The computer has been connected to wireless network.   

1) The currently wireless network currently connected to computer is selected as wireless network 

configuration tool by default. Complete configuration according to interface prompt.   


Summary of Contents for P2500W Plus Series

Page 1: ...Pantum P2500W Plus Series Monochrome Laser Printer It is recommended that you read this Guide carefully before using the printer...

Page 2: ...d Wi Fi Protected Access are marks of the Wi Fi Alliance The ownership to the names of the software in this User Guide belongs to their respective companies in accordance with corresponding license ag...

Page 3: ...Since laser components are completely sealed in the printer laser radiation will not leak To avoid laser radiation please do not randomly disassemble the printer The printer follows the provisions of...

Page 4: ...ng the printer make sure the power is turned off Plugging and unplugging the power cord plug with a wet hand can result in an electric shock The fuser unit is hot when and after printing Touching the...

Page 5: ...ge device which otherwise may result in fire or electric shock Take care not to spill liquids onto the equipment 12 Do not disassemble the equipment so as to avoid the risk of electric shock Necessary...

Page 6: ...ions 1 this device may not cause harmful interference and 2 this device must accept any interference received including interference that may cause undesired operation 27 Radiation Exposure Statement...

Page 7: ...t expressly approved by the party responsible for compliance could void the user s authority to operate the equipment 30 Shielded cables must be used with this unit to ensure compliance with the Class...

Page 8: ...he recycling of waste electrical and electronic equipment Ref EU Directive 2002 96 EC on Waste Electrical and Electronic Equipment WEEE Please contact your distributor supplier for further information...

Page 9: ...o uninstall driver under Windows 30 3 2 2 Method to uninstall driver under macOS 30 4 Wired Network Settings For wired network printer models 31 4 1 Set IP Address 31 4 2 Install the Printer to Networ...

Page 10: ...n 45 7 2 Opening Help Document 46 7 3 Manual Duplex 47 7 4 Cancel Print Job 50 8 Control Panel 51 8 1 Control Panel Overview for P2500 Series 51 8 1 1 Functions of Buttons on the Control Panel 51 8 1...

Page 11: ...uct series parameters P2500W Plus P2502W Plus Interface type USB NET Wi Fi Print Language GDI Control Panel LED Print Speed A4 22ppm Letter 23ppm Manual Duplex Support Blank Unsupport Note This produc...

Page 12: ...2 1 2 Supplied Accessories Name Parts Laser Toner Cartridge USB Interface Cable Power Cord CD Quick Setup Guide Pantum Warranty Note The Pantum Warranty may not be attached in some regions...

Page 13: ...tomatic Feed Guide 5 Paper Stop 6 Feeder Tray 7 Automatic Feeder Tray Rear View 1 Network Interface 2 USB Interface 3 Power Switch 4 Power Interface Note Printer appearance may differ because of vario...

Page 14: ...O 19752 standard Note The model is subject to increase without notice Consumables capacity may vary with different using types The Company does not recommend using consumables other than the original...

Page 15: ...the guidelines listed in this User Guide may result in poor print quality increased paper jam and excessive wear of the printer Properties such as weight composition texture and humidity are important...

Page 16: ...all the labels in the market can meet corresponding requirements Use wrinkled blistered or damaged label papers Envelope Envelopes should be loaded evenly Use wrinkled nicked stuck or damaged envelop...

Page 17: ...g area Usage Paper Size Top and Bottom Margins A Left and Right Margins B Printing A4 5 mm 0 197 inch 5 mm 0 197 inch Letter 5 mm 0 197 inch 5 mm 0 197 inch 2 4 Load the Paper 1 Open the feeder tray 2...

Page 18: ...r in position To ensure normal paper feeding adjust the bottom paper stop into the slot to keep it from slipping out and then adjust the blue stop to match the paper size Note If the paper loaded into...

Page 19: ...ript with rough texture concave and convex oil stain and good smoothness has poor printing performance Please make sure that there is no dust fluff etc on the paper Paper shall be put on a flat surfac...

Page 20: ...driver file from the official website Enter www pantum com in the address field of the Web browser find Dirves Download Driver enter the product model select the driver file corresponding to the produ...

Page 21: ...the operating system Please select the appropriate operating mode for your operating system Windows XP system automatically run the installation procedure Windows 7 Server 2012 system Pop up Autoplay...

Page 22: ...are found please check the serial number label on the back of the printer and select the printer you desire 5 Select the network you desire and click Next in the lower right corner of the interface to...

Page 23: ...r The operating mode may vary in the operating system Please select the appropriate operating mode for your operating system For Windows Windows XP system automatically run the installation procedure...

Page 24: ...ore proceeding to Step 4 4 Select the printer installation method according to your needs and click One click Installation below it If the button below the installation method is Not Connected please...

Page 25: ...rinter you may refer to Section 8 1 1 3 and print the Network Configuration Page to check The Wi Fi connection is only available for Wi Fi models models with a W in the model number such as P2500W Whe...

Page 26: ...the DVD RW driver window pops up from the right top corner of computer desktop click anywhere in the pop up window then click Autorun exe to run the installation procedure Windows 10 system When the...

Page 27: ...CD ROM Windows XP system automatically run the installation procedure Windows 7 Server 2012 system Pop up Autoplay interface click Autorun exe to run the installation procedure Windows 8 system When t...

Page 28: ...erface 7 Please select installation language and printer model 8 Select Wireline network connection and click on Install 9 The installation software will search the printer automatically and the searc...

Page 29: ...ails I Installation in basic structure mode 1 Connect computer to access point wireless router 2 Connect the printer to computer via USB cable then power the printer on 3 Place the attached installati...

Page 30: ...ork on the wireless setup window popped out and operate according to the prompts to set up the printer to wireless network please refer to Section 5 1 1 for setup method 9 The installation software wi...

Page 31: ...l the printer in the list with host ID If IP address or host name is added manually you need to know the IP address of the printer connected or host name If they are not made clear please print the Ne...

Page 32: ...system When the DVD RW driver window pops up from the right top corner of computer desktop click anywhere in the window then click Autorun exe to run the installation procedure Note Some computers ma...

Page 33: ...printers searched please click Refresh to search again When the printer IP address changes under printer driver installed with host ID you can also directly print without re installing the driver If y...

Page 34: ...omputer screen may differ because of multiple operating systems 1 Turn the power of printer and computer on 2 Insert the setup CD supplied in the CD ROM of the PC and double click on Pantum XXX Series...

Page 35: ...ed to the same network as the PC See Section 4 or 5 to learn how to configure the network 4 Insert the setup CD supplied in the CD ROM of the PC and double click on Pantum XXX Series_Mac_Driver Pantum...

Page 36: ...the installation click Print Test Page button If your printer prints the test page successfully it means that you have installed the driver correctly 3 2 2 2 2 3 Install via Host Name or IP Address 1...

Page 37: ...name Please refer to Section 8 1 1 3 10 The software installs the driver automatically and the installation process may need some time The duration is related to your computer configuration please wai...

Page 38: ...to your computer configuration please wait patiently 8 Install complete Please finish printer adding as guided or refer to Section 3 2 2 2 2 5 3 2 2 2 2 5 Add printer to macOS system I Add up the pri...

Page 39: ...for connection method In case of Wi Fi Direct mode connect wireless client to wireless network printer directly Please refer to Section 5 2 for connection methods 3 Enter the System Preferences Print...

Page 40: ...s Pantum XXX Series where XXX represents product model 3 Click uninstall to delete the driver according to instructions on uninstall window 4 Restart computer after finishing unloading 3 2 2 Method to...

Page 41: ...ew minutes Note If DHCP cannot automatically obtain the IP address the printer will automatically use the default IP address 169 254 xxx xxx Due to the features of DHCP the IP address of the printer a...

Page 42: ...3 Insert the printer CD into the computer If the software installer does not start browse to the setup exe file on the CD and double click to run the file 4 Follow the operation instructions of the in...

Page 43: ...as needed 4 3 2 Set or Change Web Server Login Password Use the embedded Web server to set a network password or change the existing password Note The default username is admin and the initial passwo...

Page 44: ...n improve the efficiency of network management receive notification messages and warning event reports from network nodes and help you discover and solve network issues in a timely manner Enable SNMP...

Page 45: ...oft AP The wireless computer is directly connected to the wireless device 5 1 Basic structure mode You can connect a computer to your printer via access point wireless router as the medium Important B...

Page 46: ...lities Wireless Network Configuration Tool on the computer Finder menu bar 2 Use USB cable to connect and configure Select Yes I have an USB cable that can be used for installation in the following in...

Page 47: ...ption method 1 None There is no encryption method used 2 WPA WPA2 it is the pre shared key PSK of Wi Fi protected access which connects wireless device and access point via TKIP or AES encryption The...

Page 48: ...ed please install the drive again 5 2 Wi Fi hotspot mode You can establish a connection between a wireless network enabled computer and a wireless network enabled printer without using an access point...

Page 49: ...om the printer or there is an obstacle between them Turn the power of access point wireless router and printer off and then restart them and set up 4 The following aspects should be inspected if the p...

Page 50: ...bile device 1 You can download it from its official website http www pantum com Service support Driver download Select printer model Download and install 2 You can use Google Play Store Apps to search...

Page 51: ...ter Select the printer Printer added successfully and start the experience Note If multiple printers are found please print the Network Configuration Page and select the printer you desire based on th...

Page 52: ...crosoft Office 1 01 16 0 4201 1006 or higher version Adobe Reader V11 7 1 or higher version For more information about applications which support Mopria printing please visit https mopria org 6 2 2 Ho...

Page 53: ...If you selected other printer or failed to select any printer please tap the pull down menu of printer and select your Pantum printer 7 Set printing parameters e g print pages 8 Tap print Note If pri...

Page 54: ...F on the iOS device 4 Click 5 Tap print 6 Please make sure the Pantum printer is selected If you select other printers or no printer please click printer option and then select your Pantum printer 7 S...

Page 55: ...ctions Diagram Manual Duplex Collate Reverse Print N in 1 Poster Print for Windows system only Zoom Print Custom Size Note You can select the 2 x 2 Poster Print in N in 1 to enable the poster printing...

Page 56: ...2 Opening Help Document You can open the Printing Preferences and click Help button for Windows system only The help document contains the user guide where you can find the information on print setti...

Page 57: ...ted with the automatic feeder tray see Section 2 1 It is recommended to use the standard paper Some paper media are not suitable for the duplex printing Trying the duplex printing with it may damage t...

Page 58: ...48 2 Select Pantum printer Click Preferences to set up for printing 3 Check Manual Duplex in the Basic tab and click OK after completing the settings...

Page 59: ...f you choose not to raise the output tray we recommend that you immediately remove the printed paper output from the printer 5 Send the print job after choosing Manual Duplex then the following prompt...

Page 60: ...o on printing the other side 7 You can click Close button to close this prompt window and it will not appear until the next Manual Duplex job comes in 7 4 Cancel Print Job Press and hold the Cancel Co...

Page 61: ...e Control Panel 8 1 1 1 Operation Function of Wi Fi Search Button When there is no Wi Fi connection short press the launch Wi Fi connection and simultaneously openthe printer Bluetooth function search...

Page 62: ...ication of LED1 are as follows Serial No Paper Wi Fi Multi colored LED1 Status Indication Status Description For printers with USB W iFi interface Status Description For printers with USB interface 1...

Page 63: ...er LED2 with green light flashing slowly 2 The printer is ready LED2 with green light staying on 3 Sleep LED2 with green light on and flashing slowly 4 Printing Multi colored LED2 with green light fla...

Page 64: ...es communication error opened cover etc LED1 off LED2 with red light staying on 6 Paper jam a job is cancelled via the panel LED1 off LED2 with green light flashing quickly 7 Paper shortage in printin...

Page 65: ...off the main power switch and unplug the power cord and USB cable 2 Use a soft cloth to wipe the outside of the printer clean 3 Open the upper cover and take out the laser toner cartridge Note When re...

Page 66: ...ut authorization Otherwise the resulting damage is not included in the printer warranty Please store the laser toner cartridge under a cool and dry environment Toner inside the laser toner cartridge i...

Page 67: ...toner cartridge surface may contain toner Please remove it carefully to avoid spilling Put the removed laser toner cartridge on a piece of paper to avoid the toner from accidently spilling After remov...

Page 68: ...venly distributed inside the cartridge 3 Remove the protective cover and put the laser toner cartridge into the printer along the guides Note Check whether there is any seal on it before installing th...

Page 69: ...connected to the proper printer port 10 1 Clearing Jammed Paper Note Remove the jammed paper in accordance with the following steps close the upper cover and tidy the paper in the tray then the print...

Page 70: ...inside the Printer 1 Open the upper cover 2 Open the upper fuser guide to decrease the pressure of compression spring 3 Pull the jammed paper out of the fuser unit If no jammed paper is found please...

Page 71: ...tput orientation 6 After removing the jammed paper insert the laser toner cartridge into the printer along the guides until you hear a click assuring you that the cartridge is fully inserted 7 Put the...

Page 72: ...oblems in Handling Paper Paper feed failure The print media is loaded incorrectly The print media is beyond the usage specification range The feed roller is dirty Please correctly load the print media...

Page 73: ...t Toner is low The print media does not meet usage specification such as the media is damp or too rough The resolution in the print program is set too low The laser toner cartridge is damaged Please p...

Page 74: ...is dirty The internal part of the laser toner cartridge is damaged The feed channel is dirty The transfer voltage inside the printer is abnormal Please use the print media within the specification ra...

Page 75: ...e print media that does not meet usage specification such as the media is damp or too rough The inside of the printer is dirty The laser toner cartridge is damaged The internal part of the printer is...

Page 76: ...Optimal Printing Temp Range 10 32 C Preferred Moisture Range for Printing 20 80 RH Power Voltage 110V Model AC110 127V 10 50 60Hz 2Hz 6A Noise acoustic pressure level Print 52dB A Standby 30dB A Ente...

Page 77: ...67...

Reviews: