background image

24

art.nr

.8822145, Rev

. 2021-03 Publ. 2021-05-06

Panthera 

AB reserves the right to make technical changes if required

TRANSPORT

We would like to emphasise that, 

when transporting a wheelchair user in a vehicle,

 it is 

always preferable to transfer the user to 

a regular car seat with a seat belt

.

The Bambino 3 model is crash tested and approved for transportation in mobility service 

vehicles. When travelling in vehicles, users may remain in their wheelchairs provided ap

-

proved restraint systems and seatbelts are used, however, Panthera AB does not recom

-

mend this.

For information on securing the wheelchair during transportation while the user remains in 

the chair, see page 25–26.

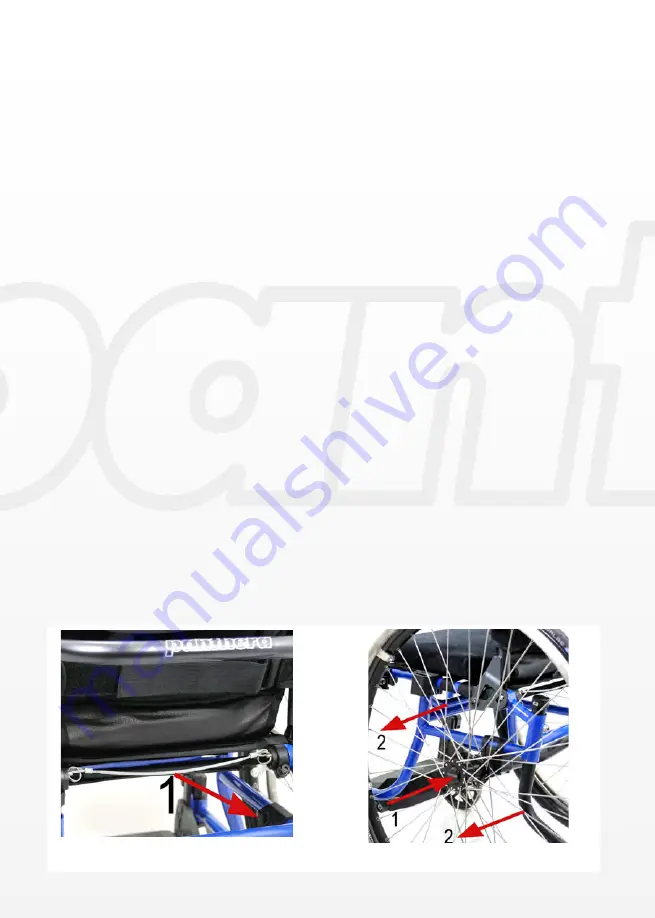
Assembling and disassembling the wheelchair


(Fig. 39 and 40)

When transporting the wheelchair, in a car, for example, the backrest can be lowered and 

the drive wheel detached.

Lowering the backrest

(Fig. 39)

:

1) Remove any side guards and armrests by pulling them upwards vertically.

2) Remove the seat cushion if necessary.

3) Pull the wire (1) and lower the backrest.

Detaching the drive wheel,


(Fig. 40)

:

1) Push the quick release button (1).

2) Pull the wheel straight off.

Attaching the drive wheel

(Fig. 40)

:

1) Push the quick release button (1).

2) Insert the wheel onto the rear axle and then push it in as far as possible.

3) Check that the button has sprung out (1), confirming the quick release is in locked 

position.

4) Pull the wheel outwards 

to ensure it is firmly attached

.

Fig. 24

Fig. 25

Fig. 26

Fig. 39

Fig. 40

Summary of Contents for Bambino 3

Page 1: ...l 2021 05 06 Panthera AB reserves the right to make technical changes if required Operating instructions for wheelchair model Panthera AB Gunnebogatan 26 SE 163 53 Spånga 46 0 8 761 50 40 www panthera se panthera panthera se Bambino 3 ...

Page 2: ...d a manual dynamic wheel chair for everyday use both inside and outside the home These wheelchairs are made to be used by people with physical disabilities and are not limited to people with a specific diagnosis Each person s individual function capacity and limitations indicates whether a manual dynamic wheelchair is suitable as a mobility aid Wheelchair model recommen dations should be given by ...

Page 3: ...ds For maximum weight of user see Technical facts CONTACT If you have any questions or need help with the product contact your local supplier Assis tance centre first To get in touch with the manufacturer see the details below Panthera AB 46 0 8 761 50 40 Gunnebogatan 26 www panthera se SE 163 53 Spånga panthera panthera se SYMBOLS The symbols used in the instructions and on the wheelchair and wha...

Page 4: ...ttention has been paid to their every detail The low weight combined with the stable fixed frame and casters with a unique profile on the tread surface make the wheelchair extremely easy to manoeuvre OVERVIEW Fig 3 1 Footrest 2 Chassis 3 Seat cushion 4 Sideguards Arm rest 5 Backrest Backrest upholstery 6 Drive wheel Tyres 7 Push rim 8 Brake 9 Quick release 10 Air valve 11 Rear axle 12 Casters 13 F...

Page 5: ...e wheelchair s balance and tipping capacity After adapting your chair check that you feel confident about the balance of the chair The tipping capacity of the chair may also be affected if a bag is hung on the backrest if you lean or stretch backwards if the tyres are worn or contain insufficient air or if there is an unexpected change to the surface you are driving on Anti tip device Panthera whe...

Page 6: ...yourself over the brake so that you do not sit on or get caught on it Driving Before using your wheelchair outdoors spend plenty of time honing your driving technique in a secure indoor environment with a flat surface Always use the anti tip devices or ensure someone is behind you as you practise Do not attempt to drive outdoors until you feel completely confident in your wheelchair Watch out for ...

Page 7: ... See Breaks under Settings 3 Place one hand on the far corner of the wheelchair chassis and the other on the surface you are moving from 4 Carefully transfer yourself into the wheelchair with good balance To ensure the wheelchair is as stable as possible reverse the chair by 5 10 cm before stopping to make sure the casters are pointing forwards Lifting while the user is in the wheelchair Fig 4 If ...

Page 8: ... speed Lean back and allow the push rims to move slowly through your hands You should be able to stop the wheelchair at any time by grasping the push rims Driving down curbs Fig 51 52 With an assistant Fig 51 Place the wheelchair right next to the curb The assistant holds the backrest bow and lifts lifts up the castors and keeps the wheelchair in balance Then roll both rear wheels slowly over the ...

Page 9: ...tting in the wheelchair Hot surfaces If the wheelchair is exposed to sunshine for long periods its surfaces may become ex tremely warm Risk of jamming While driving the chair be aware of the risk of your fingers becoming jammed between the drive wheel and the brake and between the drive wheel and side guard or armrest Ensure your fingers or loose items do not become trapped in the drive wheel s sp...

Page 10: ... wheelchair are just right for you Adjustments to the wheelchair s settings must take place in the following order 1 The depth of the seat upholstery 2 The tension of the seat upholstery 3 The footplate settings 4 The tension of the heel band 5 The height and angle of the backrest 6 The tension of the backrest upholstery 7 The balance of the wheelchair 8 The brake settings 1 The depth of the seat ...

Page 11: ... from the stoppers 2 by pulling them backwards 2 Fold up the footplate 3 until it stops Down 1 Fold the footplate down 3 until it stops and press so that it snaps into place against the stoppers 1 2 Lock the footplate around the stoppers 2 with the latches 1 by pulling them forwards Depth Fig 9 1 Loosen the screws 1 using a 4 mm Allen key 2 Screw the screws back into hole 2 to move the footplate f...

Page 12: ...4 55 If there is a need to mount the foot plate extra high Fig 55 1 Remove the footplate by loosening the screws 1 as shown in Fig 12 2 Loosen screw 1 in Fig 13 on both sides using a 4 mm Allen key 3 Turn the bracket 2 180 degrees 5 Do the same on both sides 4 Remount screw 1 on both sides 5 Loosen the screw 3 and turn the bracket 4 180 degrees 6 Remount screw 3 on both sides 7 Refit the footplate...

Page 13: ...kwise so that the lock faucet does not fix the backrest in place Use the 19 mm cap key Repeat this process on the other side 5 Release the lock nuts 4 on both sides using the 17 mm cap key 6 Adjust the angle of the backrest using the adjustment screws 5 on both sides Using the 4 mm Allen key unscrew the adjustment screws to tilt the backrest forwards Tighten ing the adjustment screws will allow th...

Page 14: ... you have the necessary support 5 Fold down the backrest upholstery s upper flap 1 7 The balance of the wheelchair Fig 17 You can adjust the balance of the wheelchair by moving the drive wheel s rear axle either forwards or backwards the further forward the rear axle is placed the greater the wheel chair s rear balance This is done in order to transfer more weight onto the drive wheel making the c...

Page 15: ... on both sides 5 Tighten the lock screws 1 on both sides 6 Reattach the rear wheels to the rear axle of the wheelchair and push in the wheels as far as possible Check that the quick release button has sprung out confirming the quick release is in locked position 7 Pull the wheels outwards to ensure they are firmly attached 8 Adjusting the brakes PLEASE NOTE The effectiveness of the brakes is affec...

Page 16: ...g 19 1 Press the knob on the anti tip device firmly 1 2 The anti tip device automatically folds out to the extended position so that it points backwards 2 3 Repeat with the second anti tip device Folding in the anti tip devices Fig 19 1 Press and hold the knob 1 2 Turn the anti tip device so it goes under the seat with your hand on the anti tip device 2 3 Repeat with the second anti tip device Ins...

Page 17: ...ght height in relation to the rear wheels 1 Use only part 1 for 20 rear wheels 2 Use only parts 1 and 2 for 22 rear wheels 3 Use parts 1 2 and 3 for 24 rear wheels Loosening the side guards Fig 21 Pull the side guards straight up to remove them from the wheelchair Armrests Fig 23 The armrests are height adjustable through a spring loaded screw There are three possi ble height positions To adjust t...

Page 18: ... 25 26 A hip belt positioning belt may be fitted without affecting conformity to the CE marking standard Hip belts can be fitted around the frame s tubing at one of the locations indicat ed Fig 24 If the wheelchair is equipped with the belt mounts accessory the hip belt is mounted through the slots in the mounts Fig 25 26 Fig 25 Fig 26 Fig 24 ...

Page 19: ...he screws 1 using a 4 mm Allen key 2 Adjust the torso support cushion in terms of height and depth 3 Tighten the screws 1 using a 4 mm Allen key Folding away Fig 28 1 Lift the plastic catch 1 a little 2 Move the torso support upwards so that the catch moves past the stop screw 3 Fold the torso support to the side Folding inwards 1 Fold the torso support inwards to the correct position 2 Move the t...

Page 20: ... orange flap lock clamp B with a click Dismounting the push bar Fig 31 29 Fig 31 1 Press 1 the orange flap inwards towards the backrest and fold 2 up clamp B 2 Loosen clamp B at the front edge from clamp A 3 which is folded down so that it re leases from the tube Fig 29 3 Squeeze the handle together 1 to open the clamp 2 so that it can be removed from the frame tube 3 4 Remove the push bar from th...

Page 21: ...21 art nr 8822145 Rev 2021 03 Publ 2021 05 06 Panthera AB reserves the right to make technical changes if required ACCESSORIES Push bar Fig 29 Fig 31 Fig 30 Fig 32 ...

Page 22: ...e lock lever 1 Adjusting the headrest Fig 34 35 Fig 34 1 Loosen these two knobs to adjust the headrest s height angle and depth 1 and 2 2 Adjust to the desired position and tighten the knobs 1 and 2 Fig 35 The headrest s plate can be mounted facing upwards or downwards which gives a higher and lower position respectively The difference is 30 mm 15mm 1 Loosen the upper knob completely and remove th...

Page 23: ...ing the tray table Fig 37 Lift the table straight up so that it releases from the side guards Transport of tray table Fig 38 1 Fold the legs on the tray table 2 Place the three magnets on the tray table against the three corresponding magnets on the bracket mounted on the drive wheel Now the tray table is attached to the drive wheel while driving the wheelchair Permitted accessories The accessorie...

Page 24: ...hile the user remains in the chair see page 25 26 Assembling and disassembling the wheelchair Fig 39 and 40 When transporting the wheelchair in a car for example the backrest can be lowered and the drive wheel detached Lowering the backrest Fig 39 1 Remove any side guards and armrests by pulling them upwards vertically 2 Remove the seat cushion if necessary 3 Pull the wire 1 and lower the backrest...

Page 25: ... vehicle is travelling The wheelchair must always be secured to the vehicle in four locations Securing the wheelchair 1 Secure the straps around the tubing above the two casters See Fig 41 2 Fasten the two straps around the rear axle See Fig 42 Please note Do not attach metal hooks directly against the rear axle 3 Pull the wheelchair backwards and fully tighten the rear straps to ensure the wheelc...

Page 26: ...s The user must be secured in the vehicle using a three point seatbelt in order to minimise the risk of injury to the head or chest in conjunction with braking or potential collision The vehicle s seatbelt must remain in contact with the user s body Seatbelts may not be separated from the user s body by any part of the wheelchair See Fig 43 and 44 Unsecured accessories in the wheelchair must be re...

Page 27: ...y RISE Date of test 30 06 2020 Panthera Bambino 3 Restraint system Unwin Sys01 User seatbelt Unwin Ocr02 Test dummy Hybrid III dummy weight 59 kg For more information about seatbelts and restraint systems contact the manufacturer Handicare Specification of wheelchair used for crash test The chair that Panthera has crash tested had the following design at the time of the test Panthera Bambino 3 Ful...

Page 28: ...heel Then clean the spacers between the wheel and the fork and wipe the outside of the wheel bearing with a cloth Apply a drop of oil to each bearing Reassemble the parts Lubricate the drive wheel axle Remove the wheel and spread a few drops of oil over the axle If you drive in rain sand salt or slush or rarely remove the drive wheel you should do this more regularly Inflate the tyres by unscrewin...

Page 29: ...he tyre 5 Reattach the wheel to the wheelchair taking care to ensure the quick release button springs out so the wheel is securely fastened to the hub Pull the wheel outwards to ensure it is firmly attached Spin the wheel to ensure the tyre has been fitted correctly and the wheel is completely circular Replacing casters Fig 46 QR link to instructional video which is also available on Panthera s we...

Page 30: ...ts attributable to defects relating to design material or manufacturing The guarantee does NOT cover faults attributable to normal wear and tear negligent maintenance handling errors incorrect storage incorrect assembly on the part of the pur chaser adjustments and use of products from other supplies without obtaining Panthera AB s written consent or deterioration attributable to repairs carried o...

Page 31: ...24 20 22 24 Push rim diameter mm 505 505 505 505 Camber angle of reawheels 6 6 6 6 Diameter of caster mm 120 120 120 120 Footrest seat to footrest cm 16 30 Variable 16 30 Variable 16 30 Variable 16 30 Variable Transport dimensions Width 37 5 40 5 43 5 46 5 Length 66 66 66 66 Height 40 40 40 40 Weights Total g 9764 9992 10220 10448 Transport 5734 5961 6190 6420 Weight of user kg 60 60 60 60 Min tur...

Page 32: ...0 22 24 20 22 24 Push rim diameter mm 555 555 Camber angle of drive wheel 6 6 Diameter of caster mm 120 120 Footrest seat to footrest cm 16 30 Variable 16 30 Variable Transport dimensions Width 37 5 40 5 Length 61 61 Height 40 40 Weights Total g 9764 9992 Transport 5734 5960 Weight of user kg 60 60 Min turning space cm 90 90 Max inclination with brake 5 5 Air pressure in tyres bar kPa 8 800 8 800 ...

Page 33: ... nr 8822145 Rev 2021 03 Publ 2021 05 06 Panthera AB reserves the right to make technical changes if required Panthera AB Gunnebogatan 26 SE 163 53 Spånga 46 0 8 761 50 40 www panthera se panthera panthera se ...

Reviews: