background image

4.2 Cambio olio

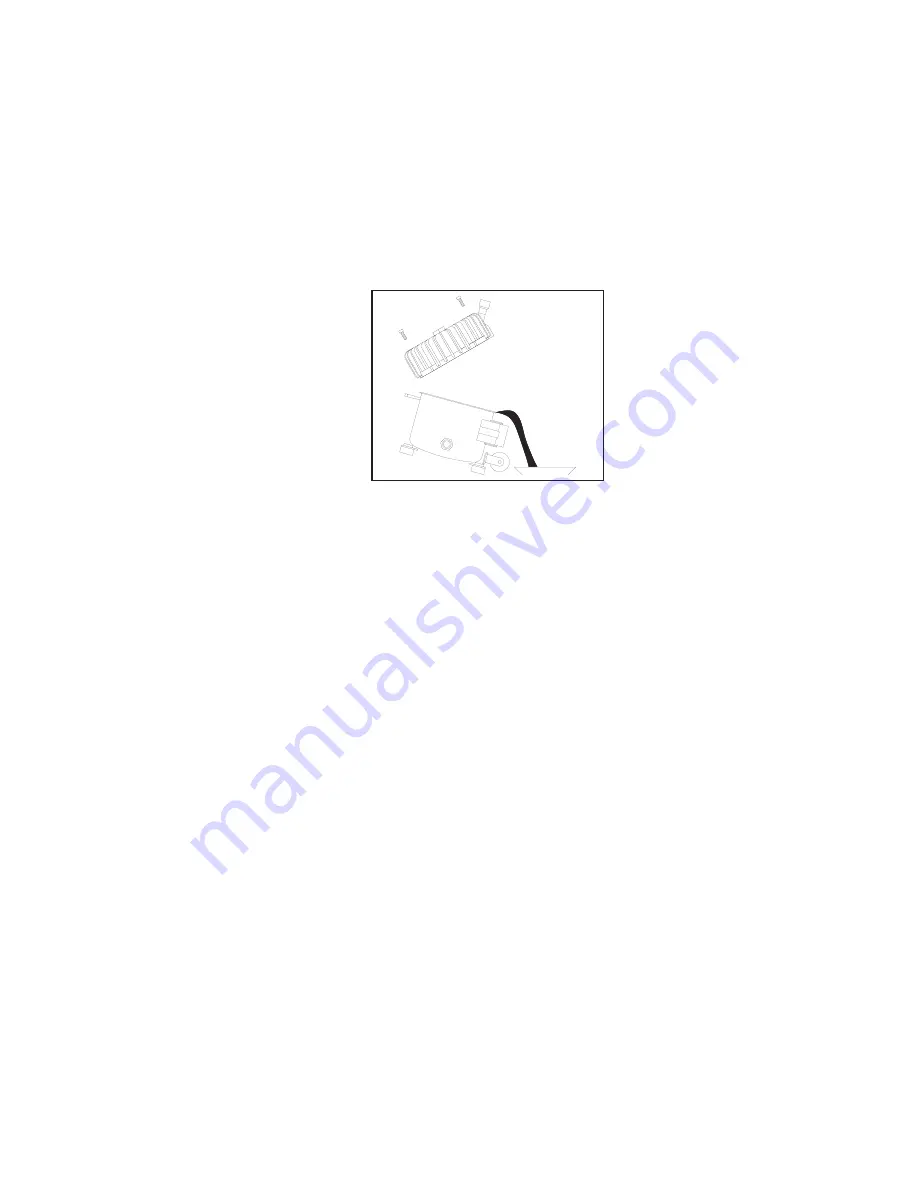
Procedere come segue fig.10:
1. Smontare il gruppo motore dal serbatoio
se necessario.
2. Togliere il coperchio alettato allentando le
4 viti.
3. Inclinare il gruppo motore (

non capovol-

gerlo

) mantenere il blocco interno al suo po-

sto con una mano.
4. Vuotare tutto l’olio.

Nota ! L’olio usato deve esse-
re riciclato in accordo alle
norme ambientali in vigore

Fig.10

5. Controllare l’O-ring del coperchio alettato.
6. Riposizionare il coperchio alettato e con-
trollare durante le operazioni che l’O-ring sia
posizionato correttamente per assicurare
una chiusura a tenuta al 100% tra la cassa
ed il coperchio .
7. Avvitare le 4 viti del coperchio alettato.
8. Montare il gruppo motore sul serbatoio.

I

IMPORTANTE !

Usare sempre l’olio “ROLOIL - SIN-
COM/32E “ in quanto ogni altro tipo di olio
può causare seri danni meccanici al com-
pressore.
Di conseguenza la garanzia si applica solo
se si utilizza l’ olio sopra indicato.

4.2 Oil replacement

Act as follows fig.10:
1. remove the motor unit from the tank, if
necessary.
2. remove the finned cover by loosing the 4
screws.
3. tilt the motor unit towards outlet side (

do

not turn it upside down

)and at the same

time keep the inner unit in its seat with your
hand.
4. Empty all oil

Note! Waste oil must be re-
cycled in conformity with the
regulations in force

5. Check the O’ring of the finned cover
6. Place the finned cover in its seat again
and check that during the operations the
O’ring is properly placed in order to ensure a
perfect seal between housing and cover.
7. Tighten the 4 screws of the finned cover
8. Assemble the motor unit on the tank

I

IMPORTANT!

Always use oil “ROLOIL – SINCOM/32E”
since any other type of oil can cause se-
vere mechanical damages to the com-
pressor.
Consequently warranty is valid only if the
above mentioned oil is used.

15

Summary of Contents for Black Panther

Page 1: ...Fax 522 941997 E MAIL sales wertherint com S N YEAR Rev 1 15 03 01 Centro di assistenza autorizzato Authorized service center COMPRESSORI SILENZIOSI AUTOMATICI AUTOMATIC SILENT COMPRESSORS P 15TC P 30TC P 50TC AL P 50 10 AL P 50 15 AL P 50 24 AL P 100 24 AL P 100 50 AL P 150 50 AL Black Panther Black Panther2 Portadent ...

Page 2: ...o olio 15 5 Inconvenienti e rimedi 16 6 Informazioni particolari 19 6 1 Demolizione del compressore 19 6 2 Parti di ricambio 19 6 3 Garanzia 19 Contents 1 General information 3 1 1 Importance and use of the manual 3 1 2 Content 3 1 3 Storage 3 1 4 Weights and dimensions 3 1 5 Packing disposal 4 1 6 Lifting 4 1 7 Safety 4 1 8 Main components 5 2 Technical specifications 6 2 1 Technical data 6 2 2 A...

Page 3: ...n in the event of sale The compressor owner and or user must know the operating instructions and recommendations before using the compressor If the operator does not fully understand the language of this manual the retailer must supply a correct and detailed translation into his or her native language THE MANUFACTURER SHALL NOT BE HELD LIABLE FOR ANY DAMAGE TO PERSONS OR OBJECTS DUE TO AN IM PROPE...

Page 4: ...rtico lari evitare il contatto poichè può provoca re bruciature La mancanza del rispetto di queste racco mandazioni può causare danni anche gravi al compressore e o alle persone 1 5 Packing disposal After having removed the compressor from the packing check that no parts have been damaged during transport The packing material has to be disposed of in compliance with the regulation in force in the ...

Page 5: ...essostato 4 Manometro pressione serbatoio 5 Riduttore filtro 6 Manometro pressione utilizzo 7 Valvola di sicurezza 1 8 Main components 1 Motor 2 Air tank 3 Pressure switch 4 Tank pressure gauge 5 Filter reducer 6 Outlet pressure gauge 7 Safety valve 5 3 1 7 2 4 5 6 ...

Page 6: ... 0 40 4 80 2 10 120 2 6 45 P 50 15 AL 230 50 0 34 2 40 50 8 15 45 115 60 0 40 4 80 2 10 120 3 96 45 P 50 24 AL 230 50 0 34 2 40 50 8 24 45 115 60 0 40 4 80 2 10 120 6 34 45 P 100 24 AL 230 50 0 68 4 80 100 8 24 47 115 60 0 80 9 60 4 20 120 6 34 47 P 100 50 AL 230 50 0 68 4 80 100 8 50 47 115 60 0 80 9 60 4 20 120 13 47 P 150 50 AL 230 50 1 02 7 20 150 8 50 49 115 60 120 14 40 6 30 120 13 49 Black ...

Page 7: ...ro 5 Condensatore B Bianco D Marrone F Azzurro G Giallo Verde 2 3 Wiring diagrams 1 Starting relay L Brown 2 Overload protector N Blue 3 Terminal box E Yellow Green 4 Pressure switch A Black 5 Capacitor B White D Brown F Sky blue G Yellow Green 7 MOTORI TIPO 15 e 30 MOTORS TYPE 15 and 30 MOTORI TIPO 50 MOTORS TYPE 50 ...

Page 8: ...come indicato sull apposita targhetta e visibile attraverso la spia livello olio NON SUPERARE MAI IL LIVELLO MAX Fig 1 3 Operation 3 1 Machine set up Install the compressor on a flat surface in a suitably sized room well ventilated and not wet where the temperature is not likely to rise above 35 C If there is not enought air ventilation install a suitably sized exhauster or fan I WARNING COMPRESSO...

Page 9: ...rente e avviare il compresso re portando l interruttore in po sizione 1 Il ciclo di funzionamento del compressore è automatico Fig 2 NEVER USE AN OIL DIFFERENT FROM THE ONE RECOMMENDED BY THE MANUFACTURER THIS WOULD VOID ALL GUARANTEES Keep any oil remaining in the bottle for fu ture topping up Now insert the intake filter on the pipe or in the hole After having added the oil never overturn or exc...

Page 10: ...rre la pressione differenziale Fig 4 I Attenzione L operazione di regolazione della pressio ne deve essere eseguita solo da personale specializzato The pressure switch stops the compressor when the pressure in the tank reaches the maximum value allowed 8 bar 120psi standard and starts it again when the pressure drop to the minimum value 6 bar 90psi standard Adjust the outlet air pressure operat in...

Page 11: ...m2 1 5 mm2 1 5 mm2 Motori tipo 50 1 mm2 1 5 mm2 1 5 mm2 2 5 mm2 Motori tipo 100 1 5 mm2 2 5 mm2 1 5 mm2 2 5 mm2 Motori tipo 150 1 5 mm2 2 5 mm2 2 5 mm2 2 5 mm2 If the pressure switch does not work overpressure the safety valve will auto matically operate and open when the pres sure exceeds the max setted value I WARNING Compressors must be connected to an outlet protected by a suitable magneto the...

Page 12: ...ondente a 46 minuti di utilizzo e 14 minuti di pausa in un ora Le curve rappresentano valori medi a 230V 50Hz e con temperatura ambiente di 20 C Fig 5 3 3 Limits for continuous operation Curve n 1 fig 5 indicates the length of continuous running at varying pressures until the overload protector switces off the motor at approx 115 C oil temperature measured from 20 C start point Example 6 bar 116 m...

Page 13: ...as follows 1 Empty the compressor air tank 2 Close the compressor outlet on the tank and check that the drain cap is closed 3 Start the compressor and check the time elapsing between starting and automatic switching off 4 Check that there are no leaks on connec tions 5 check max pressure 8 bar 120 Psi 13 Tempi di riempimento del serbatoio da 0 a pressione max in secondi Filling up time of the tank...

Page 14: ... l apposito rubinetto Fig 7 Remove the condensate that has collected in the air tank To empty the tank put it under pressure take the compressor to a place where the water will not damage the floor tip the compressor slightly forward and open the tap Fig 7 Controllare l efficienza del compressore eventuale allentamento di raccordi usura dei tubi di pressione serraggio delle viti efficenza della pa...

Page 15: ...sare seri danni meccanici al com pressore Di conseguenza la garanzia si applica solo se si utilizza l olio sopra indicato 4 2 Oil replacement Act as follows fig 10 1 remove the motor unit from the tank if necessary 2 remove the finned cover by loosing the 4 screws 3 tilt the motor unit towards outlet side do not turn it upside down and at the same time keep the inner unit in its seat with your han...

Page 16: ...re difettoso Sostituirlo g Il relé termico ha fatto spegnere il compressore per sovratemperatura Quando raffreddato il compressore ripartirà automaticamente ad una temperatura idonea 5 Troubleshooting I WARNING Before any operation on the compressor disconnect the plug from the socket Empty air tank of air before dismantling any part of compressor unit s pressure system Following operations must b...

Page 17: ... ripartirà au tomaticamente dopo 15 20 min 5 6 Perdite d aria Possono essere causate dalla cattiva tenu ta di qualche connessione Controllare tutti i raccordi bagnandoli con acqua saponata 5 2 The compressor does not reach the maximum pressure a Check any air leak See point 5 6 b Check the pressure switch efficency and if necessary adjust it See page 10 Pressure adjustment c The non return valve i...

Page 18: ...nte troppo alta Non installare mai il compressore all interno di un mobile se non adeguatamen te ventilato f Il compressore é sovraccaricato Assicuratevi che sia un modello adeguato alle vostre necessità 5 7 Leak from the valve placed under the pressure switch Damaged valve replace it The defect can be due to an unperfect valve seal See point 5 1d 5 8 The compressor starts when no air is being tap...

Page 19: ...sura La manomissione ed il cattivo uso del com pressore fanno decadere automaticamente ogni forma di garanzia Le spese di trasporto e mano d opera sono escluse dalla garanzia 6 Special informations 6 1 Compressor demolition During the compressor demolition all possible safety regulations must be ob served in order to avoid any damage to people or things All the metal parts can be recycled rubber a...

Page 20: ......

Page 21: ......

Page 22: ......

Page 23: ......

Page 24: ......

Page 25: ......

Page 26: ......

Page 27: ......

Page 28: ......

Page 29: ......

Page 30: ......

Page 31: ......

Page 32: ......

Page 33: ...9 VER 10A SWITCH 22X29 VER 10A POLEN SCHALTER 22X29 VER 10A INTERRUPTEUR INTERRUPTOR 22X29 VER 10A C0034 FERMACORDONE COMPRESSORI CABLE RELIEF KABELKLEMME ARRET CÂBLE SUJETADOR DE CABLE C0037 VITE TCEI M6X20 UNI 5931 ZB SCREW TCEI 6X20 SCHRAUBE M6X20 VIS TCEI M6X20 TORNILLO TCEI M6X20 C0038 NIPPLO 1 4 X 35 NIPPLE 1 4 X 35 NIPPEL 1 4 X 35 RACCORD FILETÉ 1 4 X 35 NIPLE 1 4 X 35 C0040 RIDUZIONE M F 1...

Page 34: ...NTO T21 230V START RELAY T21 230V RELAIS RELAIS RELÉ C0113 VITE STAFFA CONDENSATORE SCREW SCHRAUBE VIS TORNILLO C0114 DADO BASSO M8 UNI 5589 ZB NUT M8 UNI 5589 FLACHE MUTTER M8 UNI 5589 ECROU BAS M8 UNI 5589 TUERCA BAJA M8 ZINCADA C0115 GUARNIZIONE CILINDRO T21 CYLINDER GASKET ZYKLINDERDICHTUNG JOINT CYLINDRE JUNTA C0116 PLACCA VALVOLA T21 CON VALVOLE VALVE PLATE T21 WITH VALVE PLATTEN PLAQUE PLAC...

Page 35: ...UYAUX M5XØ4 5 PORTAGOMA M5XØ4 5 C0242 RIDUZIONE M F 1 2X1 4 CONNECTOR MF 1 2 X1 4 REDUKTION MF 1 2 X1 4 RÉDUCTEUR MF 1 2 X1 4 REDUCCIÓN MF 1 2 X1 4 C0268 FILTRO SCARICO AUTOMATICO AUTOMATIC DRAIN FILTER AUTOMATISCHEN ABLASSFILTER FILTRE DE DÉCHARGE AUTOMATIQUE FILTRO DE DESCARGA AUTOMÁTICO C0278 RACCORDO L GIREVOLE M M5X6 L CONNECTION M5X Ø6 L ANSCHLUSS RACCORD CONEXION L C0288 VITE KTC TCTC 3 9X1...

Page 36: ...4X1 8 SOUPAPE M M 1 4X1 8 VÁLVULA M M 1 4X1 8 C0352 RIPARTITORE L 2 VIE M F 1 8 M5 ELBOW MF1 8 M5 2 WEG VENTIL DISTRIBUTEUR DISTRIBUIDOR DE 2 VIAS C0353 RUBINETTO A SFERA M F 1 4 STRAIGHT OUTLET COCK M F 1 4 KUGELHAHN M F 1 4 ROBINET À SPHÈRE M F 1 4 LLAVE M F 1 4 C0354 RUBINETTO SPURGO M 1 4 90 DRAINCOCK M 1 4 90 ABLASSHAHN M 1 4 90 ROBINET M 1 4 90 LLAVE DE PURGA M 1 4 90 C0356 TUBO ELASTOLLAN 6...

Page 37: ... 1 JUNTA C0553 BUSSOLA DI RINFORZO D 10 8 REINFORCEMENT BUSH D10 8 BUCHSE D 10 8 BAGUE D 10 8 CASQUILLO DE REFUERZO D 10 8 C0573 MANOPOLA SENZA BORDO 25 27 HAND GRIP DREHKNOPF POIGNÈE REDONDA C0617 RONDELLA Ø6 4X12 5 UNI 6592 WASHER Ø6 4X12 5 UNI 6592 SCHEIBE Ø6 4X12 5 UNI 6592 RONDELLE Ø6 4X12 5 UNI 6592 ARANDELA Ø6 4X12 5 UNI6592 C0652 GALLETTO CON VITE 8X16 UNI 5449 WING SCREW M8X16 UNI 5449 RI...

Page 38: ...X3 8 NI REDUCTION M F C16 1 8 X 3 8 REDUKTION M F C16 1 8 X 3 8 RÉDUCTION REDUCCIÓN C1235 KIT PLACCA VALVOLE GUARNIZIONI T2134A KIT VALVE PLATE GASKET T2134A KIT PLATTEN KIT PLAQUE KIT PLACA C1236 KIT PLACCA VALVOLE GUARNIZIONI E88 KIT VALVE PLATE GASKET E88 C1237 KIT PLACCA VALVOLE GUARNIZIONI E59 KIT VALVE PLATE GASKET E59 C1422 TUBO ELASTOLLAN 6X4 BLU ELASTOLAN HOSE TUBO C1606XXR L55 230 50HZ R...

Page 39: ...KIT FILTRO ASPIRAZIONE CORTO KIT INTAKE FILTER FILTERSET KIT FILTRE KIT FILTRO C1862 PIEDINO GOMMA RUBBER SUPPORT STÜTZFUSS PIED CAOUTCHOUC PIE DE GOMA C1902 O RING 4625 O RING O RING JOINT TORIQUE EMPAQUE C1906 ANELLO PROTEZIONE GRUPPO MOTOR PROTECTION RING JOINT PROTECTION MOTEUR ANILLO PROTECTOR MOTOR C1925 VITE TS90ØCR M4X60 UNI 7688 ZB SCREW TS 90 CR M4X60 UNI7688 ZB SCRAUBE M4X60 UNI 7688 ZB...

Page 40: ...che il compressore modello déclare par la presente que le compresseur modèle hereby we declare that the compressor model hiermit erklären wir daß Kompressoren Modell por la presente declara que el compresore modelo Vi erklærer hermed at Kompressor model Vi erklærer herved at Kompressor model Vi förklarer härmed att kompressor model P 15TC P 30TC P 50TC AL P 50 10 AL P 50 15 AL P 50 24 AL P 100 24 ...

Reviews: