background image

12

Back light compensation function

Follow the procedure below.

Step 1

Set “ALC/ELC” to “ALC”, and press the [SET] button. 

The “ALC CONT” screen appears.

Note:

  •  When “ALC/ELC” is set to “ELC” or “ALC+” and the [SET] button is pressed, the “ELC CONT” or “ALC+ CONT” screen will appear. 

Step 2

Move the cursor to “BLC” and select from the following options. 

ON:

 Automatically compensate when the background is brighter than the subject. 

OFF

 (default)

:

 This mode is used when the area in front of the subject is extremely bright. 

Step 3

Move the cursor to “ABS” and select from the following options. 
ABS (Auto Black Stretch Technology)
The latest digital signal technology is applied to automatically detect the dark areas in the image, acquire the brightness data around 
the dark areas, and perform real-time color adjustment by calculating the best correction curve for each area. This function can be 
used to perform real-time adjustment and correction of back light and dark area, and reproduce natural, clear images.

ON:

 Uses ABS. 

OFF

 (default)

:

 Does not use ABS. 

Note:

  •  When “BLC” is set to “ON”, “ABS” displays “---” and may not be operated. 

Step 4

When “BLC” is set to “OFF”, bright areas of an image are masked to facilitate the visibility of dark areas. 

Move the cursor to “MASK SET” and press the [SET] button.

→ 

The mask setting screen appears. 

Step 5

Press the [UP], [

dOWN

], [righT], and [LEFT

] buttons to move the flashing cursor to the area to be masked and press the [SET] 

button. 

When the selected area is masked, the masked area will start blinking (between stripes and white). When the flashing cursor is moved 
to other areas, the masked area will be displayed in white. 
Repeat the above procedure to mask other areas as necessary.

Note:

  •  To cancel the masking, select the masked area to be canceled, and then press the [SET] button. The masked area will be deleted.
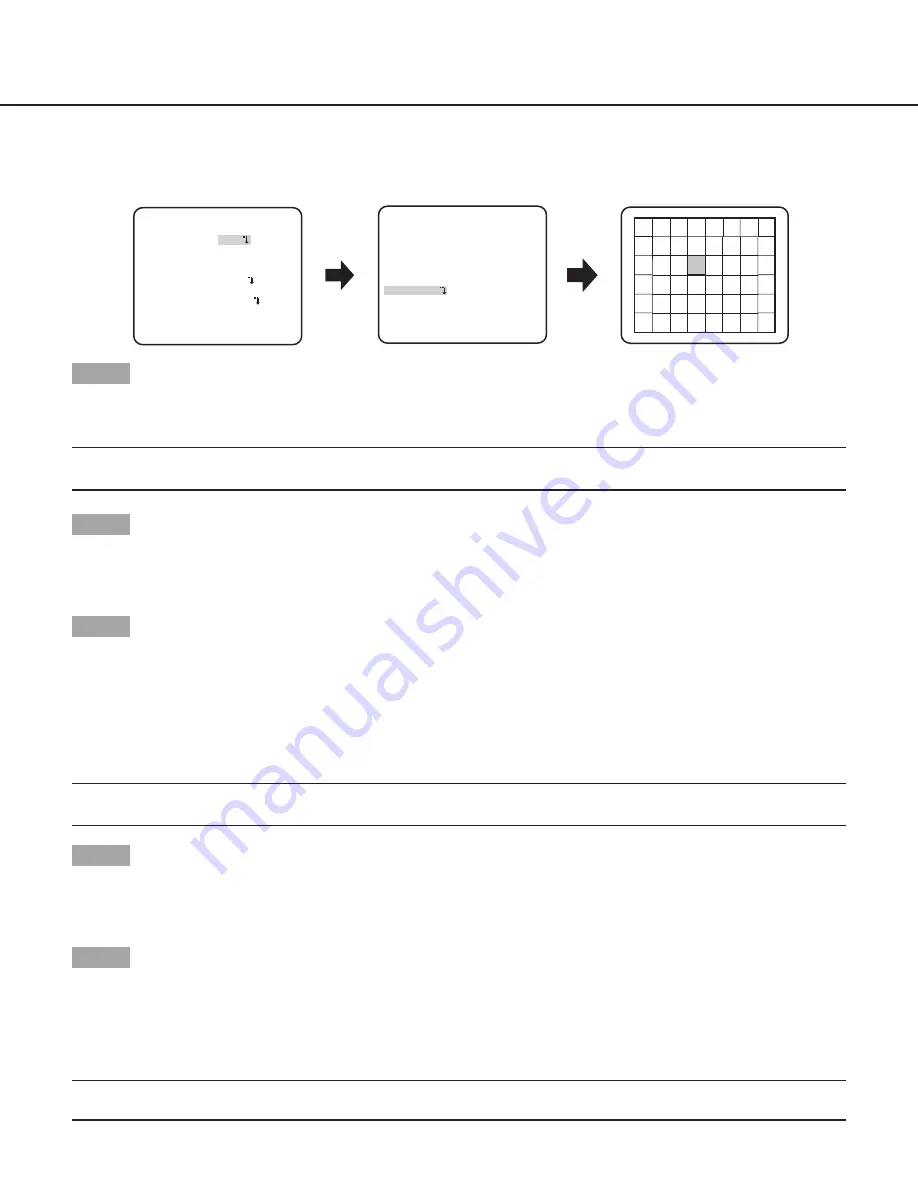
“ALC CONT” screen

Mask setting screen

“CAMERA SETUP” screen

**ALC CONT**(1)
BACK LIGHT COMP 

OFF

ABS

MASK SET


-     +

LEVEL        .I.....   0

 RET TOP END

BLC 

OFF

    **CAMERA SETUP** 

SCENE1

 ALC/ELC    ALC    

 SHUTTER    OFF

 AGC        ON(HIGH)

 SENS UP    OFF

 WHITE BAL  ATW1

 DNR        HIGH

     AUTO1

 VMD        OFF

 RET TOP END

D&N(IR)

Summary of Contents for WV-CP310

Page 1: ...se The model number is abbreviated in some descriptions in this manual Operating Instructions Color CCTV Camera Model No WV CP300 Series WV CF344 Series Lens is optional for WV CP300 Series WV CP300 W...

Page 2: ...e Acrobat Reader and Reader are either registered trademarks or trademarks of Adobe Systems Incorporated in the United States and or other countries About notations The following notations are used wh...

Page 3: ...nction setting DNR 15 8 Black and white mode setting D N IR CP310 CP310 CP300 D N ELE CP310 CP310 CP300 CF354 CF344 15 9 VMD setting VMD 16 Setting of motion detection 17 Setting of scene change detec...

Page 4: ...hronization and privacy zone SYNC Specities the synchronization type PRIVACY ZONE Hides undesired portions in the camera shooting area STABILIZER Decides whether or not to enable the image stabilizer...

Page 5: ...shot 3 The selected setup screen in the setup menu appears on the screen Note If the top screen of the setup menu is called up with the operation buttons while the camera is operated the setup mode is...

Page 6: ...LISH SET RET TOP END CAMERA ID 0123456789 ABCDEFGHIJKLM NOPQRSTUVWXYZ SPACE POSI RET TOP END RESET SYSTEM SETUP SYNC INT PRIVACY ZONE OFF STABILIZER OFF EL ZOOM OFF UPSIDE DOWN OFF LDC I 0 HUE I 0 RET...

Page 7: ...LISH SET RET TOP END CAMERA ID 0123456789 ABCDEFGHIJKLM NOPQRSTUVWXYZ SPACE POSI RET TOP END RESET SYSTEM SETUP SYNC INT PRIVACY ZONE OFF STABILIZER OFF EL ZOOM OFF UPSIDE DOWN OFF LDC I 0 RET TOP END...

Page 8: ...T RET TOP END CAMERA ID 0123456789 ABCDEFGHIJKLM NOPQRSTUVWXYZ SPACE POSI RET TOP END RESET SYSTEM SETUP SYNC INT PRIVACY ZONE OFF STABILIZER OFF EL ZOOM OFF UPSIDE DOWN OFF LDC I 0 RET TOP END SPECIA...

Page 9: ...LISH SET RET TOP END CAMERA ID 0123456789 ABCDEFGHIJKLM NOPQRSTUVWXYZ SPACE POSI RET TOP END RESET SYSTEM SETUP SYNC INT PRIVACY ZONE OFF STABILIZER OFF EL ZOOM OFF UPSIDE DOWN OFF LDC I 0 RET TOP END...

Page 10: ...haracter The entered characters are displayed in the editing area Character entry To revise a character move the arrow in the editing area to a wrong character with use of the RIGHT or LEFT button and...

Page 11: ...VMD page 11 18 To change the scene files go to step 2 Step 2 Move the cursor to SCENE1 and press the right or left button to select SCENE2 The screen changes and displays SCENE2 Step 3 To configure t...

Page 12: ...ck light and dark area and reproduce natural clear images ON Uses ABS OFF default Does not use ABS Note When BLC is set to ON ABS displays and may not be operated Step 4 When BLC is set to OFF bright...

Page 13: ...tivity of the CCD and accordingly the image becomes brighter The magnification is unchanged for selection of FIX and the magnification is automatically adjusted in accordance with the illuminance of a...

Page 14: ...t is completed Step 3 Press the right button to select AWC Refer to this page for fine adjustment of the white balance Note The adjustment of the color temperature ranges from approx 2000 K to 10000 K...

Page 15: ...ove to the lower right part of the area to be set and press the SET button 7 Digital noise reduction function setting DNR The digital noise reduction function reduces noise automatically under the con...

Page 16: ...minance of the camera is less than 0 1 lx HIGH default Switches from color to black and white images when the ambient illuminance of the camera is less than 0 2 lx Note The switching illuminance level...

Page 17: ...similar False detection may occur for approx 1 minute after turning on the power after completing settings in the SETUP menu or after changing the camera view angle Motion detection is the detection...

Page 18: ...IME DISPLAY MODE ALARM MASK SET I 20 Display mode screen MOTION DET screen Step 6 Move the cursor to Level and press the right or left button to adjust the level Repeat step 5 and 6 to adjust to optim...

Page 19: ...camera shooting area on the screen exist those portions privacy zone can be set to be hidden Up to 8 portions can be specified for the privacy zone ON 1 Grays the zone ON 2 Mosaics the zone OFF defaul...

Page 20: ...hen ON is selected for the image stabilizer the view angle becomes narrower and the resolution becomes lower When ON is selected for the image stabilizer check the view angle and resolution at camera...

Page 21: ...pside down 15 Lens distortion correction LDC The image may be distorted depending on the lens used and the zoom factor By adjusting the lens distortion correction setting the distorted image can be co...

Page 22: ...ng subject Fine adjustment with MANUAL setting after ABF Subject with large illuminance change Subject with low illuminance Too bright or reflective subject Subject through a window Place where the le...

Page 23: ...curtain In such a case move the indicator in the direction to reduce moire 19 Pedestal level adjustment PEDESTAL Press the right or left button to adjust the pedestal level of the camera When the lev...

Page 24: ...erisk at the right side of the number disappears 22 Communication setting COMMUNICATION CP310 CP310 CP300 CP310 CP310 CP300 The required communication configuration is performed to use this unit integ...

Page 25: ...to call up the screen Move the cursor to LANGUAGE and press the right or left button to select the target language then move the cursor to SET and press the SET button Select the target language from...

Page 26: ...ectronic shutter speed 1 step faster 1 7 4 Camera function Electronic shutter speed 1 step slower 1 7 5 Camera function Gain adjustment AGC ON 1 7 6 Camera function Gain adjustment AGC OFF 1 7 7 Camer...

Page 27: ...ca www panasonic com business For customer support call 1 800 528 6747 Three Panasonic Way Secaucus New Jersey 07094 U S A Panasonic Canada Inc 5770 Ambler Drive Mississauga Ontario L4W 2T3 Canada 905...

Reviews: