background image

17

Important:

  •  The following circumstances may result in detection failure or false detection. Use the camera after adjusting the detection area 

and sensitivity. 

• Not enough difference in brightness between the background and the moving photographic subject, or significant changes in 

brightness

• Dirt or water drops on the lens
• Insufficient brightness, for example, when shooting at night
• The subject is moving straight at the camera
• The subject is moving too fast or too slow
• The subject is too small or too large
• There are too many moving objects
• Light reflected through a window or from a road surface
• The camera is shaking
• Entry of outside light, such as sunlight or the headlights of a car
• Flic

kering fluorescent light

  •  Subject change detection may fail in the following cases. 

 The lens is partially covered or covered with a transparent item

• The photographic subjects before and after changing the camera direction are similar

  •  False detection may occur for approx. 1 minute after turning on the power, after completing settings in the SETUP menu, or after 

changing the camera view angle. 

  •  Motion detection is the detection function within the screen range for electronic zoom of 1x. 

“MOTION DET” screen 

 **MOTION DET**(1)

  RET TOP END

LEVEL

2S 

OFF 

DWELL TIME

DISPLAY MODE 

   ALARM

MASK SET

....I.. 20

              -     +

“CAMERA SETUP” screen

     MOTION DET

     AUTO1

    **CAMERA SETUP** 

SCENE1

 ALC/ELC    ALC    

 SHUTTER    OFF

 AGC        ON(HIGH)

 SENS UP    OFF

 WHITE BAL  ATW1

 DNR        HIGH

 VMD

 RET TOP END

D&N(IR)

Setting of motion detection

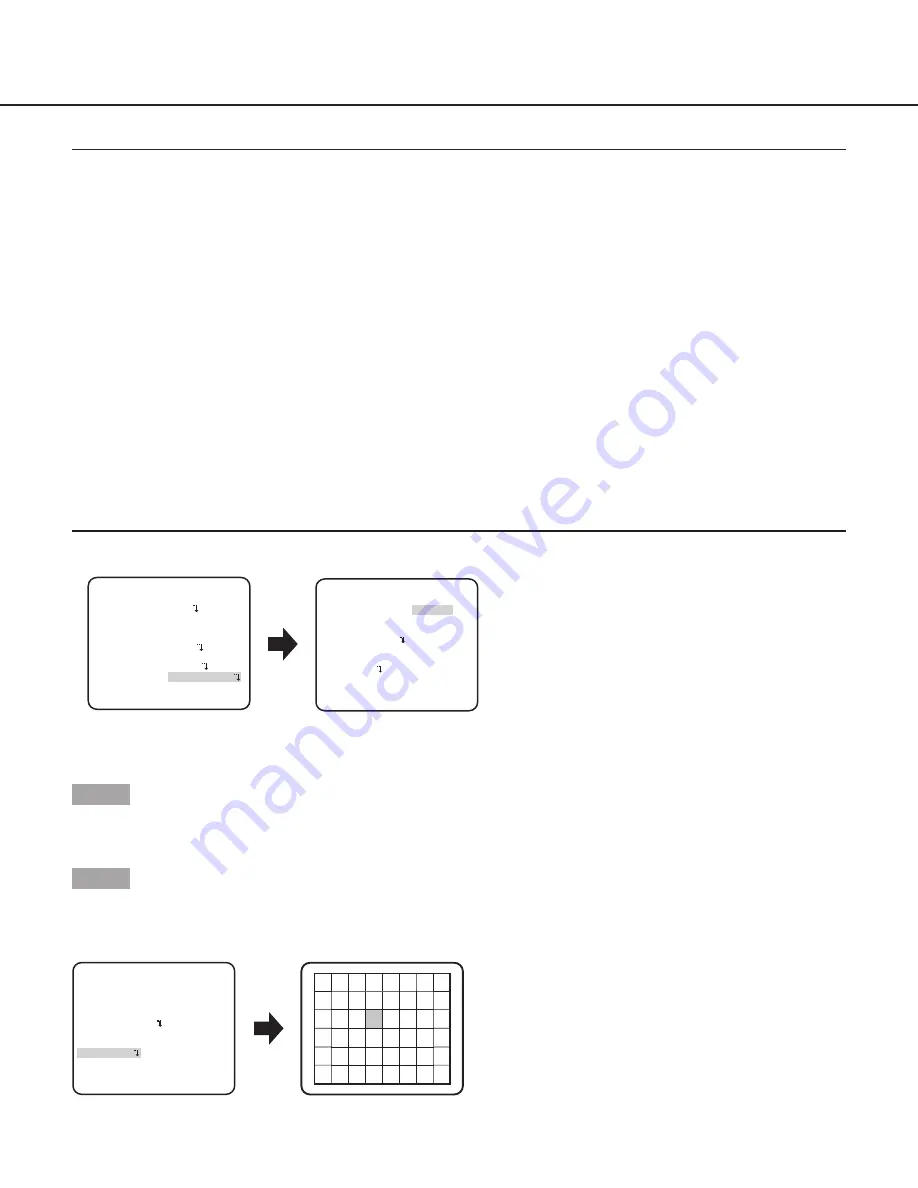
Move the cursor to “VMD”, press the [LEfT] or [RIghT ] button to select “MOTION DET”. 

Step 1

Move the cursor to “MOTION DET” and press the [SET] button.

 The “MOTION DET” screen appears. 

Step 2

Move the cursor to “MASK SET” and press the [SET] button. 

 The mask setting screen appears.

“MOTION DET” screen 

Mask setting screen

 **MOTION DET**(1)

 RET TOP END

LEVEL

2S 

OFF 

DWELL TIME

DISPLAY MODE 

   ALARM

MASK SET

....I.. 20

              -     +

In the masked area, no alarm will be issued even if a moving object is detected. The masked area is set in the same way as the 
masked area setting in “Light quantity control method selection”. (

 page 11)

Summary of Contents for WV-CP310

Page 1: ...se The model number is abbreviated in some descriptions in this manual Operating Instructions Color CCTV Camera Model No WV CP300 Series WV CF344 Series Lens is optional for WV CP300 Series WV CP300 W...

Page 2: ...e Acrobat Reader and Reader are either registered trademarks or trademarks of Adobe Systems Incorporated in the United States and or other countries About notations The following notations are used wh...

Page 3: ...nction setting DNR 15 8 Black and white mode setting D N IR CP310 CP310 CP300 D N ELE CP310 CP310 CP300 CF354 CF344 15 9 VMD setting VMD 16 Setting of motion detection 17 Setting of scene change detec...

Page 4: ...hronization and privacy zone SYNC Specities the synchronization type PRIVACY ZONE Hides undesired portions in the camera shooting area STABILIZER Decides whether or not to enable the image stabilizer...

Page 5: ...shot 3 The selected setup screen in the setup menu appears on the screen Note If the top screen of the setup menu is called up with the operation buttons while the camera is operated the setup mode is...

Page 6: ...LISH SET RET TOP END CAMERA ID 0123456789 ABCDEFGHIJKLM NOPQRSTUVWXYZ SPACE POSI RET TOP END RESET SYSTEM SETUP SYNC INT PRIVACY ZONE OFF STABILIZER OFF EL ZOOM OFF UPSIDE DOWN OFF LDC I 0 HUE I 0 RET...

Page 7: ...LISH SET RET TOP END CAMERA ID 0123456789 ABCDEFGHIJKLM NOPQRSTUVWXYZ SPACE POSI RET TOP END RESET SYSTEM SETUP SYNC INT PRIVACY ZONE OFF STABILIZER OFF EL ZOOM OFF UPSIDE DOWN OFF LDC I 0 RET TOP END...

Page 8: ...T RET TOP END CAMERA ID 0123456789 ABCDEFGHIJKLM NOPQRSTUVWXYZ SPACE POSI RET TOP END RESET SYSTEM SETUP SYNC INT PRIVACY ZONE OFF STABILIZER OFF EL ZOOM OFF UPSIDE DOWN OFF LDC I 0 RET TOP END SPECIA...

Page 9: ...LISH SET RET TOP END CAMERA ID 0123456789 ABCDEFGHIJKLM NOPQRSTUVWXYZ SPACE POSI RET TOP END RESET SYSTEM SETUP SYNC INT PRIVACY ZONE OFF STABILIZER OFF EL ZOOM OFF UPSIDE DOWN OFF LDC I 0 RET TOP END...

Page 10: ...haracter The entered characters are displayed in the editing area Character entry To revise a character move the arrow in the editing area to a wrong character with use of the RIGHT or LEFT button and...

Page 11: ...VMD page 11 18 To change the scene files go to step 2 Step 2 Move the cursor to SCENE1 and press the right or left button to select SCENE2 The screen changes and displays SCENE2 Step 3 To configure t...

Page 12: ...ck light and dark area and reproduce natural clear images ON Uses ABS OFF default Does not use ABS Note When BLC is set to ON ABS displays and may not be operated Step 4 When BLC is set to OFF bright...

Page 13: ...tivity of the CCD and accordingly the image becomes brighter The magnification is unchanged for selection of FIX and the magnification is automatically adjusted in accordance with the illuminance of a...

Page 14: ...t is completed Step 3 Press the right button to select AWC Refer to this page for fine adjustment of the white balance Note The adjustment of the color temperature ranges from approx 2000 K to 10000 K...

Page 15: ...ove to the lower right part of the area to be set and press the SET button 7 Digital noise reduction function setting DNR The digital noise reduction function reduces noise automatically under the con...

Page 16: ...minance of the camera is less than 0 1 lx HIGH default Switches from color to black and white images when the ambient illuminance of the camera is less than 0 2 lx Note The switching illuminance level...

Page 17: ...similar False detection may occur for approx 1 minute after turning on the power after completing settings in the SETUP menu or after changing the camera view angle Motion detection is the detection...

Page 18: ...IME DISPLAY MODE ALARM MASK SET I 20 Display mode screen MOTION DET screen Step 6 Move the cursor to Level and press the right or left button to adjust the level Repeat step 5 and 6 to adjust to optim...

Page 19: ...camera shooting area on the screen exist those portions privacy zone can be set to be hidden Up to 8 portions can be specified for the privacy zone ON 1 Grays the zone ON 2 Mosaics the zone OFF defaul...

Page 20: ...hen ON is selected for the image stabilizer the view angle becomes narrower and the resolution becomes lower When ON is selected for the image stabilizer check the view angle and resolution at camera...

Page 21: ...pside down 15 Lens distortion correction LDC The image may be distorted depending on the lens used and the zoom factor By adjusting the lens distortion correction setting the distorted image can be co...

Page 22: ...ng subject Fine adjustment with MANUAL setting after ABF Subject with large illuminance change Subject with low illuminance Too bright or reflective subject Subject through a window Place where the le...

Page 23: ...curtain In such a case move the indicator in the direction to reduce moire 19 Pedestal level adjustment PEDESTAL Press the right or left button to adjust the pedestal level of the camera When the lev...

Page 24: ...erisk at the right side of the number disappears 22 Communication setting COMMUNICATION CP310 CP310 CP300 CP310 CP310 CP300 The required communication configuration is performed to use this unit integ...

Page 25: ...to call up the screen Move the cursor to LANGUAGE and press the right or left button to select the target language then move the cursor to SET and press the SET button Select the target language from...

Page 26: ...ectronic shutter speed 1 step faster 1 7 4 Camera function Electronic shutter speed 1 step slower 1 7 5 Camera function Gain adjustment AGC ON 1 7 6 Camera function Gain adjustment AGC OFF 1 7 7 Camer...

Page 27: ...ca www panasonic com business For customer support call 1 800 528 6747 Three Panasonic Way Secaucus New Jersey 07094 U S A Panasonic Canada Inc 5770 Ambler Drive Mississauga Ontario L4W 2T3 Canada 905...

Reviews: