background image

58

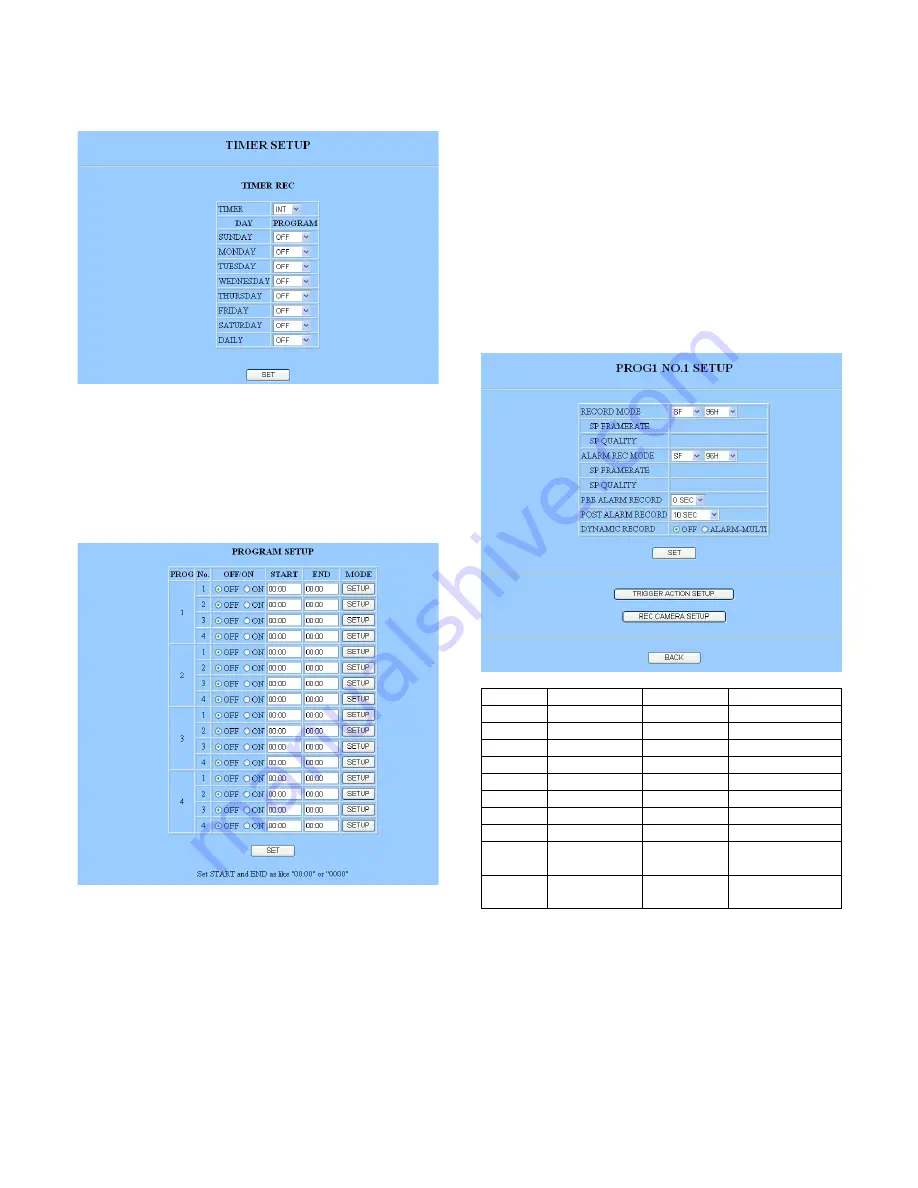
Program Assignment (TIMER REC)

When internal timer (INT) is selected, programs can be
assigned on a weekly and/or daily basis.

Assignable programs:

PROG1 – PROG4, OFF

Programming (PROGRAM SETUP)

There are four programs, each containing four events hav-
ing a start and end time, and a recording mode.

1. Select ON or OFF for each event.

ON:

Applies the schedule and mode to the program.

OFF:

Does not apply.

2. Enter the start and end times.

Assignable START times:

From 00:00 to 23:59

Assignable END times:

From 00:01 to 24:00

3. Click the SET button.

4. Click the mode SETUP button. The PROG1-4 No.1-4

window opens.

Recording Mode Setup (PROG1-4
NO.1-4 SETUP)

Parameters for internal timer recording are assigned to
each event (NO.1-4) of the program (PROG1-4) in this win-
dow. There are five recording modes available: super fine
(SF), fine (FQ), normal (NQ), long-time (EX) and optional
(SP). If combined with audio recording (-A), the number of
recording modes doubles. The selected recording mode
determines the remaining recording time displayed on the
monitor.
In the SP mode, the field rate and picture quality are vari-
able, and can be selected at option in the range of 0.1 to
30 FPS with five quality level options respectively. After the
recording mode is selected, the available recording time is
determined and displayed.

N/A

Rec Mode

Quality

Audio Record

Note

SF-xxxH

Super Fine

N/A

Field rate, quality
selected optionally

Field rate, quality
selected optionally

N/A

N/A

N/A

Available

Available

Available

Available

Fine

Normal

Long time

Optional setup

Super Fine

Fine

Normal

Long time

FQ-xxxH

NQ-xxxH

EX-xxxH

SP-xxxH

Available

Optional setup

SP-AxxxH

SF-AxxxH

FQ-AxxxH

NQ-AxxxH

EX-AxxxH

Notes: 

• For recording modes other than SP, those suffixed "xxx"

in the table will be replaced by a calculated recording
time of 24, 48, 72, 96, 120, 170, 180, 240, 480, 960, 
1 200, 1 440, 2 160, 2 880, or 8 640 hours. The selected
recording mode with the preset rate and quality will
determine the suffix.

• Even if preset to 30 or 15 FPS, the actual recording rate

may drop to 7.5 FPS at worst while busy multi-tasks
task such as playback, remote-access playback,
remote-access live image, FTP access, multi-split dis-
play, or video motion detection are carried out simulta-
neously.

Summary of Contents for WJHD200 - Digital Disk Recorder

Page 1: ...200 Digital Disk Recorder Operating Instructions 4 8 3 7 2 6 1 5 OPERATE ALARM SUSPEND RESET HDD FULL ERROR OSD DST MULTISCREEN SELECT ZOOM TIMER REMOTE LOCK SEQUECE ALARM SERCH STOP PLAY MODE SERECT PLAY TIME DATE SEARCH REC STOP SPOT MULTI CAMERA SELECT ALARM RECALL REC PUSH PAUSE SET Digital Disk Recorder WJ HD200 SETUP ESC ENGLISH FRANÇAIS ...

Page 2: ...r modifications not expressly approved by the party responsible for compli ance could void the user s authority to operate this equip ment For U S A WARNING To prevent fire or electric shock hazard do not expose this appliance to rain or moisture The apparatus shall not be exposed to dripping or splashing and that no objects filled with liquids such as vases shall be placed on the apparatus The li...

Page 3: ... outlet consult an electrician for replacement of the obsolete outlet 10 Protect the power cord from being walked on or pinched particularly at plugs convenience receptacles and the points where they exit from the apparatus 11 Only use attachments accessories specified by the manufacturer 12 Use only with the cart stand tripod bracket or table specified by the manufacturer or sold with the apparat...

Page 4: ...larm Search Playback 49 Time Date Search Playback 50 Multiscreen Playback 50 Lock Unlock Buttons 51 Password Verification 51 Enabling Button Lock 51 WJ HD200 NETWORK OPERATION 53 PREPARATIONS 54 System Requirements 54 Connection 55 Main Page and Control Panel 56 WJ HD200 SETUP 57 To Access Setup Menus 57 Timer Setup TIMER SETUP 57 Trigger Action Setup TRIGGER ACTION SETUP 59 Camera Recording Setup...

Page 5: ...H 1 8 Quad split live Multi split live Single live zoomed electrically Sequential live Recording Mode Manual recording Timer recording Alarm event recording Power on recording Recording quality and rate selectable Playback Single channel playback Step search playback Skip search playback Time Date search Quad playback Single playback zoomed electrically Remote Control Serial port control Alarm sen...

Page 6: ...are Do not strike or shake as this may damage the appli ance Fully charge up the backup battery Keep the appliance turned on for at least 48 hours to recharge the backup battery This procedure is neces sary when using the appliance for the first time or after it has been unplugged for a long time from the AC out let Insufficient charging of the battery may cause era sure of settings if the AC powe...

Page 7: ...on LOCK Holding down the button for 2 seconds will enable or disable the button lock function While locked the but tons at the front panel are not operable and the LED in the LOCK button lights up i Daylight Saving Time DST The button is recessed inside the front panel opening Pressing this button shifts the internal clock to the sum mer time or vice versa o On Screen Display Button OSD Toggles th...

Page 8: ... comes or when an alarm sensor is activated 0 Recording Stop button REC STOP Pressing the button for two seconds stops recording Recording in any mode is stopped exclusively with this button 1 to 4 are playback mode selection PLAY MODE SELECT buttons 1 Alarm Search Button ALARM SEARCH Pressing this button enables the JogDial to retrieve the beginning image of the desired alarm record Press the PLA...

Page 9: ...JogDial will scroll up or down the log page After selecting an alarm event with the D or C button press the PLAY button to start playing back the selected alarm record When operating setup menus Pressing the JogDial validates the selected para meter and moves the cursor to the next position Rotating the JogDial increases or decreases the parameter 6 Audio Out An RCA standard type jack supplies aud...

Page 10: ...spot multi split spot single sequence quad split sequence Playback image single spot multiscreen spot OSD information camera title time and date recorder status alarm status The menu setup windows are also provided via this BNC 6 Alarm Remote Port ALARM REMOTE This port accepts the alarm inputs 1 8 and remote controls while supplying status outputs See ALARM REMOTE Connection for details 7 RS232C ...

Page 11: ...p cover You will see the additional HDD bracket adjacent to the pre installed HDD unit 3 Remove six screws fastening the additional bracket 4 Disconnect the two fan cord connectors on the main board and unfasten the cord clamps to separate the cords individually Then remove the bracket from the chassis 5 Prepare the optional HDD unit 5 1 Attach the supplied serial number label and trans parent sea...

Page 12: ... the rack by using four screws not included Remove 5 rubber feet Six screws Supplied Fix the rack mounting brackets Rack 6 Assemble the optional HDD unit onto the bracket using the absorbers sleeves and screws provided with the recorder 7 Place the HDD unit on the chassis and fix it with six screws 8 Restore the fan cords and connectors as before 9 Connect the power cable and flat cable on the rea...

Page 13: ...ry system cameras are connected in combination with the multiscreen and spot monitors microphone and speakers SIGNAL GND POWER DATA 10 100BASE T MODE RS 232C MULTI SCREEN OUT SPOT OUT 1 1 ALARM REMOTE OFF ON 2 2 3 3 4 4 5 5 6 6 7 7 8 8 OUT VIDEO OUT AUDIO IN IN System Cameras System Cameras AC 120 V 60 Hz Speakers via Amplifier Multiscreen Monitor Spot Monitor Microphone Amplifier ...

Page 14: ...ULTI SCREEN OUT SPOT OUT 1 1 ALARM REMOTE OFF ON 2 2 3 3 4 4 5 5 6 6 7 7 8 8 OUT VIDEO OUT AUDIO IN IN System Cameras AC 120 V 60 Hz Speakers via Amplifier System Controller System Controller Compatible with PS Data Multiscreen Monitor Spot Monitor POWER ON OFF ALARM Data Multiplex Unit WJ MP204 ALARM SUSPEND Combination Cameras Pan Tilt Table Receiver Data Multiplex Unit RS485 Cable WV CA48 Micro...

Page 15: ... System Cameras AC 120 V 60 Hz POWER ON OFF ALARM Data Multiplex Unit WJ MP204 ALARM SUSPEND Combination Cameras Pan Tilt Table Receiver Data Multiplex Unit Hub Router PC Internet Browser PC Internet Browser RS485 Cable WV CA48 LAN Cable 10Base T 100Base TX Category 5 LAN Internet Network System Personal computers can access the WJ HD200 via the network ...

Page 16: ...iplex Unit WJ MP204 ALARM SUSPEND Combination Cameras Pan Tilt Table Receiver Data Multiplex Unit 6 6 7 7 8 8 OUT IN ON OFF POWER ON OFF POWER Spot Monitor Multiscreen Monitor Disk Recorder WJ HD200 MULTI SCREEN OUT SPOT OUT Pin 1 13 14 25 ALARM REMOTE Designation 1 2 3 4 5 6 7 8 9 10 11 12 13 Alarm Reset In Alarm In 1 Alarm In 2 Alarm Recovery Out 1 Alarm Recovery Out 2 Alarm Out 1 Alarm Out 2 2 ...

Page 17: ...puts while two outputs are provided with different driving capacity External Recording Connection The recording mode will change from the internal timer mode to the external mode EXT REC MODE specified in REC SETUP menu when the switch is turned on Time Adjusting Connection The internal timer is calibrated with this input Sensor Door Switch Alarm Input Terminals Signal Ground Terminals 7 Alarm Out...

Page 18: ...DATA 10 100BASE T MODE RS 232C MULTI SCREEN OUT SPOT OUT 1 1 ALARM REMOTE OFF ON 2 2 3 3 4 4 5 5 6 6 7 7 8 8 OUT VIDEO OUT AUDIO IN IN Personal Computer Digital Disk Recorder D sub9 D sub9 or D sub25 Note Using a conversion cable may malfunction since this RS 232C is incompatible with USB 4 ER 5 GND 3 TXD 6 DR 7 RTS 8 CTS 2 RXD 6 DR 7 GND 3 RXD 20 ER 5 CTS 4 RTS 2 TXD PC DB25 WJ HD200 DB9 1 2 3 4 ...

Page 19: ... T MODE RS 232C MULTI SCREEN OUT SPOT OUT 1 1 ALARM REMOTE OFF ON 2 2 3 3 4 4 5 5 6 6 7 7 8 8 OUT VIDEO OUT AUDIO IN IN 5 OFF 6 ON DIP Switch MODE 1 2 3 4 5 6 ON RS 485 Cable POWER ON OFF ALARM Data Multiplex Unit WJ MP204 ALARM SUSPEND 1 2 3 4 ESC SET RESET SUSPEND SET UP ALARM UNIT 0 9 8 7 6 5 4 3 2 1 POWER ON OFF ALARM Data Multiplex Unit WJ MP204 ALARM SUSPEND 1 2 3 4 ESC SET RESET SUSPEND SET...

Page 20: ...te Use only the switch combinations shown in the table above MODE 1 2 3 4 5 6 ON Termination 2 Termination 1 System Mode Setup MODE 1 2 3 4 5 6 ON MODE 1 2 3 4 5 6 ON Switch Position Mode Normal operation mode Initializing HTML contents MODE 1 2 3 4 5 6 ON MODE 1 2 3 4 5 6 ON MODE 1 2 3 4 5 6 ON Switch Position System Composition with System Controller Yes Yes Case 1 Other System Devices Note Yes ...

Page 21: ... details Turning Off the Power 1 Press the STOP button when playing back or REC STOP button when recording Confirm that the HDD access indicator has turned off 2 Turn off the power switch on the rear panel The oper ate LED goes off Notes Do not turn off the power while the HDD access indicator is on Do not leave the recorder turned off for a long time Supply AC power to the unit and turn it on to ...

Page 22: ...this will open the next lower layer menu for more minute settings STOP SETUP ESC button Pressing Moves the cursor to the left or returns to the previous menu STOP SETUP ESC button Holding down Opens the setup menu or escapes from it and switches back to normal operation WJ HD200 MAIN MENU TIMER OFFO REC SETUPO EXT REC SETUPO DISPLAY SETUPO SYSTEM SETUPO ALARM SETUPO COMMUNICATION SETUPO SWITCHER S...

Page 23: ...ETUP EXT REC SETUP REC SETUP TIMER REC Assignment PROG1 SETUP Time Zone PROG2 SETUP Time Zone TRIGGER ACTION SETUP 1 1 CAM REC SETUP 1 1 PROG1 NO 1 PROG1 NO 4 NO 1 NO 4 Same as PROG1 PROG3 SETUP Time Zone NO 1 NO 4 Same as PROG1 PROG4 SETUP Time Zone NO 1 NO 4 Same as PROG1 TIMER INT ALARM SETUP COMMUNI CATION SETUP NETWORK SETUP SWITCHER SETUP SYSTEM INFORMATION TRIGGER ACTION 1 4 CAM REC SETUP 1...

Page 24: ...e monitor after initializing 6 Press the SETUP ESC button The cursor moves to DEFAULT 7 Hold down the SETUP ESC button for 2 seconds to quit the setup Notes After closing the setup menu the system may auto matically restart if any parameter on the network has been changed The menu shown above is based on the assumption that an optional HDD is installed in the recorder As shipped from the factory t...

Page 25: ... the D or C button 4 Select any parameter from PROG1 to PROG4 using the JogDial and press the JogDial The PROG1 4 SETUP menu opens Program 1 4 Setup PROG1 4 SETUP 1 Select the event number with the D or C button and press the JogDial The cursor moves to the START position After this operation the D and C buttons move the cursor to the right and left 2 Select a start time START using the JogDIal an...

Page 26: ... the ADDENDUM attached to the manual 1 Move the cursor to MODE and press the JogDial The mode area will be highlighted 2 Select a recording mode using the JogDial and press the Jogdial Audio data will be recorded when a mode with hyphen A is selected Available recording mode SF FQ NQ EX SP SF A FQ A NQ A EX A and SP A N A Rec Mode Quality Audio Record Note SF xxxH Super Fine N A Field rate quality...

Page 27: ...arm recording and alarm control functions Refer to page 44 in the post alarm sequence 1 Move the cursor to TRIGGER ACTION SETUPO and press the JogDial The TRIGGER ACTION SETUP menu opens 2 Move the cursor to the channel 3 Select the parameter with the JogDial and press the JogDial The default is REC ALM OFF Disables alarm recording or warning REC ALM Enables both alarm recording and warning REC En...

Page 28: ... forth Clock CLOCK 1 Press the JogDial SET to move the cursor to the desired position 2 Rotate the JogDial clockwise to increase the parameter or counter clockwise to decrease The positions indi cate the year month day hour and minute respective ly The default is JAN 01 03 00 00 MM DD YY HH MM 3 Press the JogDial SET to validate the selection 4 Press the D or C button to select the next item or pr...

Page 29: ...button to quit the display setup Note When the 9 split screen is displayed the time and date position is fixed to R LOWER JUN30 03 20 00 00 JUN30 03 20 00 00 JUN30 03 20 00 00 JUN30 03 20 00 00 L UPPER L LOWER R UPPER R LOWER Status Display STATUS DISP 1 Select ON or OFF with the JogDial The default is ON ON Status display is enabled OFF Status display is disabled 2 Press the JogDial SET to valida...

Page 30: ...y has reached the preset value Finally the buzzer beeps when the disk is full provided that the DISK END BUZZER parameter in the SYSTEM SETUP is set to ON At the same time the FULL indicator turns on 1 Select the desired value with the JogDial The default is 1 1 99 The FULL indicator blinks when the remain ing capacity reaches the selected value 2 Press the JogDial SET to validate the selection 3 ...

Page 31: ...ays the camera title in the lower right corner R UPPER Displays the camera title in the upper right corner L LOWER Displays the camera title in the lower left corner L UPPER Displays the camera title in the upper left corner Note When the 9 split screen is displayed the camera title position is fixed to R LOWER 7 Press the D or C button to select the next item or press the SETUP ESC button to quit...

Page 32: ...skip the specified number forward or backward from the displayed page when rotating the JogDial 1 Move the cursor to SKIP ALM RECALL with the D or C button and press the JogDial 2 Select the number of skip pages with the JogDial and press the JogDial The default is 1 page Available skip pages 1 5 10 20 50 pages Simultaneous Recording Playback SIMUL REC PLAY This setting specifies whether to allow ...

Page 33: ... Select the desired mode with the JogDial and press the JogDial The default is CONTINUE STOP Stops recording until a new mode other than STOP is selected CONTINUE Old data is automatically overwritten from the disk start Note Remaining capacity will be displayed on the monitor by turning the JogDial counter clockwise in recording mode when STOP is selected Disk End Buzzer DISK END BUZZ The buzzer ...

Page 34: ...ote You need not set the hour when SLAVE is select ed 4 Press the SETUP ESC button to go back to the SYS TEM SETUP menu Auto Erasing Setup AUTO ERASING The redundant records on the disk can be erased every day at 24 00 midnight The number of days specified by this setting stand for the number of days the records will be protected from the present while the records older than that will be erased 1 ...

Page 35: ...Mode MONITOR MODE This setting specifies whether to allow the display to change from the currently displayed picture to the alarmed channel when an alarm operates 1 Move the cursor to MONITOR MODE with the D or C button 2 Select the parameter with the JogDial and press the JogDial The default is SPOT SPOT Switches to the picture of the alarmed channel OFF Retains the previous display mode Video Mo...

Page 36: ...to the upper left end of the area and press the JogDial Communication Setup COMMUNICATION SETUP Communication parameters are set to match those of the connected devices and the system configuration The serial port setup and network setup are made Serial Port Setup SERIAL PORT SETUP The SERIAL PORT SETUP menu appears when it is select ed in the COMMUNICATION SETUP menu Note Parameters marked with o...

Page 37: ...abled 100MS 100 m seconds 200MS 200 m seconds 1S 1 second Control Unit Address CTL UNIT ADDRESS only for PS DATA When the recorder performs as a controller in the system the unit address can be set from the setup menu on the monitor 1 Move the cursor to CTL UNIT ADDRESS with the D or C button 2 Select the address with the JogDial The default value is 1 Assignable address From 1 to 99 must be uniqu...

Page 38: ... the D or C button 2 Select the parameter with the JogDial and press the JogDial The default is AUTO AUTO The speed is automatically selected 100M_FULL 100 mega byte full duplex 100M_HALF 100 mega byte half duplex 10M_FULL 10 mega byte full duplex 100M_HALF 10 mega byte half duplex HTTP Port HTTP PORT Set an HTTP port number The default is 80 Available port numbers From 00000 to 65535 except the w...

Page 39: ...SETUP menu and press the JogDial The SEQUENCE SETUP menu opens 2 Select either MULTI SEQ SETUP or SPOT SEQ SETUP with the D or C button and press the JogDial The selected menu opens Multiscreen Sequence Setup MULTI SEQ SETUP Open the QUAD SEQ SETUP menu to program the sequence steps for displaying quad split and single input images 1 Move the cursor to the desired step using the D or C button 2 Se...

Page 40: ...p assigned 3 Select the duration for the step with the JogDial and press the JogDial Available durations 2 30S 4 Repeat steps 1 2 and 3 until all steps are pro grammed or press the SETUP ESC button to return to the SEQUENCE SETUP menu 5 Procedures for SEQUENCE TIMING are the same as step 5 in MULTI SEQ SETUP 6 Procedures for AUTO SKIP are the same as in step 6 of MULTI SEQ SETUP Camera View Setup ...

Page 41: ...te The recorder will restart when the network setup has been changed and the menu is closed System Version SYSTEM VERSION This line displays the version number of the installed sys tem software You will need the version number when updating the software System Log SYSTEM LOG The system log is displayed on the monitor with event num bers dates times and causes SYSTEM INFORMATION HDD1 HOUR METER 100...

Page 42: ...creen Monitor 1 Press the SPOT MULTI button to turn the LED in the button off The multiscreen monitor is ready to be oper ated 2 Follow the descriptions below for each monitoring mode on the multiscreen monitor Viewing a Single Live The multiscreen monitor can display a single live spot image Operating procedures are the same as for On the Spot Monitor except for selecting the multiscreen monitor ...

Page 43: ...menu setup to be applied to the sequence to skip any steps where no video signal is present Viewing a Multiscreen Live Images The multiscreen monitor can display multiscreen live images The available split patterns are Quad A input 1 2 3 4 Quad B input 5 6 7 8 and 9 split input 1 8 1 Press the MULTI SCREEN SELECT button repeatedly The pattern changes every time the button is pressed depending on t...

Page 44: ...ator that there have been alarm activations that have not yet been manual ly reset ALARM SUSPEND RESET CAMERASELECT 1 5 2 6 3 7 4 8 44 During the sequence the LEDs of the CAMERA SELECT buttons light up corresponding to the selected cameras that send images to the monitor Multiscreen monitor Spot monitor 4 During the sequence press the SEQUENCE button to pause The LED in the SEQUENCE button blinks ...

Page 45: ...arm recording will be enabled when REC is selected for the channel Alarm Recording The recorder starts alarm recording with the preset rate and picture quality if applicable See ALARM RECORDING for details Alarm Buzzer The buzzer sounds when an alarm is input if applicable CAM1 CH1 ALARM CAM1 CH1 LOSS Alarm Log Recall and Search The alarm events are stored in the log for later reference Alarm Stat...

Page 46: ...0 events can be stored T Alarm terminal was activated V VMD was activated P Alarm event notification from the PC Note In some cases the log displayed in the ALARM RECALL list may apply to the previous alarm record that was overwritten after selecting CONTINUE for the DISK END MODE This is because the alarm log is updated later than the image data To Browse through Log 1 Hold down the JogDial for 2...

Page 47: ...The power switch on the rear of the recorder must be turned on in this case 4 To return to the all channel list press the button of the selected channel now lit or the MULTISCREEN SELECT button To Search for Playback 1 Move the cursor to the desired event in the list using the D or C button 2 Press the PLAY button to play back the recorded pic ture The LED in the PLAY button lights up The alarm lo...

Page 48: ... of especially fine grade and 48 hours of recording capacity 1 Press the REC button on the front panel to start recording The indicator in the REC button lights up while the CAM SEL button of the channel indicates and the channel image is displayed on the multiscreen monitor Orange The channel image is not displayed Yellow The channel image is displayed The multiscreen monitor displays the recordi...

Page 49: ...playback if SIMUL REC PLAY is set to OFF or will allow playback to con tinue if set to ON Operation of the PLAY button will be ignored if the disk is empty for instance when the recorder is used for the very first time or right after formatting of the disk The latest recorded image is displayed on the monitor right after recording finishes Search for the desired image by skip playback before start...

Page 50: ...OP button to stop playback Note When the playback proceeds to where recording is executed on the disk the recorder will pause playback and freeze the displayed image on the monitor 4 Press the PLAY button to play back the searched record 5 Press the STOP button to stop playback Note Alarm Search Playback and Alarm Log Recall are similar but different in operations Refer to Alarm Log Recall Search ...

Page 51: ...rder allows access to the front panel controls if a button operation takes place within 5 minutes of pass word entry 3 Retry verification when password error appears on the monitor The recorder will exit from verification if there is no opera tion within 30 seconds PASSWORD Enabling Button Lock 1 You need to register passwords in the SYSTEM SETUP window prior to operating your system 2 Press the L...

Page 52: ...52 ...

Page 53: ...53 WJ HD200 NETWORK OPERATION ...

Page 54: ...dowsXP Professional or Home Edition Browser One of the following browser software Microsoft Internet Explorer 5 5SP2 6 0 Note The Netscape browsers are not applicable Display 1 024 x 768 pixels or more Trademarks Microsoft Windows WindowsXP and Internet Explorer are either registered trademarks or trademarks of Microsoft Corporation in the United States of America and or other countries PREPARATIO...

Page 55: ...b Digital Disk Recorder Personal Computer Ethernet Straigth Cable Ethernet Straigth Cable Camera OPERATE ALARM SUSPEND RESET HDD FULL ERROR OSD MULTISCREEN SELECT ZOOM TIMER REMOTE LOCK SEQUENCE ALARM SERCH STOP PLAY MODE SELECT SETUP ESC PLAY TIME DATE SEARCH REC STOP SPOT MULTI CAMERA SELECT ALARM RECALL REC PUSH PAUSE SET Digital Disk Recorder WJ HD200 1 5 2 6 3 7 4 8 DST LAN Hub Hub Digital Di...

Page 56: ...lient PC is con nected alone Specify http IP address previously set for the WJ HD200 such as a LAN connection A maximum of four PCs can access the recorder at a time About Picture Quality Picture quality transferred via the network depends on the recorder s status as follows Recorder Status Displayed Quality Timer recording Preset recording quality Pre alarm period Preset alarm recording quality E...

Page 57: ...ce and multi split patterns WJ HD200 SETUP SYSTEM INFORMATION Displays various system information Network Setup Menu USER SETUP Specifies users passwords and access levels HOST SETUP Specifies hosts and access levels FTP SETUP Specifies parameters for transmitting files MAIL SETUP Specifies senders and receivers NETWORK VIDEO SETUP Specifies application soft ware for video translation and sequence...

Page 58: ...d on the monitor In the SP mode the field rate and picture quality are vari able and can be selected at option in the range of 0 1 to 30 FPS with five quality level options respectively After the recording mode is selected the available recording time is determined and displayed N A Rec Mode Quality Audio Record Note SF xxxH Super Fine N A Field rate quality selected optionally Field rate quality ...

Page 59: ...ds 0S 1S 2S 3S 4S and 5S 8 Post alarm Recording POST ALM REC Available times seconds 5 10 20 30 Available times minutes 1 1 5 2 3 6 Manual Recording continues until the REC STOP but ton is pressed or the RESET IN signal is supplied to the rear panel Continue Recording continues while the alarm input is active or at least for 10 seconds if the input turns inactive earlier 8 Dynamic Recording DYNAMI...

Page 60: ...O 1 4 for operating procedures and available parameters Display Setup DISPLAY SETUP Time and date display and other displays of status informa tion are specified in this window 8 Clock Setup CLOCK SETUP Select a month and type a day year hour and minute 8 Time and Date type TIME DATE TYPE1 24H Time and date are displayed in one line in the 24 hour system TYPE1 12H Time and date are displayed in on...

Page 61: ...operations from unauthorized access Available numerals From 11111 to 88888 8 Status Display STATUS DISPLAY ON Status display is enabled OFF Status display is disabled 8 Status Display Position STATUS POSITION Right Lower Displays status in the lower right corner Right Upper Displays status in the upper right corner Left Lower Displays status in the lower left corner Left Upper Displays status in t...

Page 62: ...eration Detection ALTER DETECT You can enable or disable the addition of alteration detection signals in the JPEG data supplied to the net work The default is OFF ON Detects alterations OFF Does not detect Note When set to ON the data transmission rate on the network will slow down 8 Disk End Mode DISK END MODE STOP Stops recording until a mode other than STOP is selected CONTINUE Old data is auto...

Page 63: ...reas with the mouse to specify the detection areas Click the SET button when all items have been set proper ly Alarm Setup ALARM SETUP 8 Alarm Buzzer ALARM BUZZER ON Buzzer beeps while alarm is active OFF Buzzer does not beep 8 Video Loss Detection VIDEO LOSS DETECT OFF Deactivates the video loss detection ON Activates the detection 8 Monitoring Mode MONITOR MODE SPOT Switches to the picture of th...

Page 64: ...connect ed 0 SEC Does not pause 1 SEC Pauses for 1 second 5 SEC Pauses for 5 seconds Click the SET button when all items have been set proper ly Click the CAMERA NO SETUP button The CAMERA NUMBER SETUP window opens Communication Setup COMMUNICATION SETUP Click the SERIAL PORT SETUP or NETWORK SETUP button The respective window opens Serial Port Setup SERIAL PORT SETUP 8 Protocol Selection PROTOCOL...

Page 65: ...oard DDNS Password DDNS PASSWORD Enter from the keyboard DDNS Access Interval DDNS ACCESS INTERVAL Enter from the keyboard 8 Simple Network Management Protocol Note double quotation cannot be used for SNMP Camera Number Setup CAMERA NUMBER SETUP only for PS DATA Assignable numbers From 1 to 128 must be unique in the chain Click the SET button when all items have been set proper ly Network Setup NE...

Page 66: ...utton on the front panel is pressed the monitor display will be switched as follows depending on the setup QUAD ONLY QUAD 4A QUAD 4B QUAD 4A ALL QUAD 4A QUAD 4B 9 SCREEN QUAD 4A 8 Multiscreen Sequence Setup MULTI SEQUENCE SETUP Sequence Timing SEQUENCE TIMING INT The time preset on the internal timer allows the sequence to move a step forward EXT The SEQ IN signal on the rear panel allows the sequ...

Page 67: ...ill be displayed OFF The blackout screen will be displayed 8 Time TIME Available times 2 30 S Camera View Setup CAMERA VIEW SETUP 8 Mode MODE ON The live image of the channel is displayed OFF The blackout image is displayed Click the SET button when all items have been set proper ly System Information SYSTEM INFORMATION 8 HDD Hour Meter HDD HOUR METER Each meter shows how many hours the digital ha...

Page 68: ...BNET MASK The subnet mask is displayed 8 Gateway GATEWAY The gateway is displayed 8 Domain Name DOMAIN NAME The domain name is displayed when it is set to ON in the network setup 8 DNS Server Address DNS SERVER ADDRESS The DNS server address is displayed when it is set to ON in the network setup System Log SYSTEM LOG Click the SYSTEM LOG button in the SYSTEM INFORMA TION window to open the log Err...

Page 69: ...ave been set proper ly 8 Deleting Users DELETE USER Enter or select the user name you wish to erase and click the DELETE button Host Setup HOST SETUP A maximum of 8 hosts can be registered 8 Host Authorization HOST AUTHORIZATION OFF Allows free access ON Verifies the host address and access level for a maximum of eight hosts Click the SET button 8 Set Host Allowed to Access SET HOST ALLOWED TO ACC...

Page 70: ...R ADDRESS Enter the server address Login User Name LOGIN USER NAME Enter the user name Login Password LOGIN PASSWORD Enter the password Mode MODE Available modes SEQUENTIAL PASSIVE Click the SET button 8 FTP Send by Periodic Timer FTP SEND BY PERIODIC TIMER FTP Sending FTP SENDING ON Sends the channel images at the specified interval OFF Does not send Server Directory SERVER DIRECTORY Enter the di...

Page 71: ...ETE MAIL ADDRESS Enter or select the address you wish to erase and click the DELETE button Note Use the VIEW HTML to open the attached image and view it in the normal aspect Otherwise it will be vertically reduced to half size Network Video Setup NETWORK VIDEO SETUP 8 Live Playback Image Setup LIVE PLAY IMAGE SETUP Video Rate VIDEO RATE Applicable rates FAST MIDDLE SLOW VERY SLOW Click the SET but...

Page 72: ...tes is allowed Refer to Appendix for opening the downloaded files o Start Button START While playing back clicking this button will specify the start point for downloading 0 Start Time Display Area Displays the start time of the recorded image that you are to download 1 End Button END While playing back clicking this button will specify the end point for downloading 2 End Time Display Area Display...

Page 73: ... the previous 0 Pause Button PAUSE Pauses the playback image 1 Stop Button STOP Stops playbacks including REW PREV FRAME PAUSE PLAY NEXT FRAME and FF Main Control Panel 8 Camera Selection Button Camera Select Click any of the buttons The selected camera channel will be displayed in the image area 8 Multiscreen Selection Button Multiscreen Select Clicking the button displays the respective multiscr...

Page 74: ...to the main control panel ZOOM WIDE TELE buttons zoom the image in or out FOCUS FAR NEAR AUTO buttons adjust the focus of the image When AUTO is clicked the camera will adjust the focus by itself IRIS CLOSE OPEN RESET buttons adjust the iris of the image When RESET is clicked the iris will return to the factory default setting AUTO PAN ON OFF buttons allow the camera to pan endlessly within the pr...

Page 75: ...lows in the list TERM The alarm terminal on the rear of the WJ HD200 is activated VMD The built in Video Motion Detector operates PC The recorder received an alarm from a PC Alarm List Specify the month day year and time of the event you wish to search Click the OK button The dialog disappears and the searched event will be highlighted in the alarm list Note Searching may take 18 seconds at worst ...

Page 76: ... the recorder to the factory defaults page 24 and enter a new password Check the HDD status referring to HDD MAINTENANCE Consult your dealer when a malfunction is confirmed Detach the lens cap turn on the device or adjust the monitor Error message CH n LOSS n 1 8 is displayed on the monitor Error message TEMP ERROR is dis played on the monitor Administrator password cannot be recalled DISK MENU ap...

Page 77: ...77 SPECIFICATIONS APPENDIX ...

Page 78: ... video signal x1 Multiscreen Monitor Output 1 0 V p p 75 Ω Composite video signal x1 Control Port Alarm Remote Port 25 pin Full Pitch D sub connector x1 Alarm Input 1 8 Alarm Reset Input EXT REC Input Time Adjust Input Sequence Input Low active Non voltage N O Contact 100 ms Alarm Recovery Output 1 Disk End Status Output Time Adjust Output Warning Output REC Status Output Sequence Output Low activ...

Page 79: ...79 STANDARD ACCESSORIES Rack Mounting Bracket 2 pcs Screw for Rack Mounting Bracket M3x10 6 pcs Absorber 4 pcs Sleeve 4 pcs Hard Disk Fixing Screw 4 pcs ...

Page 80: ...SC PLAY CAM MON ESC SET SETUP FUNCTION Hold down 2 seconds DOWN L R UP L R DOWN L R UP DOWN L R MON ESC ALM RESET ALM RECALL SHIFT Recording REC SETUP FUNCTION SHIFT Playback and recording stop Playback stop Recording stop STOP SETUP ESC STOP SETUP ESC REC STOP SETUP FUNCTION SHIFT Playback PLAY SETUP FUNCTION SHIFT Pause PUSH PAUSE SET SETUP FUNCTION SHIFT Step playback FWD PUSH PAUSE SET STEP PU...

Page 81: ...f Enter your password Button lock on SHIFT SETUP FUNCTION 3 1 SHIFT SETUP FUNCTION 3 0 Statusd display on off OSD LOCK Time and date search TIME DATE SEARCH SHIFT SETUP FUNCTION 0 Multiscreen pattern selection Multiscreen monitor MULTISCREEN SELECT ZOOM MULTI SCREEN SELECT SPOT MULTI MON ESC Spot monitor SPOT MULTI MON ESC Camera selection 1 8 CAM SET Num Button PUSH PAUSE SET ...

Page 82: ...pleted successfully the Recorder sends back the ACK code 06H to the PC and then the response command below Parameters are omitted when the command format includes neither data nor status to send back 2 Reception error The recorder sends back the NAK code 15H followed by the parameters shown below The Recorder then resets the reception buffer and enters waiting mode for the next message Parameter e...

Page 83: ...ccc OCS ccccc ccccc 00001 00008 decimal ccccc 1 up ccccc 1 down Monitor Selection OMS mmmm OMS mmmm mmmm 0001 Multi screen Monitor mmmm 0002 Spot Monitor Button Lock MKL n MKL n 0 Unlock n 1 Lock EL zoom OZM m OZM m m 0 4 m 0 EL zoom OFF m 1 EL zoom ON m 2 2 fold m 4 4 fold m x1 x2 x4 x1 m x4 x2 x1 x4 Alarm Control Item Transmission Command ASCII Response ASCII Parameter ASCII Alarm Suspension MAD...

Page 84: ...r ASCII OSD Show Hide DIN n DIN n Toggle n 0 Hidden n 1 Shown Communication Check RCK RCK Time Date Search ZTS yyyymmddhhnnss ZTS yyyy Year mm Month dd Day hh Hour 24 hour system nn Minute ss Second Data Log Control Item Transmission Command ASCII Response ASCII Parameter ASCII Log Total Size Inquiry ILB k ILB k bbbbb k 0 Alarm log bbb 001 to 099 in decimal Log Erase ILC n ILC n n 0 Alarm log n 1 ...

Page 85: ...on k1 y1y1m1m1d1d1h1h1n1n1s1s1 k2 y2y2m2m2d2d2h2h2n2n2s2s Status Inquiry QSR QSR status1 status2 status11 mad 0 Alarm suppression On mad 1 Alarm suppression Off mkl 1 Button locked mkl 0 Button unlocked msu 1 Setup operation msu 0 Normal operation oms mmmm Monitor in operation ocs mmmmm Camera in operation otc n n 0 4a 4b Quad n 2 9SCREEN oqt ttn nnm Sequence running din n OSD show hide oae1 Alarm...

Page 86: ...VE LINK SET HDD FORMAT SET RESTART SET SYSTEM CHECK NO DISK SYSTEM CHECK DONE TO OPEN DISK MENU PUSH STOP KEY Power on System check Press the STOP button Available disk System composition changed or suspicious HDD Camera picture Needed formatting or something Turn off the power Install new HDD No No No Yes Yes Yes HDD check HDD CHECK Who to Maintain HDD Caution Addition replacement and other HDD m...

Page 87: ...tor The FULL indicator will light up when STOP is set to DISK END MODE provided that the disk space nears the end To reset it do the following 8 DISK END Setup 1 Hold down the STOP button for 2 seconds to open the MAIN MENU 2 Select SYSTEM SETUP and press the JogDial to open the SYSTEM SETUP menu 3 Move the cursor to DISK END MODE and rotate the JogDial to select CONTINUE Then press the JogDial ST...

Page 88: ...Disk Menu The menu appears if the hard disk error is found during power up The buzzer beeps every 5 seconds and the ERROR indicator turns off Press any button other than STOP to mute the buzzer beep The hard disk status and required operations are shown in the table DISK MENU NO 1 117 95GB NO 2 117 95GB REMOVE LINK SET HDD FORMAT SET RESTART SET Hard Disk Status Operation Abbreviation Status Requi...

Page 89: ...nk REMOVE LINK This command logically disconnects the faulty HDD from the recorder and is applicable to an HDD of ERR or LOST status You may use this command before physically removing the faulty HDD or when you continue to operate the system after logically removing the faulty HDD 1 Display the DISK MENU window 2 Move the cursor to REMOVE LINK 3 Select YES with the JogDial and press the JogDial Y...

Page 90: ... recording but allows playback NOW FORMATTING DISK MENU NO 1 117 95GB NO 2 117 95GB REMOVE LINK SET HDD FORMAT SET RESTART SET RESTART SET RESTART NO HDD FORMAT SET DONE Notes The PLAY ONLY mode can be utilized when you verify a transplanted HDD removed from another disk recorder that malfunctioned In normal operation after selecting the PLAY ONLY mode STOP PO appears in the status display while c...

Page 91: ...ay the image vertically reduced to half size 3 Display index html using the web browser SKIP Jumps the number of the thumbnails TOP Returns to the top page PREV Returns to the previous page NEXT Goes to the next page LAST Jumps to the last page Frame No Indicates the frame number of the dis played image SPEED Indicates the playback speed REW Changes the reverse playback speed by click ing PLAY Sta...

Page 92: ...st an e mail is sent every time the capacity is reduced by 1 A remaining capacity of less than 1 will be rounded to 0 HDD IS FULL Resetting the DISK END status is needed to resume recording DiskType IS LOGICALLY REMOVED The type of disk has failed and has been logically removed DiskType MASTER Error on HDD1 SLAVE Error on HDD2 VIDEO LOSS nCH Video loss is detected on channel n Repair the camera or...

Page 93: ... MULTI CAMERASELECT ALARM RECALL REC PUSH PAUSE SET Digital Disk Recorder WJ HD200 1 5 2 6 3 7 4 8 DST Router Router Global IP IP Address 192 168 1 100 Subnetmask 255 255 255 0 Default Gateway 192 168 1 1 IP Address 192 168 0 10 Subnetmask 255 255 255 0 Default Gateway 192 168 0 1 IP Address 192 168 0 1 Subnetmask 255 255 255 0 PC IP Address 192 168 1 1 Subnetmask 255 255 255 0 Digital Disk Record...

Page 94: ...a P R 00985 809 750 4300 Panasonic Digital Communications Security Company Unit of Matsushita Electric Corporation of America Security Systems Group www panasonic com cctv Executive Office One Panasonic Way 3E 7 Secaucus New Jersey 07094 Zone Office Eastern One Panasonic Way Secaucus NJ 07094 201 348 7303 Central 1707 N Randal Road Elgin IL 60123 847 468 5205 Western 6550 Katella Ave Cypress CA 90...

Reviews: