background image

• Friccione la piel sintética suavemente utilizando un paño

suave y seco para la limpieza cotidiana.
(Nunca use trapos que contengan productos químicos.)

• Si se ensucia la piel, aplique una solución de 3–5% de

detergente suave diluido en agua caliente y use un trapo
suave para eliminar la suciedad dando ligeros toques sobre
la superficie. A continuación enjuague bien el trapo y
utilícelo para retirar el detergente, después pase un trapo
seco y deje secar de forma natural.
(Nunca utilice un secador para secar con mayor rapidez la
piel sintética.)

• Si la piel sintética entra en contacto con vinilo durante un

periodo de tiempo prolongado, puede causar su
decoloración.

PIEL SINTÉTICA DE LA ALMOHADA, COJÍN INTERIOR, ASIENTO Y REPOSABRAZOS

LIMPIEZA Y MANTENIMIENTO

z

Pase un trapo previamente humedecido con
un detergente suave y bien escurrido.

x

Seguidamente pase por toda la unidad un
trapo humedecido sólo con agua.

* Asegúrese de escurrir bien el trapo antes de

pasarlo por el mando de control.

c

Deje secar la unidad de forma natural.

• Nunca use benceno, disolventes o alcohol.

TUBOS Y ÁREAS DE PLÁSTICO

z

Pase un trapo previamente humedecido con un detergente
suave y bien escurrido por todo el asiento.

x

Use un detergente suave para cepillar las áreas donde el
tejido del asiento está particularmente sucio. No cepille en
exceso el tejido puesto que podría producir daños.

c

Seguidamente pase por todo el tejido un trapo humedecido
sólo con agua.

v

Deje secar el tapizado de forma natural.

TEJIDO DEL ASIENTO

• Desenchufe siempre el cable de alimentación de la red antes de limpiar la unidad. Asegúrese de secarse

perfectamente las manos antes de volver a enchufar la unidad a la red una vez finalizada la limpieza. De lo
contrario podrían originarse descargas eléctricas o incendios.

PRECAUCIONES

51

Detergente

suave

Agua

Disolventes

Benceno

Alcohol

Detergente

suave

Agua

Agua

50

Este tipo de masaje emula a los pulgares
de ambas manos que trabajan sobre los
puntos de acupresión. Se trata de una
alternancia de presión y relajación que
transmite la misma sensación que un
masajista de shiatsu profesional. Este tipo
de masajes resulta ideal para aquellas
personas con fatiga y dolores musculares
que necesitan un masaje localizado.

Shiatsu

Tap A

Este movimiento reproduce la parte
exterior de los dedos golpeando
rítmicamente en un movimiento diseñado
para penetrar en el cuerpo y relajar los
músculos. Tiene su mejor efecto sobre
los músculos finos del cuello o como final
de masaje.

Este movimiento es similar al de las
palmas de las manos presionando
y friccionando una amplia zona a
ambos lados del cuerpo. Este tipo
de masaje es ideal para personas
que necesitan un extenso masaje
sobre la espalda y la zona lumbar.

Swedish

Tap B

Este movimiento reproduce los puños con
rítmicos golpecitos que proporcionan un
sólido golpeteo pensado para eliminar la
rigidez y el cansancio persistentes. Este
tipo de masajes es ideal para músculos
gruesos como los que se encuentran en
los hombros.

Whole Back Roll

Los rodillos de masaje recorren toda la
espalda en dirección ascendente y
descendente desde el cuello hasta la
zona lumbar para estirar los músculos de
la espalda y liberar tensión. Resulta ideal
durante el inicio del masaje ya que es
relativamente suave.

Knead

Este masaje alterna una fuerte presión
con una rápida relajación en un ritmo
ideado para los músculos entumecidos.
Resulta ideal para relajar los músculos
entumecidos en el cuello y los hombros.

Regional Roll

Los rodillos de masaje recorren los
músculos de la espalda pero
concentrándose en una zona localizada.
Resulta ideal en combinación con
amasamiento, percusiones B y
vibraciones.

Vibration

Las pequeñas vibraciones están
pensadas para relajar incluso el cuerpo
más tenso. Combinadas con el masaje de
rodamientos, etc. este tipo de masajes es
ideal para toda la espalda.

DETALLES DEL MODO MANUAL

All manuals and user guides at all-guides.com

all-guides.com

Summary of Contents for WEDEATSU EP1061

Page 1: ...structions completely and save for future reference Antes de utilizar esta unidad lea completamente estas instrucciones y gu rdelas por si necesita consultarlas en el futuro Sillón de masaje Instrucciones de uso Modelo No All manuals and user guides at all guides com a l l g u i d e s c o m ...

Page 2: ...English See page 3 28 Español Ver págs 29 54 INDEX íNDICE All manuals and user guides at all guides com ...

Page 3: ...rized service center if it is not working properly if it has been dropped or damaged or if it has been immersed in water 9 Always raise the center cushion to check that the fabric of the unit itself has not been ripped before using the unit Please also check other areas to ensure that the fabric has not been ripped No matter how small the rip if you find one then immediately stop using the unit un...

Page 4: ...ustment Button to adjust it properly In programmed operation 6 Do not stretch the back muscles for more than approximately 15 minutes at a time To avoid overstretching the muscles which may result in discomfort do not use the unit for more than 5 minutes when first using it You can gradually increase the duration and intensity of the massage as you become used to it Do not massage any one point fo...

Page 5: ...d coming from the massager while in use This is due to the structure of the massager and is normal 9 Make sure there are no obstacles behind the chair before reclining it The chair can be reclined to a maximum angle of 170 If the back hits a wall or pillar the chair may malfunction Be sure to have ample space behind the chair Recline the chair slowly in order to avoid contact with an obstacle 10 W...

Page 6: ... the plug shown in Figure A Make sure that the product is connected to an outlet having the same configuration as the plug No adaptor should be used with this product HOW TO MOVE THE CHAIR CAUTION Do not move the chair while someone is sitting in it Failure to observe this point may cause the chair to tip over possibly resulting in personal injury Use the casters to move the chair Do not attempt t...

Page 7: ...e massage feels too weak Center Cushion with Integrated Pillow Controller Back Cushion Zip Back Cushion Controller Controller Pocket Seat Legrest Back Cover Back Cover Handles Safety Precaution Label Wheels Power Switch Lock Switch Soles of feet Calves 2 way roller massage EP1061 EP1060 All manuals and user guides at all guides com ...

Page 8: ... Reclining Button Displays operational mode Movement Indicator Manual Operation Selection Buttons Used in Programmed Operation Tapping ON OFF Button Cover Massage Head Adjustment Buttons Used to adjust the shoulder position Shoulder Position Adjustment Button Shoulder Position Indicator Programmed Operation Buttons Used for selecting the area for concentrated massage Concentrated Area Buttons Used...

Page 9: ...ETTING UP THE MASSAGE LOUNGER 16in 40cm 16in 40cm Ensure there is Adequate Space for Reclining Ensure that there is approximately 16in 40cm behind and at least 16in 40cm in front of the unit Places to Avoid Do not use the unit in direct sunlight or in places where it will be exposed to high temperatures such as in front of a heater etc as this can cause discoloration or hardening of the synthetic ...

Page 10: ...e shoulders at the end of their massage z Open the cover of the controller and select the massage required x The seat will automatically recline to the optimum massage position c Adjust the position and intensity of the massage rollers v Press button to complete the massage 4 Adjust the Angle of the Backrest and Legrest See Page 13 Adjust the angle of the backrest and legrest to the most comfortab...

Page 11: ...ower socket x Turn the lock switch to the open position c Turn on the power switch on the back of the unit When plugging the unit in make sure that there is at least 4in 10cm slack in the power cord Take care to ensure that the power cord is not caught by the unit when it reclines 2 3 1 on off lock open lock switch After each use Be sure to tum the power switch to off To prevent children from usin...

Page 12: ...tract the massage heads to the proper position If button is pushed during the massage then the massage heads will not be retracted Please do not sit on the controller as the reclining button may be pressed causing the seat to automatically recline Sit Down Only When the Legrest is Lowered If you sit on the unit when the legrest is raised there is the possibility that it may fall over and you may b...

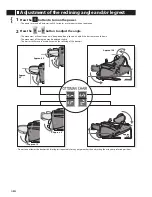
Page 13: ...ight delay before the backrest actually starts to retract Please continue to hold down the Reclining Button until the backrest is fully retracted RECLINING THE SEAT reclining Approx 170 Angle Reclined Approx 120 Approx 85 Angle Raised Approx 0 Angle Reclined Angle Raised reclining Press Press NOTE Position the chair at least 16 in 40cm away from any wall or other obstacle to ensure adequate reclin...

Page 14: ...cles This type of massage is ideal for people with stiff muscles throughout their entire back Massage starts out predominantly in the upper back Gently Massage the Whole Back This type of massage is ideal for people who are feeling tired or weary It is gentler than shiatsu massage more like a sewedish palm massage Normal Position EP1061 Massage Position Approx 14 Raised Approx 3 Reclined Reclining...

Page 15: ...en the Shoulder Position Indicator is flashing adjust the position of the massage heads upper roller so that they lightly touch the shoulder The shoulder position can be adjusted up and down 4in 10cm When it is not possible to correctly adjust the shoulder position slide your body down and try adjusting it again Lightly touching the shoulder Too high Correct position Too low Massaging the Neck and...

Page 16: ...k regional tap A vibration tap B swedish shiatsu knead Combining Massages It is possible to combine massage types It is not possible to combine massage types in the same category E g 1 Adding Tap B when Knead is selected roll manual operation whole back regional tap A vibration tap B swedish shiatsu knead roll manual operation whole back regional tap A vibration tap B swedish shiatsu knead E g 3 T...

Page 17: ...operation whole back regional tap A vibration tap B swedish shiatsu knead roll manual operation whole back regional tap A vibration tap B swedish shiatsu knead Press Press position position Raising the massage heads Lowering the massage heads Press Press position position Increasing the width Decreasing the width Press Press Roll Roll Shiatsu Tap B Tap A Vibration Combination Weak Medium only Roll...

Page 18: ... Leg Massage button The vibration massage will start The strength of the massage will be displayed It is possible to adjust the reclining angle during the massage 3 Adjusting Massage Intensity Leg massage intensity can be adjusted in 2 stages 4 Leg Massage Auto Stop A timer will automatically stop the unit approximately 15 minutes 15 17 minutes after the massage started If you want to start anothe...

Page 19: ...as it may take some time for the massage heads to return to the retracted position please continue to press the Reclining Button until the seat is fully upright reclining Closing the leg massager 3 Place the Controller in its Pocket Using the controller pocket as a grip to help you stand up can place excessive force on the pocket which can cause it to rip Please refrain from doing so 4 Return the ...

Page 20: ...th the unit Do not pull on the power cord when unplugging the unit from the power supply Always hold the power plug itself Failure to do so may lead to electric shock or short circuits Always unplug the unit from the power supply when not in use Failure to do so may lead to insulation deterioration due to dust or moisture which may in turn lead to short circuits or fire CAUTION on off lock open lo...

Page 21: ...ish Tap B Roll and Shiatsu Shiatsu and Tap B Roll Knead Tap B and Roll Tap B Roll Tap B and Knead Knead Roll Tap B and Knead Tap B Roll Knead and Shiatsu Tap B Tap B Roll and Shiatsu 2 3 6 5 4 7 8 9 Shiatsu Tap A and Roll 10 1 Roll Knead and Swedish Tap A Roll Swedish and Swedish Tap A Roll Swedish Shiatsu and Swedish Tap A Roll Swedish Roll and Swedish Tap A Roll Shiatsu Vibration Roll and Shiats...

Page 22: ...TION 1 Roll Shiatsu and Knead Roll Tap B Knead and Tap B Roll Knead and Shiatsu Tap B Tap B Roll and Shiatsu Knead Tap B Roll Tap B Roll Tap B and Knead Knead and Shiatsu Tap B Tap B Roll and Shiatsu Tap B Roll and Knead Tap B Roll 2 3 6 5 4 7 8 9 Shiatsu Swedish and Roll 10 1 Knead Roll Swedish Tap B and Tap B Roll Roll and Shiatsu Vibration Swedish Tap B Roll and Shiatsu Shiatsu and Tap B Roll K...

Page 23: ...ibration Roll and Swedish Swedish Shiatsu and Swedish Tap A Roll Shiatsu Vibration Roll and Shiatsu Vibration Swedish Tap A Roll and Swedish Swedish Tap A Roll Swedish Vibration Roll and Swedish Swedish Shiatsu and Swedish Tap A Roll Shiatsu Vibration Roll and Shiatsu Vibration Swedish Roll and Swedish Tap A Roll 2 3 6 5 4 7 8 9 Swedish 10 The movements below are shown in simplified form for the s...

Page 24: ...tern to provide a solid tapping that is designed to eliminate stubborn stiffness and tiredness This kind of massage is ideal for thick muscles such as those found in the shoulders Whole Back Roll The massage heads become rollers that roll over the back up and down from the neck to the lower back to stretch the back muscles and relieve tension It is ideal to use at the beginning of a massage as it ...

Page 25: ...he unit with a cloth that has been dampened with just water Make sure you thoroughly wring out the cloth first when cleaning the controller c Allow the unit to dry naturally Never use benzene thinners or alcohol Water Mild Detergent Thinners Benzene Alcohol PIPES AND PLASTIC AREAS z Wipe the seat fabric with a cloth that has been soaked in a weak mild detergent solution and then thoroughly wrung o...

Page 26: ...essive force is applied to the massage heads during operation in the interests of safety the massage heads may stop moving If this occurs raise your body slightly before restarting it If all markings and buttons on the controller start to flash which is extremely unusual turn off the power switch wait for approximately 10 seconds and then turn the power switch on again H Nothing can be felt when u...

Page 27: ...nnected H The unit has been damaged Unplug AC cord from outlet immediately and have massage lounger serviced H The power cord or power plug is abnormally hot Unplug AC cord from outlet immediately and have massage lounger serviced H H The length of the programs selected in programmed operation varies When using the massage lounger in programmed operation when the program is finished movement autom...

Page 28: ...Weight 128 lbs 58kg Maximum user weight 264 lbs 120kg SPECIFICATIONS EP1061 Power Supply 120V AC 60Hz Power Consumption 135W Approx 5W in Standby mode with the controller turned off or when the unit is turned off Upper Body Massage Massage Area Up Down Approx 27 6in 70cm Massage Area Left Right Distance between Massage Heads during Operation Approx 2 4 5 9in 6 15cm Massage Area Forward Back 2 2in ...

Page 29: ...aído dañado o sumergido en agua llévela al centro de asistencia autorizado más próximo 9 Levante siempre el cojín central para comprobar que el tapizado de la unidad no ha sufrido rasgaduras antes de su uso Inspeccione además otras áreas para asegurarse de que el tapizado se encuentra en perfecto estado En caso de descubrir cualquier rasgadura independientemente de su tamaño deberá interrumpir el ...

Page 30: ...tilice el botón de ajuste de la posición del rodillo para el cuello para ajustarla correctamente en la posición programada 6 No exceda los 15 minutos en cada sesión de masaje de espalda El exceso de masajeo de los músculos puede resultar molesto no utilice la unidad durante más de 5 minutos la primera vez Podrá aumentar gradualmente la duración y la extensión del masaje según se vaya acostumbrando...

Page 31: ...onamiento Esto se debe a su estructura y es completamente normal 9 Asegúrese de que no haya ningún obstáculo detrás del asiento antes de reclinarlo El asiento se puede reclinar con un ángulo máximo de 170 Si el respaldo golpea contra una pared o una columna el sillón podrá funcionar mal Asegúrese de dejar siempre un espacio amplio detrás del sillón Reclínelo lentamente para evitar que entre en con...

Page 32: ...onexión a tierra como la mostrada en la figura A Asegúrese de que el producto esté conectado a una toma de corriente que tenga la misma configuración que la clavija Con este producto no deberá utilizarse ningún adaptador CÓMO MOVER EL ASIENTO PRECAUCIÓN No mueva el asiento mientras hay alguien sentado en él Si no sigue este consejo el asiento podrá volcarse y la persona podría lesionarse Utilice l...

Page 33: ...ojín central si el masaje no le resulta lo suficientemente fuerte Cojín central con almohada incorporada Cremallera trasera del cojín Cojín lateral Mando de control Bolsillo para el mando Asiento Reposapiernas Mando de control Cubierta trasera Tirador de la cubierta trasera Etiqueta de seguridad Ruedas PARTES DE LA UNIDAD Y SUS FUNCIONES ASIENTO All manuals and user guides at all guides com ...

Page 34: ...ada Sirve para ajustar el ángulo de inclinación del respaldo y reposapiernas Botón de reclinado Indica el modo de operación manual o programado Indicador de modo Botones de selección del programa manual Se usa en el modo programado Botón de encendido apagado de percusión Tapa Botones de ajuste de los rodillos de masaje Sirve para acomodar la posición de los hombros Botón de ajuste de posición de h...

Page 35: ... EMPLAZAMIENTO DE LA UNIDAD MONTAJE DEL SILLÓN DE MASAJE Garantice espacio suficiente para abatir el asiento Serán necesarios unos 16in 40 cm aproximadamente por detrás y al menos 16in 40 cm por delante de la unidad Lugares que deben evitarse No exponga la unidad a la luz solar o en lugares expuestos a altas temperaturas por ej frente a la calefacción ya que podría causar decoloración o endurecimi...

Page 36: ...ma z Abra la tapa del mando de control y seleccione el masaje deseado x El asiento se reclinará automáticamente a la posición óptima de masaje c Ajuste la posición e intensidad de los rodillos de masajes v Pulse el botón para realizar el masaje 4 Ajuste el ángulo del respaldo y del reposapiernas ver pág 39 Ajuste el ángulo del respaldo y del reposapiernas hasta la posición más confortable Al levan...

Page 37: ...de bloqueo a su posición desbloqueada Open c Encienda el interruptor de alimentación situado en la parte posterior de la unidad Cuando enchufe la unidad asegúrese de que el cable de alimentación pueda moverse un mínimo de 4in 10 cm es decir que no quede completamente tirante Después de cada uso Asegúrese de poner el interruptor de la alimentación en off Para impedir que los niños utilicen esta uni...

Page 38: ...ento se recline automáticamente Siéntese siempre con el reposapiernas bajado Si se sienta con el reposapiernas elevado podría plegarse inesperadamente y causarle lesiones Si el reposapiernas está levantado pulse el botón para descenderlo antes de sentarse ADVERTENCIA Para evitar el peligro de lesionarse no ponga sus dedos o ninguna parte de su cuerpo en la sección mecánica del reposapiernas reclin...

Page 39: ...ulsar Premere PRECAUCIÓN Para evitar lesiones después de la utilización coloque siempre el reposapiernas y el respaldo en sus posiciones de apoyo reposapiernas bajado y respaldo subido Asegúrese de que no haya ninguna persona o animal doméstico debajo del reposapiernas antes de bajarlo a su posición de apoyo ADVERTENCIA Para evitar el peligro de lesionarse no ponga sus dedos o ninguna parte de su ...

Page 40: ...relajar los músculos entumecidos Este tipo de masaje resulta ideal para gente con los músculos de toda la espalda agarrotados Masaje suave en toda la espalda La opción suave proporciona un masaje suave para ayudar al cuerpo a recuperase Este tipo de masaje resulta ideal para personas que se sienten agotadas Posición inicial EP1061 Posición de masaje Levantado aprox 14 Reclinado aprox 3 Reclinando ...

Page 41: ...rpadea ajuste la posición de los rodillos de masaje rodillo superior de modo que toquen suavemente los hombros La posición de los hombros se puede ajustar en un margen de 4in 10 cm Si no resulta posible corregir el ajuste de la posición de hombros deslice su cuerpo hacia abajo e intente ajustar otra vez Ligero contacto con los hombros Demasiado alto Posición correcta Demasiado bajo Masajear cuello...

Page 42: ... tap B swedish shiatsu knead Combinación de masajes Es posible combinar los tipos de masajes Sin embargo no resulta posible combinar los tipos de masaje dentro de la misma categoría Por ej añadir Percusión B cuando Amasar está seleccionado roll manual operation whole back regional tap A vibration tap B swedish shiatsu knead roll manual operation whole back regional tap A vibration tap B swedish sh...

Page 43: ... swedish shiatsu knead roll manual operation whole back regional tap A vibration tap B swedish shiatsu knead Pulsar Pulsar Elevando los rodillos de masaje Descendiendo los rodillos de masaje position position Pulsar Pulsar Aumentando la separación Disminuyendo la separación position position Pulsar Pulsar Rodamientos Rodamientos Shiatsu Percusión B Percusión A Vibración Combinación Suave Medio Rod...

Page 44: ...modo programado y masaje de piernas parpadearán 2 Pulse el botón de masaje de piernas Empezará el masaje de vibración La intensidad del masaje se visualizará Durante el masaje se puede ajustar el ángulo de reclinación 3 Ajuste de la intensidad del masaje La intensidad del masaje se puede ajustar en 2 etapas 4 Parada automática del masaje de piernas Un temporizador detendrá automáticamente la unida...

Page 45: ...to que se necesita algún tiempo hasta que los rodillos de masaje alcancen la posición retractada mantenga presionado el botón de reclinado hasta que el asiento esté completamente vertical Cierre del dispositivo de masaje para las piernas reclining 3 Introduzca el mando de control en el bolsillo Evite ayudarse del bolsillo del mando para levantarse del sillón ya que el exceso de fuerza en el bolsil...

Page 46: ...cidentes si los niños juegan con la unidad No tire del cable de alimentación para desenchufar la unidad de la red Hágalo siempre cogiendo el enchufe De lo contrario podrían producirse descargas eléctricas o cortocircuitos Desenchufe siempre la unidad de la red cuando no la esté usando De lo contrario puede producirse deterioro debido al polvo o la humedad lo cual podría causar un cortocircuito des...

Page 47: ... Amasar Percusión B y Rodamientos Percusión B Rodamientos Percusión B y Amasar Amasar Rodamientos Percusión B y Amasar Percusión B Rodamientos Amasar y Shiatsu Percusión B Percusión B Rodamientos y Shiatsu 2 3 6 5 4 7 8 9 Shiatsu Percusión A y Rodamientos 10 Parte superior del cuerpo 1 Rodamientos Amasar y Sueco Percusión A Rodamientos Sueco y Sueco Percusión A Rodamientos Sueco Shiatsu y Sueco Pe...

Page 48: ...hiatsu Percusión B Percusión B Rodamientos y Shiatsu Amasar Percusión B Rodamientos Percusión B Rodamientos Percusión B y Amasar Amasar y Shiatsu Percusión B Percusión B Rodamientos y Shiatsu Percusión B Rodamientos y Amasar Percusión B Rodamientos 2 3 6 5 4 7 8 9 Shiatsu Sueco y Rodamientos 10 Parte superior del cuerpo 1 Amasar Rodamientos Sueco Percusión B y Percusión B Rodamientos Rodamientos y...

Page 49: ...co Percusión A Rodamientos Sueco Vibración Rodamientos y Sueco Sueco Shiatsu y Sueco Percusión A Rodamientos Shiatsu Vibración Rodamientos y Shiatsu Vibración Sueco Percusión A Rodamientos y Sueco Sueco Percusión A Rodamientos Sueco Vibración Rodamientos y Sueco Sueco Shiatsu y Sueco Percusión A Rodamientos Shiatsu Vibración Rodamientos y Shiatsu Vibración Sueco Rodamientos y Sueco Percusión A Rod...

Page 50: ...os que proporcionan un sólido golpeteo pensado para eliminar la rigidez y el cansancio persistentes Este tipo de masajes es ideal para músculos gruesos como los que se encuentran en los hombros Whole Back Roll Los rodillos de masaje recorren toda la espalda en dirección ascendente y descendente desde el cuello hasta la zona lumbar para estirar los músculos de la espalda y liberar tensión Resulta i...

Page 51: ...la unidad un trapo humedecido sólo con agua Asegúrese de escurrir bien el trapo antes de pasarlo por el mando de control c Deje secar la unidad de forma natural Nunca use benceno disolventes o alcohol TUBOS Y ÁREAS DE PLÁSTICO z Pase un trapo previamente humedecido con un detergente suave y bien escurrido por todo el asiento x Use un detergente suave para cepillar las áreas donde el tejido del asi...

Page 52: ...enderlo Si se aplica una fuerza excesiva sobre los rodillos de masaje durante el funcionamiento detendrán su movimiento por motivos de seguridad Si se da el caso incorpórese ligeramente antes de volver a iniciar el masaje Si todos los indicadores y botones del mando de control comienzan a parpadear lo cual es completamente inusual apague el interruptor de alimentación espere aproximadamente 10 seg...

Page 53: ...dad ha sufrido daños Desenchufe inmediatamente el cable de alimentación de la toma de corriente y solicite que le reparen el sillón de masaje H El cable de alimentación o el enchufe se calientan desmesuradamente Desenchufe inmediatamente el cable de alimentación de la toma de corriente y solicite que le reparen el sillón de masaje H H La duración de los programas seleccionados en el modo programad...

Page 54: ... Peso 128 lbs 58 kg Peso máximo del usuario 264 lbs 120 kg DATOS TÉCNICOS EP1061 Alimentación 120V AC 60Hz Consumo de energía 135W Aprox 5W en modo de espera con el mando de control apagado o cuando la unidad está apagada Masaje de la parte superior del cuerpo Área de masaje Arriba Abajo 27 6in 70 cm aprox Área de masaje Izquierda Derecha Distancia entre los rodillos de masaje durante el funcionam...

Page 55: ...All manuals and user guides at all guides com ...

Page 56: ...nsumer Electronics Company One Panasonic Way 3D 1 Secaucus New Jersey 07094 1 800 338 0552 for questions and comments www panasonic com massage All manuals and user guides at all guides com a l l g u i d e s c o m ...

Reviews: