background image

6. VL-V900 basic operations

14

6.3 Main monitor operations with the lobby station

6.3.1 Image viewing screen of the main monitor

6.3.2 Monitoring the outside with the lobby station or camera

1

Press 

M

N

.

R

If there are multiple devices, select the desired device 


.

R

If a camera is connected to the lobby station, you can alternate monitoring between the lobby station and 
camera by pressing 

 or 

.

2

When finished, press 

M

N

.

Note:

R

Depending on the composition of the system, monitoring may not be available.

6.3.3 Opening entrance doors

While talking to a visitor or monitoring with a lobby station or camera, press 

.

6.3.4 Calling extension telephones
1

Press 

M

N

.

2

Select the desired extension telephone.

R

Up to 4 extension telephones may be displayed.

3

Press  


.

4

When finished, press 

M

N

.

6.4 System conditions and limitations

Please note the following system conditions and limitations.

R

Only one call or monitoring session can be handled at a time.
Subsequent calls will disconnect the current call (if the current call has lower priority), or will not be connected (if 
the current call has higher priority).
Low priority: Monitoring
Medium priority: General calls (lobby station to main monitor, main monitor to PBX extension, etc.)
High priority: Emergency calls

R

All calls and monitoring sessions are disconnected after the pre-programmed "timeout" time elapses.

R

In order to perform the above operations, optional devices and configuration for those devices are required. 
Contact your building manager for more information.

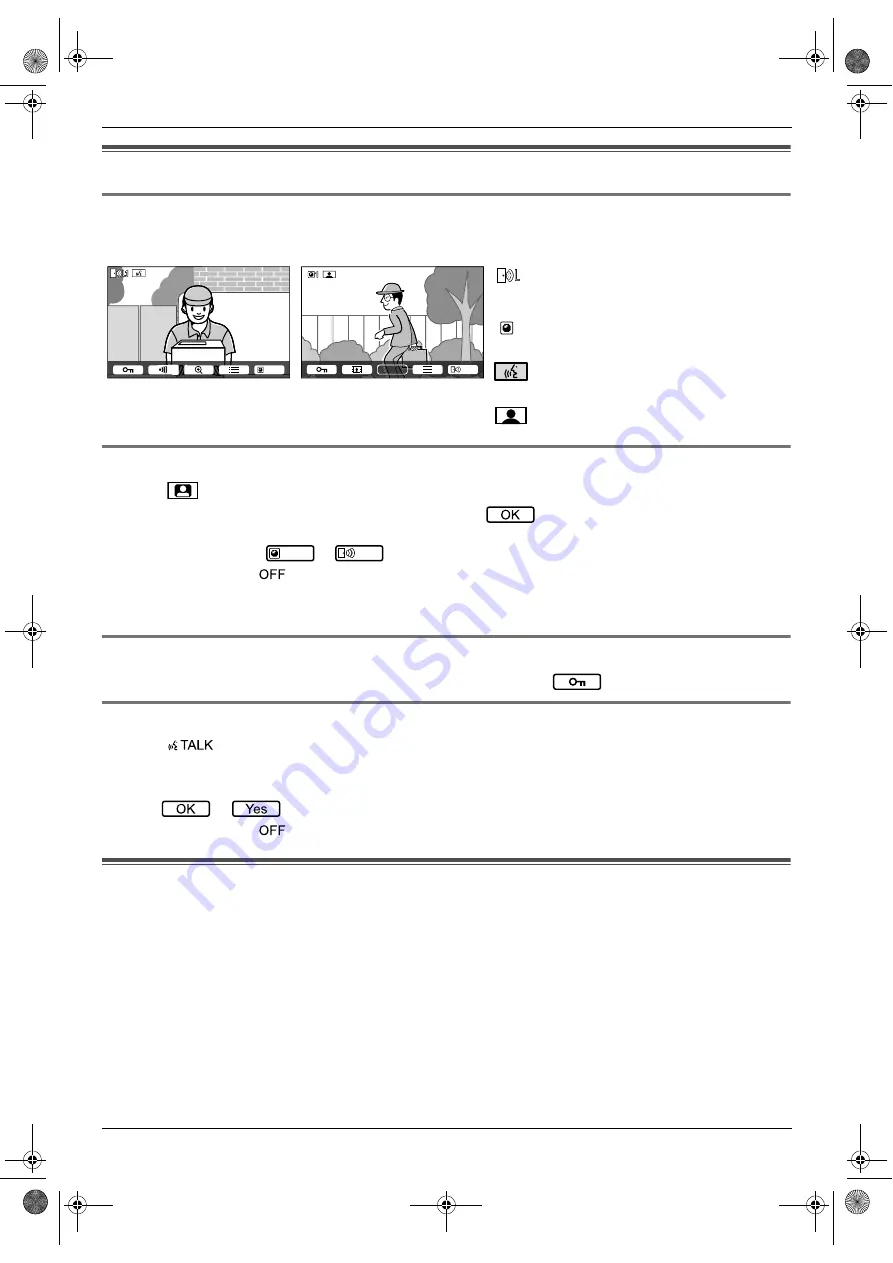
Image from lobby station

Image from camera

Status icons

Indicates which lobby station is calling, 
monitoring, or talking. ("1" indicates the 

device number.)
Indicates which camera is monitoring. 

("1" indicates the device number.)

Indicates that the main monitor is 

talking.

Indicates that the main monitor is 

monitoring.

Camera

1

1

Lobby

1

1

1

Camera

Lobby

prj_4367-as_is.book  Page 14  Monday, April 24, 2017  10:37 AM

Summary of Contents for VL-SV71

Page 1: ...tely This system is an auxiliary system it is not designed to provide complete protection from property loss Panasonic will not be held responsible in the event that property loss occurs while this sy...

Page 2: ...the label on the rear of the main monitor 1 2 Accessory information 1 2 1 Supplied accessories Note R Accessories for installing the main monitor and the doorphone are described in the supplied Insta...

Page 3: ...scribed in 6 VL V900 basic operations Page 13 of this document For further information about features and operations visit our Web site and find the document https panasonic net cns pcc support interc...

Page 4: ...and white illustration of icon is used Buttons with printing on them or near them Button printing is displayed usually wrapped in thick brackets M N M N Soft keys Black and white illustration of the c...

Page 5: ...parts of the product R Completely insert the AC cable plug and power plug into the power outlets Failure to do so may cause electric shock and or excessive heat resulting in a fire Do not use damaged...

Page 6: ...epairs without being initialized the memory including recorded data and settings for the main monitor extension monitor may be cleared and set to factory default after repair R If operations cannot be...

Page 7: ...website for further information on collection centres etc or call the toll free number below Website http www panasonic com in corporate sustainability panasonic india i recycle program html Service h...

Page 8: ...he display 3 2 1 Main monitor display information Image viewing screen A Status icons page 8 B Soft key icons page 8 Status icons main monitor A Lens cover B Camera lens C LED lights D Call button and...

Page 9: ...uage 3 Press 4 Press again 5 Set the date and time R Press to select an item i e year month day etc R Press or to change the setting 6 When finished press Note R The date and time settings may be dele...

Page 10: ...one calls or monitoring sessions Each time new images are recorded they are saved in an image set of up to 8 images When a visitor calls you the main monitor and extension monitor record 8 images auto...

Page 11: ...hat the electric lock is connected to 7 Select the unlocking time 8 When finished press M N 4 7 2 Unlocking electric locks 1 Press while talking or monitoring R If there are 2 electric locks available...

Page 12: ...nsion monitors 1 Main monitor Press M N select Register Cancel 2 Select Register R When you are prompted to register your main monitor select Main monitor 3 Select the registration number of the exten...

Page 13: ...ottom of the screen 3 Press M N or M N to search for the desired name 4 Press M N to call Searching through all names 1 Press M N 2 Press M N or M N to search for the desired name 3 Press M N to call...

Page 14: ...nditions and limitations R Only one call or monitoring session can be handled at a time Subsequent calls will disconnect the current call if the current call has lower priority or will not be connecte...

Page 15: ...ur display Talking method Hands free Installation method Wall mount mounting bracket supplied Power source Input 220 240 V AC 0 2 A 50 60 Hz Output 24 V DC 0 6 A Dimensions mm height width depth Appro...

Page 16: ...Panasonic Corporation 2017 PNQX8539ZA C0517MM0 1006 Oaza Kadoma Kadoma shi Osaka 571 8501 Japan http www panasonic com prj_4367 as_is book Page 16 Monday April 24 2017 10 37 AM...

Reviews: