background image

18

 No image can be displayed

Ɣ


 Check the TV is turned on.

Ɣ


 Check the mains lead is plugged into the TV and the socket outlet.

Ɣ


 Check the correct input mode is selected.

Ɣ


 Check the setting of [AV] ([COMPONENT] / [VIDEO]) in [Input Selection] to match the output of the external 
equipment.

Ɣ


 Is [Contrast], [Brightness] or [Colour] in the Picture Menu set to the minimum?

Ɣ


 Check all required cables and connections are firmly in place.

 Unusual image is displayed

Ɣ


 Turn the TV off with Mains power On / Off switch, then turn it on again.

Ɣ


 If the problem persists, initialise all settings.   

[Shipping Condition] in [System Menu] (Setup Menu)

 Parts of the TV become hot

Ɣ


 Even if the temperature of parts of the front, top and rear panels has risen, these temperature rises do not cause 
any problems in terms of performance or quality.

 The LCD panel moves slightly and clattered sound is heard when it is pushed with a finger

Ɣ


 There is some flexibility around the panel to prevent damage to the panel. This is not a malfunction.

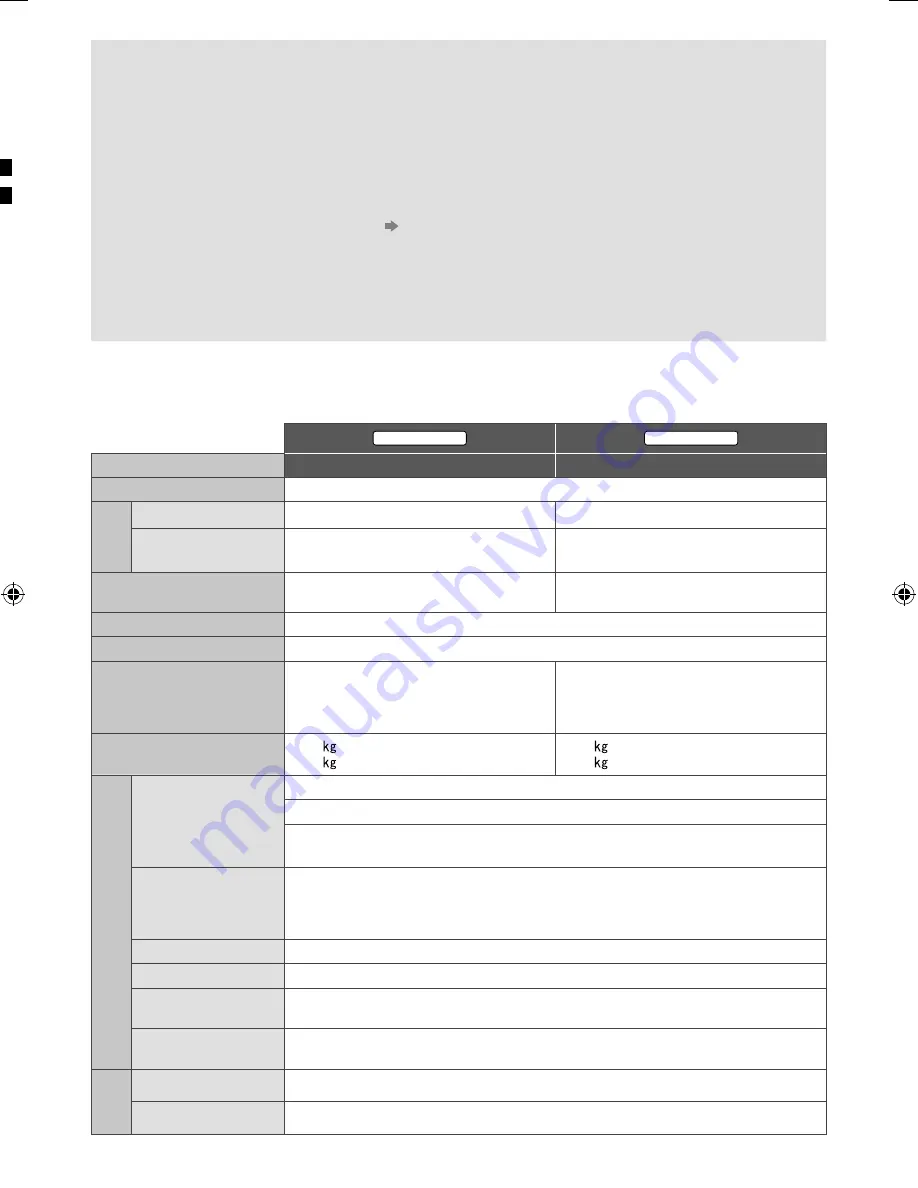
  Specifications


Ŷ

 TV


47-inch model


55-inch model

 Model No.

 TH-L47WT60H

 TH-L55WT60H

 Power Source

 AC 220-240 V, 50 / 60 Hz

 Power

 Rating

 159 W

 178 W

 Standby power 
consumption

 0.2 W

 0.2 W

 Visible screen size 
(diagonal)

 119 cm

 139 cm

 Display resolution

 1,920 (W) × 1,080 (H)

 Panel

 LED backlight Liquid Crystal Display

 Dimensions (W × H

*

1

 × D)

 1,057 mm × 717 mm × 358 mm 
(With Pedestal)
 1,057 mm × 621 mm × 32 mm 
(TV only)

 1,227 mm × 814 mm × 358 mm 
(With Pedestal)
 1,227 mm × 717 mm × 32 mm 
(TV only)

 Mass

 16.5   Net (With Pedestal)
 12.5   Net (TV only)

 20.0   Net (With Pedestal)
 16.0   Net (TV only)

 Connection terminals

 AV IN 
(COMPONENT / 
VIDEO)

 VIDEO

 RCA PIN Type × 1

 1.0 V[p-p] (75 

:

)

 AUDIO L - R

 RCA PIN Type × 2

 0.5 V[rms]

 Y

 1.0 V[p-p] (including synchronisation)

 P

B

/C

B

, P

R

/C

R

 ±0.35 V[p-p]

 HDMI 1 / 2 / 3 input

 TYPE A Connectors
 HDMI 1 / 3: 3D, Content Type, Deep Colour
 HDMI 2: 3D, Content Type, Audio Return Channel, Deep Colour

Ɣ


 This TV supports “HDAVI Control 5” function.

 Card slot

 SD Card slot × 1

 ETHERNET

 10BASE-T / 100BASE-TX

 USB 1 / 2 / 3

 USB1 / 2: USB2.0 DC 5 V, Max. 500 mA
 USB3: USB3.0 DC 5 V, Max. 900 mA

 DIGITAL AUDIO 
OUT

 PCM / Dolby Digital / DTS, Fibre optic

 Sound

 Speaker

 8 train speakers × 2, Woofer (

ĭ

 75 mm) × 1

 Audio output

 18 W (4 W + 4 W + 10 W)

 Rec
Ban

 Rec
 (Ana

 Aeri

 Ope

 Buil

 Buil

 Blue
tech

 *

1:


W

 *

2:


Th

 *

3:


No
(e


Ŷ

 3D

 Dim
 Mas
 Usa
 Mate

Ɣ


 Use

 No

Ɣ


 VIER

Ɣ


 Des

Ɣ


 For 

Ɣ


 TH-
Mod


Ŷ

 Wh

Ɣ


 Plea


 Rear 

Ɣ


 Hole
insta

TH_L47_55WT60H_EN TEMP.indd   18

TH_L47_55WT60H_EN TEMP.indd   18

3/25/2013   9:30:36 AM

3/25/2013   9:30:36 AM

Summary of Contents for Viera WT60Hseries

Page 1: ...5 Connections 7 Identifying Controls 11 First time Auto Tuning 14 Using your VIERA Operations 15 How to Use eHELP 16 Viewing 3D images 17 Others FAQs 17 Specifications 18 Maintenance 20 Thank you for purchasing this Panasonic product Please read these instructions carefully before operating this product and retain them for future reference The images shown in this manual are for illustrative purpo...

Page 2: ...on in your country Please refer to that legislation for more information on the relevant laws and regulations involved or contact the owner of the rights in the content you wish to record or playback This product is licensed under the AVC patent portfolio license for the personal and non commercial use of a consumer to i encode video in compliance with the AVC Standard AVC Video and or ii decode A...

Page 3: ...of electrical shock fire damage or injury please follow the warnings and cautions below Ŷ Mains plug and lead Warning If you detect anything unusual immediately remove the mains plug ƔThis TV is designed to operate on AC 220 240 V 50 60 Hz ƔInsert the mains plug fully into the socket outlet ƔEnsure that the mains plug is easily accessible ƔDisconnect the mains plug when cleaning the TV ƔDo not tou...

Page 4: ... to the malfunction ƔDo not use the TV and VIERA Touch Pad Controller near any automatic control equipment such as automatic doors or fire alarms Radio waves may interfere with the automatic control equipment and cause accidents due to the malfunction ƔKeep the distance at least 22 cm from the TV and VIERA Touch Pad Controller when you have a cardiac pacemaker Radio waves may interfere with the op...

Page 5: ...may cause an allergic reaction Ŷ Viewing 3D Images Caution ƔPay special attention when children are viewing 3D images 3D images should not be viewed by children younger than about 6 years old as a guideline All children must be fully supervised by parents or guardians who must ensure their safety and health while they are viewing 3D images ƔStop viewing 3D images immediately if you feel tired feel...

Page 6: ...a furniture as shown to prevent the TV from falling over ƔThis information is designed to reduce the risk of injuries caused by the TV falling over However no measure can guarantee protection in all cases Removing the pedestal from the TV Be sure to remove the pedestal in the following way when using the wall hanging bracket or repacking the TV 1 Remove the assembly screws from the cover 2 Pull ou...

Page 7: ... TV Analogue TV AC 220 240 V 50 60 Hz Mains lead supplied Aerial RF cable Ŷ Mains lead Insert the mains plug firmly into place ƔWhen disconnecting the mains lead be absolutely sure to disconnect the mains plug at the socket outlet first ƔKeep RF aerial cable away from the mains lead to avoid and minimise mains interference pickup ƔDo not place the RF cable under the TV ƔAn aerial correct cable 75 ...

Page 8: ...ork environment If you do not have any broadband network services please consult your retailer for assistance ƔPrepare the internet environment for wired connection or wireless connection ƔSetup of the network connection will start when first using the TV p 14 Ŷ Wired connection TV Internet environment LAN cable Shielded ƔUse the Shielded Twist Pair STP LAN cable Ŷ Wireless connection Internet env...

Page 9: ... system External equipment DVD Player etc TV ƔUse HDMI2 for connecting an amplifier This connection is applicable when using an amplifier that has ARC Audio Return Channel function As for an amplifier without ARC function use DIGITAL AUDIO OUT ƔTo enjoy the sound from the external equipment in multi channel sound e g Dolby Digital 5 1ch connect the equipment to the amplifier For the connections re...

Page 10: ...for connecting an amplifier This connection is applicable when using an amplifier that has ARC Audio Return Channel function 2 Use USB 3 port for connecting the USB HDD Using the cable tie and spiral tube supplied ƔDo not bundle the RF cable and mains lead together could cause distorted image ƔFix cables with the cable tie and spiral tube as necessary ƔWhen using the optional accessory follow the ...

Page 11: ... On Off 10 Teletext button ƔThis button is not used for this model 11 Volume Up Down 12 Numeric buttons ƔChanges channel ƔSets characters ƔWhen in Standby mode switches TV on 13 eHELP ƔDisplays eHELP Built in Operating Instructions 14 Light ƔLights the buttons for about 5 seconds except the buttons 25 15 Input mode selection ƔTV switches to Digital TV Analogue TV ƔAV switches to AV input mode from...

Page 12: ...below 5 Option Menu 6 HOME ƔSame function of the remote control button 17 p 11 7 Volume Up Down ƔSame function of the remote control button 11 p 11 8 APPS ƔSame function of the remote control button 5 p 11 9 On screen remote control ƔPress to display the remote control GUI Graphical User Interface Press again to move the position of GUI To change the page of GUI slide your finger to the left right...

Page 13: ...ustments have been made or options have been set Return to the previous menu Exit the menu system and return to Home Screen 1 Input mode selection ƔPress repeatedly until you reach the desired mode Main Menu ƔPress and hold for about 3 seconds to display main menu OK when in the menu system 2 Channel Up Down Cursor Up Down when in the menu system 3 Volume Up Down Cursor Left Right when in the menu...

Page 14: ...uth Africa American System American CATV or Japan CATV Register the VIERA Touch Pad Controller to this TV Select Pairing and follow the on screen instructions to use the touch pad controller supplied ƔTo register later on or detailed settings VIERA Touch Pad Controller Setup Menu 3 Select the type of Home Screen The demonstration to explain how to use my Home Screen is displayed Confirm the demons...

Page 15: ...lt Home Screen etc For details follow the on screen instructions or refer to eHELP Watching my Home Screen Watching TV 1 Select the TV viewer from Home Screen select access 2 Select Digital TV or Analogue TV 3 Select a channel up down or ƔTo select 2 or more digit channel position number e g 399 To access each feature Access APPS List and select a feature Example APPS List ƔAPPS is the application...

Page 16: ...tion in eHELP ƔIf this is not the first time to view eHELP from when the TV is turned on the confirmation screen is displayed to select whether First Page or Last Page 2 Select the category and item Category field Item field Sub item field Description select category access select item access select sub item access ƔTo return to the previous field ƔTo scroll the description if more than 1 page Whi...

Page 17: ...ode Selection 1 Put the 3D Eyewear on 2 View the 3D images Safety precautions will be displayed when you first watch the 3D image Select Yes or No to continue to view 3D images ƔTo change 2D 3D mode Note ƔDo not exert pressure on or scratch the lens of the 3D Eyewear Ɣ3D content will not be correctly visible if the 3D Eyewear is worn upside down or back to front ƔWhen viewing 3D images make sure y...

Page 18: ...s not a malfunction Specifications Ŷ TV 47 inch model 55 inch model Model No TH L47WT60H TH L55WT60H Power Source AC 220 240 V 50 60 Hz Power Rating 159 W 178 W Standby power consumption 0 2 W 0 2 W Visible screen size diagonal 119 cm 139 cm Display resolution 1 920 W 1 080 H Panel LED backlight Liquid Crystal Display Dimensions W H 1 D 1 057 mm 717 mm 358 mm With Pedestal 1 057 mm 621 mm 32 mm TV...

Page 19: ... 11a n 5 15 GHz 5 35 GHz 5 47 GHz 5 85 GHz IEEE802 11b g n 2 40 GHz 2 4835 GHz Security WPA2 PSK TKIP AES WPA PSK TKIP AES WEP 64 bit 128 bit Bluetooth wireless technology 3 Standard Compliance Bluetooth 3 0 Frequency Range 2 402 GHz 2 480 GHz 1 With Camera pop up 20 mm height 2 The frequency and channel differ depending on the country 3 Not all the Bluetooth compatible devices are available with ...

Page 20: ...oth to clean the dirt or fingerprints For stubborn dirt First clean the dust on the surface Dampen a soft cloth with clean water or diluted neutral detergent 1 part detergent to 100 parts water Wring the cloth and wipe the surface Finally wipe away all the moisture Caution ƔDo not use a hard cloth or rub the surface too hard otherwise this may cause scratches on the surface ƔTake care not to subje...

Reviews: