background image

14

English

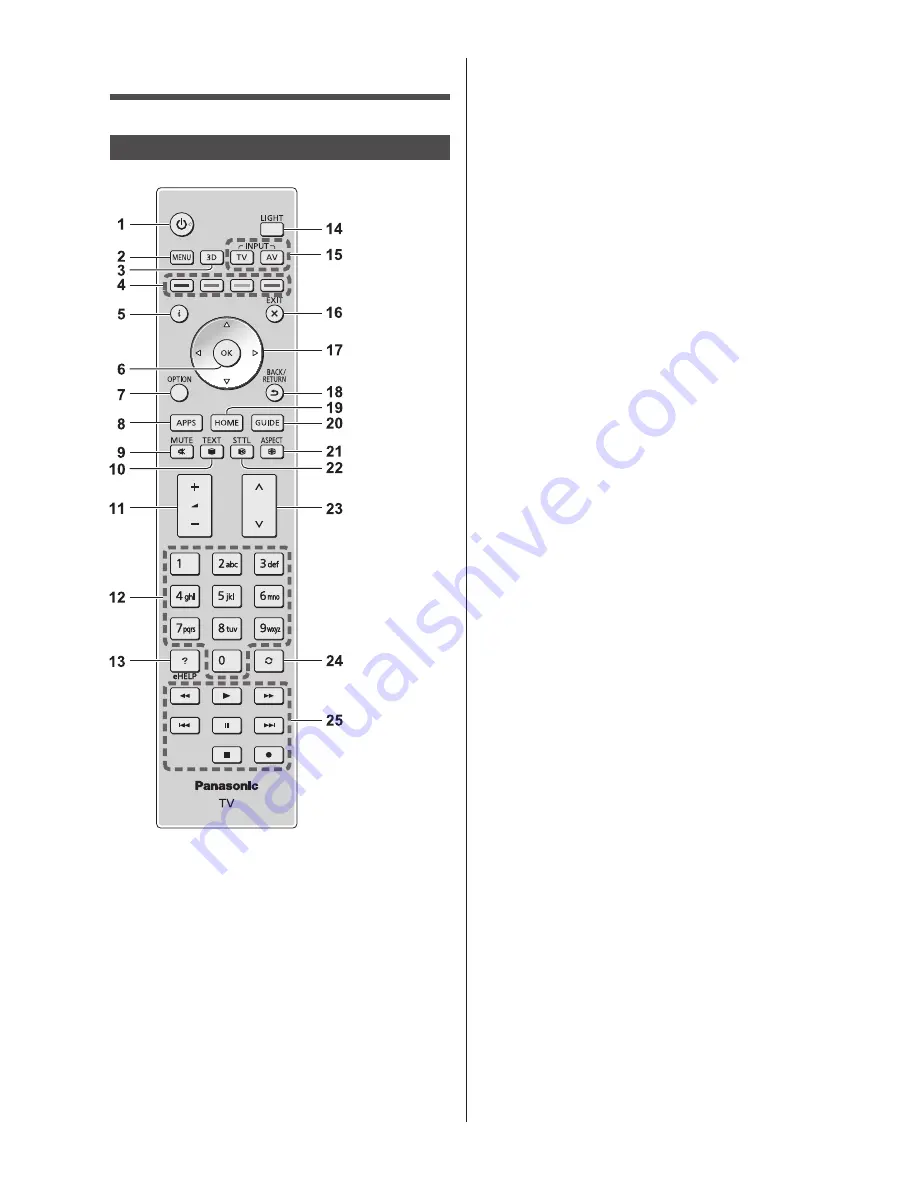
 6 OK


 Confirms selections and choices.


 Press after selecting channel positions to quickly 
change channel.

 7 [Option Menu]


 Easy optional setting for viewing, sound, etc.

 8 APPS


 Displays [APPS List] (applications list).

 9  Sound Mute On / Off
 10 Text service button
 11 Volume Up / Down
 12 Numeric buttons


 Changes channel and teletext pages.


 Sets characters.


 When in Standby mode, switches TV on.

 13 [eHELP]


 Displays [eHELP] (Built-in Operating Instructions).

 14 Light


 Lights the buttons for about 5 seconds (except the 
buttons “1, 4, 7, 14, 17 and 25”).

 15 Input mode selection


 TV - switches to Freesat / DVB / Analogue / Other 
Sat. / Satellite.


 AV - switches to AV input mode from Input 
Selection list.

 16 Exit


 Returns to [Home Screen].

 17 Cursor buttons


 Makes selections and adjustments.

 18 Return


 Returns to the previous menu / page.

 19 HOME


 Displays [Home Screen].

 20 TV Guide


 Displays Electronic Programme Guide.

 21 Aspect


 Changes aspect ratio.

 22 Subtitles


 Displays subtitles.

 23 Channel Up / Down
 24 Last view


 Switches to previously viewed channel or input 
mode.

 25 Operations for contents, connected equipment, 

etc.

  Identifying Controls

  Remote Control


 1  Standby On / Off switch
 2 [Main Menu]


 Press to access Picture, Sound, Network, Timer, 
Setup and Help Menus.

 3 3D button


 Switches the view between 2D and 3D.

 4 Coloured buttons

 (red-green-yellow-blue)


 Used for the selection, navigation and operation of 
various functions.

 5 Information


 Displays channel and programme information.

Summary of Contents for Viera TX-55AX902B

Page 1: ...e instructions carefully before operating this product and retain them for future reference The images shown in this manual are for illustrative purposes only English Model No TX 55AX902B TX 65AX902B For more detailed instructions refer to eHELP Built in Operating Instructions How to use eHELP p 19 M0814 0 English ...

Page 2: ... Contents Be Sure to Read Important Notice 3 Safety Precautions 3 Quick Start Guide Accessories 7 Connections 9 Identifying Controls 14 First time Auto Setup 17 Using your VIERA Operations 18 How to Use eHELP 19 Viewing 3D images 20 Others FAQs 21 Maintenance 22 Specifications 22 ...

Page 3: ...ailable depending on the country area broadcaster service provider and network environment The compatibility with future services is not guaranteed Check the latest information on the available services at the following website http panasonic net viera support Panasonic does not guarantee operation and performance of peripheral devices made by other manufacturers and we disclaim any liability or d...

Page 4: ...ipment and cause accidents due to the malfunction Keep the distance at least 22 cm from the TV and Touch Pad Controller when you have a cardiac pacemaker Radio waves may interfere with the operation of the pacemaker Insert the mains plug fully into the socket outlet Ensure that the mains plug is easily accessible Disconnect the mains plug when cleaning the TV Do not touch the mains plug with wet h...

Page 5: ...connect to any wireless network SSID for which you do not have usage rights Such networks may be listed as a result of searches However using them may be regarded as illegal access SSID is a name for identifying a particular wireless network for transmission Do not subject the built in wireless LAN to high temperatures direct sunlight or moisture Data transmitted and received over radio waves may ...

Page 6: ...mages Stop viewing 3D images immediately if you feel tired feel unwell experience any other uncomfortable sensation or clearly see double images Take an appropriate break before continuing to view When you set the 3D effect by using 3D Adjustment take into account that the vision of 3D images varies among different individuals Do not view 3D images if you have a history of oversensitivity to light...

Page 7: ...ories Remote Control p 14 N2QAYA000074 Touch Pad Controller p 15 N2QBYA000011 Pedestal p 7 The pedestal cannot be held by one hand because of its weight Handle with both hands Batteries 4 R03 p 15 16 3D Eyewear 2 p 20 AV1 SCART adaptor p 10 AV2 COMPONENT VIDEO adaptor p 11 Operating Instructions Production Registration Leaflet Accessories may not be placed all together Take care not to throw them ...

Page 8: ...ing the TV 1 Pull out the cover from the pedestal 2 Remove the assembly screws A from the TV 3 Lift up the TV at a slight angle from the pedestal as shown View from the side 4 Attach the cover to the pedestal 4 Hooks Ensure that the TV does not hang over the edge of the base 55 inch model a 1 238 mm b 283 mm 65 inch model a 1 457 mm b 356 mm ...

Page 9: ...Analogue Connections External equipment and cables shown are not supplied with this TV Please ensure that the unit is disconnected from the mains socket before attaching or disconnecting any cables Check the terminal type and cable plugs are correct when connecting Use a fully wired HDMI compliant cable Use a fully wired SCART cable Keep the TV away from electronic equipment video equipment etc or...

Page 10: ... for wired connection or wireless connection Setup of the network connection will start when first using the TV p 18 Wired connection TV Internet environment LAN cable Shielded Use the Shielded Twist Pair STP LAN cable Satellite dish To ensure your satellite dish is correctly installed please consult your local dealer Also consult the received satellite broadcasting companies for details For Frees...

Page 11: ...supplied Game equipment Camcorder Wireless connection Internet environment Built in wireless LAN Access point Connections for 4K contents 4K compatible equipment TV or HDMI cable DisplayPort cable 4K compatible equipment To watch contents of 4K format connect the 4K compatible equipment to HDMI terminal or DisplayPort by using a 4K compatible cable When connecting to DisplayPort use the DisplayPor...

Page 12: ...e please contact your content provider For more information refer to eHELP Functions Common Interface read the manual of the CI module or check with the content provider TV CI module USB HDD for recording Use USB 3 for connecting the USB HDD For more information refer to eHELP Recording VIERA Link Use HDMI1 4 for VIERA Link connection For more information refer to eHELP Functions VIERA Link HDAVI ...

Page 13: ... Put the cables into the cover To bundle the connected cables the cable tie that had bundled the mains lead can be used Do not bundle the Satellite cable RF cable and mains lead together could cause distorted image Fix cables as necessary Be careful not to nip the cables between the pedestal and the edge of the cover When using the optional accessory follow the option s assembly manual to fix cabl...

Page 14: ...AV switches to AV input mode from Input Selection list 16 Exit Returns to Home Screen 17 Cursor buttons Makes selections and adjustments 18 Return Returns to the previous menu page 19 HOME Displays Home Screen 20 TV Guide Displays Electronic Programme Guide 21 Aspect Changes aspect ratio 22 Subtitles Displays subtitles 23 Channel Up Down 24 Last view Switches to previously viewed channel or input ...

Page 15: ... is designed for the convenient operations especially on Home Screen or internet contents You can operate the TV intuitively with this controller Touch Pad Controller can be used by registering to this TV with Bluetooth wireless technology The registration starts automatically when you press any buttons except Standby On Off switch after installing batteries After registering you can operate the T...

Page 16: ...ure quality when Ambient Sensor in the Picture Menu is set to On 7 Power LED Red Standby Green On Orange Standby with some functions recording etc active The LED blinks when the TV receives a command from the remote control 8 LED illumination Lights LED according to settings To turn the LED illumination off Set LED Illumination in Other Settings Setup menu to Off Set LED Illumination in Info Bar S...

Page 17: ...ollowing the on screen instructions Example Please select your viewing environment Home Shop How to use remote control Move the cursor Access the item store the setting Return to the previous item if available Select Home Select Home viewing environment to use in your home environment Shop is for shop display To change viewing environment later on you will need to initialise all settings by access...

Page 18: ...r mode Dual Tuner Single Tuner Select your region Set up Info Bar function For more information refer to eHELP Functions Info Bar 3 Select the type of Home Screen The demonstration to explain how to use my Home Screen is displayed Confirm the demonstration by following the on screen instructions and then select the desired Home Screen Example Home Screen Selection Example TV Home Screen Auto Setup...

Page 19: ...tions of each feature and the setup of APPS List follow the on screen instructions or refer to eHELP my Home Screen APPS List How to Use eHELP eHELP is the detailed operating instructions built into the TV and helps you to get more understanding of the operations for each feature 1 Display eHELP or Help eHELP If this is not the first time to view eHELP from when the TV is turned on the confirmatio...

Page 20: ... the input mode is not switched automatically select the input mode connected to the player using the AV button 3D supported broadcast Please consult the suppliers of contents or programmes for availability of this service 3D photos and 3D videos taken by 3D compatible Panasonic products Available in Media Player and Network services 2D images converted to 3D Press the 3D button and set to 2D 3D m...

Page 21: ...istance please follow these simple guides to solve the problem For more information refer to eHELP Support FAQs The TV does not switch on Check the mains lead is plugged into the TV and the socket outlet The fuse in the mains plug may have blown Replace it with one of an identical rating p 3 The TV goes into Standby mode Auto power standby function is activated The remote control does not work or ...

Page 22: ...ergent to 100 parts water 3 Wring the cloth firmly Please note liquids do not enter the TV inside May lead to product failure 4 Finally wipe away all the moisture Caution Do not use a hard cloth or rub the surface too hard otherwise this may cause scratches on the surface Take care not to subject the surfaces to insect repellent solvent thinner or other volatile substances This may degrade surface...

Page 23: ...ntent of 4K format is not supported Content Type Deep Colour x v Colour HDMI2 4K 3D 3D content of 4K format is not supported Content Type Audio Return Channel Deep Colour x v Colour This TV supports HDAVI Control 5 function DisplayPort VESA DisplayPort applicable to 4K format Card slot SD Card slot 1 Common Interface slot complies with CI Plus 1 ETHERNET RJ45 IEEE802 3 10BASE T 100BASE TX 1000BASE...

Page 24: ...etooth compatible devices are available with this TV Up to 5 devices can be used simultaneously except Touch Pad Controller 3D Eyewear Dimensions W H D 165 mm 38 mm 166 mm Mass Approx 18 Usage temperature range 0 C 40 C Materials Main body Lens section Resin Use Panasonic 3D Eyewear supporting passive 3D system technology Note Touch Pad Controller uses Bluetooth wireless technology Design and Spec...

Page 25: ......

Page 26: ......

Page 27: ......

Page 28: ...rrect method of disposal Note for the battery symbol bottom two symbol examples This symbol might be used in combination with a chemical symbol In this case it complies with the requirement set by the Directive for the chemical involved Sales and Support Information Customer Communications Centre For customers within the UK 0844 844 3899 For customers within Ireland 01289 8333 Monday Friday 9 00am...

Reviews: