background image

62

LSQT1040

E

d

iting

Using playlists

(RAM)


(-RW‹VR›)

¬

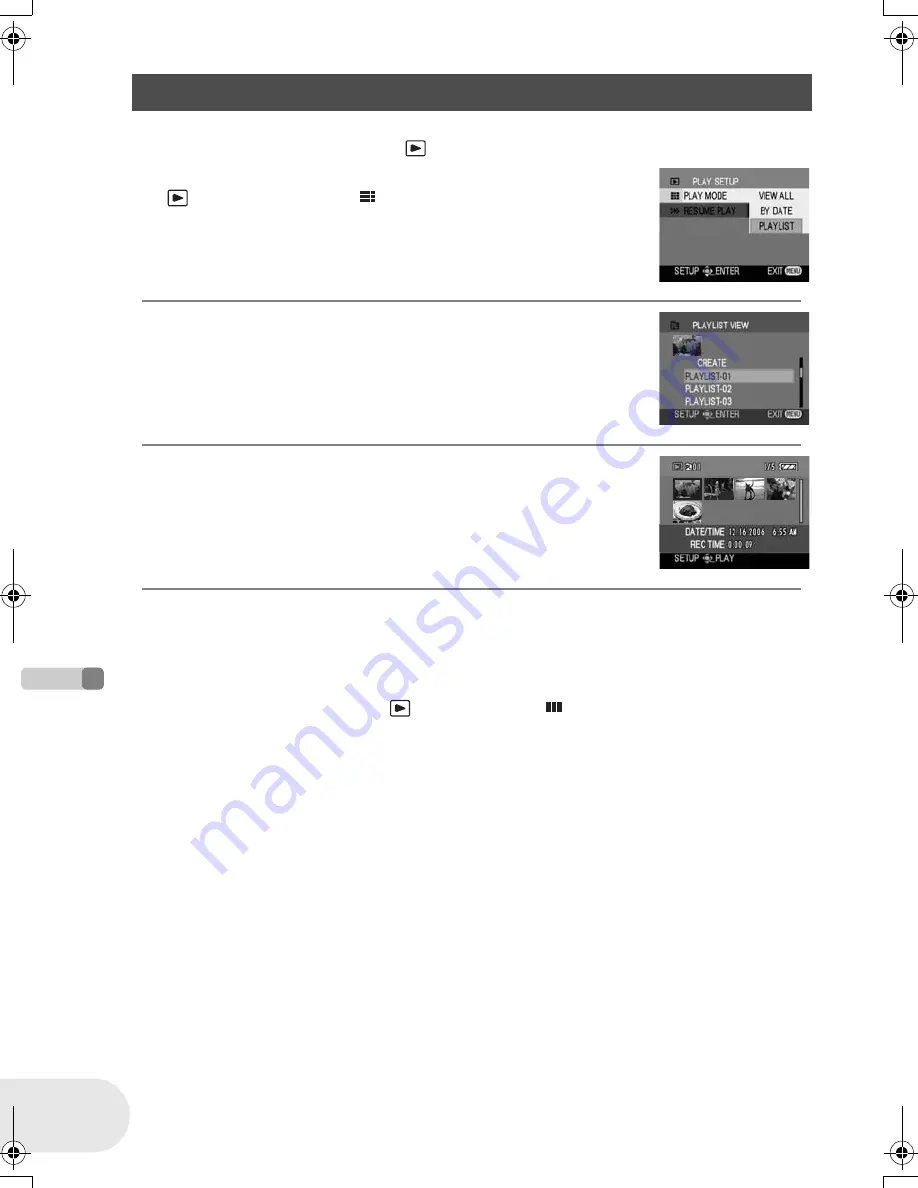
Rotate the mode dial to select 

.

1 Press the MENU button, then select 

[

PLAY SETUP] 

[

PLAY MODE] 

[PLAYLIST] 

and press the joystick.

2 Select the playlist to be played back, then press the 

joystick.

Scenes in the selected playlist are displayed as thumbnails.

3 Select the scene to start playback, then press the 

joystick.

To select a different playlist

When the first scene is selected in the playlist thumbnail view screen, move the joystick left. The 
screen returns to the PLAYLIST VIEW (step 2).

To return to showing the original scenes

Press the MENU button, then select [

PLAY SETUP] 

[

PLAY MODE] 

[VIEW ALL] or 

[BY DATE] and press the joystick.

Playing back a playlist

D105(P)eng.book  62 ページ  2006年1月16日 月曜日 午後4時1分

Summary of Contents for VDR-D105

Page 1: ...NA 7262 or contact us via the web at http www panasonic com contactinfo LSQT1040 B P Operating Instructions DVD Video Camera Model No VDR D105 Cover Before connecting operating or adjusting this product please read the instructions completely Spanish Quick Use Guide is included Guía para rápida consulta en español está incluida ...

Page 2: ...LACED REPLACE ONLY WITH THE SAME OR EQUIVALENT TYPE CAUTION USE OF CONTROLS OR ADJUSTMENTS OR PERFORMANCE OF PROCEDURES OTHER THAN THOSE SPECIFIED HEREIN MAY RESULT IN HAZARDOUS RADIATION EXPOSURE Date of Purchase Dealer Purchased From Dealer Address Dealer Phone No Model No Serial No VDR D105 CAUTION RISK OF ELECTRIC SHOCK DO NOT OPEN CAUTION TO REDUCETHE RISK OF ELECTRIC SHOCK DO NOT REMOVE COVE...

Page 3: ... different from that to which the receiver is connected Consult the dealer or an experienced radio TV technician for help FCC Caution To assure continued compliance follow the attached installation instructions and use only shielded interface cables with ferrite core when connecting to computer or peripheral devices Any changes or modifications not expressly approved by the party responsible for c...

Page 4: ...et consult an electrician for replacement of the obsolete outlet 10 Protect the power cord from being walked on or pinched particularly at plugs convenience receptacles and the point where they exit from the apparatus 11 Only use attachments accessories specified by the manufacturer 12 Use only with the cart stand tripod bracket or the table specified by the manufacturer or sold with the apparatus...

Page 5: ...re may form on the disc and inside the unit DO NOT LEAVE YOUR CAMERA OR THE POWER SUPPLY TURNED ON WHEN NOT IN USE STORAGE OF YOUR CAMERA Store and handle your camera in a manner that will not subject it to unnecessary movement avoid shaking and striking Your camera contains a sensitive pick up device which could be damaged by improper handling or storage CARE TO CLEAN YOUR CAMERA Do not use stron...

Page 6: ...ted viewing uses only unless otherwise authorized by Macrovision Corporation Reverse engineering or disassembly is prohibited Manufactured under license from Dolby Laboratories Dolby and the double D symbol are trademarks of Dolby Laboratories Other names of systems and products mentioned in these instructions are usually the registered trademarks or trademarks of the manufacturers who developed t...

Page 7: ... function 41 Backlight compensation function 43 Wind noise reduction function 44 Cinema mode 44 MagicPix function 45 Image stabilizer function 45 Recording with the video light 46 Manual recording functions 47 Scene mode 47 Manual focus adjustment 49 White balance 50 Manual shutter speed aperture adjustment 52 Playback Motion picture playback 53 Editing Editing scenes 56 Deleting scenes 56 Dividin...

Page 8: ...ons 85 Troubleshooting 86 Cautions for use 89 Explanation of terms 93 Specifications 95 Optional accessories 97 DVD video camera accessories 97 When using the remote control not supplied 98 Accessory Order Form 99 Request for Service Notice 100 Limited Warranty 101 Customer Services Directory 102 Index 103 Spanish Quick Use Guide Guía española para el uso rápido 104 ...

Page 9: ... Easy recording l 36 No need to search for the recording start position The new recording will not overwrite any previously recorded scene Easy playback l 53 Recorded scenes are displayed as thumbnails You can easily search for the scenes you want to watch ...

Page 10: ...n easily record dub this video to a VCR or a DVD recorder hard disk Using with DVD player recorder l 75 Just insert the disc into a DVD player recorder compatible with 8 cm 3z discs to play back the scenes recorded with this unit on it If you have a DVD recorder with hard disk you can copy dub scenes recorded on a disc with this unit to the hard disk ...

Page 11: ...ttery holder and slide it until it clicks Removing the battery While sliding the BATTERY RELEASE lever slide the battery to remove it How to turn on off the power While pressing the button A set the OFF ON switch to ON OFF Inserting removing a disc 1 Slide the DISC EJECT lever once and release it 2 Open the cover of the disc compartment by hand and insert remove the disc 3 Push the section marked ...

Page 12: ...ording start stop button again to pause recording Motion picture playback Rotate the mode dial to select 1 Select the scene to be played back 2 Press the joystick 3 Move the joystick to operate 1 Playback Pause Move Skip playback backward Move and hold Review playback 9 Move Skip playback forward 9 Move and hold Cue playback Stops the playback and shows the thumbnails ...

Page 13: ...the supplied USB cable when connecting to the computer Operation is not guaranteed with any other USB cables Battery pack CGA DU12 AV S cable K2KZ9CB00001 AC adaptor PV DAC14D USB cable K1HA05CD0014 DC cable K2GJ2DC00011 8 cm 3z DVD RAM disc Single sided AC cable K2CA2CA00029 or K2CA2CA00025 Shoulder strap VFC3506 1A CAUTION This unit will operate on 110 120 220 240 V AC An AC plug adaptor may be ...

Page 14: ... OFF ON l 24 14 Status indicator l 24 15 Mode dial l 27 16 Joystick l 28 Move up down left or right to select items Press the center to enter the selection 17 Delete button l 56 67 18 Menu button MENU l 31 19 Battery holder l 22 20 Zoom lever W T l 38 Volume lever sVOLUMEr l 54 21 Eyepiece corrector knob l 34 22 Tripod receptacle l 16 23 Battery release lever BATTERY RELEASE l 22 Due to limitation...

Page 15: ...djust the belt length and the pad position 1 Flip the belt 2 Adjust the length 3 Fix the belt Put the strap through the fixture 1 and through the stopper 2 so it will not come off Extend part 3 by at least 2 cm 1z Put the opposite end of the strap through A and attach it in the same way Due to limitations in LCD production technology there may be some tiny bright or dark spots on the LCD monitor s...

Page 16: ...g be sure to cover the lens with the lens cap for protection B When you remove the lens cap press the knobs firmly If the lens cap cord has come off Pass the end of the lens cap cord through the attached eye on the lens cap Then pass the lens cap through the loop made by itself and pull tight This is a hole for attaching the unit to the optional tripod Please carefully read the operating instructi...

Page 17: ... monitor according to your preference It can rotate up to 180o A towards the lens or 90o B towards the viewfinder The brightness and color level of the LCD monitor can be adjusted from the menu l 34 If it is forcibly opened or rotated the unit may be damaged or fail When the LCD monitor is rotated by 180o towards the lens when recording yourself the LCD monitor and the viewfinder will be simultane...

Page 18: ...at Video format Characteristic Rewritable disc Rewritable disc One time recording disc 1 1 By formatting the disc it can be used repeatedly l 69 One time recording disc Display on the screen Indication in these instructions RAM RW VR RW V R Functions Editing on this unit Playback on other products 2 2 DVD players and DVD recorders that support 8 cm 3 discs 3 3 Playback is possible on compatible pr...

Page 19: ... Discs recorded on this unit may not be playable on other products Recording on DVD R in DVD Video Recording format is not supported When using DVD RW or DVD R do not perform the following as doing so may make the disc unusable Record on a disc with other products after recording on it with this unit Record on a disc with this unit after recording on it with other products Insert an un finalized d...

Page 20: ...RW is inserted in this unit the screen on the right appears Select YES then press the joystick 2 Select format type then press the joystick 3 When the confirm screen appears select YES then press the joystick To change the format type format the disc again l 69 If the disc is formatted then all the data recorded on the disc will be erased When using brand new DVD RW VIDEO DVD Video format VR DVD V...

Page 21: ...aning sprays benzine thinner static electricity prevention liquids or any other solvent Do not use scratch proof protectors or covers Do not drop stack or impact discs Do not place objects on them Do not use the following discs Discs with exposed adhesive from removed stickers or labels Discs that are badly warped or cracked Irregularly shaped discs such as heart shapes Do not place in the followi...

Page 22: ...hing The battery is over discharged discharged excessively In a while the lamp will light up and normal charging will start When the battery temperature is excessively high or low the CHARGE lamp flashes and the charging time will be longer than normal Battery charging time l 23 We recommend using Panasonic batteries If you use other batteries we cannot guarantee the quality of this product Push t...

Page 23: ...will flash The recordable time will become shorter when you use both the viewfinder and the LCD monitor simultaneously while rotating the LCD monitor frontward to record yourself etc The batteries heat up after use or charging This unit will also heat up while being used This is not a malfunction Be aware that the operating time of the battery will become shorter in low temperatures We recommend c...

Page 24: ...hts red The date and time display flashes Set this l 33 While pressing the button A set the OFF ON switch to OFF The status indicator B goes off Connecting to the AC outlet Turning the unit on off How to turn on the power A B How to turn off the power A B When the power is turned on for the first time after changing the disc or battery the unit carries out a recognition procedure to check that the...

Page 25: ... release it A few moments after the ACCESS PC lamp blinks the cover of the disc compartment will open slightly 2 Open the cover of the disc compartment by hand and insert remove the disc Inserting disc Fit the disc onto the spindle in the center A Recording playback side B Pickup lens Removing disc While pressing down on the spindle grasp the edge of the disc and gently lift it out 3 Push the sect...

Page 26: ...t it with its recording playback side facing the inside Do not allow the recording playback side to become dirty or scratched Do not remove the battery pack or disconnect the AC adaptor while removing the disc or until power is completely turned off If you do the cover will not open If this happens reattach the battery pack or reconnect the AC adaptor slide the DISC EJECT lever once and then relea...

Page 27: ...modes Rotate the mode dial slowly but surely Do not forcefully turn the dial Rotate the mode dial and set the desired mode pictograph to the position shown in the illustration Disc recording mode l 36 Use this to record motion pictures on a disc Disc playback mode l 53 Use this to play back motion pictures on a disc ...

Page 28: ...ions l 31 Press the center of the joystick and icons will be displayed on the screen Each press switches the display as follows depending on the mode In the disc playback mode the icons will be automatically displayed on the screen Basic operations 1 Select by moving up 2 Select by moving down 3 Select by moving left 4 Select by moving right 5 Press the joystick to select the item Joystick and scr...

Page 29: ... white balance adjustment mode is selected 51 4 White balance 50 Shutter speed 52 Iris or gain value 52 s r 21 White balance mode selection manual adjustments 49 50 52 Disc playback mode A The operation icon is off Icon Direction Function Page 1 3 Playback pause 53 4 Stop playback and show thumbnails 53 2 Rewind skip during playback 53 2 Reverse slow frame playback during pause 54 9 1 Fast forward...

Page 30: ...witching the language Switching the language You can switch the language on the screen display or the menu screen 1 Press the MENU button then select LANGUAGE and press the joystick 2 Select English and press the joystick ...

Page 31: ...isplayed differs depending on the position of the mode dial Do not switch the mode dial when the menu is displayed 2 Move the joystick up or down in order to select the desired top menu A 3 Move the joystick right or press the joystick The submenu B is displayed 4 Move the joystick up or down in order to select the submenu item C Current settings on menus MENU A B C ...

Page 32: ...own in order to select the desired item 7 Press the joystick to enter the selection To get back to the previous screen Move the joystick left To exit the menu screen Press the MENU button The menu screen does not appear during recording or playing You cannot start other operations while the menu screen appears MENU ...

Page 33: ... desired display style and press the joystick Changing the date and time display style Press the MENU button then select SETUP DATE TIME desired display style and press the joystick The date and time function are driven by a built in lithium battery Make sure to check the time before recording If 0 or is indicated when this unit is turned on then the built in lithium battery runs down After chargi...

Page 34: ...tor Color level of the LCD monitor EVF SET Brightness of the viewfinder In order to adjust the brightness of the viewfinder close the LCD monitor and the viewfinder will be activated When the LCD monitor is rotated by 180 towards the lens the brightness of the LCD monitor cannot be adjusted These settings will not affect the images actually recorded Adjust the focus by sliding the eyepiece correct...

Page 35: ...ur hand through the grip belt 3 Do not cover the microphones or sensors with your hands 4 Keep your arms near your body 5 Slightly open your legs When you are outdoors record pictures with the sunlight behind you If the subject is backlit it will become dark in the recording Basic camera positioning 4 5 1 2 3 ...

Page 36: ...ng and pressing it again to pause recording become one scene When about 5 minutes has passed without any operation this unit automatically turns off to prevent the battery from running down When you use this unit turn it on again This setting can also be set to OFF l 79 POWER SAVE The maximum number of scenes on a disc per side 999 Even if there is remaining capacity for recording on a disc you ma...

Page 37: ...c pattern noise may appear on a playback image in the following cases When there is a complicated pattern in the background When the unit is moved too much or too fast When a subject with sharp movements has been recorded Particularly if REC MODE was set to during recording Screen indications in the disc recording mode R 0h02m R 0h02m R 0h02m 0h00m10s 0h00m10s 0h00m10s SP A B C Immediately after r...

Page 38: ...e range over which the zoom lever is moved When the zoom speed is high the subject may not be focused easily RAM RW VR RW V R If the zoom magnification exceeds 30k then the digital zoom function will be activated The maximum magnification provided by the digital zoom can be switched Rotate the mode dial to select Press the MENU button then select ADVANCED D ZOOM desired item and press the joystick...

Page 39: ...e is horizontally flipped as if you see a mirror image However the image recorded is the same as a normal recording Rotate the mode dial to select Rotate the LCD monitor towards the lens side When the LCD monitor is opened the viewfinder automatically turns off However if the LCD monitor is then rotated towards the lens side the viewfinder is activated When the LCD monitor is rotated towards the l...

Page 40: ...k to display the icon shown in the illustration 2 Move the joystick down to select To cancel the soft skin mode Select again If the background or anything else in the scene has colors similar to the skin color they will also be smoothed If the brightness is insufficient the effect may not be clear Soft skin mode This makes skin colors appear softer for a more attractive appearance ...

Page 41: ...t to select 3 Press the recording start stop button Start recording fade in When you start recording the image audio disappears completely and the image audio gradually appears To fade out 1 During recording press the joystick to display the icon shown in the illustration 2 Move the joystick left to select Fade in fade out function Fade in The image and audio gradually appear Fade out The image an...

Page 42: ...e in out The color which appears in fading pictures can be selected Press the MENU button then select ADVANCED FADE COLOR WHITE or BLACK and press the joystick By operating the OFF ON switch the fade in fade out function is canceled While the fade in fade out function is selected it takes several seconds to display the image when you start recording It also takes several seconds to pause recording...

Page 43: ...to select 1 Press the joystick to display the icon shown in the illustration 2 Move the joystick right to select ª The image on the screen will become brighter To return to normal recording Select ª again By operating the OFF ON switch or mode dial the backlight compensation function is canceled Backlight compensation function This is for protecting a backlit subject from being darkened ...

Page 44: ...een so that they look like theater movies Rotate the mode dial to select Press the MENU button then select BASIC CINEMA ON and press the joystick To cancel the cinema mode Press the MENU button then select BASIC CINEMA OFF and press the joystick Images played back vary depending on the TV connected Please refer to the operating instructions for your TV When images are played back on a TV screen th...

Page 45: ... so that dark scenes invisible to the naked eye can be recorded brightly For this reason bright dots that are usually invisible may be seen but this is not a malfunction By operating the OFF ON switch or mode dial the MagicPix function is canceled If set in a bright place the screen may become whitish for a while RAM RW VR RW V R Reduces the image shaking due to hand movement when recording Rotate...

Page 46: ...hin 1 5 m 5 feet of the unit Using the video light reduces battery time Set the video light to off when not in use Do not look directly into the light If the video light is used with a conversion lens attached a slight vignetting darkening around edges effect occurs on the screen Using the MagicPix function at the same time will make conditions even brighter The video light enables brightening of ...

Page 47: ...ically sets optimum shutter speeds and apertures Rotate the mode dial to select 1 Set the AUTO MANUAL FOCUS switch to MANUAL 2 Press the MENU button then select BASIC SCENE MODE desired item and press the joystick Scene mode This is for recording in various situations Display Mode Recording conditions 5 Sports To record sports scenes or scenes where there are quick motions Portrait To make people ...

Page 48: ...htness of the playback image may change If you record a subject illuminated with strong light or a highly reflective subject vertical lines of light may appear If the brightness is insufficient the sports mode does not function The 5 display flashes If this mode is used indoors the screen may flicker Portrait mode If this mode is used indoors the screen may flicker If so change the scene mode sett...

Page 49: ...position The manual focus indication 1MF is displayed 3 Move the joystick left or right to bring the subject into focus When focused with a wide angle the subject may not be in focus when zoomed in First zoom in on the subject and then focus on it To restore to the automatic adjustment Press the AUTO MANUAL FOCUS switch down again to the FOCUS position You can also restore the auto focusing by set...

Page 50: ...tick left or right to select the white balance mode To restore to the automatic adjustment Set the white balance mode to You can also restore the automatic adjustment by setting the AUTO MANUAL FOCUS switch to AUTO White balance This is for recording in natural colors MNL MNL AWB MNL Display Mode Recording conditions Auto white balance adjustment Indoor mode for recording under incandescent lamps ...

Page 51: ...sensor detects the type of light source during recording Do not cover the white balance sensor during recording or it may not function properly When the display flashes white the manual white balance previously adjusted is stored Whenever recording conditions change re set the white balance for correct adjustment When the unit is turned on with the lens cap fitted the automatic white balance adjus...

Page 52: ...cording under fluorescent light mercury light or sodium light because the color and brightness of the playback image may change If you increase the shutter speed manually the sensitivity lowers and accordingly the gain value increases automatically which may increase the noises on the screen You may see vertical lines of light in the playback image of a brightly shining subject or highly reflectiv...

Page 53: ...joystick when you have arrived at the page with the scene you want to display 3 Press the joystick The selected scene is played back on the full screen The operation icon is automatically displayed on the screen 4 Move the joystick to operate During playback the recording time is not displayed on the screen No sound will be heard except during normal playback If pause play is continued for 5 minut...

Page 54: ...e the playback 2 Move the joystick right The frames will be advanced one at a time in the reverse direction when you move the joystick left Normal playback is restored when you move the joystick up Adjust the speaker volume during playback Move the volume lever to change the volume level The further the indicator moves to the right towards the i end the higher the volume level becomes When the adj...

Page 55: ... day they are grouped separately in the following cases When the number of scenes exceeds 99 RAM RW VR RW V R When the disc is removed RW V R When the disc is repaired RW V R When the mode dial is switched R When the power is turned off R Press the MENU button then select PLAY SETUP RESUME PLAY ON and press the joystick If playback of a motion picture is stopped R appears on the thumbnail view of ...

Page 56: ...the scenes on the disc When PLAY MODE is set to BY DATE All the scenes selected by date 2 Only when SELECT is selected in step 1 Select the scene to be deleted then press the joystick The selected scene is encircled by a yellow frame When the joystick is pressed again the selected scene will be canceled Up to 8 scenes displayed on a page can be set in succession 3 Only when SELECT is selected in s...

Page 57: ...lete the unnecessary part l 58 In case of ALL the deletion may take time if there are many scenes on the disc Do not turn off this unit while deleting When you delete scenes use a battery with sufficient battery power or use the AC adaptor It may not be possible to delete scenes that have been divided Combine the divided scenes and then delete them ...

Page 58: ...ess the joystick 2 Select the scene to be divided then press the joystick The selected scene is played back 3 When you reach the area where you want to divide the scene move the joystick down to set the dividing point 4 When the confirmation message appears select YES then press the joystick To continue dividing other scenes Repeat steps 2 4 To complete editing Press the MENU button Dividing a sce...

Page 59: ...ne are combined If you wish to combine scenes that are not next to each other or scenes with different recording dates first create a playlist and then combine the scenes on the playlist l 61 66 3 When the confirmation message appears select YES then press the joystick To continue combining other scenes Repeat steps 2 3 To complete editing Press the MENU button Combining scenes This function is on...

Page 60: ...e of the disc capacity by making a playlist If you create or delete playlists the original scenes will not be modified Editing scenes on a playlist will not affect the original scenes The maximum number of items on a disc per side Playlists 99 Playlist scenes 999 If original scenes are deleted the portion of playlists created with these scenes is also deleted What is a playlist Recorded scenes Pla...

Page 61: ...elected scene will be canceled Up to 8 scenes can be set in succession The scenes are registered in the playlist in the order that they were selected After creating a playlist the order of the scenes in it can be changed by MOVE function l 64 4 Press the MENU button 5 When the confirmation message appears select YES then press the joystick The thumbnail view screen of the created playlist is displ...

Page 62: ...e selected playlist are displayed as thumbnails 3 Select the scene to start playback then press the joystick To select a different playlist When the first scene is selected in the playlist thumbnail view screen move the joystick left The screen returns to the PLAYLIST VIEW step 2 To return to showing the original scenes Press the MENU button then select PLAY SETUP PLAY MODE VIEW ALL or BY DATE and...

Page 63: ...ted scene is encircled by a yellow frame When the joystick is pressed again the selected scene will be canceled Up to 8 scenes can be set in succession The scenes are added to the playlist in the order that they were selected The order of the scenes in the playlist can be changed by MOVE function l 64 5 Press the MENU button 6 When the confirmation message appears select YES then press the joystic...

Page 64: ... be edited then press the joystick 3 Select MOVE then press the joystick 4 Select the scene to be moved then press the joystick The selected scene is encircled by a yellow frame and the position to insert is shown by a red bar 5 Select the position to insert the scene then press the joystick To continue moving other scenes in the playlist Repeat steps 4 5 To complete editing Press the MENU button ...

Page 65: ...aylist to be edited then press the joystick 3 Select DIVIDE then press the joystick 4 Select the scene to be divided then press the joystick The selected scene is played back 5 When you reach the area where you want to divide the scene move the joystick down to set the dividing point 6 When the confirmation message appears select YES then press the joystick To continue dividing other scenes Repeat...

Page 66: ...t EDIT and press the joystick 2 Select the playlist to be edited then press the joystick 3 Select COMBINE then press the joystick 4 Select the scene to be combined then press the joystick The selected scene and the next scene are combined 5 When the confirmation message appears select YES then press the joystick To continue combining other scenes Repeat steps 4 5 To complete editing Press the MENU...

Page 67: ... mode l 62 steps 1 and 2 1 Press the MENU button then select EDIT and press the joystick 2 Select the playlist to be edited then press the joystick 3 Select DELETE SELECT or ALL and press the joystick When ALL is selected the selected playlist will be erased Proceed to step 6 4 Only when SELECT is selected in step 3 Select the scene to be deleted then press the joystick The selected scene is encir...

Page 68: ...leting other scenes Repeat steps 4 6 To complete editing Press the MENU button Deleting scenes on a playlist will not increase the remaining capacity for recording The playlist itself is deleted if you delete all the scenes in it When a playlist is deleted the number of each subsequent playlist decreases by one It may not be possible to delete scenes that have been divided Combine the divided scen...

Page 69: ... format type l 19 then press the joystick 3 When the confirmation message appears select YES then press the joystick When formatting is complete press the MENU button to exit the message screen During formatting do not turn this unit off When you format the disc use a battery with sufficient battery power or the AC adaptor In the case of a double sided disc format each side It may not be possible ...

Page 70: ... If this unit becomes hot or is shaken strongly or impacted while finalizing the finalization will fail and the disc may become unplayable on other devices If the power supply stops while finalizing the finalization will fail and the disc may become unplayable on other devices even if disc repair is carried out Finalizing a disc This is for enabling discs to be played on other devices Finalizing v...

Page 71: ...zing is complete press the MENU button to exit the message screen When you un finalize the disc use a battery with sufficient battery power or the AC adaptor DVD RW VR format cannot be un finalized DVD RW VR format after finalization can be recorded and edited in the same way as DVD RW VR format before finalization DVD R cannot be un finalized Un finalizing a DVD RW This is for un finalizing a DVD...

Page 72: ...utton then select SETUP DISC PROTECT and press the joystick 2 When the confirmation message appears select YES then press the joystick To release disc protection 1 Press the MENU button then select SETUP DISC PROTECT and press the joystick 2 When the confirmation message appears select YES then press the joystick If the disc has been protected on another device it may not be possible to release th...

Page 73: ...R Information such as the number of recorded scenes the remaining space and whether or not the disc is finalized or protected is displayed Rotate the mode dial to select Press the MENU button then select SETUP INFORMATION YES and press the joystick To exit the information screen Press the MENU button ...

Page 74: ...de dial to select 3 Change the input channel on the TV Example Set the channel to VCR2 etc The channel set will differ depending on the terminal to which the unit is connected 4 Start playback on this unit The image and audio are output on the TV If the image or audio from this unit is not output on the TV Check that the plugs are inserted as far as they go Check the connected terminal Check the T...

Page 75: ...lize the disc on this unit l 70 You cannot record images that allow One time only recording on a 8 cm 3z disc RW V R 1 Finalize the disc on this unit l 70 2 Insert the disc in the DVD recorder player then play it back Do not insert a disc that has not been finalized into a DVD recorder player the disc may be unusable Also a message asking you to format the disc may appear on the DVD recorder Do no...

Page 76: ...0 2 Insert the disc in the DVD recorder then copy dub the contents onto the hard disk For details on how to copy dub the images onto the hard disk refer to the operating instructions of the DVD recorder DVD RW VR format may have to be finalized In this case finalize the disc on this unit l 70 Do not insert a DVD RW Video format or DVD R that has not been finalized into a DVD recorder the disc may ...

Page 77: ...to it This allows you to enjoy more beautiful pictures 2 Turn on this unit then rotate the mode dial to select 3 Change the input channel on the video device and TV Example Set the channel to LINE1 etc on the video device The channel set will differ depending on the terminal to which the unit is connected 4 Start playback on this unit Then start recording on the connected device See the operating ...

Page 78: ...30 Motion picture playback menus DELETE Only when PLAY MODE is set to VIEW ALL or BY DATE SELECT l 56 ALL l 56 PLAY SETUP PLAY MODE l 55 61 62 RESUME PLAY l 55 EDIT SCENE Only when PLAY MODE is set to VIEW ALL or BY DATE DIVIDE l 58 COMBINE l 59 EDIT Only when PLAY MODE is set to PLAYLIST ADD l 63 MOVE l 64 DIVIDE l 65 COMBINE l 66 DELETE l 67 SETUP FORMAT DISC l 69 FINALIZE l 70 UN FINALIZE l 71 ...

Page 79: ...t on again When using the AC adaptor the unit will not turn off even if you set this to 5 MINUTES INITIAL SET YES NO When there is a menu that cannot be selected depending on a combination of functions set to YES for changing the menu settings back to the initial shipping condition Language setting cannot be back to the initial shipping condition DEMO MODE OFF ON This item is used to start the uni...

Page 80: ...anual focus 2t Zoom magnification indication ª Back light mode Image stabilizer 1 100 Shutter speed OPEN F2 0 F number 0dB Gain value Soft skin mode Fade White Fade Black MagicPix function Video light Zoom microphone Wind noise reduction Motion picture recording mode AUTO MNL EIS ZOOM XP SP LP 5 Sports mode Portrait mode Low light mode Spotlight mode Surf snow mode Auto white balance Indoor mode r...

Page 81: ... on the disc displayed Scenes recorded on the selected date displayed Scenes in the selected playlist displayed No 10 Scene number Volume adjustment R Resume playback Contents that have been protected on another device 0 or The built in battery is low l 33 The warning alarm indication appears when LCD monitor is rotated towards the lens side Return the direction of the LCD monitor to normal positi...

Page 82: ...nly and cannot record If you un finalize a DVD RW Video format it can be used for recording l 71 CANNOT RECORD DISC IS FULL The disc is full or the number of scenes has reached the maximum limit so no further data can be recorded Delete unnecessary scenes l 56 or insert a new disc CANNOT RECORD THE NUMBER OF SCENES HAS EXCEEDED THE MAXIMUM LIMIT CANNOT OPERATE TEMPERATURE IS HIGH PLEASE TURN OFF A...

Page 83: ...epairing may take time depending on the error When you repair the disc use a battery with sufficient battery power or the AC adaptor Depending on the condition of the data it may not be possible to completely repair the data If the disc is removed without it being repaired you will no longer be able to playback the scenes recorded before the power went off Do not repair a disc that has been record...

Page 84: ... MagicPix When the video light is on gain up mode Image stabilizer When the MagicPix function is used When the video light is on gain up mode Video light on gain up mode When the MagicPix function is used Functions Conditions which disable the functions Scene mode When setting the AUTO MANUAL FOCUS switch to AUTO When the MagicPix function is used When the video light is on Change of white balance...

Page 85: ...rom one side of the disc to the other The recording time indicated on the disc package is the total time for both sides You will need to eject the disc and turn it over to record on both sides Can DVD R only be recorded to once only Recording can be started and stopped until the disc is full However the data recorded on the DVD R cannot be erased Is playback possible on a DVD player By finalizing ...

Page 86: ...ating time of the battery becomes shorter Has the battery worn out The battery has a limited life If the operating time is still too short even after the battery is fully charged the battery has worn out and can no longer be used This unit cannot be operated though powered up This unit does not operate normally Press the RESET button l 88 If normal conditions are not restored yet remove the batter...

Page 87: ... available memory free up some memory by deleting unnecessary scenes l 56 or use a new disc Is the unit set to the disc recording mode No recording is possible unless the mode dial is at Is the disc cover open If the cover is open this unit may not operate normally Close the disc cover Recording starts but stops immediately The playback picture breaks up for a moment Is the disc scratched or dirty...

Page 88: ... disc to erase the data l 69 Please be aware that if a disc is formatted then all the data recorded on the disc will be erased Even if a disc is formatted it cannot be used Either this unit or the disc may be damaged Please consult a dealer The indication disappears The screen is frozen No operation can be performed Turn off the power to this unit If the power cannot be turned off press the RESET ...

Page 89: ...or a long time When you use the unit in a sandy or dusty place such as a beach do not let sand or fine dust get into the body and terminals of the unit Also keep the unit away from sea water Sand or dust may damage the unit Care should be taken when inserting and removing a disc If sea water splashes onto the unit wipe off the water with a well wrung cloth Then wipe the unit again with a dry cloth...

Page 90: ...e batteries at your destination If you drop the battery accidentally check to see if the terminals are damaged Attaching a battery with damaged terminals can damage the unit Tips for storing the battery The battery should be stored in the vinyl bag so metal does not come into contact with the terminals The battery should be stored in a cool place free from humidity with as constant temperature as ...

Page 91: ...ry or AC adaptor Contact your dealer When the lamp is off Charging is completed When the lamp is off but charging is not completed trouble may have occurred in the AC adaptor or the battery Contact your dealer If there is dust a scratch or dirt on disc or if it is warped the following phenomena may occur Block noise in playback image Momentary stop of playback image Sound interrupted during playba...

Page 92: ...e g a heated swimming pool When this unit is taken to a location with a significant temperature difference such as from a cold place to a hot place If for example you have used this unit for recording on a ski slope and are taking it into a heated room place the unit inside a plastic bag remove as much of the air from inside the bag as possible then seal the bag Leave the unit for about an hour in...

Page 93: ...et 10 Candlelight Outside of the effective range of automatic white balance adjustment the image will become reddish or bluish Even within the effective range of automatic white balance adjustment the automatic white balance adjustment may not function properly if there is more than one light source For light outside the functional automatic white balance adjustment range use the manual white bala...

Page 94: ... the dirty window Similarly when recording something on the opposite side of a road with heavy traffic a vehicle that happens to pass by may be brought into focus Recording a subject that is surrounded by objects with glossy surfaces or by highly reflective objects Since whatever is shiny or glistens is brought into focus it is hard to focus on the subject to be recorded The focus may become blurr...

Page 95: ...icture approx 340 K Lens 30k power zoom F1 8 F3 9 f 1 90 mm to 57 0 mm 35 mm equivalent 35 7 mm to 1072 mm Filter diameter 30 5 mm Zoom 30k optical zoom 50 1000k digital zoom Monitor 2 5z LCD monitor approx 105 K pixels Viewfinder Color electric viewfinder approx 123 K pixels Microphone Stereo with a zoom function Speaker 1 round speaker 20 mm Standard illumination 1 400 lx Minimum required illumi...

Page 96: ...emperature 0 C to 40 C 32 F to 104 F Operating humidity 10 to 80 Recording media 8 cm 3z DVD RAM Ver 2 1 8 cm 3z DVD RW Ver 1 1 2X SPEED 2X 1X 8 cm 3z DVD R for General Ver 2 0 Compression MPEG2 Recording mode and transfer rate XP 9 Mbps VBR SP 5 Mbps VBR LP 2 5 Mbps VBR Audio compression Dolby Digital Dolby AC3 16 bit 48 kHz 2 ch Power source AC 110 V to 240 V 50 60 Hz Power consumption 19 W DC o...

Page 97: ...VD video camera accessories Accessory No Figure Description LM AF30U 8 cm 3z DVD RAM single sided LM AF60U 8 cm 3z DVD RAM double sided LM RW30U 8 cm 3z DVD RW single sided LM RW60U 8 cm 3z DVD RW double sided LM RF30V 8 cm 3z DVD R single sided PV DAC14 AC adaptor with AC Cable and DC Cables CGA DU12A 1B 1150 mAh Rechargeable Lithium Ion Battery Pack CGA DU21A 1B 2040 mAh Rechargeable Lithium Ion...

Page 98: ...ame or equivalent type recommended by the equipment manufacturer Discard used batteries according to manufacturer s instructions Risk of fire explosion and burns Do not recharge disassemble heat above 100 C 212 F or incinerate Keep the Button Type battery out of the reach of children Never put Button Type battery in mouth If swallowed call your doctor Install battery with Panasonic PART NO CR2025 ...

Page 99: ...hip To Mr Mrs Ms First Last Street Address City State Zip Phone Day Night 4 Shipping information UPS delivery requires complete street address Please photocopy this form when placing an order 3 Method of payment check one Check of Money Order enclosed NO C O D SHIPMENTS VISA MasterCard Make Check or Money Order Payable to PANASONIC ACCESSORIES Please do not send cash 2 Items Ordered Quantity Acces...

Page 100: ... this product needs service Please include your proof of purchase Failure to do so will delay your repair To further speed your repair please provide an explanation of what is wrong with the unit and any symptom it is exhibiting Mail this completed form and your Proof of Purchase along with your unit to Panasonic Services Company 410B Airport Road Elgin IL 60123 9333 Attn Camcorder Repair ...

Page 101: ... TV s or non expanded standard 4 3 pictures on wide screen TV s or onscreen data in a stationary and fixed location The warranty ALSO DOES NOT COVER damages which occurred in shipment or failures which are caused by products not supplied by the warrantor or failures which result from accidents misuse abuse neglect bug infestation mishandling misapplication alteration faulty installation set up adj...

Page 102: ...na Puerto Rico 00985 Phone 787 750 4300 Fax 787 768 2910 For hearing or speech impaired TTY users TTY 1 866 605 1277 Purchase Parts Accessories and Instruction Books online for all Panasonic Products by visiting our Web Site at http www pasc panasonic com or send your request by E mail to npcparts us panasonic com You may also contact us directly at 1 800 332 5368 Phone 1 800 237 9080 Fax Only Mon...

Page 103: ...ial setting 79 Iris 52 L Language 30 LCD monitor 17 34 92 M MagicPix function 45 Manual focus 49 Menu 31 Menu list 78 Motion picture playback 53 Motion picture recording 36 O Operation icons 28 P Pickup lens 25 Playing back motion pictures by date 55 Playlist 60 Power save 79 Protect Disc 72 R Recording mode 37 Recording time elapsed 37 Remaining time 37 Resume playback 55 S Scene mode 47 Self rec...

Page 104: ...uje la batería contra el porta batería y hágala deslizar hasta que dispare Cómo quitar la batería Mientras hace deslizar la palanca BATTERY RELEASE haga deslizar la batería para quitarla Cómo encender apagar la alimentación Mientras pulsa el botón A ajuste el interruptor OFF ON a ON OFF Insertar quitar un disco 1 Haga deslizar la palanca DISC EJECT una vez y la deje 2 Abra la tapa del compartimien...

Page 105: ...arada de la grabación para detener brevemente la grabación Reproducción de imágenes dinámicas Gire el selector de modo para seleccionar 1 Seleccione la escena a ser reproducida 2 Pulse el joystick 3 Mueva el joystick para obrar 1 Reproducción Pausa Mueva Salto de reproducción hacia atrás Mueva y mantenga Reproducción regresiva 9 Mueva Salto de reproducción en adelante 9 Mueva y mantenga Reproducci...

Page 106: ...106 LSQT1040 Others ...

Page 107: ...107 LSQT1040 Others ...

Page 108: ...016 7000 B Panasonic Consumer Electronics Company Division of Panasonic Corporation of North America One Panasonic Way Secaucus NJ 07094 Panasonic Puerto Rico Inc Ave 65 de Infantería Km 9 5 San Gabriel Industrial Park Carolina Puerto Rico 00985 P ...

Reviews: