background image

19

INS

T

A

L

LI

NG


Y

O

UR 

AP

P

ARA

TUS

User Parameters

(See note1)
(See note2)
(See note3)

STOP

FUNCTION/
EDIT

COPY/SET

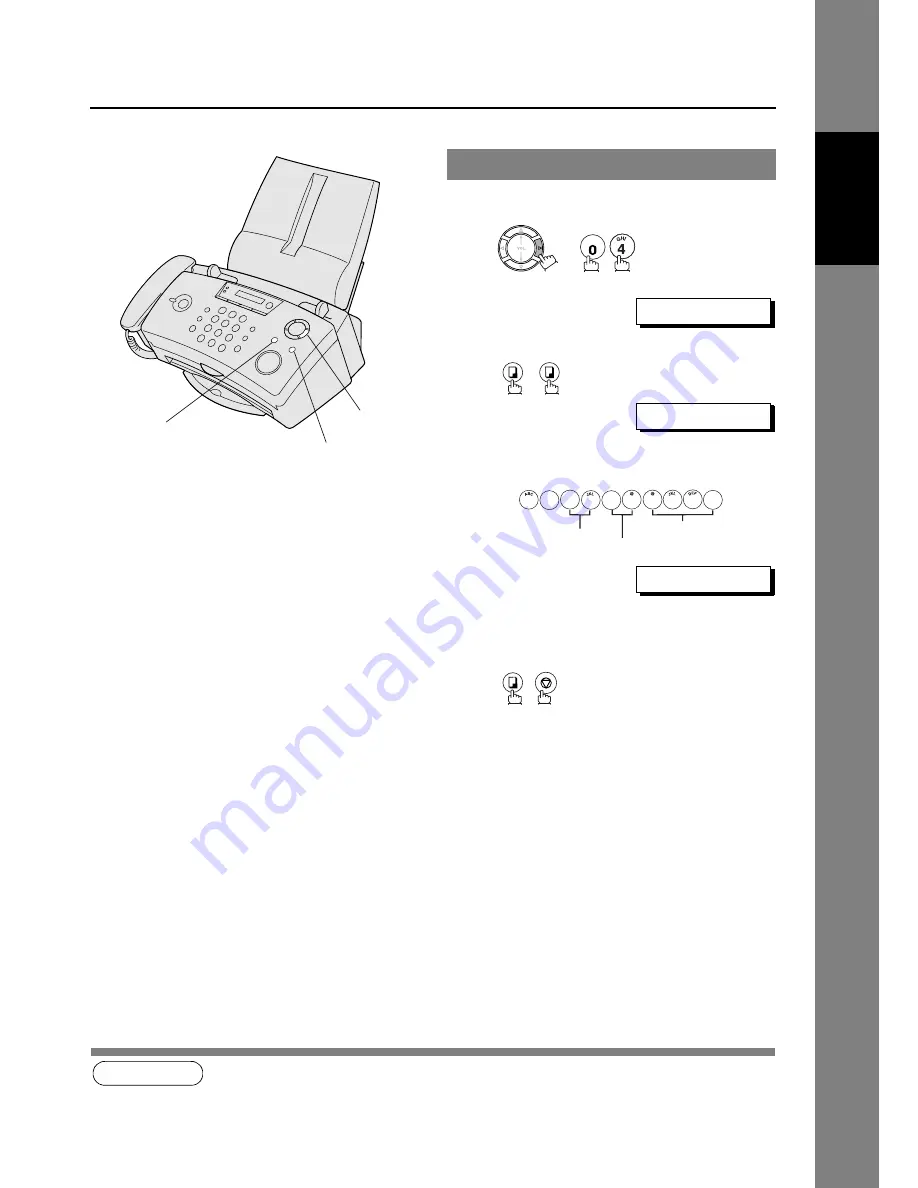
Setting the Date and Time

You can set to display Date and Time on your
apparatus.

1

2

3

Enter Date, Month, Year and Time.

Ex: 20, May 2001 PM3:30

If you make a mistake, use the [<] and [>] to
move the cursor to edit.

4

FUNCTION/

EDIT

BASIC SETTING ?

COPY/

SET

COPY/

SET

01-01-’00 00:00

0

0

0

0

1

2

1

5

3

5

[0] must be inserted
if it is one digit.

24 hours

Lower digits of Year

20-05-’01 15:30

COPY/

SET

STOP

1. To cancel operation press [STOP] button.
2. The accuracy of the clock will be approximately ±60 seconds a month.
3. If a power failure occurs, a built-in battery will back up this information up to 8 minutes when

it is fully charged.

NOTE

Summary of Contents for UF-E1

Page 1: ...User s Guide Before operating this product please read the instructions carefully and save this manual for future use English Facsimile UF E1 DZSD001252 product number ...

Page 2: ...L NO Sending and Receiving Documents XMT RCV Selecting Functions SELECT FUNC Managing Outgoing Messages OGM HOW TO SET OGM Remote Control Code Table RMT CONTROL CODE Set Up Internet Parameters INTERNET SETTING Register E mail Address EMAIL ADDRESS Sending and Receiving Fax via Internet INTERNET XMT RCV Printing Help 1 2 to select the items see below to print 3 Supplies Black Ink Cartridge Order No...

Page 3: ...bers 28 Erasing Speed Dialling Numbers 29 T Telephone 30 Directory Search Dialling 30 Direct Dialling 31 Abbreviated Dialling 31 Manual Number Dialling 31 T Loading Documents 33 Documents You Can Send 33 How to Load Documents 34 Setting Contrast Resolution and Halftone 34 T Sending Documents 35 Multi station Transmission Broadcasting 36 T Receiving Documents 37 TEL mode 39 FAX TEL Auto Switching m...

Page 4: ...T Sending Documents Via Internet 67 Sending Documents 67 Multi station transmission 68 T Receiving Messages Documents Via Internet 69 T Error Messages 70 I FAX Error Messages 70 T Programming Internet Parameters 71 Configuring Network Connection 71 T Programming Internet Parameters 72 Entering Characters 72 Registering Mail Setting 73 T Registering Editing of Directory Search 74 Registering Direct...

Page 5: ...e Print Cartridge Contact 93 Removing Dried Ink from the Nozzle of the Print Cartridge 94 Cleaning the Drain Pan 94 Clearing a Document Jam 95 Adjusting the Automatic Document Feeder ADF 95 Checking the Telephone Line 96 T Specifications 97 T Paper Specifications 99 T Glossary 100 T ITU T Image No 1 103 MAINTENANCE AND TROUBLESHOOTING APPENDIX ...

Page 6: ...POWER SUPPLY CORD FROM AC OUTLET WHEN DISASSEMBLING FOR FUTURE USE CAUTION denotes hazards that could result in minor injury or damage to the machine 1 When you know that a thunderstorm is coming we recommend that you 1 Unplug the telephone line cord from the phone jack 2 Turn off the power and unplug the power supply cord from AC outlet 2 The apparatus may not necessarily provide an effective tra...

Page 7: ...S Notice to Users in New Zealand The grant of a Telepermit for any item of terminal equipment only indicates that Telecom has accepted that the item complies with minimum conditions for connection to its network It does not mean endorsement of the apparatus by Telecom nor does it provide any sort of warranty Above all it does not assure that any item will work correctly in respect to another item ...

Page 8: ...its 0000 For business users on a Centrex line your display will also show the Centrex extension numbers in the shorter extension number format used within your company TO RETURN A CALL From the CALL SELECTION print out select the telephone number which you wish to call If you recognize the telephone number as a local non cellular number then you can simply dial the 7 digit telephone number without...

Page 9: ... place where you bought the apparatus or an office supplies store before proceeding with installation Apparatus Handset Curl Cord Telephone Line Cord Power Cord User s Guide and Quick Reference Guide Ink Cartridge Black CD ROM Panafax Printing System and Quick Start Guide PTT Plug For Australia only Roset It may not be supplied depending on countries Registration Form and Internet Setup Guide Dust...

Page 10: ... External View Front View Rear View Recording Paper Guide Handset Recording Paper Tray Document Guides Recording Paper Stacker Document Exit Pull out when copying or receiving Printer Interface Connection ...

Page 11: ... detail in this manual 13 REPLAY Used to replay any stored messages 14 OUT Used to set when the user is not around to attend to calls 15 REDIAL PAUSE Used to set a pause when entering a telephone number or redialling the last dialled number 16 HOLD Used to pause an interval during a conversation 17 SPEAKERPHONE Used for hands free conversation or to enter a space when registering a telephone numbe...

Page 12: ...l times 3 This apparatus must be properly earthed through an ordinary 3 prong AC outlet If 3 prong AC outlet is not provided it is required to be earthed to the terminal on the rear of the apparatus 4 This apparatus cannot function during a power failure 1 Connect the handset cord 2 Connect the telephone line cord 3 Connect the power cord 4 Connect the printer interface cable It is not attached Pr...

Page 13: ...he wiring code as below If in any doubt please consult a qualified electrician Use a fuse that is approved by ASTA or BSI to BS1362 Always replace the fuse cover and never use the plug with the fuse cover omitted IMPORTANT The wires in this mains lead are coloured in accordance with the following code Green or Green Yellow Earth Blue Neutral Brown Live As the colours of the wires in the mains lead...

Page 14: ...ake out the Ink Cartridge from its plastic packaging 5 Remove the tape on the Ink Cartridge 3 6 Hold the Ink Cartridge with the contact points gold plated facing inwards and slide the Ink Cartridge into the Ink Cartridge Cradle Continued on the next page CAUTION Make sure that the old and new Ink Cartridges are out of reach from the children as the ink may be harmful to them 1 2 5 Ink Cartridge Cr...

Page 15: ... the cartridge See note1 4 7 Press the outer end of the Ink Cartridge as illustrated until a click sound is heard 5 8 Close the Cartridge Cover 9 Close the Panel Cover 10 Press 0 for new Ink Cartridge 1 You may purchase the required ink cartridge Order No PC 30BK Black PC 30CL Colour for your apparatus from the place where you bought the apparatus or an offfice supplies store 9 8 NOTE ...

Page 16: ...dge in its home position when the UF E1 is not being used Leaving it out of position will cause the ink to evaporate quickly Storing Ink Cartridge The following instructions will help you when storing unused ink cartridge Keep the ink cartridge in its sealed container until you are ready to use it Store the ink cartridge container at room temperature Check the expiration date on the cartridge pack...

Page 17: ...y Extender 2 2 Place the recording paper FACE UP on the Paper Tray until the leading edge placed into the apparatus stops and make sure the top sheet enters first 3 Adjust the Paper Guide to the width of the recording paper 3 4 Place the Dust Protector Cover on the Paper Tray See note 1 1 To avoid paper feed problem the Dust Protector Cover must be installed after placing the re cording paper Pape...

Page 18: ... during standby mode Speakerphone Volume 4 levels 1 2 3 or 4 can be set and use and to adjust to return to standby Receiver Volume 4 levels 1 2 3 or 4 can be set When you are calling use and to adjust RINGER VOLUME 1 SPEAKER PHONE MONITOR VOLUME 2 SPEAKER PHONE RECEIVER VOL 2 1 When SILENT DETECTION is set the apparatus will not trigger ringing sound See page 83 2 You can also adjust the volume of...

Page 19: ...mistake use the and to move the cursor to edit 4 FUNCTION EDIT BASIC SETTING COPY SET COPY SET 01 01 00 00 00 0 0 0 0 1 2 1 5 3 5 0 must be inserted if it is one digit 24 hours Lower digits of Year 20 05 01 15 30 COPY SET STOP 1 To cancel operation press STOP button 2 The accuracy of the clock will be approximately 60 seconds a month 3 If a power failure occurs a built in battery will back up this...

Page 20: ...ceives your documents Setting Your NAME 1 2 3 Enter your NAME max 25 characters and digits by using the keypad See page 21 Ex PANASONIC If you make a mistake use and to move the cursor to edit If more that 11 characters are entered the characters on the left will be scrolled off from the display 4 FUNCTION EDIT BASIC SETTING COPY SET COPY SET NAME NAME PANASONIC COPY SET STOP ...

Page 21: ...e and press COPY SET This enters the selected characters Ex Entering PANASONIC Entering Characters Ten buttons Character String Ten buttons Character String Number of times buttons pressed Number of times buttons pressed 1 2 3 4 5 6 7 8 9 1 2 3 4 5 6 7 8 9 1 P Q R S 7 A B C 2 T U V 8 D E F 3 W X Y Z 9 G H I 4 0 J K L 5 M N O 6 Panel buttons Use Enter a SPACE Move the cursor to the right or left De...

Page 22: ...ter your ID max 20 digits by using the keypad and SPEAKERPHONE for a space Ex If you make a mistake press CLEAR to erase the number then reenter the correct number If more than 11 characters are entered the characters on the left will be scrolled off from the display 4 1 You may use to enter a character at the beginning of the ID number to indicate the fol lowing digit s for your country code 2 Ex...

Page 23: ... STOP FUNCTION EDIT Keypad Microphone COPY SET START To Record TAM OGM 1 2 3 4 After a beep tone is heard start recording via the microphone approx 20 cm away and speak towards MIC on the Control Panel 5 to end recording The OGM is played FUNCTION EDIT COPY SET TAM OGM COPY SET REC TAM OGM COPY SET PRESS START START STOP Sample of greeting messages TAM OGM Hello I am unable to answer your call rig...

Page 24: ...se TAM OGM 1 2 or or 3 Your apparatus plays the recorded OGM See note 2 4 Your apparatus erases the recorded OGM See note 3 FUNCTION EDIT COPY SET TAM OGM COPY SET ERASE TAM OGM COPY SET ERASE F T FIRST COPY SET ERASE F T LAST COPY SET START TO ERASE START 1 Press STOP anytime to end OGM 2 When the apparatus beeps 3 times and the display shows NOT RECORDED it means that OGM is not recorded 3 To ch...

Page 25: ... Control Panel 5 to end recording The OGM is played FUNCTION EDIT COPY SET TAM OGM COPY SET REC F T FIRST COPY SET PRESS START START STOP To Record F T Last OGM 1 2 3 4 After a beep tone is heard start recording via the microphone approx 20 cm away and speak towards MIC on the Control Panel 5 to end recording The OGM is played FUNCTION EDIT COPY SET TAM OGM COPY SET REC F T LAST COPY SET PRESS STA...

Page 26: ... to 7 To return to standby press STOP 1 If you require a special access number to get to an outside line enter it first and then press REDIAL PAUSE A hyphen is displayed for pause 2 Use SPEAKERPHONE to enter a space between the numbers to make it easier to read 3 If you are using Pulse dialling and you wish to change to Tone dialling in the middle of dialling press TONE represented by a T The dial...

Page 27: ...OP 1 If you require a special access number to get to an outside line enter it first and then press REDIAL PAUSE A hyphen is displayed for pause 2 Use SPEAKERPHONE to enter a space between the numbers to make it easier to read 3 If you are using Pulse dialling and you wish to change to Tone dialling in the middle of dialling press TONE represented by a T The dialling method will be changed from Pu...

Page 28: ...ONIC TEL 9 555 1234 COPY SET COPY SET 1 2 3 4 to move the cursor to the incorrect character and delete incorrect character by CLEAR and enter new character 5 6 to move the cursor to the incorrect character and delete incorrect character by CLEAR and enter new character 7 To correct another telephone number repeat steps 1 to 5 DIRECTORY SEARCH MATSUSHITA PANASONIC FUNCTION EDIT COPY SET NAME PANSON...

Page 29: ...er DIRECTORY Dialling Number Erasing Speed Dialling Numbers 1 2 Enter the ABBR dialling numbers you want to erase Ex 3 4 5 6 ABBR ABBR NO PANASONIC FUNCTION EDIT EDIT DELETE COPY SET START TO DELETE START 1 2 3 4 5 6 DIRECTORY SEARCH MATSUSHITA PANASONIC FUNCTION EDIT EDIT DELETE START TO DELETE COPY SET START ...

Page 30: ...et VOL DIRECTORY SEARCH Directory Search Dialling 1 Please register telephone number and station name before use See pages 26 and 27 2 3 4 Lift up the handset DIRECTORY SEARCH MATSUSHITA PANASONIC Initial Character Ten Keys Initial Character Ten Keys Initial Character Ten Keys 1 Press JKL 5 Press WXYZ 9 Press ABC 2 Press MNO 6 Press Other Press DEF 3 Press PQRS 7 Press Press GHI 4 Press TUV 8 Pres...

Page 31: ... methods Enter a telephone number from the keypad Abbreviated Dialling See below Directory Search Dialling See page 30 3 When the other party answers begin your conversation Abbreviated Dialling 1 and a 1 digit code Ex The display will show the registered name 2 Lift up the handset or press SPEAKERPHONE The full number e g 9 555 1234 will be dialled Manual Number Dialling 1 Enter the telephone num...

Page 32: ...pause during a conversation Melody will be played to the caller 2 Press HOLD again to resume conversation 1 Press SPEAKERPHONE or lift up the handset 2 Press REDIAL PAUSE button 3 The apparatus starts to dial the last dialled telephone number 1 Press SPEAKERPHONE 2 Talk with the other party 3 Press SPEAKERPHONE again after you finished talking 00 00 20 HOLD REDIAL PAUSE SPEAKER PHONE ...

Page 33: ...er etc or made of cloth or metal Remove clips staples or other similar fastening objects You are advised to make a photocopy of the above documents before transmission Documents You Can Send Document Size Document Thickness Effective Scanning Area Minimum Size 105 148 Maximum Size 297 210 Direction Direction Single sheet 0 06mm 45g m2 to 0 15mm 112g m2 Multiple sheets 0 06mm 45g m2 to 0 10mm 80g m...

Page 34: ...reset to STANDARD resolution Use Fine or Super Fine for detailed documents and Halftone when sending photographs or illustrations with grey tones Press RESOLUTION repeatedly to select See note1 See note2 FACE DOWN How to Load Documents 1 Set documents FACE DOWN and make sure bottom sheet enters the apparatus first A maximum of 20 pages at a time 2 Adjust the document guides to the width of the doc...

Page 35: ...cument Guides 2 Press REDIAL PAUSE button 3 The apparatus starts to dial the last dialled telephone number 1 To stop the transmission press STOP 2 If you need a special access number to get to an outside line dial it first then press PAUSE to enter a pause represented by a before dialling the full number Ex 9 PAUSE 555 1234 3 If you are using pulse dialling and you wish to change to Tone dialling ...

Page 36: ...n of the following methods Abbreviated Dialling See page 31 Directory Search Dialling See page 30 Ex When entering a station for Abbreviated Dialling or Directory Search Dialling press COPY SET after each station is entered 3 The document is stored into memory and then the apparatus starts to dial the telephone number for each station in sequence 1 You can review the stations you have entered in s...

Page 37: ...tus to FAX TAM mode Your Usage When You are at Home IN MODE When You are OUT OUT MODE When you receive a fax call When a telephone call is received the apparatus will ring When you receive a fax call When a telephone call is received the apparatus automatically receives documents the apparatus will ring When you receive a fax call When a telephone call is received the apparatus automatically recei...

Page 38: ...SET COPY SET OUT OUT Lamp OFF Lamp ON Required Setting OUT button Set the RCV MODE IN to the MANUAL RCV Set the RCV MODE IN to the FAX TEL Set the RCV MODE OUT to the FAX TAM Set the RCV MODE OUT to the FAX RCV MODE IN RCV MODE IN MANUAL RCV FAX TEL FAX TAM RCV MODE OUT RCV MODE OUT FAX VOL VOL VOL VOL VOL VOL VOL FUNCTION EDIT FUNCTION EDIT FUNCTION EDIT ...

Page 39: ...et See note 2 Lift up the handset when it rings Reception starts automatically Reception ends Replace the handset 1 If a document is placed in your apparatus when you press START your apparatus will switch to fax transmission To receive faxes remove the doument and press START 2 An incoming call will be cut off when you replace the handset before pressing START 3 To use this function set FRIENDLY ...

Page 40: ...l without ringing See note 1 2 It rings about 12 times See note 2 F T FIRST OGM is played repeatedly to the other party Finally F T LAST OGM is played to the other party See note 3 Change Setting back to TEL mode 1 2 3 4 5 1 Setting RING COUNTER is valid when the SILENT RCV is set to OFF See pages 80 and 81 2 Set the number of rings that the apparatus will alert for a telephone call See page 81 3 ...

Page 41: ...on the next page The apparatus will receive a document with one ring Note To change the number or rings setting of SILENT RECEPTION must be changed See below The apparatus will ring 12 times While ringing the other party will hear F T First OGM and simulated ring back tone Note The number of rings can be changed See Setting the Ring Counter for FAX TEL mode on the next page Fax Call Voice Call You...

Page 42: ...t See note 1 5 Setting the Ring Counter for FAX TEL mode 1 2 3 3 6 9 or 12 is available to select 4 1 Ring Counter varies depending on countries FUNCTION EDIT BASIC SETTING COPY SET RING COUNTER COPY SET RING COUNTER 5 COPY SET STOP FUNCTION EDIT BASIC SETTING COPY SET F T RING CNT COPY SET 12 COPY SET STOP NOTE ...

Page 43: ... will answer the call with one ring See note 1 2 TAM OGM is played 3 When a telephone call is received the message is recorded max 30 seconds See note 2 FAX mode If it is a fax call 1 It will answer the call with one ring See note 1 2 Reception starts If it is a telephone call 1 It will answer the call with one ring See note 1 2 Telephone calls will not be accepted in this mode 1 Setting RING COUN...

Page 44: ... the next page The following table shows a typical example with 2 telephone numbers on a single phone line Ex Hong Kong The following illustration shows a typical set up in your apparatus to detect the double ring pattern See note1 Distinctive Ring Detector DRD Telephone No Usage Distinctive Ring Sound Ring Pattern 555 2222 Fax Riiing Riiing Single Ring 555 1111 Business Ring Ring Ring Ring Double...

Page 45: ...y press STOP Hong Kong DUPLEX RINGING Single Ring Double Ring Fax TEL or TAM Singapore DISTINCTIVE RINGING Single Ring Double Ring Fax TEL or TAM Australia FAXSTREAM DUET Triple Ring Double Ring Fax TEL or TAM New Zealand FAX ABILITY Fax Ringer Primary Ringer Fax TEL or TAM U K SINET Type1 Ringer Normal Ringer Fax TEL or TAM FUNCTION EDIT BASIC SETTING COPY SET DRD COPY SET OFF ON COPY SET 20 MAY ...

Page 46: ... ICM or to return to standby 1 When the apparatus displays MEMORY FULL 870 please erase ICM 2 When you want to receive a call while playing the ICM press STOP The display will show PICK UP TELEPHONE Lift up the handset to talk 3 To cancel ICM playback midway press STOP 4 If nothing is done while playing an ICM for 5 seconds the message will be kept in the memory You can play back the ICM anytime b...

Page 47: ...irst ICM Play the previous ICM Play the next ICM Play the ICM slowly Play the ICM quickly Erase the current ICM Erase all ICMs 1 repeatedly until your request is displayed 2 3 Erase One ICM At A Time 1 Select the ICM to be erased 2 while playing the ICM 3 To erase next ICM continue from step 2 To quit press STOP REPLAY SLOW FAST ERASE FUNCTION EDIT ERASE MESSAGE COPY SET START TO ERASE START 01 TU...

Page 48: ...ET START 1 1 2 1 Load the documents on the ADF 1 Adjust the Document Guides 2 Place the documents FACE DOWN max 20 pages 3 4 Enter the number of copies Ex max 99 5 The apparatus stores the document then prints out the copies COPY SET NO OF COPY 01 NO OF COPY 09 START STORING COPY 01 09 1 It is not available to select Standard and Super Fine S Fine resolution for making copies NOTE ...

Page 49: ...nction allows you to enlarge an A5 sized document to an A4 sized photocopy Enlargement Copy 1 Set document s FACE DOWN on the ADF and adjust the Document Guides 2 3 4 Enlarged copy A4 Original A5 DOCUMENT SET COPY SET NO OF COPY 01 ENLARGE COPY START STORING ...

Page 50: ... Parallel Port on your PC 5 Turn ON the power on the apparatus and the PC 6 to switch the apparatus to the Printer Mode 7 Install Panafax Colour Printing software to your PC while referring to its Quick Start Guide When you replaced Black Ink Cartridge with Colour Ink Cartridge please keep the replaced Ink Cartridge in the Cartridge Holder as illustrated below 8 Press the holding tab to remove Ink...

Page 51: ...t 24 hour clock Ex 11 30 p m 5 Enter telephone number Ex Also documents can be transmitted by any of these combinations Directory Search Dialling Abbreviated Dialling Ex 6 1 If you make a mistake in step 4 press CLEAR then re enter the correct time 2 To cancel the Deferred Communication setting see page 52 3 You cannot register a telephone number into Abbreviated dialling function when deferred tr...

Page 52: ...ransmission See note1 1 2 3 4 See note 1 5 1 2 3 4 1 If you set more than one destination press to confirm FUNCTION EDIT DEFERRED XMT COPY SET CONFIRM COPY SET TIME 23 30 COPY SET station name STOP FUNCTION EDIT DEFERRED XMT COPY SET CANCEL COPY SET START TO CANCEL START DELETED NOTE ...

Page 53: ...ote Station When MANUAL RCV at RCV MODE IN is set 1 Call your apparatus from a remote location 2 Your apparatus will answer after 15 rings 3 and after you hear a long beep dial the Remote Password and button within 10 seconds You must use Tone dialling Ex 4 Replace the handset When FAX TEL at RCV MODE IN is set 1 Call your apparatus from a remote location 2 Your apparatus answers During the greeti...

Page 54: ...ard the microphone from a distance of approximately 20 cm 4 to stop the recording 1 During your conversation 2 to start the recording 3 Continue your conversation 4 to stop the recording 1 Memo Message A message can be recorded through the built in microphone 2 2 way Recording Conversation over the telephone can be recorded for a later reference 3 A warning tone pu pu may be heard while the conver...

Page 55: ...of Voice Message Transfer 1 After a message is recorded your apparatus starts to dial the assigned telephone number 2 When you answer the call you will hear a series of tone Pi Pi Pi 3 and dial the Remote Password within 10 seconds You must use Tone dialling Ex 4 You will hear the message 5 Replace the handset after listening to the message 1 The telephone line will be disconnected if you enter th...

Page 56: ... note4 About Remote Function 1 Make the call from an outside telephone 2 While you are hearing the OGM 3 4 Enter the remote control password 4 digits 5 6 Enter the remote control code within 10 seconds for desired operation See page 57 7 End the call 1 When playing back messages press before ending the call 2 The call will be cut off if the remote control password is not entered within 10 seconds ...

Page 57: ...e1 See note2 Remote Control Code Operation Item 1 Play back the previous message 2 Play back messages 3 Play back next message 6 Delete all messages and recordings Registering the Remote Control Password 1 2 3 4 Enter the remote control password 4 digits Ex 5 1 To quit registration press STOP 2 The bulletin board password and remote control password cannot be the same FUNCTION EDIT TAM SETTING COP...

Page 58: ...ither erase register it to fax directory or Black List or dial to displayed station Dialling to displayed station Deleting all caller s information See note1 See note2 Caller ID List 1234567890123 1 2 3 4 See note 5 or The apparatus starts to dial FUNCTION EDIT CALLS LIST COPY SET CALLED HISTORY COPY SET 1 123456789 2 MGCS SPEAKER PHONE 1 2 3 4 5 6 7 8 FUNCTION EDIT CALLS LIST COPY SET CALLED HIST...

Page 59: ...r 9 FUNCTION EDIT CALLS LIST COPY SET CALLED HISTORY COPY SET 1 123456789 FUNCTION EDIT REGISTER COPY SET STATION NAME COPY SET PANASONIC COPY SET 555 1234 COPY SET STOP 1 2 3 4 5 6 7 Enter Blacklist number 2 digits 01 to 10 and then press COPY SET 8 FUNCTION EDIT CALLS LIST COPY SET CALLED HISTORY COPY SET 1 123456789 FUNCTION EDIT REGISTER BLACK LIST EDIT COPY SET NO 02 111 2345 COPY SET STOP ...

Page 60: ...Caller ID 60 Deleting a displayed station 1 2 3 4 5 6 7 FUNCTION EDIT CALLS LIST COPY SET CALLED HISTORY COPY SET 1 123456789 2 MGCS DELETE COPY SET START TO DELETE START STOP ...

Page 61: ... the Blacklist number 2 digits 01 to 10 and then press COPY SET 5 Enter the telephone number up to 20 digits including pauses and spaces Ex 6 To record another number repeat steps 4 to 6 To return to standby press STOP 1 If the station name sent from the caller side matches with the one registered in the ABBR dial list registered Station Name for its telephone number will be displayed by pressing ...

Page 62: ...s COPY SET Ex 01 to 10 5 Then enter a new telephone number See note 1 2 Ex 6 To change another number repeat steps 4 to 6 To return to standby press STOP 1 Use or to move the cursor then enter the correct number over the incorrect number 2 Use CLEAR to enter a space between the numbers you set Each space is counted as a digit and you can enter up to 20 digits per station FUNCTION EDIT BASIC SETTIN...

Page 63: ...telephone number in the Blacklist Erasing the telephone number in Blacklist 1 2 3 4 Enter the Blacklist number and then press COPY SET Ex 01 to 10 5 repeatedly to delete all numbers 6 To erase another number repeat steps 4 to 6 To return to standby press STOP FUNCTION EDIT BASIC SETTING COPY SET BLACK LIST REG COPY SET NO 02 12345678 COPY SET ...

Page 64: ...inging if it is a fax call or with ringing if it is a voice call See note1 See note2 See note3 Selecting Caller Type 1 2 3 4 Select required station from ABBR dialling numbers or Directory Search dialling numbers 5 6 7 1 To quit setting midway press STOP 2 When you choose TEL setting it rings 5 times and receives documents by current receiving setting 3 When you choose FAX setting it receives docu...

Page 65: ...ument in the personal computer To do this the user has to download a viewer software from the website via a personal computer and convert the documents The address of the website is http www panasonic co jp mgcs internetFAX All i FAX apparatus accept and recognize only TIFF documents Any documents other than TIFF type for instance BMP IPG GIF TXT DOC XLS etc are received an error message will be p...

Page 66: ...he recipient has to inform the sender to convert his documents to TIFF format before transmission The converter software can be downloaded from the following website http www panasonic co jp mgcs internetFAX ISO 8859 1 character set Note that the characters tabulated are acceptable and recognized by this apparatus Any other characters cannot be detected and therefore will not be printed legibly by...

Page 67: ...a Internet See note1 FACE DOWN Sending Documents 1 Set the documents face down 2 3 or 4 The apparatus starts to dial the ISP telephone number DOCUMENT SET INTERNET ENTER STATION S PANASONIC ABBR MGCS START 1 To stop the transmission press STOP NOTE ...

Page 68: ...d Dialling Directory Search Dialling Ex When entering a station for Abbreviated Dialling or Directory Search Dialling press COPY SET after each station is entered 4 The document is stored into memory and then the apparatus starts to dial the ISP telephone number DOCUMENT SET INTERNET ENTER STATION S PANASONIC ABBR COPY SET COPY SET MGCS START STORING 1 To stop the transmission press STOP NOTE ...

Page 69: ...dial to Internet Service Provider and receive messages or documents automatically If the apparatus fails to receive message or documents an error message will be printed See page 70 INTERNET MAIL CHECK START 1 The user can preset timings max 10 times to dial out to ISP to receive emails automatically by the apparatus See page 78 2 Electronic mails will be received into memory and printed out only ...

Page 70: ... FAX Message receives when DEL POP ERR MSG is turned OFF The attached files are stored in server Retrieve them using a personal computer All attached files cannot be printed out due to memory overflow As the attached files have been deleted from server please contact sender if necessary Memory Overflow during receiving a message Message receives when DEL POP ERR MSG is turned ON The attached files...

Page 71: ... COPY SET ck panasonic com 9 10 Enter the password See note Ex abcd 11 12 Ex 202 224 128 006 See note 13 14 Ex 202 224 128 050 See note 15 16 17 to continue registration or press STOP at step 15 to return to standby COPY SET PASSWORD COPY SET PASSWORD PRIMARY DNS COPY SET COPY SET 202 224 128 006 COPY SET SECONDARY DNS COPY SET 202 224 128 050 COPY SET ISP TEL NO CONNECTION MAIL SETTING 1 To corre...

Page 72: ...il Address login name server name subject etc Ex jack Entering Characters Ten buttons Character String Number of times buttons pressed 1 2 3 4 5 6 7 8 9 10 11 12 13 14 15 16 17 18 19 20 21 22 _ 1 a b c A B C 2 d e f D E F 3 g h i G H I 4 j k l J K L 5 m n o M N O 6 p q r s P Q R S 7 t u v T U V 8 w x y z W X Y Z 9 0 space j a c k SPEAKER PHONE COPY SET ...

Page 73: ... note Ex 1234 10 11 12Enter email address See page 72 See note Ex smith japan jp 13 14 15Enter server name See page 72 See note Ex japan jp 16 17 18Enter POP3 server name See page 72 See note Ex japan jp 19 PASSWORD 1234 COPY SET E MAIL ADDRESS COPY SET smith japan jp COPY SET SMTP SERVERS COPY SET japan jp COPY SET POP3 SERVER COPY SET japan jp COPY SET STOP 1 To correct entered data move the cur...

Page 74: ...e the step below 9 FUNCTION EDIT i FAX SETTING COPY SET DIRECT SEARCH COPY SET NEW EMAIL ADD COPY SET STATION NAME NAME JOHN WILLS E MAIL ADDRESS COPY SET john tls com cn COPY SET NEW EMAIL ADD STOP Editing Directory Search 1 2 3 4 5 Scroll down the station name and select the one you want to edit 6 7 8 Enter correct station name See page 72 Ex JOHN SMITH 9 Edit the email address Ex john tls com a...

Page 75: ...EDIT i FAX SETTING COPY SET ABBR ADDRESS COPY SET ABBR NO STATION NAME NAME MS JANE E MAIL ADDRESS COPY SET jane japan com COPY SET STOP Editing ABBR 1 2 3 4 Enter numeric number from 0 to 9 to edit 5 Enter correct station name See page 72 Ex MR SMITH 6 7 Enter correct address See page 72 Ex smith japan com 8 To add new entry repeat from step 4 otherwise continue the step below 9 FUNCTION EDIT i F...

Page 76: ...d Subject 1 2 3 4 and enter sender name See page 72 See note Ex Panasonic 5 6 Enter the title or subject of message See page 72 See note Ex ACE Sales 7 1 To correct entered data move the cursor to required character and overwrite on it 2 To delete entered data press CLEAR repeatedly until all characters were deleted FUNCTION EDIT i FAX SETTING COPY SET USER INFO COPY SET SENDER NAME COPY SET Panas...

Page 77: ... email address Max 60 digits using US ASCII SMTP SERVER Enter the SMTP server name Max 60 digits per entry using US ASCII POP3 SERVER Enter the POP3 server name Max 60 digits per entry using US ASCII 02 DIRECT SEARCH NEW EMAIL ADDRESS EMAIL ADDRESS Enter email address using US ASCII STATION NAME Enter the name to identify the email address CONFIRM Used for editing registered email address Select t...

Page 78: ...ttached files from ISP server once the apparatus has received it OFF Select to keep all emails and attached files in ISP server when the apparatus had an error to receive it 06 MAIL ADD HIST TO REGISTER To register email address from log list press FUNCTION EDIT and select REGISTER TO DELETE To delete email address from log list press FUNCTION EDIT and select DELETE 1 After you changed setting of ...

Page 79: ...AX SETTING COPY SET MAIL ADD HIST COPY SET smith panasonic FUNCTION EDIT REGISTER COPY SET STATION NAME NAME SMITH COPY SET smith panasonic COPY SET STOP Deleting Email Address 1 2 3 4 Scroll down to the desired email address 5 6 Scroll down to select function 7 8 9 FUNCTION EDIT i FAX SETTING COPY SET MAIL ADD HIST COPY SET smith panasonic FUNCTION EDIT DELETE COPY SET START TO DELETE START DELET...

Page 80: ...is made When the transmission ends however these parameters return to their preset values Home position Parameters can be changed by the procedure described below See note1 Setting Fax Parameters 1 or or or or 2 3 repeatedly until your request is displayed Ex Choose SILENT RCV in the BASIC SETTING 4 5 ON or OFF is available to select 6 To set another parameter repeat operation from step 3 or to re...

Page 81: ...Daylight Savings Time automatically The built in clock will advance 1 hour at 2 00 am on the first Sunday in March and fall back 1 hour at 2 00 am on the last Sunday in October 12 HOLD MUSIC ON OFF Select whether or not the apparatus will play Hold Music while the line is being put on hold 13 DRD Distinctive Ring Detector ON OFF Select whether or not the apparatus checks for a distinctive ring pat...

Page 82: ...ec Set the recording time for each incoming message 43 04 IN OUT REMOTE SET ON OFF Select whether or not the apparatus accepts the IN OUT mode to be changed using the Remote Control operation 57 05 CALL SCREENING ON OFF Select whether or not you can monitor the incoming call through the speaker while it is being recorded and answer it if you wish by simply lifting up the handset 1 The contents of ...

Page 83: ... COMM JOURNAL INC OFF ALWAYS Select the print condition for the COMM Journal INC Print only when the transmission has failed OFF Do not print ALWAYS Print after each transmission 84 09 PRINT JOURNAL AUTOMATIC MANUAL Select whether or not the apparatus prints the journal automatically after each 32 transactions 84 11 DIRECT RCV ON OFF Select whether or not the apparatus receives document directly n...

Page 84: ...rnal COMM JOURNAL allows you to verify whether the transmission was successful You may select the print status Off Always Inc in the FAX SETTING COMM JOURNAL See page 83 See note1 See note2 Journal and Lists 1 2 for Transaction Journal or for Fax Parameter List or for Speed Dialling Number List or for Caller ID List See note 1 or for Blacklist See note 1 for i Fax Parameter List for E Mail Address...

Page 85: ... dirty and must be cleaned To clean the scanning area Cleaning the Document Scanning Area 1 1 Open the Panel Cover until it is secured 2 Press the tabs on each side of the Feed Roller inwards and lift it up 2 3 Open the white plastic protector and hold it 4 Wipe the Scanning Area gently with a soft cloth Be sure to use a clean cloth as the Scanning Area is easily scratched 3 5 Press the tabs on ea...

Page 86: ...ording is not prolonged more than the 6 sec limit The voice of the caller is too soft and detected as no sound Voice messages received without talking Caller hangs up the phone without talking Cannot activate OUT mode 47 Telephone Answering Machine Check if memory is full Delete messages Print out documents Transmission stops Transmitting Check if the telephone line cord is disconnected Cannot tra...

Page 87: ...documents are written faintly Check with the transceiver Ensure documents are distinctly written Adjust Scanning Contrast Cannot be printed Recording paper Check if the paper is recommended for use The apparatus does not operate at all Mal function When you encounter mal functioning please disconnect the power supply plug and connect it once again The operation should be normalised However should ...

Page 88: ...15 Replace the Print Cartridge Out of ink 93 016 Paper jam may have occurred Remove jammed paper Ink Cartridge Cradle cannot move 33 34 96 98 031 Reload the document properly Remove document jam Make a copy to fit in correct size Document misfeeding Document is jammed Document length exceeds 1 meter 060 Close the Panel Cover Panel Cover is open 34 96 030 Reload the document properly Remove documen...

Page 89: ...ceived data has too many errors 404 405 Reload the document and send again During initial handshake communication error occurred 400 Check with the other party Reload the document and send again During initial handshake receiving station did not respond or communication error occurred 420 421 Remote side misdeal Check with the other party Apparatus goes to receiving mode but receives no command fr...

Page 90: ...MTP Server s hard disk may be full 716 Check the DNS Server IP Address Check the SMTP Server Name Check the POP Server Name Cannot logon to the designated DNS Server SMTP Server or POP Server 712 Check the registered email address Incorrect email address 714 Try to connect again Email communication error 720 Contact with your ISP company Cannot connect to the POP Server POP server is down 721 Chec...

Page 91: ... reject tone Pi Pi Pi will be heard when HELP is pressed 2 It is not possible to set the minute setting Meaning Info Code Action Page 770 772 782 Try to connect again Connect with your ISP company to compare modem capability Connection error 870 Transmit documents without storing into memory Memory overflow occurred while storing documents into memory for transmission 780 781 784 787 Try to connec...

Page 92: ...m will sound Clearing Recording Paper Jam 1 1 Open the Panel Cover 2 Lift up the Cartridge Cover from the right corner 2 3 Remove jammed paper CAUTION While removing the jammed paper do take care not to touch the cable that is attached to the cartridge holder 3 4 Close the Cartridge Cover 5 Close the Panel Cover 1 2 ...

Page 93: ... the Ink Cartridge from the Ink Cartridge Cradle Clean the Ink Cartridge with a swab moistened only with water DO NOT clean the Nozzle of the Ink Cartridge 4 Gently clean the contact on the Ink Cartridge Cradle with a swab moistened only with water 5 Reinstall the Ink Cartridge and reevaluate the print quality Cleaning the Print Head 1 2 Apparatus starts to clean the Print Head Then prints the Ink...

Page 94: ...aste can so that the nozzle of the Ink Cartridge is pointed toward the waste can 2 Gently scrape the dried ink with the edge of a business card or other rigid paper stock so that the dried ink falls into the waste can DO NOT use a swab to remove dried ink from the Ink Cartridge Cleaning the Drain Pan 1 Open the Panel Cover 2 Open the Cartridge Cover 3 Remove the Ink Cartridge 4 Inspect the Drain P...

Page 95: ...we suggest you adjust the ADF To adjust ADF Clearing a Document Jam 1 1 Open the Panel Cover 2 Remove jammed paper 2 3 Close the Panel Cover Adjusting the Automatic Document Feeder ADF Open the ADF Door and slide the Pressure Adjusting Lever to the desired position depending on the condition Position Condition 1 To prevent feed trouble 2 Standard position 3 To prevent multiple feed trouble ...

Page 96: ...plug the Telephone Line Cord from the telephone jack that was supplied by the telephone company 2 Plug a different regular telephone into the same telephone jack 3 Check for dial tone through the handset If there is still no dial tone report it to your local telephone company or Call from another telephone to this number If the telephone does not ring report it to your local telephone company ...

Page 97: ...ffective Recording Size A4 203 mm x 280 5mm Print Margin Resolution Conforms to ITU T FAX Coding Scheme MH MR Conforms to ITU T Modem Type ITU T V 34 V 29 V 27 ter V 21 and V 17 Modem Speed 33600 31200 28800 26400 24000 21600 19200 16800 14400 12000 9600 7200 4800 2400 and 300 bps DATA Coding Scheme None Modem Type ITU T V 34 V 32bis V 32 V 22bis V 22 Modem Speed 33600 31200 28800 26400 24000 2160...

Page 98: ...TU T Test Chart No 1 using Standard Resolution Power Supply 200 240 VAC 50 60 Hz Single Phase Power Consumption Dimensions 386mm W x 290mm D x 211mm H excluding projections Weight Approx 4 3Kg excluding recording paper Operating Environment Tx Temperature 5 to 35ºC Relative Humidity 15 to 70 Rx Temperature 15 to 35ºC Relative Humidity 20 to 80 Atmospheric pressure 2500 m Standby Approx 2 0W Transm...

Page 99: ...Paper Recycle Paper Letter A4 17 to 24 lb 64 to 90 g m2 70 sheets Max 100 sheets under condition of 20 to 30ºC 50 to 60 RH 70 to 75 g m2 Coated Paper Letter A4 17 to 24 lb 64 to 90 g m2 70 sheets Formulated for ink jet printing Transparency Letter A4 10 sheets Thickness 0 0039 to 0 0051 in 0 10 to 0 13 mm Formulated for ink jet printing 1 It is possible that the paper meets the specifications list...

Page 100: ...hat identifies an Internet site Domain Names always have 2 or more parts separated by dots The part on the left is the most specific and the part on the right is the most general DNS Domain Name Server The purpose of the DNS is to store records containing domain information such as Fully Qualified Domain Names FQDN and translate them to TCP IP addresses DTMF Dual Tone Multi Frequency Dialling meth...

Page 101: ... by your apparatus listing the last 32 transmitting and receiving transactions Keypad A group of numeric buttons located on your control panel LCD Liquid Crystal Display The display area of your apparatus Line Holding You can hold the line by pressing the HOLD button on your control panel While the line is on hold the other party will hear hold music To resume conversation lift up the handset Manu...

Page 102: ...wering Machine TAM which allows the caller to leave a message TIFF Converter The TIFF Converter converts the document into the format that allows the Internet FAX to receive and print as a mail The converter also allows the document to be registered called TIFF file creation function as a file TIFF Image Viewer An application software to view the contents of TIFF F File Some TIFF Image Viewers may...

Page 103: ...y request the installation of a suitable BT connection socket for telephone network or PBX connection In the latter case the form may be used only where the extension wiring is owned by BT To THE DISTRICT BUSINESS SYSTEMS MANAGER At I We have purchased a Approval No and intend to use the equipment in your area I We do do not require the installation of a BT wall socket for this equipment signed Na...

Page 104: ...Facsimile Number Directory Name Number ...

Page 105: ...1 FAX TAM mode 43 FAX TEL Auto Switching mode 40 I Information Codes 88 Installing the Print Cartridge 14 Installing Replacing Recording Paper 17 Interface Cable 12 M Making Copies 48 Memo 2Way Recording 54 Multi station Transmission 36 P Printing Help 2 R Registerring theRemote control Password 57 Remote Function 56 Remote Function Table 57 Remote Reception 53 Removing Dried Ink from the Nose of ...

Page 106: ...tion System Inc CORPORATE OVERSEAS SALES AND OPERATION MANAGEMENT DEPARTMENT 2 3 8 Shimomeguro Meguro ku Tokyo Japan 153 8687 1999 Matsushita Electric Industrial Co Ltd All rights reserved Printed in Singapore H0999TNO DZSD001252 ...

Reviews: