Main Menu - Sound
15
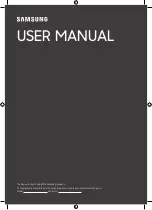
1.
Push the MAIN MENU button.
2.
Move to the SOUND Menu using the Up or
Down button.
3.
Choose the SOUND Menu by using the Left or
Right buttons.
4.
Choose the function to change using the Up or
Down button.
5.
Adjust the setting of the function using the Left
or Right buttons.
6.
Push the MAIN MENU repeatedly until you
return to normal viewing.
Sound Menu
Function
DYNAMIC
.
Amplifies the Low Frequencies and outputs optimum sound. Used where music is
more common than speech such as musicals, video clips etc.
STANDARD
.
Used where speech is more common than music such as talk shows, news etc.
SOFT
.
Used where music and speech are fairly evenly spread.
Note:
Sound menu levels can be set for TV, AV1, AV2, AV3, AV4 and RGB modes.
Item
Effect
Indicator / Operation
BASS
<
>
BASS
-------|------
12
Not adjustable in VIRTUAL Mode.
Less
More
TREBLE
<
>
TREBLE
----------|---
18
Not adjustable in VIRTUAL Mode.
Less
More
BALANCE
<
>
BALANCE
-------|------
32
Left
Right
BASS BOOST
<
>
Used to increase the Bass level.
Off
On
LOUDNESS
<
>
Used to increase the Bass level at low volume settings.
Off
On
SURROUND
<
>
Please refer to page 16
Change
Normalisation
Pressing the Normal (N) button on the remote control, whilst the Sound Menu is displayed, will return all
sound settings to the factory-preset levels. This is called “Normalisation”.
Normalisation
will not
occur if the Sound Menu is not displayed when the Normal (N) button is pressed.
N
EXIT
ACCESS
SELECT