


2 3
You may need to install a driver from the Windows 95 CD-ROM (included) or a PC Card's floppy disk. Simply follow
the on-screen instructions and read the PC Card's operation manual on how to install the driver.
N O T E
3
Turn your computer on
There are some PC Cards that require a special or updated device driver be installed.
Follow the instructions on the screen and read any related manuals on how to install
device drivers.
Installing a PC Card
Simply slide the PC Card in until it snaps into place. Please refer to the manual for each
card on how to install the card (insertion is typically label-side up).
Label-side up
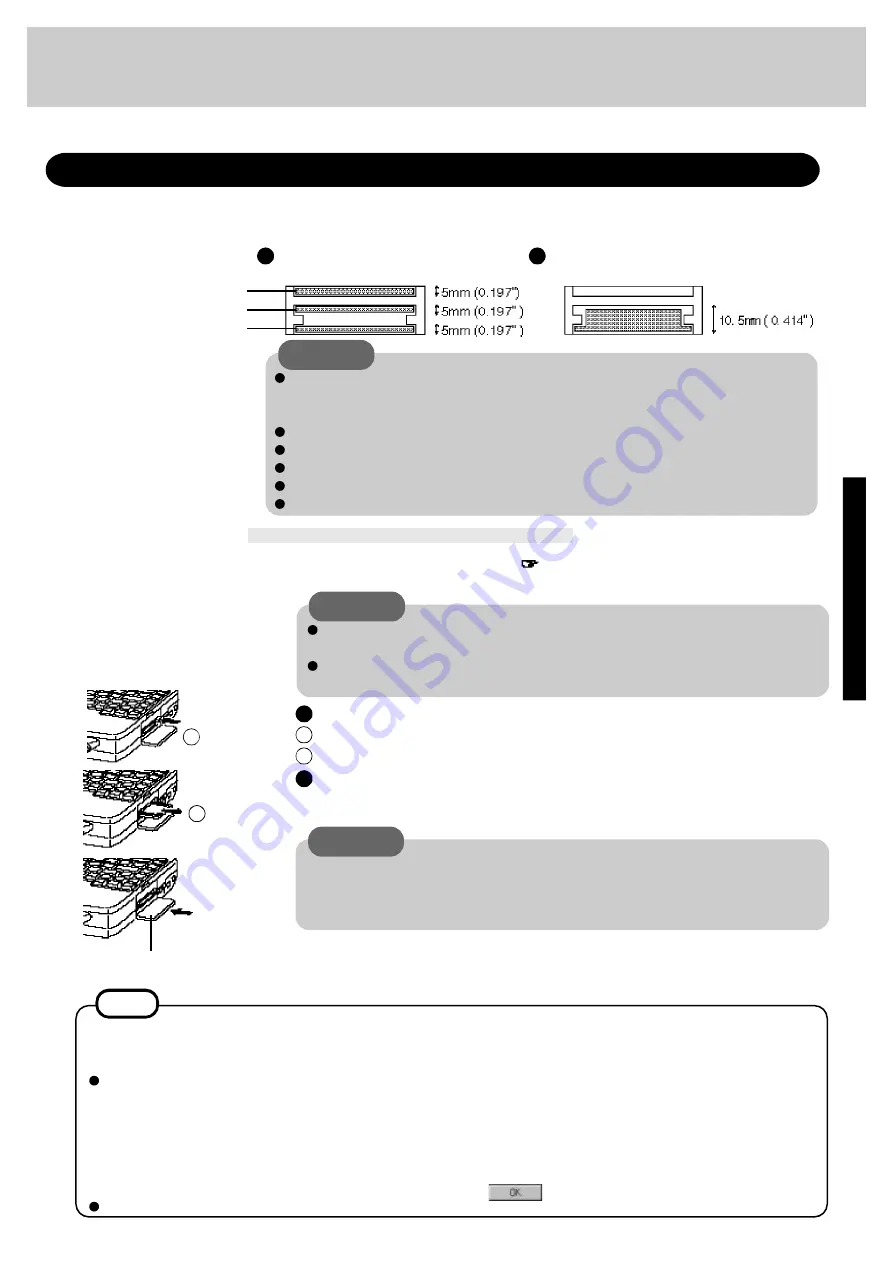
Your computer has three PC Card slots. These slots conform to the PC Card Standard; there-
fore, communications and SCSI devices may be utilized. The slots allow you to use three Type
I or Type II cards (or two Type I and one Type II), or one Type III card.
Using PC Cards
1
2
Type
I
or
II
Three cards can be used simultaneously.
Type
III
One card can be used only in the bottom slot.
C A U T I O N
Please check the PC Cards’ specifications. Be sure the total operating current does not
exceed the specified limit. Damage may result otherwise.
Allowable Current (total for three slots) : 3.3 V: 400 mA, 5 V: 400 mA, 12 V: 120 mA
There are times when both a Type I card and a Type II card will not work at the same time.
SRAM and FLASH ROM cards (except for ATA interface) are not supported.
When using a CardBus type card, use only that card; do not insert any other PC Cards.
Only the bottom slot can support a Zoomed Video (ZV) card.
Only the middle or bottom slot can support a CardBus.
Removing a PC Card
2
C A U T I O N
Power off your computer
(
page 10)
Do not shut down using the suspend or hibernation mode.
1
Do not install or remove peripherals while your computer is in the suspend or
hibernation mode; abnormal operation may result.
Before removing a PC Card, go to [Socket Status] (in [Start] - [Settings] - [Control
Panel] - [PC Card (PCMCIA)]), select the PC Card slot and press [Stop].
Installing/Removing a PC Card
Press the button a second time to partially eject the PC Card.
Pull the PC Card the rest of the way out.
1
2
B u t t o n
middle slot
bottom slot
upper slot
C A U T I O N
CardBus:
You may experience noise when using a CardBus card,
inserted in the PC Card slot. Also, please note that a
parallel device in the ECP mode may not function. Do
not use the ECP mode and disable the sound chip in
the Setup Utility ([Supervisor Setup] - [Sound Chip]
and [Parallel Port (Data Direction)]) when using a
CardBus card.
Use a CardBus card alone with no other card inserted.
ZV Card:
When you use a ZV Card, installation of PhoenixCard Manager95
is needed. Follow these instructions to load PhoenixCard Man-
ager.
1
Set the items of [Sound Chip] to [Automatic (PnP)] in the
Setup Utility.
2
Select [Start] - [Run] and type "c:\util\drivers\pccard\disk1\setup.exe",
press
, then follow the on-screen instructions.
After you insert a PC Card, a message may appear instructing you to insert the Windows
9 5 C D - R O M . I f t h i s h a p p e n s , p r e s s t h e [ B r o w s e ] b u t t o n , t h e n t y p e
"c:\windows\options\cabs". If you have a floppy disk with a driver, insert the disk in the
floppy disk drive, then type "a:".
Artisan Technology Group - Quality Instrumentation ... Guaranteed | (888) 88-SOURCE | www.artisantg.com


