121
English
Using data cloning
Menu settings and adjusted values of a single display
can be copied to multiple displays by using a USB
memory or via LAN.
Note
●
If the sizes of the displays are different, the cloning
function does not operate. Use the common sized
displays.
●
Set the input to something other than [USB] or
[MEMORY VIEWER], and perform the data cloning.
●
The cloning password is the one set for [Cloning
password].
●
The initial password in the factory default state is
[AAAA].
●
The remote control is necessary to operate [LAN data
cloning].
■
Data that can be copied
Settings and set values of [Picture], [Sound], [Setup] and
[Position] menus
User image registered in [Setup] - [Image settings]
The following contents of the [Detailed set up] page on
the Web control screen
[Status notification set up]
●
The following data cannot be copied. Setting is
required for each display.
[Cloning password]
[Date and time]
[Network settings] - [Display name]
Setting for [Network settings] - [LAN setup]
[Synchronize display setting]
[Time zone]
[NTP synchronization]
NTP server name
DNS server
[Control settings] in [Display ID]
The setting contents of the [Change password] page
on the Web control screen
The following contents of the [Detailed set up] page
on the Web control screen
[Network config]
[Adjust clock]
[Command port set up]
The setting contents of the [Crestron Connected]
page on the Web control screen
■
Supported device
●
Commercially available USB memory devices are
supported. (Those with security functions are not
supported.)
●
USB memory devices other than those formatted in
FAT16 or FAT32 cannot be used.
●
Up to 32 GB of USB memory in size are supported.
●
Only single partition configuration is supported.
Copying the display data to the USB
memory
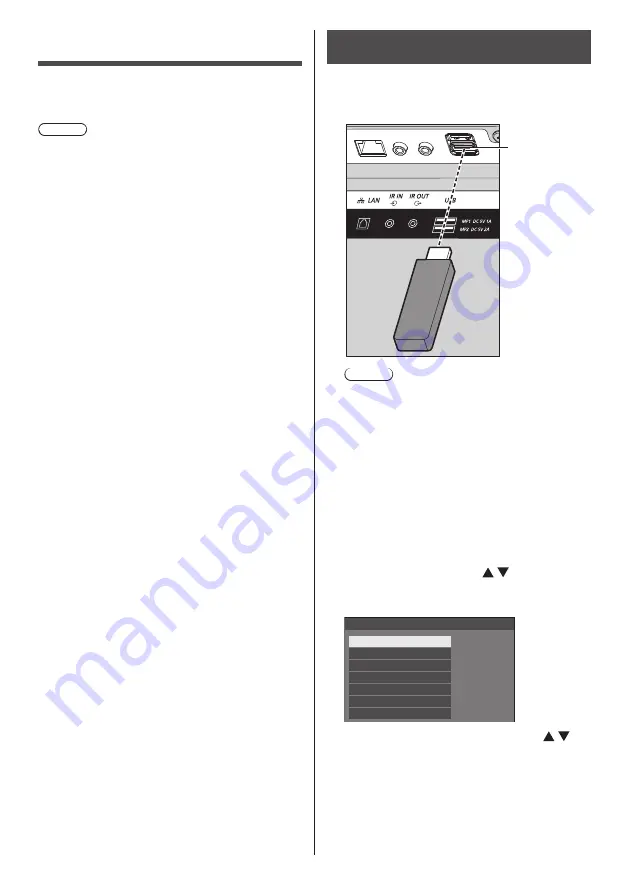
1
Insert the USB memory device to the
USB terminal on the bottom of the
display.
USB
memory
USB terminal
Note
●
Depending on the type of a USB memory device,
it may come in contact with the periphery such as
a back cover, and cannot be attached. Use a USB
memory device connectable to this unit.
●
Failure to save in or read from the USB memory
device displays an error message.
2
After the [Cloning password] screen
is displayed, go to the step
6
.
When the [Cloning password] screen is not
displayed, follow the steps 3 to 5 to display.
3
Display [Setup] menu pressing
<SETUP>.
4
Select [Options] with and press
<ENTER>.
The following display appears.
Options
Display information
Software licenses
Cloning password
USB data cloning
Shipping
LAN data cloning
Output log data
5
Select [USB data cloning] with
and press <ENTER>.
[Cloning password] screen is displayed.
6
Enter the cloning password, and then
press <ENTER>.
Data cloning screen is displayed.


