background image

50

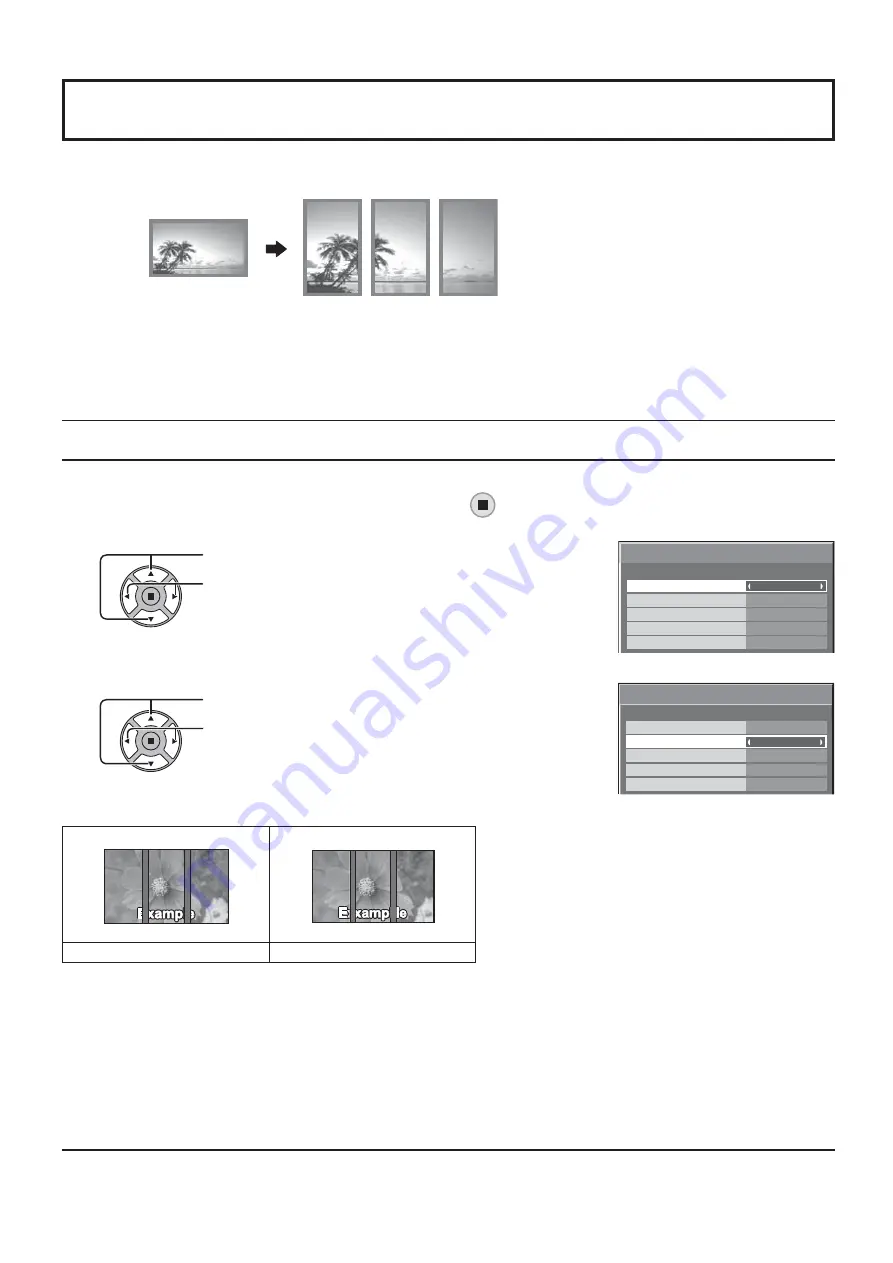
Divide an input image into 3 parts, and display one of them to a plasma display which is set vertically. The image will be enlarged 3 
times and rotated 90-degree.

SETUP for PORTRAIT

(Example)

Notes:

•  During Touch Pen mode, “PORTRAIT SETUP” becomes “OFF” and this function cannot be used.
•  When using the PORTRAIT function with displays set vertically, “DISPLAY ORIENTATION” in SETUP menu has to be 

set to “PORTRAIT” (see page 47).

• Turn up the power switch for the upward direction when you set Display vertically.
• During Portrait display, the 3D images are displayed as 2D images.

Press to select the PORTRAIT SETUP.

Press to select “ON” or “OFF”.

Note:

If you set PORTRAIT SETUP to ON, MULTI 
DISPLAY SETUP will be unavailable.

Press to select SEAM HIDES VIDEO.

Press to select “OFF” , “ON”.

How to setup PORTRAIT

1

2

3

To hide joints between displays.

Suitable for moving image display.

To show joints between displays.

Suitable for still image display.

ON

OFF

OFF

PORTRAIT SETUP
SEAM HIDES VIDEO

OFF 

1

OFF

VIDEO WALL UNIFORMITY

VIEWING AREA
LOCATION

16:9

PORTRAIT SETUP

OFF

PORTRAIT SETUP
SEAM HIDES VIDEO

OFF 

1

OFF

VIDEO WALL UNIFORMITY

VIEWING AREA
LOCATION

16:9

PORTRAIT SETUP

Select “PORTRAIT SETUP” in “SETUP” menu and press 

 button.

Summary of Contents for TH-65PB1U

Page 1: ...o Operating Instructions Display Operations Interactive Plasma Display English Before connecting operating or adjusting this product please read these instructions completely Please keep this manual for future reference ...

Page 2: ...CK DO NOT OPEN WARNING To prevent damage which may result in re or shock hazard do not expose this apparatus to rain or moisture Do not place containers with water ower vase cups cosmetics etc above the set including on shelves above etc WARNING 1 To prevent electric shock do not remove cover No user serviceable parts inside Refer servicing to quali ed service personnel 2 Do not remove the groundi...

Page 3: ...ent of the obsolete outlet 10 Protect the power cord from being walked on or pinched particularly at plugs convenience receptacles and the point where they exit from the apparatus 11 Only use attachments accessories speci ed by the manufacturer 12 Use only with the cart stand tripod bracket or table speci ed by the manufacturer or sold with the apparatus When a cart is used use caution when moving...

Page 4: ...roubleshooting for 3D Eyewear 24 Table of images that can be seen for each 3D Picture Format and the source image format 24 On Screen Menu Displays 25 Adjusting POS SIZE 26 PICTURE Adjustments 29 ADVANCED SETTINGS 30 Picture Pro les 31 Saving pro les 32 Loading pro les 33 Editing pro les 33 SOUND Adjustment 34 SDI SOUND OUTPUT 34 SETUP menu 35 DAY TIME SETUP ON OFF TIMER SETUP 36 DAY TIME SETUP 36...

Page 5: ... cause undesired operation FCC CAUTION To assure continued compliance follow the attached installation instructions and use only shielded interface cables when connecting to computer or peripheral devices Any changes or modi cations not expressly approved by Panasonic Corp of North America could void the user s authority to operate this device FCC Declaration of Conformity Model No TH 65PB1U Respo...

Page 6: ... HDMI Terminal Board TY FB10HMD DVI D Terminal Board TY FB11DD Mate IF Boad TY FB11HB AV Terminal Box TY TB10AV 3D IR TRANSMITTER TY 3D30TRW 3D Eyewear TY EW3D3SU TY EW3D3MU TY EW3D3LU Electronic Pen for Interactive Plasma Display TY TPEN1PBU Wireless Module ET WM200U When using the Plasma Display Do not bring your hands face or objects close to the ventilation holes of the Plasma Display Top of t...

Page 7: ...t and 2 3 4 7 cm or more at the rear and also keep the space between the bottom of the display and the oor surface If using some other setting up method follow the manual of it If there is no speci c indication of installation dimension in the installation manual leave a space of 3 15 16 10 cm or more at the top bottom left and right and 2 3 4 7 cm or more at the rear When installing the Plasma Di...

Page 8: ... should responsibly convey the precautions for use of the 3D Eyewear to the user 3D Eyewear sold separately Do not drop exert pressure on or step on the 3D Eyewear Be careful of the tips of the frame when putting on the 3D Eyewear Be careful not to trap a nger in the hinge section of the 3D Eyewear Pay special attention when children are using the 3D Eyewear 3D Eyewear should not be used by childr...

Page 9: ...hen viewing 3D content Do not use the 3D Eyewear at a distance less than the recommended distance View from at least the recommended distance 3 times the effective height of the screen Recommended distance 94 5 2 4 m When the top and bottom area of the screen is blackened such as movies view the screen at a distance 3 times further than the height of the actual image That makes the distance closer...

Page 10: ...when the remote control acts sporadically or stops operating the Plasma Display 6 Do not burn or breakup batteries 7 Batteries must not be exposed to excessive heat such as sunshine re or the like 3 Replace the cover Accessories Supplied Check that you have the Accessories and items shown Operating Instruction book Remote Control Transmitter N2QAYB000691 Batteries for the Remote Control Transmitte...

Page 11: ...sing the clamper Secure any excess cables with clamper as required Note One clamper is supplied with this unit In case of securing cables at three positions please purchase it separately Note Please use 8 10 W speaker AC cord connection and xing cable xing Speaker connection Attach the clamper To remove from the unit Keep pushing both side snaps hole Bundle the cables snaps hooks Set the tip in th...

Page 12: ...d with 1 slot width does not function when installed in the right side slot AV IN HDMI HDMI Input Terminal see page 13 Connect to video equipment such as VCR or DVD player WIRELESS MODULE LAN Refer to Operating Instructions Network Operations DVI D IN DVI D Input Terminal see page 13 PC IN PC Input Terminal Connect to video terminal of PC or equipment with Y PB CB and PR CR output see page 14 SERI...

Page 13: ...HDMI cable 8Ω 20W 10W 10W DVI video cable Within 5 m Stereo mini plug M3 PC with DVI D video out Shared with PC IN Pin No Signal Name Pin No Signal Name 1 T M D S data 2 13 2 T M D S data 2 14 5 V DC 3 T M D S data 2 shield 15 Ground 4 16 Hot plug detect 5 17 T M D S data 0 6 DDC clock 18 T M D S data 0 7 DDC data 19 T M D S data 0 shield 8 20 9 T M D S data 1 21 10 T M D S data 1 22 T M D S clock...

Page 14: ... suf cient clarity The PC input terminals are DDC2B compatible If the computer being connected is not DDC2B compatible you will need to make setting changes to the computer at the time of connection Some PC models cannot be connected to the set There is no need to use an adapter for computers with DOS V compatible Mini D sub 15P terminal The computer shown in the illustration is for example purpos...

Page 15: ... detail instructions on command usage Pin layout for SERIAL Terminal Command Command Parameter Control details PON None Power ON POF None Power OFF AVL Volume 00 63 AMT 0 Audio MUTE OFF 1 Audio MUTE ON IMS None SL1 S1A S1B VD1 YP1 HM1 DV1 PC1 NW1 Input select toggle SLOT input SLOT INPUT SLOT input SLOT INPUT A SLOT input SLOT INPUT B VIDEO input VIDEO COMPONENT RGB IN input COMPONENT HDMI input H...

Page 16: ...work It takes some time for the network to start up just after the power is turned on During that time NETWORK SETUP in the SETUP menu is grayed out and cannot be set Press the button on the remote control to turn the Plasma Display off Power Indicator Red standby Press the button on the remote control to turn the Plasma Display on Power Indicator Green Turn the power to the Plasma Display off by ...

Page 17: ...tes Once the items are set the screens won t be displayed when switching on the unit next time After the setting the items can be changed in the following menus OSD LANGUAGE see page 47 DAY TIME SETUP see page 36 DISPLAY ORIENTATION see page 47 Power ON warning message The following message may be displayed when turning the unit power ON Activate 3D Safety Precautions if you deliver 3D images to u...

Page 18: ...nnected to the Plasma Display Input signals will change as follows PC COMPONENT DVI NETWORK HDMI VIDEO PC PC input terminal in PC IN NETWORK Network input terminal in LAN or WIRELESS MODULE VIDEO Video input terminal in AV IN VIDEO COMPONENT Component or RGB input terminal in COMPONENT RGB IN HDMI HDMI input terminal in AV IN HDMI DVI DVI input terminal in DVI D IN COMPONENT may be displayed as RG...

Page 19: ...et to On See page 58 Orange Depending on the type of the function board installed when the power is supplied to the slot Orange When CONTROL I F SELECT is set to LAN or WEB CONTROL is set to ON Refer to Operating Instructions Network Operations Power ON Green PC POWER MANAGEMENT DPMS Orange With PC input signal See page 44 DVI D POWER MANAGEMENT Orange With DVI input signal See page 44 Volume Adju...

Page 20: ...PICTURE button see page 29 Sound mute On Off Press this button to mute the sound Press again to reactivate sound Sound is also reactivated when power is turned off or volume level is changed N button see page 28 29 30 34 POSITION buttons INPUT button Press to select input signal sequentially see page 18 ECO MODE ECO Press to change the ECO MODE setup status see page 44 FUNCTION buttons FUNCTION se...

Page 21: ...ULL For PC signal input Notes The aspect mode is memorized separately for each input terminal Do not allow the picture to be displayed in 4 3 mode for an extended period as this can cause a permanent image retention to remain on the Plasma Display Panel For SD signal input 525 480 60i 60p 625 575 50i 50p For HD signal input 1125 1080 60i 50i 60p 50p 24p 25p 30p 24sF 1250 1080 50i 750 720 60p 50p 4...

Page 22: ...uch Pen mode see page 37 During 3D image see page 38 When MULTI DISPLAY SETUP is ON see page 48 When PORTRAIT SETUP is ON see page 50 When SCREENSAVER except for NEGATIVE IMAGE is running see page 39 While Digital Zoom is in operation Adjusting POS SIZE cannot be used Select the magni cation required for the enlarged display Each time this is pressed the magni cation factor changes This is shown i...

Page 23: ...ayer If you use the non 3D compatible player the images will be displayed without 3D effect To view the contents of 3D formats other than Frame Sequential with 3D effect Match the picture format in 3D INPUT FORMAT see page 38 before viewing You can view SIDE BY SIDE and TOP AND BOTTOM with 3D effect even if you use the non 3D compatible player Please consult the suppliers of contents or programmes...

Page 24: ...ect your eyesight before use 3D Eyewear is turned off automatically Check that there are no obstacles between the 3D IR TRANSMITTER and the 3D Eyewear or that the 3D Eyewear is placed inside the coverage area If the 3D Eyewear stops receiving the infrared signal for about 5 minutes the 3D Eyewear will be turned off automatically There is something wrong with the 3D images Switch SWAPPED and NORMAL...

Page 25: ... COLOR PICTURE TINT ADVANCED SETTINGS MEMORY SAVE COLOR TEMP NORMAL MEMORY LOAD MEMORY EDIT Example PICTURE menu 3 Set Set Set Press 4 Exit the menu Press Press to return to the previous menu MENU Press several times Menu display list PICTURE menu SETUP menu POS SIZE menu SOUND menu Note Menu that cannot be adjusted is grayout Adjustable menu changes depending on signal input and menu setting 25 0...

Page 26: ...nabled under the following conditions When inputting an analog signal Component PC This setting is enabled if COMPONENT RGB IN SELECT see page 52 in SETUP menu is RGB When inputting a digital signal HDMI DVI A PC format signal enables this setting When the signal is not PC format this setting is enabled only if OVER SCAN see page 27 is OFF or 1 1 PIXEL MODE see page 28 is ON H SIZE V SIZE is not a...

Page 27: ...Hz or higher DOT CLOCK and CLOCK PHASE cannot be automatically corrected When digital signal input DOT CLOCK and CLOCK PHASE cannot be made AUTO SETUP may not work when a cropped or dark image is input In such case switch to a bright image with borders and other objects are clearly shown and then try auto setup again Depending on the signal out of alignment may occur after AUTO SETUP Carry out ne ...

Page 28: ...nd V SIZE cannot be adjusted when ON is selected OFF ON 1 1 PIXEL MODE 2k1k For 2k1k signals When the input signal is a 2k1k signal 2048 1080 24p 2048 1080 24sF the display size is adjusted as follows OFF ON LEFT ON CENTER ON RIGHT Note 2k1k signals can only be received when the Dual Link HD SDI Terminal Board TY FB11DHD is installed CLAMP POSITION During Component PC input signal Adjusts the clam...

Page 29: ...MA DYNAMIC STANDARD For viewing in standard evening lighting environments This menu selects the normal levels of BRIGHTNESS and PICTURE DYNAMIC For viewing in brighter environments This menu selects higher than normal levels of BRIGHTNESS and PICTURE CINEMA For use in viewing tone focused pictures with brightness reduced MONITOR For use when creating broadcast or movie content With this picture ev...

Page 30: ...More Adjusts picture sharpness Item Effect Details BLACK EXTENSION Less More Adjusts the dark shades of the image in gradation INPUT LEVEL Less More Adjustment of parts which are extremely bright and hard to see GAMMA Down Up 2 0 2 2 2 4 2 6 W B HIGH R Less More Adjusts the white balance for light red areas W B HIGH G Less More Adjusts the white balance for light green areas W B HIGH B Less More A...

Page 31: ...ANDARD BRIGHTNESS SHARPNESS PICTURE MENU COLOR PICTURE TINT ADVANCED SETTINGS COLOR TEMP NORMAL 31 Picture Pro les Up to 8 combinations of picture adjustment values in the PICTURE menu and ADVANCED SETTINGS can be stored in the display memory as pro les and applied as needed for a convenient way to enjoy your preferred picture settings Custom picture Original picture Save the picture adjustment va...

Page 32: ...ring pro le names Pro le names can be up to 40 characters To enter text select characters in the on screen keyboard Edit the default profile name in the text box as desired MEMORY NAME INPUT OK A MEMORY1 B C D E F G H I J K L M ALL DELETE N O P Q R S T U V W X Y Z DELETE SPACE a b c d e f g h i j k l m n o p q r s t u v w x y z 0 1 2 3 4 5 6 7 8 9 _ ˆ CANCEL 1 select 2 set Example Specifying MY PI...

Page 33: ...E MEMORY1 DATA OK 1 select 2 set 1 In the PICTURE menu select MEMORY EDIT MEMORY SAVE MEMORY LOAD MEMORY EDIT 1 select 2 access 2 Select MEMORY NAME CHANGE MEMORY EDIT MEMORY NAME CHANGE MEMORY DELETE 1 select 2 set 3 Select the pro le to rename MEMORY NAME CHANGE MEMORY2 MEMORY3 MEMORY4 MEMORY1 1 2 3 4 1 select 2 set 4 Enter a name for the pro le Entering pro le names page 32 MEMORY NAME INPUT EM...

Page 34: ...OUT LEFT CHANNEL RIGHT CHANNEL CHANNEL 1 CHANNEL 1 OFF LEVEL METER OFF SDI SOUND OUTPUT Item Details LEFT CHANNEL CHANNEL 1 to CHANNEL 16 Selects left audio channel RIGHT CHANNEL CHANNEL 1 to CHANNEL 16 Selects right audio channel SOUND OUT ON OFF ON Enables audio output OFF Disables audio output LEVEL METER OFF 1 8CH 9 16CH Sets audio channels to show in the audio level meter 8 channels are displ...

Page 35: ...NGS MENU DISPLAY DURATION 30 S OSD BRIGHTNESS 5 35 SETUP menu 1 Press to display the SETUP menu Press to select the menu to adjust Press to adjust the menu Press to exit from adjust mode 2 3 4 Press to return to the previous menu Page 48 Page 50 Page 36 Page 36 Page 47 NETWORK SETUP Set this to connect the Display to a computer via a network For details of PJLink and Network refer to Operating Ins...

Page 36: ...ess to select SET Press to store DAY TIME SETUP Notes SET cannot be selected unless TIME is set Unless setting the present time other than 99 99 DAY and TIME cannot be set The settings of DAY and TIME are reset when leaving the display turned off for about 7 days for the following reasons Pressing switch of the unit to turn off the display Disconnecting the AC cord Interruption of power supply 1 1...

Page 37: ...equency The electronic pen cannot be used when VIDEO or COMPONENT input is selected When using the electronic pen adjust POS SIZE so that the screen of the computer can be correctly displayed see page 26 Setting the Remote Control You can also turn Touch Pen mode ON OFF with the FUNCTION buttons on the remote control see page 46 In Touch Pen mode the menus and functions are restricted as follows P...

Page 38: ...played during 3D images PC FULL NANODRIFT 3D 3D INPUT FORMAT 3D images method is set AUTO 3D images are automatically displayed according to the signal SIDE BY SIDE TOP AND BOTTOM One of the formats of the 3D standard Select these formats as necessary NATIVE Displays the input signal as it is Use to identify the format type of the input signal LEFT RIGHT SWAP NORMAL SWAPPED This function calibrate...

Page 39: ... or any buttons on the main unit Note When the display is turned off the SCREENSAVER will be deactivated Press to select the MODE Press to select each mode items SCREENSAVER For preventing image retention OFF INTERVAL Operates when SHOW DURATION and SAVER DURATION are set up and those times arrive TIME OF DAY Operates when START TIME and FINISH TIME are set up and those times arrive STANDBYAFTERSC...

Page 40: ...d the Operating Time may be set Time cannot be set when MODE is ON or OFF Press to select START TIME FINISH TIME when TIME OF DAY is selected Press to select SHOW DURATION SAVER DURATION when INTERVAL is selected Press to select SCREENSAVER DURATION when STANDBY AFTER SCR SAVER is selected Press to setup button Forward button Back Note Timer function will not work unless TIME is set Notes Pressing...

Page 41: ...Make it light gray Notes To reduce the occurrence of image retention set the SIDE BAR ADJUST to BRIGHT The side bar may ash alternate black white depending on the picture being shown on the screen Using Cinema mode will reduce such ashing side bars 4 3 mode image retention Reduces screen image retention The following settings are setup to reduce image retention Select EXTENDED LIFE SETTINGS in SET...

Page 42: ...t peak brightness Note When a still picture is viewed for an extended time the screen may become slightly darker see page 63 NANODRIFT SAVER Moves the display position of the screen slightly to reduce image retention on the display panel LOW HIGH NANODRIFT SAVER operates The display position of the screen moves at set time intervals You can set the screen movement range Some of the screen may appe...

Page 43: ...ocked itisgrayedoutandcannotbeset PICTURE MENU and PICTURE will no longer be able to set in the PICTURE menu and they are labeled with icon to indicate their locked status Also NORMALIZE MEMORY SAVE and MEMORY LOAD are not available 0 0 0 5 PICTURE NORMAL NORMALIZE DYNAMIC BRIGHTNESS SHARPNESS PICTURE MENU COLOR PICTURE TINT ADVANCED SETTINGS MEMORY SAVE COLOR TEMP NORMAL MEMORY LOAD MEMORY EDIT E...

Page 44: ...d Power is turned on the power indicator lights up green Notes This function operates only during PC signal input This function is effective when SYNC is set to AUTO COMPONENT RGB IN SELECT is set to RGB and during normal viewing DVI D POWER MANAGEMENT When this function is set to ON it operates under the following conditions to turn the power on or off automatically When no pictures sync signal a...

Page 45: ...Blu ray1 Blu ray2 Blu ray3 Blu ray4 CATV VCR STB SKIP PC PC DVD1 DVD2 DVD3 DVD4 Blu ray1 Blu ray2 Blu ray3 Blu ray4 CATV VCR STB SKIP NETWORK NETWORK SKIP SKIP The INPUT button press will skip its input 1 SLOT INPUT is displayed when a Terminal Board is installed 2 COMPONENT may be displayed as RGB depending on the setting of COMPONENT RGB IN SELECT see page 52 When a Terminal Board with dual inpu...

Page 46: ... settings are as follows FUNCTION1 button TOUCH PEN FUNCTION2 button SCROLLING BAR To exit this mode press any button TOUCH PEN ON FUNCTION BUTTON GUIDE The function display setting for the FUNCTION button is con gured ON Press the FUNCTION button to display the function list of the button OFF The function list is not displayed INPUT SLOT INPUT NETWORK Simply press to select the input INPUT SLOT i...

Page 47: ...NU DISPLAY DURATION 5 S 30 S OSD BRIGHTNESS 1 5 NO ACTIVITY POWER OFF 3MIN PRESS ANY KEY TO ABORT Select your preferred language Selectable languages English UK Deutsch Français Italiano Español ENGLISH US Chinese Japanese Russian Sets the fan control panel drive control and the display style of on screen menu for vertical installation DISPLAY ORIENTATION Notes Turn up the power switch for the upw...

Page 48: ...in SETUP menu and press button How to setup MULTI DISPLAY group of 16 4 4 group of 4 2 2 group of 9 3 3 Example group of 25 5 5 1 2 Press to select the MULTI DISPLAY SETUP Press to select ON or OFF Item Details MULTI DISPLAY SETUP Select ON or OFF Note If you set MULTI DISPLAY SETUP to ON PORTRAIT SETUP will be unavailable HORIZONTAL SCALE Select 1 2 3 4 5 VERTICAL SCALE Select 1 2 3 4 5 SEAM HIDE...

Page 49: ...me time Notes Set the Remote ID On to operate the ID remote control If Remote ID is set to On you can use the remote control without identical ID number during option menu display see page 57 The ID remote control cannot be used when ID select is set to anything other than 0 and the remote control ID is not the same as the ID select number see page 57 ID remote control button operation The operati...

Page 50: ...uring Portrait display the 3D images are displayed as 2D images Press to select the PORTRAIT SETUP Press to select ON or OFF Note If you set PORTRAIT SETUP to ON MULTI DISPLAY SETUP will be unavailable Press to select SEAM HIDES VIDEO Press to select OFF ON How to setup PORTRAIT 1 2 3 To hide joints between displays Suitable for moving image display To show joints between displays Suitable for sti...

Page 51: ...VIEWING AREA LOCATION 16 9 PORTRAIT SETUP OFF PORTRAIT SETUP SEAM HIDES VIDEO OFF 1 OFF VIDEO WALL UNIFORMITY VIEWING AREA LOCATION 16 9 PORTRAIT SETUP 4 VIEWING AREA Set a mode of image division for PORTRAIT function LOCATION Set a location of image to be displayed for PORTRAIT function VIEWING AREA LOCATION When PORTRAIT SETUP ON Display the image of the selected LOCATION When PORTRAIT SETUP is ...

Page 52: ...MPONENT RGB signals RGB Note Make setting of the selected input terminal COMPONENT RGB IN or PC IN YUV RGB IN SELECT YUV RGB Select to match the signals from the source connected to the DVI input terminals YUV signals YUV RGB signals RGB Notes Selection may not be possible depending on which optional board is installed Make setting of the selected input terminal SLOT or DVI D IN ...

Page 53: ...come unstable Should this occur set the system to match the format of the input signal 3 2 PULLDOWN When ON the display attempts to reproduce a more natural interpretation of sources such as movie pictures which are recorded at 24 frames per second If the picture is not stable turn the setting to OFF ON OFF Note When ON this setting only affects the following signal input NTSC PAL signal input dur...

Page 54: ...SDI Terminal Board TY FB11DHD OFF ON ON Enables active through OFF Disables active through Note Settings can only be performed for this menu when a slot mounted with a Dual Link HD SDI Terminal Board TY FB11DHD is selected FRAME CREATION Automatically compensates the picture frame rate and removes juddering movements to make the images smooth OFF MID MAX Note Depending on the contents images may b...

Page 55: ...block noise when playing MPEG videos Note NOISE REDUCTION cannot be adjusted while a PC signal is being applied NOISE REDUCTION SETUP for Input Signals Sets the following three NR Noise Reduction functions together VIDEO NR MOSQUITO NR BLOCK NR Press to select NOISE REDUCTION Press to select OFF MIN MID MAX ADVANCED Sets the three NR functions separately Press to select ADVANCED Press to enter ADV...

Page 56: ...SLOT INPUT A and SLOT INPUT B are displayed 2 COMPONENT may be displayed as RGB depending on the setting of COMPONENT RGB IN SELECT see page 52 Notes Only the adjusted signal is displayed see page 18 This menu is available only when Input lock is Off Initial VOL level Press button to adjust the volume when the unit is turned on Off On Off Sets normal volume On Sets your preferred volume Notes When...

Page 57: ... off and in again Normal Power returns in as the same state as before the power interruption Standby Power returns in standby mode Power Indicator red orange On Power returns in power On Power Indicator green Note When using multiple displays Standby is preferred to be set in order to reduce a power load ID select Sets panel ID number when panel is used in Remote ID or Serial ID Set value range 0 ...

Page 58: ... the board with time delay according to the setting The power indicator lights up red rst and it turns orange when the power starts being supplied to the board Clock Display Off Not display the clock On Display the clock The clock is displayed at the lower left of the screen when button is pressed Note When DAY TIME SETUP is not set the clock is not displayed even if Clock Display is On see page 3...

Page 59: ...10 30 01 02 1 8 03 04 05 12 00 06 9 12 PON IMS SL1 DAM ZOOM AVL 10 07 08 1 Program Press ACTION button Program Edit screen Program number Options On Weekly Command Timer Audio input select Input Search Onscreen display 1 3 Normalization When both main unit buttons and remote control are disabled due to the Button lock Remocon User level or Remote ID adjustments set all the values Off so that all t...

Page 60: ...es Command is performed in order of execution time regardless of the command number If a command execution time overlaps with that of other commands these commands are performed in number order Pressing Time becomes and Command becomes 7 Note Press to return to the previous screen Command setting screen Weekly Command Timer 20 00 20 30 57 58 8 8 22 00 59 60 61 62 AVL 00 DAM NORM POF 63 64 1 Progra...

Page 61: ...d SLOT INPUT B Image input Audio input SLOT INPUT A SLOT INPUT A VIDEO COMPONENT DVI PC NETWORK NO AUDIO SLOT INPUT B SLOT INPUT B VIDEO COMPONENT DVI PC NETWORK NO AUDIO VIDEO SLOT INPUT A SLOT INPUT B VIDEO COMPONENT DVI PC NETWORK NO AUDIO COMPONENT SLOT INPUT A SLOT INPUT B VIDEO COMPONENT DVI PC NETWORK NO AUDIO HDMI SLOT INPUT A SLOT INPUT B VIDEO COMPONENT HDMI DVI PC NETWORK NO AUDIO DVI S...

Page 62: ...ary Input Set the input to search when Priority is selected NONE SLOT INPUT VIDEO COMPONENT HDMI DVI PC NETWORK SLOT INPUT is displayed when an optional Terminal Board is installed When a Terminal Board with dual input terminals is installed SLOT INPUT A and SLOT INPUT B are displayed Notes This menu is available only when Input lock is Off see page 57 If the input is changed by this function the ...

Page 63: ...nexpectedly Check the settings of PC POWER MANAGEMENT DVI D POWER MANAGEMENT NO SIGNAL POWER OFF and NO ACTIVITY POWER OFF in the SETUP menu Any of them may be set to ON ENABLE see page 44 47 Power indicator is blinking in red There is possibility of malfunction Please contact an Authorized Service Center This Plasma Display uses special image processing Hence a slight time lag may occur between i...

Page 64: ...the areas around the left and right edges of the screen is slightly elongated 4 3 4 3 Pictures with a 4 3 aspect ratio are displayed with their original aspect ratio Side panels are displayed at the left and right edges of the screen 4 3 1 4 3 2 4 3 Pictures with a 4 3 aspect ratio are displayed with their original aspect ratio The left and right edges of the pictures are masked by side panels 4 3...

Page 65: ... 70 Hz 56 48 70 07 75 0 34 1 024 768 75 Hz 60 02 75 03 78 75 35 1 024 768 85 Hz 68 68 85 00 94 5 36 1 066 600 60 Hz 37 64 59 94 53 0 53 0 37 1 152 864 60 Hz 53 70 60 00 81 62 38 1 152 864 75 Hz 67 50 75 00 108 0 39 1 280 768 60 Hz 47 70 60 00 80 14 40 1 280 800 60 Hz 1 49 31 59 91 71 0 71 0 41 1 280 800 60 Hz 2 49 70 59 81 83 5 83 5 42 1 280 960 60 Hz 60 00 60 00 108 0 43 1 280 960 85 Hz 85 94 85 ...

Page 66: ...play the Shipping menu Press to select YES Press to con rm Wait for 10 seconds Press the power switch on main unit to turn the power off from the unit 1 Press the MENU button till the SETUP menu is displayed 2 Press the Volume Up or Down button to select OSD LANGUAGE 3 Press and hold the ENTER button till the Shipping menu is displayed 4 Press the Volume Up or Down button to select YES 5 Press the...

Page 67: ...lect SLOT INPUT 40 IMS S1A Input select SLOT INPUT A 41 IMS S1B Input select SLOT INPUT B 42 IMS VD1 Input select VIDEO 43 IMS YP1 Input select COMPONENT 44 IMS HM1 Input select HDMI 45 IMS DV1 Input select DVI 46 IMS PC1 Input select PC 47 IMS NW1 Input select NETWORK 48 49 50 51 52 53 54 55 OSP SCR0 Screen Saver SCROLLING BAR ONLY OFF 56 OSP SCR1 Screen Saver SCROLLING BAR ONLY ON 57 POF Power O...

Page 68: ...onnector COMPONENT RGB IN Y G PB CB B PR CR R AUDIO L R BNC BNC BNC RCA Pin jack 2 with sync 1 0 Vp p 75 0 7 Vp p 75 0 7 Vp p 75 0 5 Vrms Shared with VIDEO DVI D IN AUDIO DVI D 24 Pin Content Protection Stereo mini jack M3 1 Compliance with DVI Revision 1 0 Compatible with HDCP 1 1 0 5 Vrms Shared with PC IN PC IN AUDIO High Density Mini D sub 15 Pin Stereo mini jack M3 1 Y or G with sync 1 0 Vp p...

Page 69: ...he software licensed under the GNU LESSER General Public License Version 2 1 LGPL 2 1 and or 5 open source software other than the software licensed under the GPL and or LGPL For the software categorized as 3 and 4 please refer to the terms and conditions of GPL 2 0 and LGPL 2 1 as the case may be at http www gnu org licenses old licenses gpl 2 0 html and http www gnu org licenses old licenses lgp...

Reviews: