20
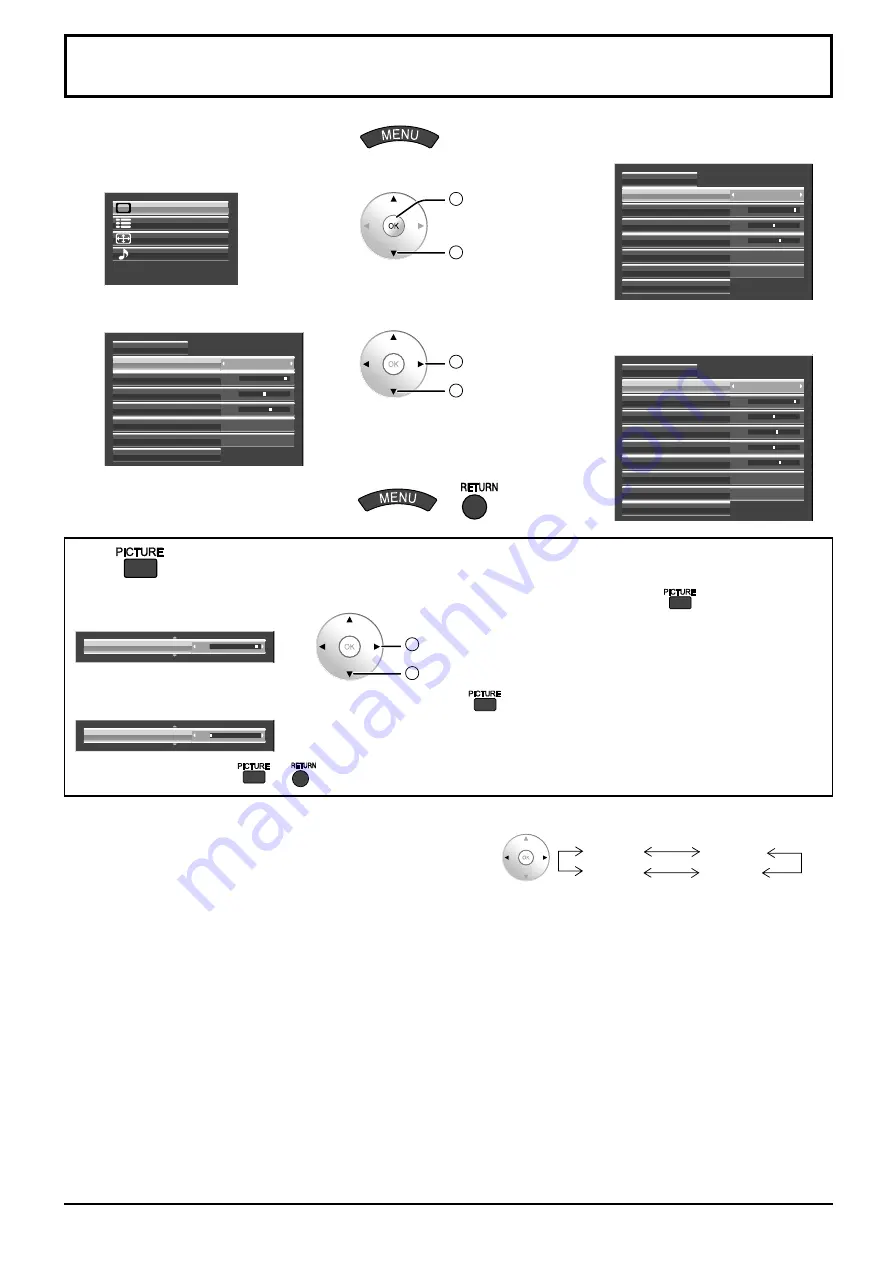
Picture Adjustments
1
Display the menu screen.
2
Select “Picture”.
Sound
Picture
Setup
Pos. /Size
2
OK
1
select
3
Select the item and set.
Normal
Advanced settings
Picture Mode
25
0
5
Off
Normal
Contrast
Normalise
Brightness
Sharpness
White balance
Colour Management
2
adjust or select
1
select
4
Exit the menu.
or
Using
for menu display
To display a menu for adjustment of the Picture menu on the bottom of the screen, press
.
25
Contrast
2
adjust or select
1
select
To display a menu for Advanced settings adjustment, press
again.
0
Black extension
To hide the menu, press
or
.
●
Picture Mode
You can switch to the optimal picture mode for the video
source and viewing environment.
Monitor
Normal
Cinema
Dynamic
Normal:
For viewing in standard (evening lighting)
environments. This menu selects the normal levels of
Brightness and Contrast.
Dynamic:
For viewing in brighter environments.
This menu selects higher than normal levels of
Brightness and Contrast.
Cinema:
Ideal for movies.
Monitor:
For use when creating broadcast or movie content.
With this picture, even if the overall average picture
level (APL) changes, the brightness of areas with the
same signal level does not change.
Notes:
When “Monitor” is selected in Picture Mode, the following menu items cannot be set.
Picture menu: Contrast
Screensaver menu: Peak limit (see page 34)
Setup menu: Power save (see page 36)
If you would like to change the picture and colour of the selected Picture menu to something else, adjust using
the items in the Picture menu. (see next page)
•
•
During “RGB” and “PC” input
signal.
Normal
Advanced settings
Picture Mode
25
0
5
Off
Normal
Contrast
Normalise
Brightness
Sharpness
White balance
Colour Management
During “Digital” and
“Component” input signal.
Normal
Advanced settings
25
0
5
Off
Normal
Colour Management
6
0
White balance
Picture Mode
Contrast
Normalise
Brightness
Colour
Hue
Sharpness


