background image

9

Initial setup involves selecting all the settings required 

to be able to search for and store all the analogue

channels you can receive.

Make sure that the television is switched on and follow 

wizard opens, which guides you through the initial 

setup process. 

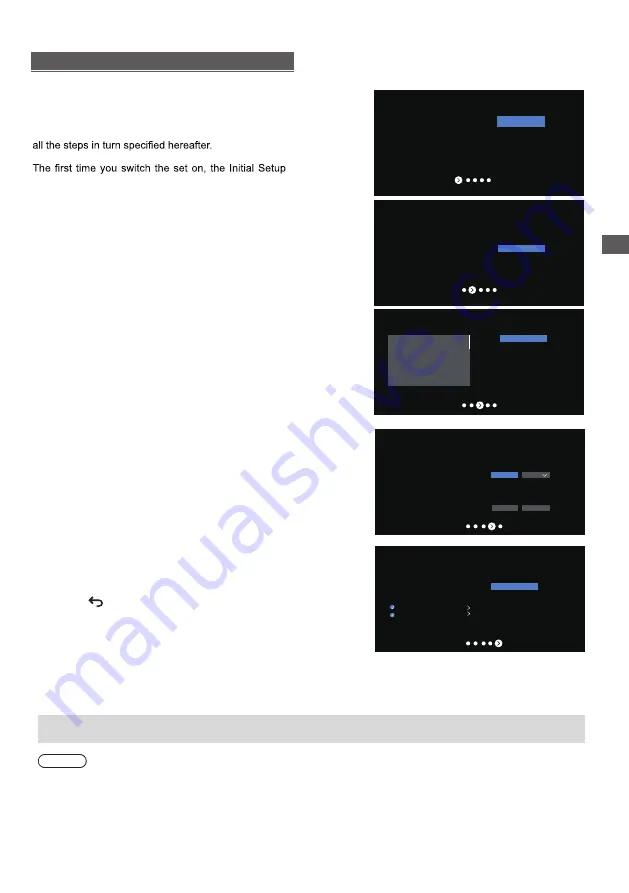
Step 2: Where are you?

Press ▲/▼ to select your 

Country/Region.Press       to

confirm and move to next step. 

OK 

Note: Picture mode setting will not be accessible

when you select Shop Mode. 

Home Mode: 

You Would be able to view the standard

settings for Picture and sound modes.

Shop Mode:

 You can enjoy enhanced setting for Picture

and Sound modes.

Step 1: Environment


Press ▲/▼ to select your 

environment.Then press       to 

enter next step. 

OK 


Step 3: Terms & Conditions

Use 

▲/▼

 to read Terms & Conditions, then press 

OK 

to

confirm and move to next step.

Step 4: Channel installation

Use 

▲/▼

 to select Tunner mode: Antenna, Cable;

Type:Digital, Analogue and All, then press 

OK 

to confirm and

move to next step.

Step 5: Please check settings 

When all setup is done, the [Please check settings] interface

displays on the screen, and press OK to finish the initial setup.

You can also go back to former step and make any changes

by using        button. 

Country/Region

PHILIPPINES

Environment

Home

Step 1:

Step 2:

Step 3:

Step 4:

Step 5:

Home
Shop

1

2 3 4 5

Next

Environment

Please choose your Environment

Home

Shop

Where are you?

We will provide you with the local time,climate

and more information.

Country/Region

Terms & Conditions

Please read the terms & conditions and agree.

  Terms and Conditions

  Terms and Conditions 

  The contents and services 

(

collectively the


“Licensed Application”

made available to you

through this TV set (this “Device”) are licensed, not

sold,  to you for use only under these terms and

conditions. The providers of the Lisensed Application

(each an “Application Provider”) reserve all rights not

expressly granted to you.

  1.Scope of License

   The license granted to you for a Licensed

Application by the relevant Application Provider

is limited to a non-transferable license to use the 

Licensed Application on the Device that you own or

Next

PARAGUAY
PERU
PHILIPPINES
URUGUAY
VENEZUELA

Channel installation

Tuner mode

ANTENNA
CABLE

Type

Digital

Scan

Skip

Please verify settings in system settings

.

Please check settings

Start now

Initial Setting


Setup is now complete and your TV is ready for viewing.

Note

If tuning has failed, check the connection of the RF cable, then follow the on-screen instructions.

Initial Setup

Summary of Contents for TH-50LX800X

Page 1: ...s are presented as conceptual images and may be different from the actual products The illustrations for 50 inch model is used in this manual unless otherwise mentioned Transport only in upright position Model No TH 50LX800X TH 55LX800X TH 65LX800X 50 inch model 55 inch model 65 inch model Dolby Dolby Vision Dolby Atmos and the double D symbol are trademarks of Dolby Laboratories Licensing Corpora...

Page 2: ... 6 Initial Setup 8 Operating the TV 10 Watching External Inputs 13 Using Media Player 16 Using Homepage Apps 13 Using the Menu Functions 14 Additional Information 17 Troubleshooting 18 Maintenance 18 Specifications 19 2 Important Notice Handling of customer information ...

Page 3: ...o help avoid risk of electrical shock fire damage or injury please follow the warnings and cautions below Mains plug and lead Warning This TV is designed to operate on AC 100 240 V 50 60 Hz Insert the mains plug fully into the socket outlet Ensure that the mains plug is easily accessible Disconnect the mains plug when cleaning the TV Do not touch the mains plug with wet hands Do not damage the mai...

Page 4: ... TV away from other devices that use 2 4 GHz and 5 GHz signals such as other wireless LAN devices microwave ovens and mobile phones When problems occur due to static electricity etc the TV might stop operating to protect itself In this case turn the TV off at the Mains power On Off switch then turn it back on Bluetooth wireless technology Caution The TV use the 2 4 GHz radio frequency ISM band Blu...

Page 5: ... Holes for wall hanging bracket installation Model a b Preparation Illustrations shown may be different between models and countries Note 65 inch model Assembly screws Base M5 27 4 1 Assemble the pedestal Please contact your local Panasonic dealer to purchase the recommended wall hanging bracket Rear of the TV View from the side Screw for fixing the TV onto the wall hanging bracket not supplied a ...

Page 6: ...electrically grounded to metal wall studs Always ensure that there are no electrical cables pipes etc in the wall before you begin the wall bracket installation To prevent fall and injury remove the TV from its fixed wall position when it is no longer in use Warning Connections Aerial RF cable Aerial Keep RF aerial cable away from the mains lead to avoid and minimise mains interference pickup Do n...

Page 7: ...er To enjoy the sound from the external equipment in multi channel sound e g Dolby Digital 5 1ch connect the equipment to the amplifier For the connections Blu Ray Player Blu Ray Player TV HDMI cable AV Game equipment Using HDMI terminal TV HDMI cable Equipment Amplifier Equipment TV HDMI cable HDMI 1 eARC Amplifier with speaker system Use HDMI1 to connect the TV to an amplifier which has eARC ARC...

Page 8: ...ice Step 3 Select whether or not to connect your TV set to the Wi Fi network WIFI Step 4 Read to accept the Google terms of service and privacy policy Step 5 Terms of Service Accept By continuing you agree to the Google Terms of Service the Google Privacy Policy and the Google Play Terms of Service This device may also receive and install updates and apps from Google your device s manufacturer or ...

Page 9: ...tep and make any changes by using button Country Region PHILIPPINES Environment Home Step 1 Step 2 Step 3 Step 4 Step 5 Home Shop 1 2 3 4 5 Next Environment Please choose your Environment Home Shop Where are you We will provide you with the local time climate and more information Country Region Terms Conditions Please read the terms conditions and agree Terms and Conditions Terms and Conditions Th...

Page 10: ...settings menu MENU To enter the picture mode PICTURE To enter the sleep timer OFF TIMER To enter source selection interface INPUT Goes to the AUDIO LINK homepage Goes to the prime video homepage To select the apps Goes to the Google Play homepage EXIT Exit the menu and return to the previous menu Mic Available only when the network connection is normal Displays the options menu of selected functio...

Page 11: ...unpair the Bluetooth remote As follow Step 1 Press button to enter the home page Step 2 Press to choose and then press OK to enter Step 3 Press to select Remotes Accessories and then to chooe the Bluetooth remote name to enter next steps Step 4 Press unpair and then choose OK button How to Pair Remote Control with the TV This is a Bluetooth remote control and before using it please pair it with th...

Page 12: ...n below Volume increase Volume reduction Previous channel Next channel 3 Remote control signal receiver 4 Voice signal receiver 5 Power LED 2 Voice On Voice Off White Standby Note Make sure the TV is connected to the Internet before using Voice Please set it to On before using Voice Please log in to your GOOGLE account before using Voice Turn it left to set it On the indicator light will lighting ...

Page 13: ... may differ from actual product appearance And for some models certain options are not available You can select all the features from homepage Press to display homepage Press to select icons from the screen list Press OK to enter each option Customize channels Add and remove channels from your Home screen Using Homepage Apps To exit the APP press or Note If the external equipment has an aspect adj...

Page 14: ...he Normal Cool Warm Dynamic Contrast To select ON or OFF Aspect Ratio Displays the Aspect Ratio screen Follow the operation guide to select the mode 16 9 4 3 Auto Original Backlight Select the level of 0 100 Picture Sound Menu Picture Sound System Picture Sound System Channel Channel Picture Mode Normal 100 High 16 9 Backlight ECO Setting Aspect Ratio Advanced Settings Sound Mode To select the mod...

Page 15: ...uide menu EPG Setup favorite channel list Favorite Press OK to display some signal information on current digital channel such as signal strength Frequency etc Channel Diagnostic Desktop Allows you to scan for all available analog and digital channels Digital Channel Setup To select the option to adjust the Teletext Setup and Audio Setup Teletext Setup Press OK and then use to select Preferred Tel...

Page 16: ...00mA MAX 5V 1 Select Document 2 Press Up Down Left or Right direction button to select your desired file and press OK to Play 3 Use OK key to see more option ZOOM ZOOM 4 Press Return key of remote to Stop playing Document icon Access Select Photo 1 Select Picture icon then press OK button to view the picture 2 Press Up Down Left or Right direction button to select your desired picture file and pre...

Page 17: ... complying with a non compression standard HDMI allows you to enjoy high definition digital images and high quality sound by connecting the TV and the equipment Applicable HDMI features Input audio signal 2ch Linear PCM sampling frequencies 48 kHz 44 1 kHz 32 kHz Input video signal Input signal that can be displayed p 17 Match the output setting of the digital equipment Signal name HDMI 525 480 60...

Page 18: ... and 30 degree angle Situate the TV away from sunshine or block sources of bright light from shining on the remote control signal receiver of the TV Parts of the TV become hot Even if the temperature of parts of the front top and rear panels has risen these temperature rises do not cause any problems in terms of performance or quality The TV panel moves slightly when it is pushed with a finger Cla...

Page 19: ... inch model TH 65LX800X 65 inch model 65 inch model 250 W 0 5W 50 inch model 155 W 0 5W 55 inch model 200 W 0 5W 50 inch model 126 cm 55 inch model 139 cm 65 inch model 164 cm 50 inch model 3 840 W 2160 H 55 inch model 3 840 W 2160 H 65 inch model 3 840 W 2160 H 1120 x 658 x 83 mm TV only 50 inch model 1234 x 787 x 269 mm With Pedestal 1234 x 725 x 83 mm TV only 55 inch model 1120 x 720 x 269 mm W...

Page 20: ...z and 5 15 5 825GHz Security Support for WPA WPA2 Bluetooth V5 0 Built in Bluetooth 2 4 2 485GHz Receiving systems Band name Systems Systems Function 1 PAL M N 2 3 NTSC M 8 PAL Reception of broadcast 6 NTSC 4 43 7 NTSC 3 58 Playback from Special VCR s or DVD 4 5 PAL 60 Hz 5 5 MHz PAL 60 Hz 6 0 MHz PAL 60 Hz 6 5 MHz Playback from Special Disc Players and Special VCR s or DVD Receiving channels Anal...

Page 21: ...distributed in the hope that it will be useful but WITHOUT ANY WARRANTY without even the implied warranty of MERCHANTABILITY or FITNESS FOR A PARTICULAR PURPOSE Please refer to the detailed terms and conditions thereof system settings Oss License At least three 3 years from delivery of this product Panasonic will give to any third party who contacts us at the contact information provided below for...

Page 22: ...ided below and retain this book plus your purchase receipt as a permanent record of your purchase to aid in identification in the event of theft or loss and for Warranty Service purposes Model Number Serial Number Information on Disposal in other Countries outside the European Union This symbol is only valid in the European Union If you wish to discard this product please contact your local author...

Reviews: