background image

11

V

iewing

HDMI1/2

TV

VCR

DVD

REC

TV/AV

OK

1

2

3

4

5

6

7

8

9

0

• 

W

atching V

ideos and DVDs

• 

W

atching TV

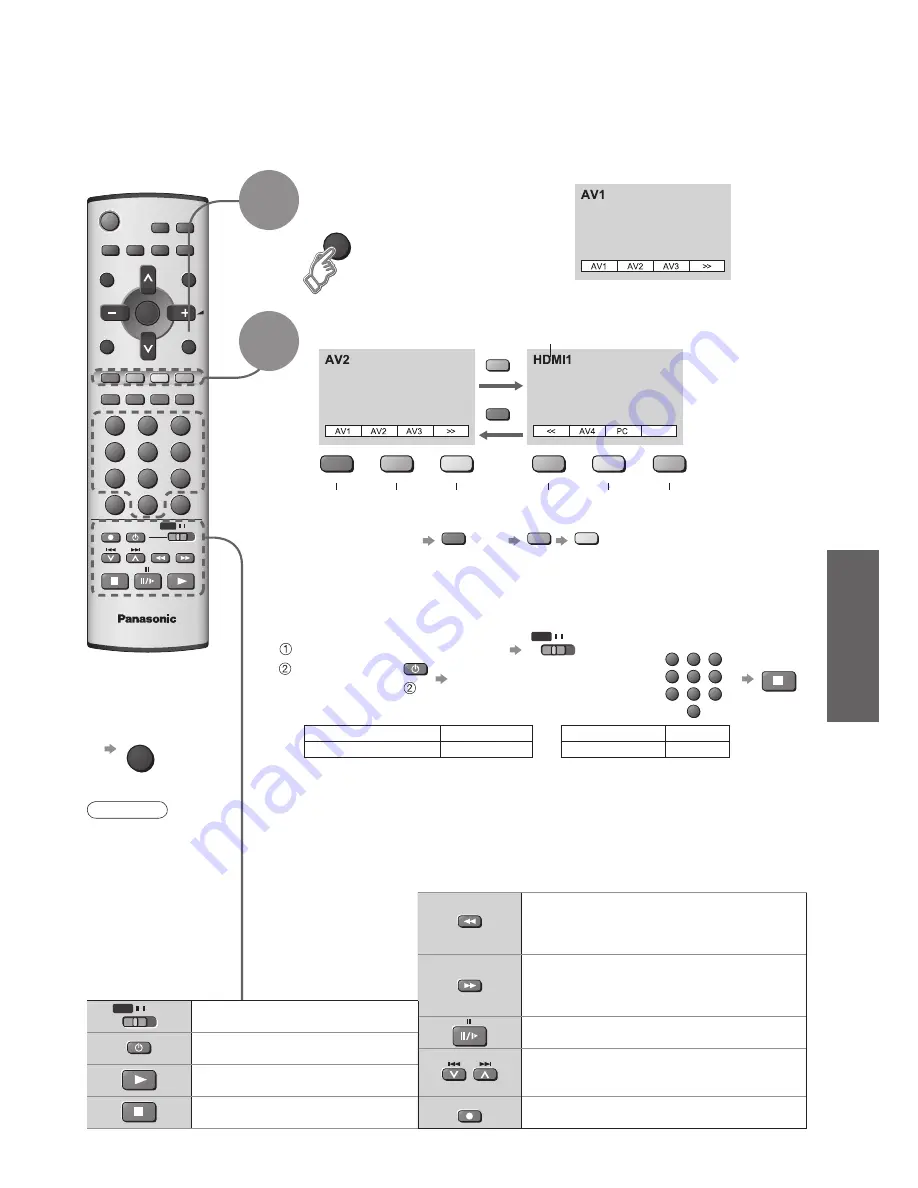
Watching Videos and DVDs

With the equipment turned On

Select the external input

1

It is possible to connect a variety of external equipment to the TV unit. Once the equipment is connected, 

use the following procedure to view the input. To connect the equipment (p. 22)

TV/AV

Select the connector connected to the equipment

(AV mode screen)

Note

• 

If the external 

equipment has an 

aspect adjustment 

function, set to 

"16:9".

• 

For details, see 

the manual of the 

equipment or ask 

your local dealer.


To return to TV


TV/AV

• 

example: AV1   

red

PC   

blue


yellow

green

red

yellow

green

yellow

blue

red

blue

Displays the selected connector

Some Panasonic VCR and DVD equipment connected to the TV unit can be 

directly operated with the remote control.

• 

After setting, execute operation con

fi

 rmation. If there is no operation, set a 

different code.

• 

The respective VCR / DVD code is cancelled when battery has been 

exchanged. Set it again.

• 

Depending on the model, operation may not be possible.

• 

In some cases, new products may not be operative.

2

Rewind / Slow-motion / Search

VCR: Rewind, review (during playback)

DVD: Play at slow speed


Press and hold to search backward

Fast-forward / Slow-motion / Search

VCR: Fast-forward, cue (during playback)

DVD: Play at slow speed


Press and hold to search forward

Pause

Pause / Restart

Programme Up, Down / Skip

VCR: Select  programme

DVD: Skip the track or title

REC

Record

Start recording

VCR

DVD

VCR / DVD switch

Select VCR / DVD

Standby

Set to Standby mode / Turn on

Play

Playback VCR / DVD

Stop

Stop the operations

AV1

AV2

AV3

AV4

PC

HDMI1/

HDMI2


Remote control setting

VCR

DVD

1

2

3

4

5

6

7

8

9

0

VCR

Manufacturer

Code

Panasonic / National 10,11,12,13

DVD

Manufacturer

Code

Panasonic

70, 71


Switch to select VCR or DVD

Enter the manufacturer code

(two digit code)

Press 


Press and hold 


while operating 

Summary of Contents for TH-42PV60A

Page 1: ...INDEX TV TEXT HOLD STILL Operating Instructions Plasma Television English Please read these instructions before operating your set and retain them for future reference The images shown in this manual...

Page 2: ...2 Turn your own living room into a movie theatre Experience an amazing level of multi...

Page 3: ...ed Features How to Use Menu Functions 14 picture sound quality etc Editing and Setting Channels 16 Owner ID 18 Displaying PC Screen on TV 19 External Equipment 20 Control with HDMI Connections Basic F...

Page 4: ...e lead near a high temperature object Do not twist the lead bend it excessively or stretch it Do not pull on the lead Hold onto the mains plug body when disconnecting lead Do not use a damaged mains p...

Page 5: ...st may lead to fire or electrical shock First remove the mains plug from the socket outlet Caution The surface of the display panel has been specially treated and may be easily damaged Do not tap or s...

Page 6: ...Rear of the TV Caution Incorrect installation may cause battery leakage and corrosion resulting in damage to the remote control unit Do not mix old and new batteries Do not mix different battery types...

Page 7: ...p 14 Resets settings Selects programmes in sequence Teletext p 12 Viewing a favourite teletext channel p 12 Stereo Bilingual Sound Selection p 27 Sound mute On Off VCR DVD operations p 11 Volume OK T...

Page 8: ...fore attaching or disconnecting any leads Input owner ID Note Do not put the Coaxial cable close to the mains lead to avoid noise Do not place the Coaxial cable under the TV To obtain optimum quality...

Page 9: ...selection Select the system of your area NZ INDONES Australia Auto tuning Automatically set the channels received in your area start select If it is not the first time to perform Auto tuning all previ...

Page 10: ...ain to clear on screen display information Displayed information For example Programme number Channel number Stereo mode Aspect mode Sound menu Picture menu Change aspect ratio or 16 9 ASPECT Change t...

Page 11: ...g execute operation confirmation If there is no operation set a different code The respective VCR DVD code is cancelled when battery has been exchanged Set it again Depending on the model operation ma...

Page 12: ...r bar What is TOP mode In TOP mode four differently coloured subjects are situated at the bottom of the display To access more information about one of these subjects press the appropriately coloured...

Page 13: ...number changes to white Corresponding colour button To change stored pages 1 2 3 4 5 6 7 8 9 0 OK hold down Enter new page number Colour button you want to change 0 0 0 Enter the 4 digit number examp...

Page 14: ...to the input signal To return to TV TV AV To return to the previous screen MENU Select the menu Select the item example Picture menu select select Adjust or select change example Picture menu example...

Page 15: ...ignal when HDMI is connected Auto Digital Analogue p 26 HDMI2 terminal is for digital signal only HDMI1 input Auto Control with HDMI function p 20 HDMI setting Access Teletext display mode TOP List p...

Page 16: ...u Access Off Off Teletext TOP HDMI setting Owner ID 4 Select the function 5 Set MENU next select next select next select Skip Auto tuning Manual tuning Sound system Colour system Fine tuning Sys selec...

Page 17: ...s function is only effective when pressing the Programme number up or down button either on the TV unit or on the remote control Display the channel you want to skip Set Skip to On OK Manual tuning Re...

Page 18: ...red personal information can be changed by entering that number Enter the 4 digit PIN number Make a note of the PIN number in case you forget it Enter your name address and zip code in that order Stor...

Page 19: ...ght red area and repeatedly adjusted W B High B White balance of bright blue area W B Low R White balance of dark red area W B Low B White balance of dark blue area Gamma 2 0 2 2 2 5 S Curve Setup men...

Page 20: ...onic DVD Recorder DIGA Panasonic Player theatre Panasonic Amplifier etc allow you to enjoy the easy playback or home theatre About connections see p 21 Read the manuals of the equipment too Non HDMI c...

Page 21: ...cture menu Setup menu Home theatre Sound menu You can control the theatre speaker with TV s remote control This function is available when Panasonic Amplifier or Player theatre is connected next Displ...

Page 22: ...ocassettes DVDs VCR DVD recorder To watch DVDs DVD player To watch camcorder images Video camera To watch satellite broadcasts Set top box To play games Game equipment Control with HDMI Recommended Co...

Page 23: ...x DVD Recorder VCR RF cable or AV4 IN MONITOR OUT 1 2 Listening To watch satellite broadcasts To record playback To watch DVDs DVD player External Equipment Connect the S VIDEO or VIDEO terminal when...

Page 24: ...2 11 0 1 2 3 4 5 S2 S10 6 9 9A 21 62 63 69 S 1 S 2 S 3 21 22 23 24 28 57 58 59 62 63 69 90 91 92 93 94 95 96 97 98 99 70 73 74 75 76 77 78 79 80 81 89 100 107 117 118 120 125 S11 S12 S13 S14 S15 S16 S...

Page 25: ...he tracking of the VCR See the VCR manual To select the ratio manually Only 16 9 or 4 3 in PC mode The optimum size and aspect can be chosen and you can enjoy finer images p 10 16 9 Directly displays...

Page 26: ...the HDMI terminal using an HDMI compliant fully wired cable Note HDMI2 terminal is for digital signal only Use with a PC is not assumed The 720p 1080i signals will be reformatted before being displaye...

Page 27: ...ation Stereo Bilingual Sound Selection Note If the stereo signal is poor or the receiving conditions are not optimum or if STEREO MONO automatic switching occurs it is recommended you switch from STER...

Page 28: ...age is activated Not a faulty symptom The screen saver is activated if the TV unit is not operated for a certain time in AV mode Contrast is lowered when radio menu etc lasts for several minutes after...

Page 29: ...et the sound setting of the connected equipment to 2ch L PCM Check the HDMI1 input setting in the Sound menu p 14 If digital sound connection has a problem select analogue sound connection p 26 An err...

Page 30: ...nsing Connection Terminals AV1 Input AUDIO L R RCA PIN Type 2 0 5 V rms VIDEO RCA PIN Type 1 1 0 V p p 75 S VIDEO Mini DIN 4 pin Y 1 0 V p p 75 C 0 286 V p p 75 AV2 Input AUDIO L R RCA PIN Type 2 0 5...

Page 31: ...ct to a Panasonic Authorised Service Centre together with your proof of purchase receipt as a proof of purchase date Please note that freight and insurance to and or from your nearest Authorised Servi...

Page 32: ...k of International Business Machines Corporation Macintosh is a registered trademark of Apple Computer USA S VGA is a registered trademark of the Video Electronics Standard Association Even if no spec...

Reviews: