Panasonic TC-P42G10 Operating Instructions Manual Download Page 19

36

37

Advanced

 How to Use Menu Functions

(picture, sound quality

, etc.)

Menu

Item

Adjustments/Configurations (alternatives)

Setup 

SUB MENU

Channel surf mode

Sets the mode to select the channel with Channel up/down button 

(All/Favorite/Digital only/Analog only)

Set favorite

Sets favorite channels. (p. 20)

Edit CH caption

Changes the station identifier. (p. 51)

Signal meter

Checks the signal strength if interference or freezing occurs on a digital image. (p. 51)

Menu

Item

Adjustments/Configurations (alternatives)

Setup

Channel surf mode

Sets the mode to select the channel with Channel up/down button

(All/Favorite/Digital only/Analog only)

• 

Favorite: Only channels registered as FAVORITE (p. 20)

Channel surf mode

All

Language

Selects the screen menu language (p. 16)

Language

Clock

Adjusts the clock (p. 18)

Clock

ANT/Cable setup

Sets channels (p. 50)

ANT/Cable setup

Connected 

devices

Input labels

Selects the terminal and label of the external equipment (p. 53)

Audio out

[Component 1/Component 2/HDMI 1/HDMI 2/HDMI 3/Video 1/Video 2]

To prevent howling, stops output of audio specified in this menu. (p. 53) 

(On/Off)

Anti Image 

retention

Pixel orbiter

Prevents “Image retention” with Wobbling. (

Automatic/Periodic

)

• 

Automatic: Shifts the display image automatically.

• 

Periodic:   Shifts the display image every (1/2/3/4) minutes according to what was set in the “Time (minutes)” menu.

Pixel orbiter

Automatic

Time (minutes)

Sets the time for “Pixel orbiter-Periodic” setting. 

(1/2/3/4)

Time (minutes)

4

4:3 side bars

Change the brightness of the side bar (

Off/Dark/Mid/Bright

) (4:3 mode only)

• 

The recommended setting is “Bright” to prevent panel “Image retention”. (p. 60)

4:3 side bars

Bright

Scrolling bar

Press “OK” to start “Scrolling” on the screen (p. 60)

Scrolling bar

VIERA

 Link settings

VIERA Link

Controls equipment connected to HDMI terminals (p. 40) 

(On/Off)

• 

“Power off link”, “Power on link”,  “Stand-by power save”, “Auto power stand-by” and “Default speakers” cannot be selected if “Off” is set.

VIERA Link

On

Power on link

Sets “Power on link” of HDMI connection equipment (p. 40) 

(Yes/No)

Power on link

Yes

Power off link

Sets “Power off link” of HDMI connection equipment (p. 40) 

(Yes/No)

Power off link

Yes

Stand-by power 

save

Set “Stand-by power save” of HDMI connection equipment. (p. 40) 

(No/Yes)

Stand-by power save

No

Auto power 

stand-by

Set “Auto power stand-by” of HDMI connection equipment. (p. 40) 

(No/Yes (with reminder)/Yes (no reminder)

Auto power stand-by

No

Default speakers

Selects the default speakers (p. 40) 

(TV/Theater)

Default speakers

TV

Network setting

Sets Network setting (p. 44)

Network setting

VIERA CAST setting

Sets VIERA CAST setting (p. 46)

VIERA CAST setting

Network cameras list

Set Network Camera status. (Search/Registration/Connection/Deleting/Default setting etc.) (p. 30)

Network cameras list

ECO/energy saving

No signal for 10 

minutes

To conserve energy, the TV automatically turns off when NO SIGNAL and NO OPERATION is performed 

for more than 10 minutes. 

(Enable/Disable)

Note

• 

Not in use when setting “Auto power on”, “On/Off Timer”, “Lock”, “SD mode” or Digital channel. 

• 

“No signal for 10 minutes was activated” will be displayed for about 10 seconds when the TV is turned 

on for the first time after turning the power off by “No signal for 10 minutes”.

• 

The on-screen display will flash 3, 2 and 1 to indicate the last three (3) remaining minutes prior to the shut-off.

No signal for 10 minutes

Enable

No activity for 3 

hours

To conserve energy, the TV automatically turns off when no operation of remote or side panel key 

continues for more than 3 hours. 

(Enable/Disable)

Note

• 

Not in use when setting “Auto power on”, “On/Off Timer” or PC input display.

• 

“No activity for 3 hours was activated” will be displayed for about 10 seconds when the TV is turned on 

for the first time after turning the power off by “No activity for 3 hours”.

• 

The on-screen display will flash 3, 2 and 1 to indicate the last three (3) remaining minutes prior to the shut-off.

No activity for 3 hours

Disable

Advanced 

setup

Auto power on

Turns TV On automatically when the cable box or a connected device is turned On. 

(No/Yes)

TV AC cord must be plugged into this device. TV comes on every time the power is restored.

• 

The “Sleep” timer, “On / Off timer”, and “First time setup” will not function if “Auto power on” is set. (p. 54)

Auto power on

No

Play SD card 

automatically

Set “Movie”, “Thumbnail” or “Slideshow” to play back SD cards automatically. 

(Slideshow/Thumbnail/Movie/Set later/Off)

Play SD card automatically

Set later

About

Displays TV version and software license.

About

Reset to default

Performing Reset will clear all items set with Setup, such as channel settings. (p. 50)

Reset to defaults

How to Use Menu Functions 

(Continued)


Menu list


Sub menu list

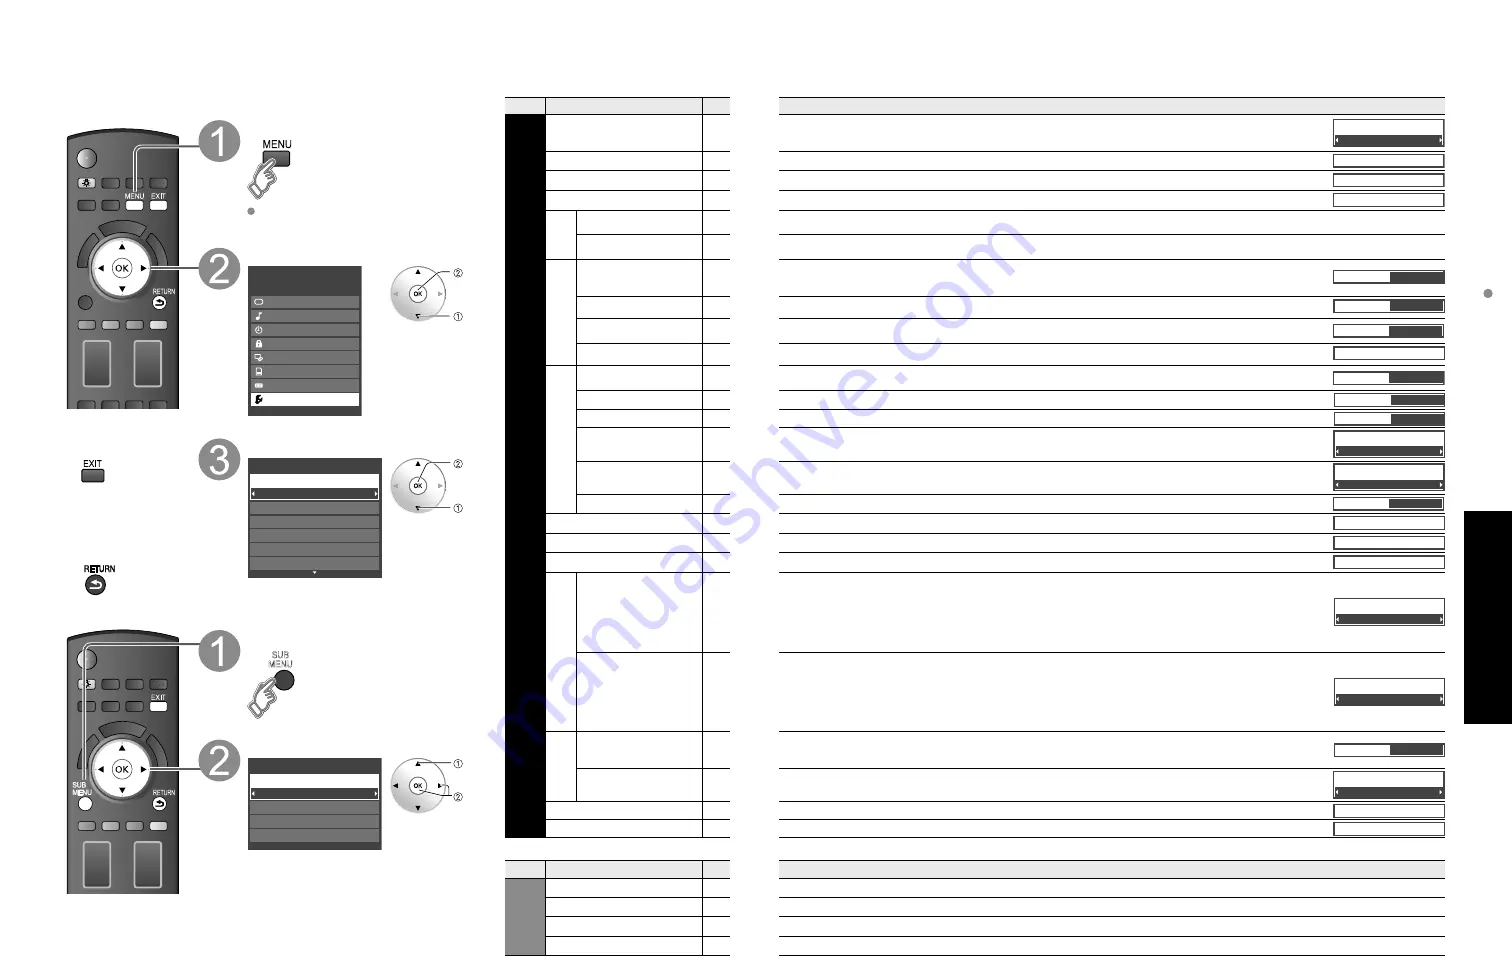
Various menus allow you to make settings for the picture, sound, and 
other functions so that you can enjoy watching TV best suited for you.


Press to exit from 
a menu screen


Press to return 
to the previous 
screen
 

Display menu

 Displays the functions that can be set 

(varies depending on the input signal)

Select “Setup”

Menu

Picture
Audio
Timer
Lock
VIERA Link
SD card
Closed caption

Setup

 next

 select

Select the item

All

Setup

1/2

Clock
ANT/Cable setup
Connected devices
Anti image retention

Language

Channel surf mode

 next

 select

Display Sub Menu

SUB

MENU

Select the item

All

Setup SUB MENU

Edit CH caption
Signal meter

Set favorite

Channel surf mode

 select

 set

 or

 next

Summary of Contents for TC-P42G10

Page 1: ...a al identificarlo en el caso de que le sea sustraído o lo pierda y también para disponer de los servicios que le ofrece la garantía Modelo Número de serie Panasonic Consumer Electronics Company Division of Panasonic Corporation of North America One Panasonic Way Secaucus New Jersey 07094 U S A Panasonic Canada Inc 5770 Ambler Drive Mississauga Ontario L4W 2T3 CANADA 2009 Panasonic Corporation of ...

Page 2: ...Network Camera 30 Displaying PC Screen on TV 32 How to Use Menu Functions picture sound quality etc 34 VIERA LinkTM HDAVI ControlTM 38 Network setting 44 VIERA CAST setting 46 Lock 48 Editing and Setting Channels 50 Closed Caption 52 Input Labels Audio Out 53 Using Timer 54 Recommended AV Connections 55 Ratings List for Lock 56 Technical Information 57 Care and Cleaning 61 FAQ 62 Specifications 64...

Page 3: ...ing materials and plastic bags sheets to prevent them from being played with by young children creating the potential risk of suffocation Set up This Plasma TV may fall and can cause personal injury or even death if not installed correctly To prevent personal injury or death follow these warnings Install the Plasma TV in accordance with the manufacturer s recommended pedestal or stand correspondin...

Page 4: ...are mounting the display is appropriate Some wall mounts are not designed to be mounted to walls with steel studs or old cinder block construction If you are unsure contact a professional installer A minimum of two people are required for installation Flat panel displays can be heavy Panasonic recommends that a qualified installer perform the wall mount installation See page 5 Safety Precautions C...

Page 5: ...pedestal and be absolutely sure to take steps to prevent the TV from tipping over Handle the TV carefully during installation since subjecting it to impact or other forces may cause its panel to crack Wall hanging bracket angle TY WK4P1RW for 42 46 50 TY WK5P1RW for 54 Attaching the pedestal to TV Assembling the pedestal Fix securely with assembly screws A Total 4 screws Tighten screws firmly Imag...

Page 6: ...TV standard definition television SDTV data broadcasting multi channel surround sound audio and interactive television If no Cable Box AC Cord Connect after all the other connections have been made Back of the TV Cable TV AC 120 V 60 Hz VHF UHF Antenna Cable Box or or Accessories Optional Accessory Continued AC cord connection Antenna terminal Pin terminals HDMI terminal green blue red green Firml...

Page 7: ...nnection can be made with the use of a Component Video or HDMI cable p 14 VCR Connection can be made with the use of an RF cable and Composite Video S Video cable p 14 VHF UHF Antenna TV AV Equipment e g DVD Recorder or VCR Back of the TV AC Cord AC 120 V 60 Hz VHF UHF Antenna AV Equipment e g DVD Recorder or VCR with TV tuner Connecting TV and AV equipment Please refer to A D on p 14 Example 3 Co...

Page 8: ...e power cord is inserted into the wall outlet Do not place any objects between the TV remote control sensor and remote control TV controls indicators Changes the input mode Chooses menu and submenu entries Displays the Main menu POWER button Volume up down Remote control sensor Within about 23 feet 7 meters in front of the TV set Selects channels in sequence Front of the TV Back of the TV C A T S ...

Page 9: ...Cable setup ANT in Auto program set select ANT in Cable Cable TV Antenna Antenna Not used Skip TV tuning go to Select Not used when no wire is connected to the Antenna Cable terminal Typical when Cable Satellite box is connected to a TV input Prevents accidental tuning to an unavailable signal Press to exit from a menu screen Note To change setting Language ANT Cable setup Network setting VIERA CA...

Page 10: ...e Press to exit from a menu screen Note About broadcasting systems Analog NTSC Conventional broadcasting Digital ATSC New programming that allows you to view more channels featuring high quality video and sound Adjust the clock First time setup Language VIERA CAST setting Network setting Clock ANT Cable setup Input labels next select Mode Manual Adjust the clock manually Year Month Day Hour Minute...

Page 11: ...el without pressing OK or Delete a favorite channel Set favorite 1 3 26 1 1 2 3 4 5 select delete while holding down Favorite Feature Use Favorite Feature 1 Display Favorite channels 2 Select the channel Favorite channels 1 3 26 1 1 2 3 4 5 select or 3 Set Favorite channel Favorite channels 1 3 26 1 1 2 3 4 5 ok To change the page Press repeatedly to change between pages 1 3 2 3 3 3 or exit Change...

Page 12: ... 11 34 00h05m27s PLAY 00 00 14 Pause Date and time Duration 06 10 2009 11 34 00h05m27s PLAY 00 00 14 Skip Skip R Y G B Pause Stop RETURN Play To display hide banner Navigation area Elapsed time of current movie Movie Banner To display Navigation area To hide Navigation area To previous movie To next movie Movie player SD Card Insert the card Remove the card Label surface Push until a click is hear...

Page 13: ...udio Slideshow settings Background music select change next Set the Background music Off Background music select change Select the Background music from 3 types Each Background music plays for 90 seconds Off Music 1 Music 2 Music 3 Slideshow settings Fast Off Off Sepia Slideshow settings Speed Repeat Transition Effect Select Adjust Note To stop in mid cycle Press Speed You can set how many seconds...

Page 14: ...l that has GAME label Video 2 GAME HDMI 3 GAME HDMI 1 GAME Cycle through the input terminals if there are multiple Input terminals that have GAME label p 53 If there is no Input terminal with GAME label you cannot switch the input terminal to any other input terminal than the one currently selected Operate the connected equipment using the remote control supplied with the equipment Note For detail...

Page 15: ...choose a wired connection If the Cable DSL modem is far from the TV and or you have more TVs in the house you may want to use a wireless network Connecting to the internet A Basic connection If you are not using the network for connecting anything else but the TV you could just connect the TV directly to the Cable DSL Ethernet connection see schematic below B Advanced wired connection If you are u...

Page 16: ...screen Camera name Camera 1 Model BL C210A For more details on setting and operation of the Network camera please also read the operating manuals for the Network camera Network Camera You can operate the Network camera from TV s remote and also check the images from Network camera on your TV Basic operation for Network camera Network Camera setting Display Menu Network Camera setting operation R G...

Page 17: ...onnector p 61 On green Uses a synchronized signal on the Video G signal which is input from the G connector p 61 Dot clock Alleviates the problem if a picture appears to be vertically striped flickers partially or is blurred H position Adjusts the horizontal position V position Adjusts the vertical position Clock phase Alleviates the problem if the whole picture appears to flicker or is blurred Fi...

Page 18: ... to aspect mode for reducing noise p 60 H size Size 1 Audio Reset to default Resets Bass Treble and Balance adjustments to factory default settings Reset to defaults Bass Increases or decreases the bass response Bass 0 Treble Increases or decreases the treble response Treble 0 Balance Emphasizes the left right speaker volume Balance 0 Advanced audio A I sound Equalizes overall volume levels across...

Page 19: ...VIERA CAST setting p 46 VIERA CAST setting Network cameras list Set Network Camera status Search Registration Connection Deleting Default setting etc p 30 Network cameras list ECO energy saving No signal for 10 minutes To conserve energy the TV automatically turns off when NO SIGNAL and NO OPERATION is performed for more than 10 minutes Enable Disable Note Not in use when setting Auto power on On ...

Page 20: ...tions please refer to the operating manuals for the equipment VIERA LinkTM Connections Follow the connection diagrams below for HDAVI control of a single piece of AV equipment such as a DVD recorder DIGA RAM theater or Player theater system Refer to page 40 43 for Setup Menu settings and additional control information Optional HDMI and or optical cables are not included If connection or setting of...

Page 21: ... the equipment Auto power save for HDAVI Control 2 or later Condition Auto power stand by Yes The equipment has HDAVI Control 2 or later for available equipment only connected with HDMI cable Examples of timing for operation When the input is switched from HDMI When the Speaker output is changed from Home theater to TV The connected VIERA Link compatible equipment will be turned off automatically ...

Page 22: ...quipment you want to access Recorder Home theater Player Camcorder LUMIX Network Camera Using VIERA TOOLS p 21 If there is more than one equipment item a number after the name indicates the number of items e g Recorder 1 Recorder 2 Recorder 3 The number of equipment items that can be connected is three for recorders and a total of three for Home theater Player Camcorder LUMIX Note There is a limit...

Page 23: ... enter each IP address When IP automatic acquisition in DHCP can be used Network setting 1 2 Connection test Succeeded IP setting mode Automatic IP address 192 168 0 5 Subnet mask 255 255 255 0 Default gateway 192 168 0 254 The acquired address is displayed select ok Subnet mask OK 10I 0 0 0 0 change channel ok or Each IP address is acquired automatically DNS setting DNS setting mode Primary DNS S...

Page 24: ... specified by the provider It is not required for normal household use Proxy setting Proxy address Proxy port Proxy address This is the address of the relay server that is connected to the target server instead of the browser and sends data to the browser Setting is only required if specified by the provider Select Proxy address and Press OK Proxy port This number is specified by the provider toge...

Page 25: ...nel 3 Channel 4 Channel 5 select set To lock unlock all channels Select Mode and set to All or Off All Locks all channels Off Unlocks all channels Game lock Locks Channel 3 Channel 4 and external inputs Select Game in 5 and set to On select set On Locks Off Unlocks Program lock To set a rating level V chip technology enables restricted shows to be locked according to TV ratings Select Mode and set...

Page 26: ...URN Delete ABC abc G Y Edit CH caption Caption Channel select change set next or Caption Select the station identifier maximum 7 characters available Favorite Set favorite 1 3 26 1 1 2 select next Set favorite Select the number Add Press OK to select Yes add or No skip Move cursor to channel number Manual program Edit Cancel Apply Caption Favorite Add 2 Yes 3 Yes Channel select Press OK to tune to...

Page 27: ... to defaults and press OK Press to exit from a menu screen Display menu Select Closed caption Menu VIERA Link Picture Audio Timer Lock SD card Closed caption Setup next select Input Labels Audio out Input labels Display labels of connected devices Devices connected to external input terminals can be labeled for easier identification during input selection In selecting input mode from p 26 Select t...

Page 28: ...T Select the channel Channel Select the day Day The time to turn On On time The time to turn Off Off time Select the inputs Inputs AM PM Timer setting On Off Timer set Clear Recommended AV Connections These diagrams show our recommendations or how to connect the TV unit to your various equipment For other connections consult the instructions for each piece of equipment and its specifications For a...

Page 29: ...mpt Exempt programming G General Programming intended for audience of all ages Contains no violence or the violence content is minimal or is depicted appropriately 8 ans 8 General Not recommended for young children Programming intended for a broad audience but contains light or occasional violence Adult supervision recommended 13 ans Programming may not be suitable for children under the age of 13...

Page 30: ...AVI Control 2 or more function to the TV with HDMI cable the sound from DIGITAL AUDIO OUT terminal can be output as multi channel surround HDAVI Control 4 is the newest standard current as of December 2008 for the HDAVI Control compatible equipment This standard is compatible with the conventional HDAVI equipment HDMI connection HDMI high definition multimedia interface allows you to enjoy high de...

Page 31: ...d dish soap diluted by 100 times the amount of water and then wring the cloth to remove excess liquid Use this cloth to wipe the surface of the display panel then wipe it evenly with a dry cloth of the same type until the surface is dry Do not scratch or hit the surface of the panel with fingernails or other hard objects Furthermore avoid contact with volatile substances such as insect sprays solv...

Page 32: ...he HDMI device to Linear PCM If digital sound connection has a problem select analog sound connection Problem Actions Press any button to return moves on the screen Screen Some spots remain bright or dark Chaotic image noisy No image can be displayed Only spots are displayed instead of images Neither image nor sound is produced The function to prevent Image retention is activated Not a faulty symp...

Page 33: ...No of pixels 50 class 49 9 inches measured diagonally 54 class 54 1 inches measured diagonally 43 5 24 4 49 9 1 105 mm 622 mm 1 268 mm 47 1 x 26 5 x 54 1 1 198 mm x 673 mm x 1 374 mm 2 073 600 1 920 W 1 080 H 5 760 1 080 dots Sound Audio Output 20 W 10 W 10 W 10 THD PC signals VGA SVGA XGA WXGA SXGA Horizontal scanning frequency 31 69 kHz Vertical scanning frequency 59 86 Hz Channel Capability Dig...

Page 34: ...Factory Service Center or other Authorized Servicer or damage that is attributable to acts of God THERE ARE NO EXPRESS WARRANTIES EXCEPT AS LISTED UNDER LIMITED WARRANTY COVERAGE THE WARRANTOR IS NOT LIABLE FOR INCIDENTAL OR CONSEQUENTIAL DAMAGES RESULTING FROM THE USE OF THIS PRODUCT OR ARISING OUT OF ANY BREACH OF THIS LIMITED WARRANTY As examples this excludes damages for lost time cost of havi...

Page 35: ...D INCLUDING ANY IMPLIED WARRANTIES OF MERCHANTABILITY AND FITNESS FOR A PARTICULAR PURPOSE IN NO EVENT WILL PANASONIC CANADA INC BE LIABLE FOR ANY SPECIAL INDIRECT OR CONSEQUENTIAL DAMAGES In certain instances some jurisdictions do not allow the exclusion or limitation of incidental or consequential damages or the exclusion of implied warranties so the above limitations and exclusions may not be a...

Reviews: