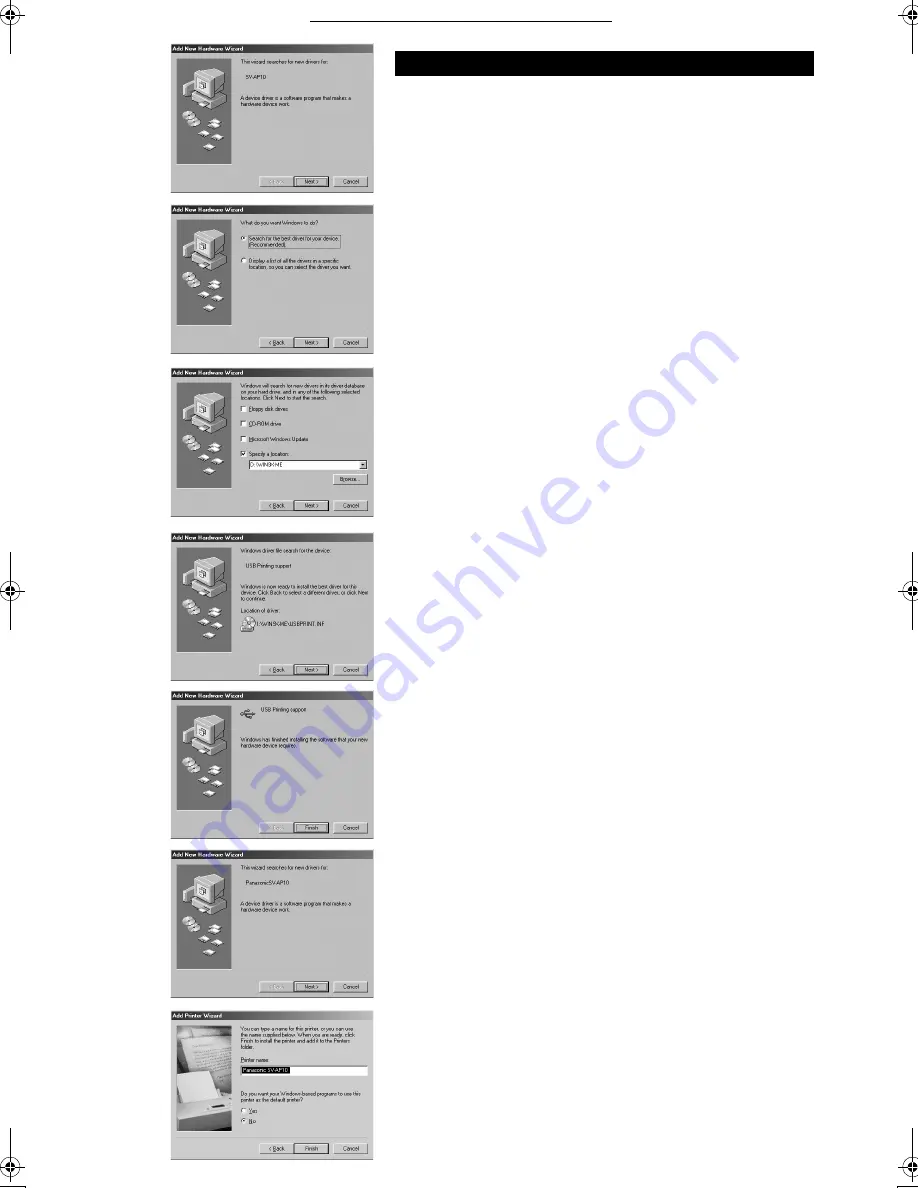
Connecting and Operating with a personal computer
36
36
36
36
1
Turn on the personal computer and insert the supplied
CD-ROM into the CD-ROM drive.
2
Turn on the Photo Printer.
3
Use auxiliary USB Connection Cable to connect.
≥
The [Add New Hardware Wizard] screen appears.
≥
Depending on your PC environment, step 4 and 8 may be skipped.
If this is the case, you will proceed from step 9.
4
Click the [Next] Button.
≥
The [Add New Hardware Wizard] screen appears.
≥
If the [Add New Hardware Wizard] screen does not appear, please
refer to page 37.
5
Click the [Next] Button.
≥
Confirm whether your device is configured to the optimal driver
detection setting.
6
Check the location to be specified and enter the path as
"D:\Win9X-ME" if your system is Windows 98SE. Enter
the path as "D:\Win2K-XP" if your system is Windows
2000 (example of D drive assigned as CD-ROM drive).
7
Click the [Next] Button.
≥
Re-click the [Next] Button when the search confirmation screen
appears.
≥
The message of [File *****.DLL is not found] can be displayed
depending on the environment of PC. Many PCs may install this
file on the Hard Disk. Click [Refer] and select
[C:\windows\option\cabs].
≥
If your system is Windows 2000, proceed to the step 13.
8
Click the [Finish] Button.
9
[Add New Hardware Wizard] screen appears again.
Click the [Cancel] Button.
10
Restart the computer.
11
[Add New Hardware Wizard] screen appears again.
Repeat the steps from 4 through 7.
12
Select [No] when the [Add Printer Wizard] screen
appears.
≥
Select [Yes] to set as the default printer.
13
Click the [Finish] Button.
≥
The driver setup is completed.
≥
Please read also the “Notes on Installation of Printer Driver”
(
l
l
l
l
41)
carefully.
≥
When installation is not finished correctly or the message is
displayed, refer to [Readme.txt] file in the supplied CD-ROM.
For Windows 98SE/2000
5
6
4,9
12,13
11
8
7
SV‑AP10B.book 36 ページ 2002年9月18日 水曜日 午前8時55分
Summary of Contents for SV-AP10B
Page 55: ...55 55 55 55 ...


