8
Si
mp
le
S
etu
p
C
a
b
le co
nn
e
c
ti
on
s
RQ
TX00
87
ENGL
ISH
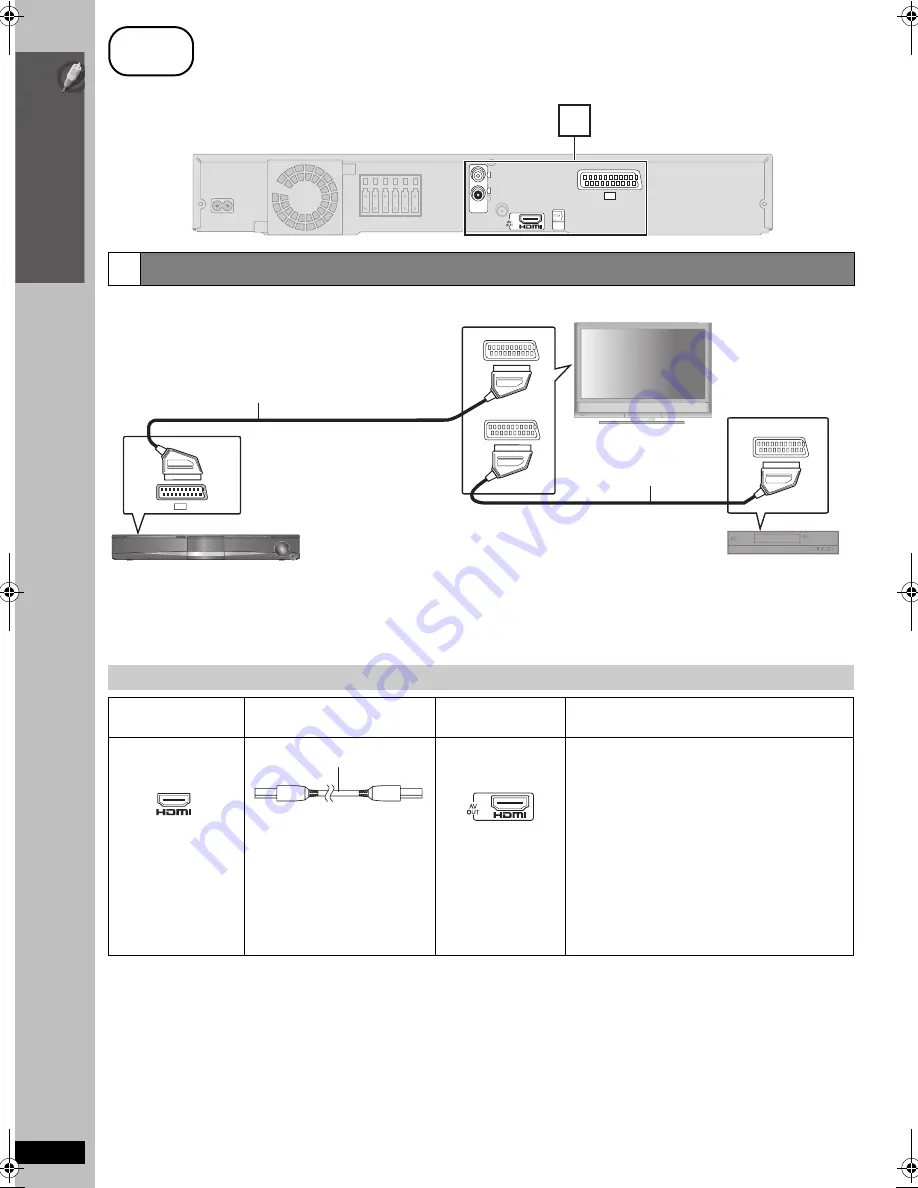
Basic setup example
§
This connection will also enable you to play TV audio through your home theater system (
➜
30, Enjoying TV audio). Select the appropriate audio
out (e.g. Monitor) on the TV.
To improve picture quality, you can change the video signal output from the SCART (AV) terminal to suit the type of TV you are using.
≥
Select “S-VIDEO”, “RGB 1” or “RGB 2” from “VIDEO OUT – SCART” in “VIDEO” menu (
➜
22).
≥
When both the HDMI cable and scart cable are connected, there will be no RGB output from the SCART (AV) terminal.
[Note]
≥
Do not make the video connections through the video cassette recorder.
Due to copy guard protection, the picture may not be displayed properly.
≥
Only one video connection is required. Choose one of the video connections above depending on your TV.
step
3
Cable connections
3
Audio and video connections
Other video connections for improved picture quality
TV terminal
Cable required
(not included)
Main unit terminal
Features
HDMI cable
[Note]
≥
Non-HDMI-compliant cables
cannot be utilized.
≥
It is recommended that you use
Panasonic’s HDMI cable.
Recommended part number:
RP-CDHG15 (1.5 m),
RP-CDHG30 (3.0 m),
RP-CDHG50 (5.0 m), etc.
[\\\\\\\\\\\HDMI\\\\\\\\\\\]
This connection provides the best picture quality.
≥
Set “VIDEO PRIORITY” to “ON” (
➜
23, “HDMI” menu).
≥
Set “VIDEO FORMAT” in Menu 4 (HDMI) (
➜
19).
VIERA Link “HDAVI Control”
If your Panasonic TV is VIERA Link compatible, you can
operate it synchronising with home theater operations
or vice versa (
➜
26, Using the VIERA Link “HDAVI
Control
TM
”).
≥
Make the extra audio connection (
➜
9) when you use
VIERA Link “HDAVI Control” function.
OPTICAL
IN
AV
3
AUX
L
R
Main unit
AV1
AV2
AV OUT
AV
Main unit
Scart cable
§
(not included)
TV
(not included)
Scart cable
(not included)
Set top box or video
cassette recorder
(not included)
AV IN
8
SC-PT465E-RQTX0087-1R_eng.book Page 8 Wednesday, January 30, 2008 4:13 PM


