INT
R
O
17
RQT
7
0
6
2
STEP
5
Radio and system connections
A
OUT
AV4 IN
R-AUDIO-L
R-AUDIO-L
VIDEO
OPTICAL
IN
S-VIDEO
L
VIDEO S-VIDEO
1
L
3
L
2
R
4
5
R
A
∑
System cable
(K1HA25HA0001)
∑
AM loop aerial
(N1DAAAA00002)
∑
FM indoor aerial
(RSA0007-L)
∑
AC mains leads
(RJA0053-3X)
A
EXT LOOP
75
OUT
AV4 IN
R-AUDIO-L
R-AUDIO-L
VIDEO
OPTICAL
IN
AM ANT
FM ANT
S-VIDEO
LOOP
ANT
GND
VIDEO S-VIDEO
AV1 (TV)
AV2 (DECODER/EXT)
1
2
3
4
5
6
Adhesive tape
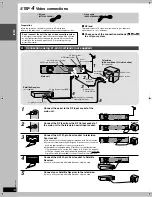
Fix the other end of the
aerial where
reception is best.
Stand the aerial up on
its base.
Place the aerial where
the reception is best.
Keep loose aerial cable
away from other wires and
cables.
FM indoor aerial
Main unit
Catch is facing right
Catch is facing down
Loosen the terminal
with a Phillips-head
screwdriver.
White
Red
Black
Main unit
1
Connect the aerials.
3
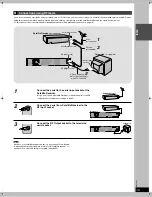
Connect the AC mains leads.
≥
Connect both AC mains leads to enjoy all the features of this system.
(The leads are the same.)
≥
Plug the Television, Satellite Receiver into the household mains socket.
Push up.
Insert the aerial cables as
far as possible.
Pull down.
To disconnect
Press the catch and pull out.
Catch
Tighten the terminal
screw again.
Subwoofer
Click!
2
Connect the system cable.
AM loop aerial
AC IN
1
L
3
L
2
R
4
5
R
A
AC IN
System cable
AC mains lead
AC IN terminal
Main unit
Subwoofer
AC IN terminal
Conserving power
BE SURE TO READ THE CAUTION FOR AC MAINS LEAD
ON PAGE 2 BEFORE CONNECTION.
The main unit consumes a small amount of power, even when it is
turned off. To save power when the unit is not to be used for a long
time, unplug it from the household mains socket.
Set the unit to the standby mode, and remove the AC mains lead
once “BYE” disappears from the unit’s display.
Note that clock and timer settings will be lost after 120 minutes of
back up time.
To household mains
socket
After marking the connections perform radio tuning ( page 48)
Note
➜
7062en.book 17 ページ 2003年8月27日 水曜日 午後2時56分


