background image

3

1 Safety Precautions

1.1.

General Guidelines

1.

IMPORTANT SAFETY NOTICE

There are special components used in this equipment which are important for safety. These parts are marked by   in the
Schematic Diagrams, Circuit Board Layout, Exploded Views and Replacement Parts List. It is essential that these critical parts
should be replaced with manufacturer’s specified parts to prevent X-RADIATION, shock, fire, or other hazards. Do not modify
the original design without permission of manufacturer.

2. An Isolation Transformer should always be used during the servicing of AC Adaptor whose chassis is not isolated from the AC

power line. Use a transformer of adequate power rating as th is protects the technician from accidents resulting in personal
injury from electrical shocks. It will also protect AC Adaptor from being damaged by accidental shorting that may occur during
servicing.

3. When servicing, observe the original lead dress. If a short circuit is found, replace all parts which have been overheated or

damaged by the short circuit.

4. After  servicing,  see  to  it  that  all  the  protective  devices  such  as insul ation  barriers,  insulation  papers  shields  are prop erly

installed.

5. After servicing, make the following leakage current checks to prevent the customer from being exposed to shock hazards.

1.1.1.

Leakage Current Cold Check

1. Unplug the AC cord and connect a jumper between the two prongs on the plug.
2. Measure the resistance value, with an ohmmeter, between the jumpered AC plug and each exposed metallic cabinet part on

the equipment such as screwheads, connectors, control shafts, etc. When the exposed metallic part has a return path to the
chassis, the reading should be between 1M

Ω

 and 5.2M

Ω

.

When the exposed metal does not have a return path to the chassis, the reading must be 

1.1.2.

Leakage Current Hot Check

1. Plug the AC cord directly into the AC outlet. Do not use an isolation transformer for this check.
2. Connect a 1.5k

Ω

, 10 watts resistor, in parallel with a 0.15

μ

F capacitors, between each exposed metallic part on the set and a

good earth ground such as a water pipe, as shown in Figure 1-1.

3. Use an AC voltmeter, with 1000 ohms/volt or more sensitivity, to measure the potential across the resistor.
4. Check each exposed metallic part, and measure the voltage at each point.
5. Reverse the AC plug in the AC outlet and repeat each of the above measurements.
6. The potential at any point should not exceed 0.75 volts RMS. A leakage current tester (Simpson Model 229 or equivalent)

may be used to make the hot checks, leakage current must not exceed 1/2 milliamp. In case a measurement is outside of the
limits specified, there is a po ssibility of a shock hazard, and the equipment should be repaired and rechecked before it is
returned to the customer.

Figure 1-1

Summary of Contents for SA-AKX200LM

Page 1: ...ES Devices 2 2 Precaution of Laser Diode 2 3 General description about Lead Free Solder PbF 2 4 Handling Precautions for Traverse Unit 2 5 Grounding for electrostatic breakdown prevention 3 Service Navigation 3 1 Service Information 4 Specifications 5 Location of Controls and Components 5 1 Remote Control Key Button Operation 5 2 Main Unit Key Button Operation 6 Service Mode 6 1 Cold Start 6 2 Sal...

Page 2: ...1 Wiring Connection Diagram 12 Schematic Diagram 12 1 Schematic Diagram Notes 12 2 Main Micon Circuit 1 3 12 3 Main Micon Circuit 2 3 12 4 Main Micon Circuit 3 3 12 5 Main USB Circuit 12 6 Main Tuner AUX Circuit 12 7 Main DSP Bluetooth Circuit 12 8 Main Damp Circuit 12 9 Main Voltage Regulator Circuit 12 10 Panel Circuit For SA AKX200LM 12 11 Panel Circuit For SA AKX400LM 12 12 USB CD Interface an...

Page 3: ...hock hazards 1 1 1 Leakage Current Cold Check 1 Unplug the AC cord and connect a jumper between the two prongs on the plug 2 Measure the resistance value with an ohmmeter between the jumpered AC plug and each exposed metallic cabinet part on the equipment such as screwheads connectors control shafts etc When the exposed metallic part has a return path to the chassis the reading should be between 1...

Page 4: ... conditions are noticed No sound is heard when the power is turned on Sound stops during a performance The function of this circuitry is to prevent circuitry damage if for example the positive and negative speaker connection wires are shorted or if speaker systems with an impedance less than the indicated rated impedance of the amplifier are used If this occurs follow the procedure outlines below ...

Page 5: ...5 1 4 1 For SA AKX200LM Figure 1 3 1 4 2 For SA AKX400LM Figure 1 4 ...

Page 6: ...ds Do not modify the original design without permission of manufacturer Model SC AKX200LM Safety K2CB2CB00022 RKM0764 KL RKM0764Z KL RD DDL112 PX RQT0A36 M N0AB1GK00001 CD UNIT RGR0473A L Part No SWITCHING POWER SUPPLIES AC DC CONVERTER TOP CABINET BEND TOP CABINET UNBEND AC CORD O I BOOK SP Part Name REAR PANEL Model SC AKX400LM Safety K2CB2CB00022 RKM0764 KL RKM0764Z KL RD DDL112 PX RQT0A34 1M N...

Page 7: ...nt to damage ES devices 6 Do not remove a replacement ES device from its protective package until immediately before you are ready to install it Most replacement ES devices are packaged with leads electrically shorted together by conductive foam aluminum foil or compara ble conductive material 7 Immediately before removing the protective material from the leads of a replacement ES device touch the...

Page 8: ...e Parts Route The following 3 types of lead free solder are available through the service parts route RFKZ03D01K 0 3mm 100g Reel RFKZ06D01K 0 6mm 100g Reel RFKZ10D01K 1 0mm 100g Reel Note Ingredient tin Sn 96 5 silver Ag 3 0 Copper Cu 0 5 Cobalt Co Germanium Ge 0 1 to 0 3 2 4 Handling Precautions for Traverse Unit The laser diode in the optical pickup unit may break down due to static electricity ...

Page 9: ...royed by the static electricity of the working environ ment Repair in the working environment that is grounded 2 5 1 Worktable grounding Put a conductive material sheet or iron sheet on the area where the optical pickup is placed and ground the sheet 2 5 2 Human body grounding Use the anti static wrist strap to discharge the static electricity form your body Figure 2 3 Figure 2 3 ...

Page 10: ...low service personnel s to understand and service this model Please place orders using the parts list and not the drawing reference numbers If the circuit is changed or modified this information will be followed by supplement service manual to be filed with original service manual 3 1 1 Software Update Procedure ...

Page 11: ...pply AC 127 V 60 Hz Power consumption 53 W for AKX200 71 W for AKX400 Dimensions W x H x D 348 mm x 193 mm x 251 mm Weight 2 5 kg Operating temperature range 0 C to 40 C Operating humidity range 35 to 80 RH no condensation Power Consumption in standby mode Power Consumption in standby mode With BLUETOOTH STANDBY set to ON 9 2 W approximate Note 1 Specifications are subject to change without notice...

Page 12: ...1 5 Location of Controls and Components 5 1 Remote Control Key Button Operation 5 1 1 For SA AKX200 5 1 2 For SA AKX400 ...

Page 13: ...1 5 2 Main Unit Key Button Operation 5 2 1 For SA AKX200 ...

Page 14: ...1 5 2 2 For SA AKX400 ...

Page 15: ...USB CD keys for 5 sec or more For AKX400 3 Press and hold OPEN CLOSE and CD RADIO AUX keys for 5 sec or more The display will show upon entering into this mode for 2 sec Note OPEN CLOSE button is invalid and the main unit displays LOCKED while the lock function mode is entered Cancellation of Sales Demonstration Lock Mode To cancel the sales demonstration lock mode 1 Turn on the unit 2 Select to C...

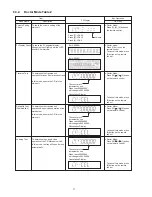
Page 16: ...rol In CD mode 1 Enter into Doctor Mode 2 To exit press DELETE button on remote control or press POWER I button on Main Unit Displaying of 1 Year Develop 2 Model Type 3 ROM Type 4 Firmware Version Display 1 For AKX200 Cold Start To active cold start upon next AC power up when reset start is execute the next time In Doctor Mode 1 Press 4 button on the remote control Version No 001 999 specific for ...

Page 17: ...99999 will change to 00000000 Cancellation Display For AKX200 For AKX400 Traverse Test To determine the traverse unit operation for inner outer access track The counter will increment by one When reach 99999999 will change to 00000000 The counter will increment by one When reach 99999999 will change to 00000000 Cancellation Display Reliability Test Combination In this mode ensure the CD is in the ...

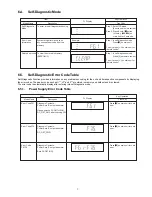
Page 18: ...rol Step 2 Press hold g button follow by y i on main unit for 2 seconds Error Code Information System will perform a check on any unusual error code from the memory Example Step 1 In self diagnostic mode Press g on main unit To exit press 8 on main unit or remote control Delete error code To clear the stored in memory EEPROM IC Step 1 In self diagnostic mode Press 0 on remote control FL Display Ke...

Page 19: ... during cold start Error Code F26 Diagnosis Contents Communication between CD servo LSI and micro p abnormal During switch to CD function if SENSE L within fail safe time of 20ms Press g on main unit for next error Press g on main unit for next error Press g on main unit for next error FL Display Key Operation Front Key Item Description Mode Name Error Code F70 Diagnosis Contents Bluetooth Communi...

Page 20: ...20 7 Troubleshooting Guide Contents for this section is not available at time of issue ...

Page 21: ...eatsinks due to its high temperature after prolong use See caution as described below During disassembly and assembly please ensure proper service tools equipments or jigs is being used During replacement of component parts please refer to the section of Replacement Parts List as described in the ser vice manual Select items from the following indexes when disassembly or replacement are required D...

Page 22: ...sassembly Flow Chart 8 3 Main Components and P C B Locations Main P C B SMPS Module Rear Panel CD Mechanism Unit CD Interface P C B Front Panel Unit Top Cabinet Panel P C B USB P C B Music Port P C B For AKX400 ...

Page 23: ... Cabinet as arrow shown Step 5 Slightly lift up to remove Top Cabinet 8 5 Disassembly of Front Panel Unit Refer to Disassembly of Top Cabinet Step 1 Lift up Wire Clampers Step 2 Detach 17P FFC at connector CN2500 on Main P C B Step 3 Detach 9P Wire at connector CN2503 on Main P C B Step 4 Detach 4P Wire at connector CN2507 on Main P C B For AKX400 ...

Page 24: ...Front Panel Unit 8 6 Disassembly of Panel P C B Refer to Disassembly of Top Cabinet Refer to Disassembly of Front Panel Unit Step 1 Remove Volume Knob Step 2 Remove Multi Control Knob Step 3 Remove 2 screws Step 4 Release catches Step 5 Lift up to remove Panel P C B ...

Page 25: ...tep 3 Lift up to remove USB P C B 8 8 Disassembly of Music Port P C B For AKX400 Refer to Disassembly of Top Cabinet Refer to Disassembly of Front Panel Unit Step 1 Remove screw Step 2 Lift up to remove Music Port P C B 8 9 Disassembly of Rear Panel Refer to Disassembly of Top Cabinet Step 1 Remove 7 screws Step 2 Release tabs Step 3 Remove Rear Panel ...

Page 26: ... Bracket Unit Step 4 Detach 9P Wire at connector CON2 on SMPS Module Step 5 Detach 17P FFC at connector CN2500 on Main P C B Step 6 Detach 9P Wire at connector CN2503 on Main P C B Step 7 Detach 4P Wire at connector CN2507 on Main P C B For AKX400 Step 8 Detach 10P FFC at connector P2004 on Main P C B Step 9 Detach 24P FFC at connector P2005 on Main P C B Step 10 Remove Main P C B ...

Page 27: ...Remove 3 screws Step 3 Remove Transformer Bracket Unit Step 4 Release catch Step 5 Remove SMPS Module 8 12 Disassembly of CD Mecha nism Unit Refer to Disassembly of Top Cabinet Refer to Disassembly of Front Panel Unit Step 1 Remove 6 screws Step 2 Detach 10P FFC at connector P2004 on Main P C B Step 3 Detach 24P FFC at connector P2005 on Main P C B Step 4 Remove screw ...

Page 28: ...28 Step 5 Remove screw Step 6 Release catches Step 7 Lift up to remove Inner Chassis Unit Step 8 Remove 2 screws Step 9 Remove CD Mechanism Unit ...

Page 29: ...sassembly of Top Cabinet Refer to Disassembly of Front Panel Unit Refer to Disassembly of CD Mechanism Unit Step 1 Remove 2 screws Step 2 Desolder pins of the motor M7301 Step 3 Desolder pins of the motor M7302 Step 4 Remove CD Interface P C B XTN2 6GFJ g ...

Page 30: ...Panel P C B on the insulated material as shown Step 5 Attach 17P FFC at connector CN2500 on Main P C B Step 6 Panel P C B and Main P C B can be checked as dia gram shown 9 2 Checking of SMPS Module Step 1 Remove Top Cabinet Step 2 Remove Rear Panel Step 3 Remove SMPS Module Step 4 Place SMPS Module on the insulated material Step 5 Attach 9P Wire at connector CON2 on SMPS Module Step 6 SMPS Module ...

Page 31: ...N7002 P2004 OPEN SW 8 3 CN7002 P2004 CLOSE SW SPM 9 2 CN7002 P2004 SPM 10 1 CN7002 P2004 TRV 1 10 CN7002 P2004 TRV 2 9 CN7002 P2004 LDM 3 8 CN7002 P2004 LDM LDM LDM 4 7 CN7002 P2004 SPINDLEMOTOR M7302 TRAVERSE MOTOR M7301 CD INTERFACE P C B 3 3V Q2001 LASER DRIVE D L N I V 3 2 5CH MOTOR DRIVER C0GBY0000213 IC2004 7 1 D L O V 8 1 D L O V 1 1 L S O V 2 1 L S O V VOFC 14 3 1 C F O V 6 1 K T O V VOTK ...

Page 32: ...5V D6400 Q2501 SWITCH QR2501 LED DRIVE 5V PW D5V A 9 9 CN2503 CN6402 PW D5V A D6401 USB SELECTOR C1JBAS000401 IC2500 OE SELECT D D 8 10 1 2 1D 4 1D 5 2D 6 2D 7 BLUETOOTH MODULE IC7000 UART TX BT UART RX UART RX BT UART TX HOST WAKE HOST WAKE LDO ON BT WAKE BT CTS BT UART RTS BLUETOOTH DEVICE FREQUENCY 2 101 4 102 11 106 13 105 15 103 4 DAT1 2GB NAND FLASH MEMORY RFKB5157F AKX400LM IC2007 3 DAT0 2 ...

Page 33: ...4 JK6000 3 JK6000 RIGHT LEFT 1 JK6000 2 JK6000 POWER AMPLIFIER C1AB00003994 AKX200 C1AB00004014 AKX400 IC6000 6 INPUT B PWM1B 27 5 INPUT A PWM1A 28 14 INPUT C PWM2A 30 15 INPUT D PWM2B 29 QR6100 SWITCH 10 A LSB SELECTOR C0JBAR000367 IC6100 DOUT FM ANT JK51 FM AM RADIO RECEIVER VUEALLPT087 IC52 LIN 15 RIN 16 GCGPIO2 18 DCLK 17 DFS 14 SDIO 8 SCLK 7 RST 5 2 FMI AM ANT JK52 L52 4 6 3 1 2 4 AMI 13 3 L ...

Page 34: ...D SMPS MODULE AC INLET SMPS MODULE PW 16V H P 0 1 3 VIN 1 BOOT 7 VSENSE 5 RT CLK 2 EN 16V DC DC CONVERTER C0DBAYY01594 IC1002 H P 0 1 2 VIN 1 BOOT 7 VSENSE 6V DC DC CONVERTER C0DBAYY01594 IC1003 32 5V 32 5V SMPS ID SYNC QR1006 Q1008 QR1008 SWITCH DC DETECT CIRCUIT QR1007 SWITCH 3 VIN 3 3V VOLTAGE REGULATOR C0DBGYY03909 IC1000 VOUT 2 PW 3R3V 3 VIN 3 3V VOLTAGE REGULATOR C0DBGYY03909 IC1005 VOUT 2 P...

Page 35: ...4 4 CN6100 CN2500 PW SYS3R3V 17 1 CN6100 CN2500 PW CD5R6V 3 3V 3 3V PW CD3R3V 3 3V 3 3V PW SYS3R3V PW CD5R6V 16 2 CN6100 CN2500 PW CD3R3V 15 3 CN6100 CN2500 PW 16V DC DET PWR PW SYS3R3V PW CD5R6V PW 5V PW CD3R3V PW 12V PW 16V PW USBB 5V PW USBA 5V PW 16V 16V F F F DC DET PWR F SWITCHING TRANSFORMER T6000 Q6001 F F FL DISPLAY VOLTAGE SUPPLY CIRCUIT 3 3V 3 3V 12V 12V 5V 5V 3 3V 3 3V PW 12V 15 3 CN60...

Page 36: ...O CD LOADING P C B CD MECHANISM UNIT CN7002 CN7001 10P 5P TO OPTICAL PICKUP UNIT CD MECHANISM UNIT TO SMPS MODULE CN2503 P2005 P2004 CN1002 ZJ6402 9P CN2500 17P 9P 9P CN6300 4P CN6001 AKX200 CN6100 AKX400 17P 10P 24P CN2507 4P MAIN P C B A PANEL P C B B MUSIC PORT P C B For AKX400 E USB P C B C CD INTERFACE P C B D ...

Page 37: ...rwise noted F Farads pF pico Farad Coil Unit of inductance is H unless otherwise noted REF IS FOR INDICATION ONLY Voltage and signal line S6200 Power switch S6201 Open Close switch S6202 Stop switch S6211 D Bass switch S6212 Album Track switch S6213 Forward switch S6214 CD Radio AUX switch S6215 Play Pause switch S6216 DJ Jukebox PlayMenu switch AKX200 S6216 DJ Jukebox switch AKX400 S6221 Latin EQ...

Page 38: ..._REC_LED I2S_WCK PW_SYS_3R3V I2S_BCK I2S_WCK D1H8R0040016 RX2002 I2S_SDO0 I2S_BCK DSP_SDA DSP_MUTE DSP_RESET DSP_SCL DSP_RESET I2S_SDO0 DSP_SDA DSP_SCL DSP_MUTE V_UP PCONT PCONT V_UP DC_DET_PWR SYNC DC_DET_AMP_FAN DC_DET_AMP_FAN SYNC SMPS_ID 47K R2498 FL_CLK REGION3 OPEN_SW FL_DATO REGION2 KEY_INT INNER_SW REGION1 35 KEY2 34 VDD_ADC 33 VDD_ADC DSP_RESET DSP_SCL DSP_ERROR JTAG JTAG JTAG DVSS JTAG D...

Page 39: ...10 C2164 C2165 0 1 0 01 C2163 6 7 5 9 13 15 14 11 10 12 21 22 18 16 17 20 19 8 1 3 4 2 24 23 P2005 0 R2171 C2179 0 01 D2002 DA2J10100L R2167 4 7 Q2001 B1ADCF000001 LASER DRIVE R2156 100 J0JHC0000045 LB2013 R2182 10K R2162 0 R2163 0 R2165 0 R2160 0 1K R2170 LB2014 J0JBC0000134 2 1 27 5 24 25 22 17 19 18 15 16 1 2 0 2 0 3 7 11 10 2 1 4 1 3 1 8 29 9 23 6 3 4 26 28 IC2004 C0GBY0000213 5CH MOTOR DRIVER...

Page 40: ...RFU NC NC NC NC VCC RFU VSSQ NC VSS VCC NC VSS NC RFU RFU DAT2 DAT1 DAT6 NC NC NC NC DAT3 DAT5 DAT4 DAT0 NRST NRST VSS VSS CLK CLK VCC CLK VSS CLK NC NC VSS VSS VSS RFU RFU NC VCC VCC VCC NRST NRST NC RFU VCC VSS NC NC NC NC NC NC NC NC RFU RFU VCC 78 VSS VSS RFU VCC VCC VCC RFU NC NC VSS NC NC NC NC VCCQ NC NC NC RFU CMD RFU CLK VCC VSS CMD CMD VSSQ VSSQ CLK NC NC NC NC NC NC NC NC NC NC NC NC NC...

Page 41: ...PW_D5V DGND GND ILIM OC EN VOUT VIN 1 2 5 6 3 4 C0DBZYY00723 HIGH SIDE SWITCH IC2501 GND ILIM OC EN VOUT VIN AGND MPORT_L MPORT_R MPORT_DET SEL D 1D 2D 2D D VCC OE 1D GND USB_REC_LED MI USB B MI PW_USB5V VR DGND MI TU DS DA VR VR VR DS TU VR DA USB_A_LED MI USB_OVC MI USB A MI USB_MUX_OE MI USB_D MI USB_D MI BUG_AN_RIN TU BUG_AN_LIN TU MPORT_DET MI LB2501 0 PW_3R3V PW_ 5V PW_12V KEY2 FL_GND PW_SYS...

Page 42: ...UN_INT DS DS R V A D S D S U I M R V A D S D S U DSP_SDA MI DSP_SCL MI DGND MI TUN_RST MI MI MI R V A D US US MI MI S D I M LIN DCLK RIN NC VUEALLPT087 FM AM RADIO RECEIVER NC SDIO VDD GND DOUT VIO RCLK GCGPO2 DFS RFGND AMI SEN RST SCLK FMI GCGPO1 AM ANT AM ANT AUX IN AKX200 AUX IN 1 AKX400 FM ANT AM ANT ANAL_SEL BUG_AN_LIN PW_12V BUG_AN_RIN C6110 16V47 C6101 0 1 C6105 1 1 C6104 R6150 10K R6151 10...

Page 43: ...DA DGND MI MI MI U T I M TU TU MI MI TUN_SDO MI MI MI R V A D U T S U I M R V A D U T S U PW_3R3V I2S_WCK I2S_BCK BCK PWM1A LRCK DVDD1 12 DVSSCORE LDOPOFF ERRIN SDOUT1 SDOUT2 REG15 DVDDCORE BCKO LRCK DVSS2 DVDD2 CLKO VALID PWM1B DVDD_PWM1 DVSS_PWM1 25 SDA SCL SMUTE PWM3A PWM4B 1 DVSS1 2 RST_N DVSS_PWM2 36 DVDD_PWM1 35 PWM4A CLK110M ANATEST BSSEL ADDR XI XO AVSS AVDD XINSEL TST DIVSEL DVSS_OSC PWM2...

Page 44: ... C6021 0 1 C6018 10 C6005 0 1 C6019 22K R6046 10 R6007 10 R6050 C6020 43 11 9 10 34 36 35 12 33 6 5 39 38 41 40 8 37 23 22 20 18 16 14 13 15 17 19 31 32 28 26 25 27 30 29 21 24 3 42 44 2 7 4 1 IC6000 M3 BST_C GVDD_CD BST_D M1 OTW OUT_D GND CLIP INPUT_D PVDD_CD FAULT OUT_D PVDD_CD M2 GND LEFT LEFT RIGHT RIGHT AVDD INPUT_C GND VDD C_START DVDD RESET OC_ADJ GVDD_AB INPUT_B INPUT_A GND GND GND OUT_B P...

Page 45: ...1 8M 0 01 C1018 R1044 2 2K 4 7 C1020 0 01 C1019 10 C1039 PW_SYS_3R3V DGND C1024 1 1 C1025 C1048 0 1 1 4 2 3 IC1004 C0DBGYY00911 3 1 2 B0ADDJ000032 D1002 D1006 B0EAKM000117 B0EAKM000117 D1001 C1000 10 B0EAKM000117 D1009 C1001 10 2 1 3 IC1000 C0DBGYY03909 3 3V VOLTAGE REGULATOR C1047 0 1 C1032 10 0 01 Q1000 B1AAKD000012 0 1 C1023 3 1 2 B0ADDJ000032 D1011 C1052 16V220 32 5V 1 5V VOLTAGE REGULATOR VIN...

Page 46: ...0JHC0000118 LB6805 J0JHC0000118 PW_12V FL_GND 1 C6813 C6814 1 C6816 0 1 2 3 1 5 4 6 Q6816 B1HFCDE00002 SWITCH R6816 4 7K R6812 100 R9002 3 9K R9007 K 9 3 R9012 3 9K 39 R6810 R9011 2 7K S6200 S6212 S6213 R9006 2 7K S6215 R9001 2 2K S6201 S6223 R6811 39 KEY3 KEY2 KEY1 S6216 S6224 S6202 C6821 6 3V100 C6820 1 R6813 100 R9003 7 5K R9013 7 5K R9008 7 5K R9009 18K R9004 18K S6221 S6225 S6222 S6211 S6214 ...

Page 47: ... C6003 100P GR2 C6004 100P GR3 C6005 100P GR4 C6006 100P GR5 C6007 100P GR6 C6009 100P GR7 C6011 100P GR8 C6013 100P GR9 C6014 100P GR10 C6015 100P GR11 C6016 100P GR12 C6018 100P 43 1 2 5 6 8 37 36 38 1 3 2 3 34 33 27 28 25 26 9 2 0 3 35 9 3 0 4 10 1 9 4 17 16 21 23 24 22 0 2 8 1 9 1 15 11 13 12 7 44 A2BB00000184 FL DISPLAY FL6000 FL_DA R6018 220 P0 P3 P2 R6007 10K K2 PW_CD3R3V R6006 10K R6017 47...

Page 48: ...OR AKX400 USB PORT A PLAY USB PORT B REC PLAY 2 5 G 1 4 6 G 3 JK6400 2 5 G 1 4 6 G 3 JK6401 USB_A_D 470K R6401 470K R6402 DGND B3AAA0000487 D6401 0 1 C6400 J0JHC0000118 LB6400 USB_A_D 3 2 6 7 4 5 1 9 8 CN6402 LB6401 J0JHC0000118 C6401 0 1 PW_D5V PW_D5V_A PW_USBA_5V B3AAA0000487 D6400 PW_USBB_5V USB_B_D USB_B_D DGND DGND D D USB5V D D USB5V TO LOADING P C B CD MECHANISM UNIT 1 10 2 3 1 5 4 CN7001 6...

Page 49: ... C62 C67 IC52 JK51 JK52 LB52 L52 L53 R52 R59 VA51 JK6002 R6146 C6099 R6147 C6100 R6134 R6136 C6105 AKX400 R6135 C6104 AKX400 R6133 C66 C52 C6106 AKX400 C6102 AKX400 R6101 AKX400 R6100 AKX400 C6103 AKX400 R6105 AKX400 C6107 AKX400 LB51 C51 L51 Q6001 AKX400 Q6002 R6054 R6055 R6056 R6057 C6027 R6070 R6132 C6068 Q6007 Q6300 C6500 C6521 C6592 C6591 R6559 LB6501 C6501 C6523 C6525 C6561 C6560 X6500 R6502...

Page 50: ... R6811 R6810 C6820 R6812 R6813 R6814 C6808 R6803 R6805 R6802 C6807 C6801 D6806 R6801 Q6801 R6804 C6803 D6801 C6804 D6802 C6805 R6806 C6802 Q6816 C6816 R6815 R6816 R6818 R6817 LB6803 LB6805 C6813 LB6802 C6814 CK6817 R9043 CK6811 W114 W111 W102 W104 W100 W105 W113 W115 W110 R6820 R6822 W112 W107 W108 W109 W117 W101 W116 W118 W106 W103 W119 W120 IR6500 SENSOR USB PORT A USB PORT B REC PLAY PLAY MULTI...

Page 51: ...2 W157 W171 W170 W169 W167 W131 W129 W135 W132 W144 W143 W140 W137 W139 W101 W109 W168 W148 W130 R6126 R6124 R6123 R6119 R6117 R6118 R6125 R6116 W124 W114 W113 W112 W122 W126 W127 W121 W178 W179 W116 W142 LB6015 LB6016 LB6017 W180 W181 W182 W183 ALBUM TRACK ILLUMINATION POWER W184 W185 W186 W187 W188 W189 W156 LB6014 CK6024 CK6020 IR6500 S6200 S6213 S6222 S6212 S6221 S6211 S6225 S6215 S6216 S6201 ...

Page 52: ... 3 2 4 2 STANDBY 0 3 2 4 2 REF NO MODE 1 2 3 4 5 6 7 8 9 10 11 12 13 14 15 16 17 18 19 20 CD PLAY 3 2 3 2 3 2 3 2 3 1 3 2 0 0 0 1 1 3 2 0 0 0 0 0 3 2 1 6 0 0 STANDBY 3 2 3 2 3 2 3 2 0 0 0 0 3 1 0 3 2 0 0 0 0 0 3 2 1 6 0 0 REF NO MODE 21 22 23 24 25 26 27 28 29 30 31 32 33 34 35 36 37 38 39 40 CD PLAY 2 6 3 2 0 1 3 2 2 9 2 9 0 0 3 3 0 3 3 0 1 1 6 1 6 0 5 0 9 0 8 1 6 1 6 1 STANDBY 2 6 3 2 0 3 2 2 9 ...

Page 53: ...8 9 10 11 12 13 14 15 16 CD PLAY 3 2 0 3 2 0 3 2 0 0 0 0 0 0 0 3 2 3 2 3 2 3 2 STANDBY 3 2 0 3 2 0 3 2 0 0 0 0 0 0 0 3 2 3 2 3 2 3 2 REF NO MODE 1 2 3 4 5 6 7 8 9 10 USB B ON 3 0 0 0 2 3 0 3 0 3 3 3 3 REF NO MODE 1 2 3 4 6 USB A ON 5 0 5 5 5 REF NO MODE 1 2 3 4 6 USB B ON 5 0 5 5 5 REF NO MODE 1 2 3 4 5 6 7 8 9 10 11 12 13 14 15 16 17 18 19 20 CD PLAY 12 6 12 6 1 2 3 3 1 7 1 7 3 2 3 3 0 0 0 0 7 8 ...

Page 54: ... 11 12 13 14 15 16 CD PLAY 6 5 0 6 5 0 0 1 0 0 0 0 0 0 6 5 6 5 0 1 0 13 STANDBY 6 5 0 6 5 0 0 1 0 0 0 0 0 0 6 5 6 5 0 1 0 13 REF NO MODE E C B E C B E C B E C B E C B CD PLAY 12 8 16 1 13 4 2 9 1 9 2 2 0 3 2 0 32 6 0 12 16 3 11 7 0 STANDBY 12 8 16 1 13 4 2 9 1 9 2 2 0 3 2 0 32 6 0 12 16 3 11 7 0 REF NO MODE E C B E C B CD PLAY 16 3 11 7 0 0 0 3 2 STANDBY 16 3 11 7 0 0 0 3 2 REF NO MODE 1 2 3 4 5 6...

Page 55: ...7 38 39 40 CD PLAY 23 3 23 3 21 4 23 3 15 9 19 6 15 9 21 4 23 3 23 7 22 21 6 21 4 21 4 21 4 21 4 21 4 21 4 21 4 21 4 STANDBY 23 3 23 3 21 4 23 3 15 9 19 6 15 9 21 4 23 3 23 7 22 21 6 21 4 21 4 21 4 21 4 21 4 21 4 21 4 21 4 REF NO MODE 41 42 43 44 CD PLAY 21 5 21 8 3 3 0 STANDBY 21 5 21 8 3 3 0 REF NO MODE E C B E C B E C B CD PLAY 0 15 5 0 2 0 0 2 3 2 0 4 3 0 STANDBY 0 15 5 0 2 0 0 2 3 2 0 4 3 0 R...

Page 56: ...6500 FOR AKX200 ONLY FL6801 FL6000 FOR AKX400 ONLY CN6402 CN6300 CN6100 FOR AKX400 ONLY CN6001 FOR AKX200 ONLY 34 34 34 34 34 32 32 32 32 31 31 31 31 24 23 21 20 18 17 17 16 15 14 13 1 13 1 13 11 11 10 9 8 7 FOR AKX400 ONLY FOR AKX400 ONLY 6 6 4 2 a b c 1 2 3 4 5 6 7 8 9 A B C D E F G H 10 11 12 13 NOTE PART IS NOT SUPPLIED REF IS FOR INDICATION ONLY SA AKX200LM SA AKX400LM CABINET DRAWING ...

Page 57: ... UNIT CN7002 CN7001 CN2503 CN2507 FOR AKX400 ONLY CN2500 CN1002 312 312 301 43 42 42 42 42 42 41 40 39 39 FOR AKX400 ONLY FOR AKX200 ONLY 38 36 36 35 35 34 34 34 34 34 34 34 33 33 33 33 33 33 30 30 29 28 28 27 26 22 22 19 19 12 3 1 a b c d d e e f f g g 1 2 3 4 5 6 7 8 9 A B C D E F G H 10 11 12 13 NOTE PART IS NOT SUPPLIED REF IS FOR INDICATION ONLY SA AKX200LM SA AKX400LM CABINET DRAWING ...

Page 58: ...AM PAD ACCESSORIES BAG AM LOOP ANTENNA A5 FM INDOOR ANTENNA A4 A3 OI BOOK AC CORD A2 A1 REMOTE CONTROL P3 P2 P2 P2 FRONT P1 SC AKX200LM PACKAGING DRAWING POLYFOAM TOP FRONT POLYFOAM TOP REAR POLYFOAM BOTTOM P2 1 2 3 4 5 6 7 8 9 A B C D E F G H 10 11 12 13 NOTE PART IS NOT SUPPLIED ...

Page 59: ...X400LM SA AKX400LM ACCESSORIES BAG AM LOOP ANTENNA A5 FM INDOOR ANTENNA A4 A3 OI BOOK AC CORD A2 A1 REMOTE CONTROL P3 P2 P2 FRONT P1 SC AKX400LM PACKAGING DRAWING POLYFOAM TOP POLYFOAM BOTTOM P2 1 2 3 4 5 6 7 8 9 A B C D E F G H 10 11 12 13 ...

Page 60: ...ANEL 1 AKX200 13 RGP1727A K FRONT PANEL 1 AKX400 13 1 RKAX0042 K LEG CUSHION 2 14 RGU2979 K UPPER FUNCTION BUTTON 1 AKX200 14 RGU2979B K UPPER FUNCTION BUTTON 1 AKX400 15 RGU2980 K LEFT FUNCTION BUTTON 1 AKX200 15 RGU2980A K LEFT FUNCTION BUTTON 1 AKX400 16 RGU2981 K RIGHT FUNCTION BUTTON 1 AKX200 16 RGU2981A K RIGHT FUNCTION BUTTON 1 AKX400 17 RGW0457 K VOLUME KNOB 2 AKX200 17 RGW0457 S VOLUME KN...

Page 61: ...CREW 4 43 REX1851 9P WIRE USB MAIN 1 TRAVERSE DECK RD DDL112 PX BRS1 1C LOADER 1 PACKING MATERI ALS P1 RPG0R18 PACKING CASE 1 P1 RPG0R16 PACKING CASE 1 AKX400 AKX200 P2 RPN2727B J C J POLYFOAM 1 AKX200 P2 RPN2729A J B J POLYFOAM 1 AKX400 P3 RPH0332 MIRAMAT SHEET 1 ACCESSORIES A1 N2QAYB001019 REMOTE CONTROL 1 AKX200 A1 N2QAYB001022 REMOTE CONTROL 1 AKX400 A2 K2CB2CB00022 AC CORD 1 A3 RQT0A36 M O I ...

Page 62: ... E S D JIGS ADJ IC1000 C0DBGYY03909 IC 1 E S D IC1002 C0DBAYY01594 IC 1 E S D IC1003 C0DBAYY01594 IC 1 E S D IC1004 C0DBGYY00911 IC 1 E S D IC1005 C0DBGYY03909 IC 1 E S D IC2001 C1AB00004188 IC 1 E S D JIGS ADJ IC2002 RFKWEKX200LM IC W DATA 1 E S D IC2003 RFKWFKX200LM IC W DATA 1 E S D AKX200 IC2003 RFKWFKX400LM IC W DATA 1 E S D AKX400 IC2004 C0GBY0000213 IC 1 E S D IC2005 C0EBY0000664 IC 1 E S D...

Page 63: ...E 1 E S D AKX400 D6021 B0EAMM000057 DIODE 1 E S D AKX200 D6024 B0EAMM000057 DIODE 1 E S D AKX400 Safety Ref No Part No Part Name Description Qty Remarks D6102 B3AAA0001129 DIODE 1 E S D AKX400 D6103 B3ABA0000905 DIODE 1 E S D AKX400 D6104 B3ABA0000905 DIODE 1 E S D AKX400 D6105 B3AAA0001129 DIODE 1 E S D AKX400 D6201 DA2J10100L DIODE 1 E S D AKX400 D6202 DA2J10100L DIODE 1 E S D AKX400 D6203 DA2J1...

Page 64: ... Part No Part Name Description Qty Remarks JACKS JK51 K4ZZ02000103 JK FM ANTENNA 1 JK52 K4AC02B00042 JK AM ANTENNA 1 JK6000 K4AL04B00001 JK SPEAKERS 1 JK6002 K2HA2YYA0009 JK AUX IN 1 AKX200 JK6301 K2HC103A0031 JK AUX IN 2 1 AKX400 JK6400 K1FY104A0034 JK USB A 1 JK6401 K1FY104A0034 JK USB B 1 JK6002 K2HA2YYA0009 JK AUX IN 1 1 REMOTE SENSOR IR6500 B3RAD0000049 REMOTE SENSOR 1 CHIP JUMPERS W100 ERJ8G...

Page 65: ...GA103JA023 10K 1 16W 1 R2002 D0GB334JA065 330K 1 10W 1 R2003 D0GAR00J0005 0 1 16W 1 AKX400 R2004 D0GBR00J0004 0 1 10W 1 R2006 D0GBR00J0004 0 1 10W 1 Safety Ref No Part No Part Name Description Qty Remarks R2012 D0GA471JA023 470 1 16W 1 R2024 D0GA222JA023 2 2K 1 16W 1 R2026 D0GA102JA023 1K 1 16W 1 R2033 D0GA222JA023 2 2K 1 16W 1 R2035 D0GA681JA023 680 1 16W 1 R2036 D0GA105JA023 1M 1 16W 1 R2037 D0G...

Page 66: ...ks R6100 D0GB103JA065 10K 1 10W 1 AKX400 R6101 D0GB472JA065 4 7K 1 10W 1 AKX400 R6101 D0GBR00J0004 0 1 10W 1 AKX400 R6102 D0GB103JA065 10K 1 10W 1 AKX400 R6102 D0GBR00J0004 0 1 10W 1 AKX400 R6103 D0GB102JA065 1K 1 10W 1 AKX400 R6103 D0GBR00J0004 0 1 10W 1 AKX400 R6104 D0GB103JA065 10K 1 10W 1 AKX400 R6105 D0GB271JA065 270 1 10W 1 AKX400 R6105 D0GB472JA065 4 7K 1 10W 1 AKX400 R6106 D0GB103JA065 10K...

Page 67: ...rt Name Description Qty Remarks C1055 F1H1H104B047 0 1uF 50V 1 C2102 F1G1C104A146 0 1uF 16V 1 AKX400 C2103 F1G1C104A146 0 1uF 16V 1 AKX400 C2104 F1G1C104A146 0 1uF 16V 1 C2105 F1G1C104A146 0 1uF 16V 1 C2107 F1G1C104A146 0 1uF 16V 1 C2108 F1G1C104A146 0 1uF 16V 1 C2110 F1G1C104A146 0 1uF 16V 1 C2111 F1G1C104A146 0 1uF 16V 1 C2112 F1G1C104A146 0 1uF 16V 1 C2113 F1G1C104A146 0 1uF 16V 1 C2114 F1H1C22...

Page 68: ...V 1 C6068 F1J1A106A043 10uF 10V 1 C6099 F1H1H681B052 680pF 50V 1 C6100 F1H1H681B052 680pF 50V 1 C6101 F1H1H104B047 0 1uF 50V 1 AKX400 C6102 F1H1H681B047 680pF 50V 1 AKX400 C6103 F1H1H681B047 680pF 50V 1 AKX400 C6104 F1H1A105A113 1uF 10V 1 AKX400 C6105 F1H1A105A113 1uF 10V 1 AKX400 C6106 F1H1A105A113 1uF 10V 1 AKX400 C6107 F1H1A105A113 1uF 10V 1 AKX400 C6108 F1H1A105A113 1uF 10V 1 C6109 F1H1A105A11...

Reviews: