background image

VQT4J81

5

153

FRANÇAIS

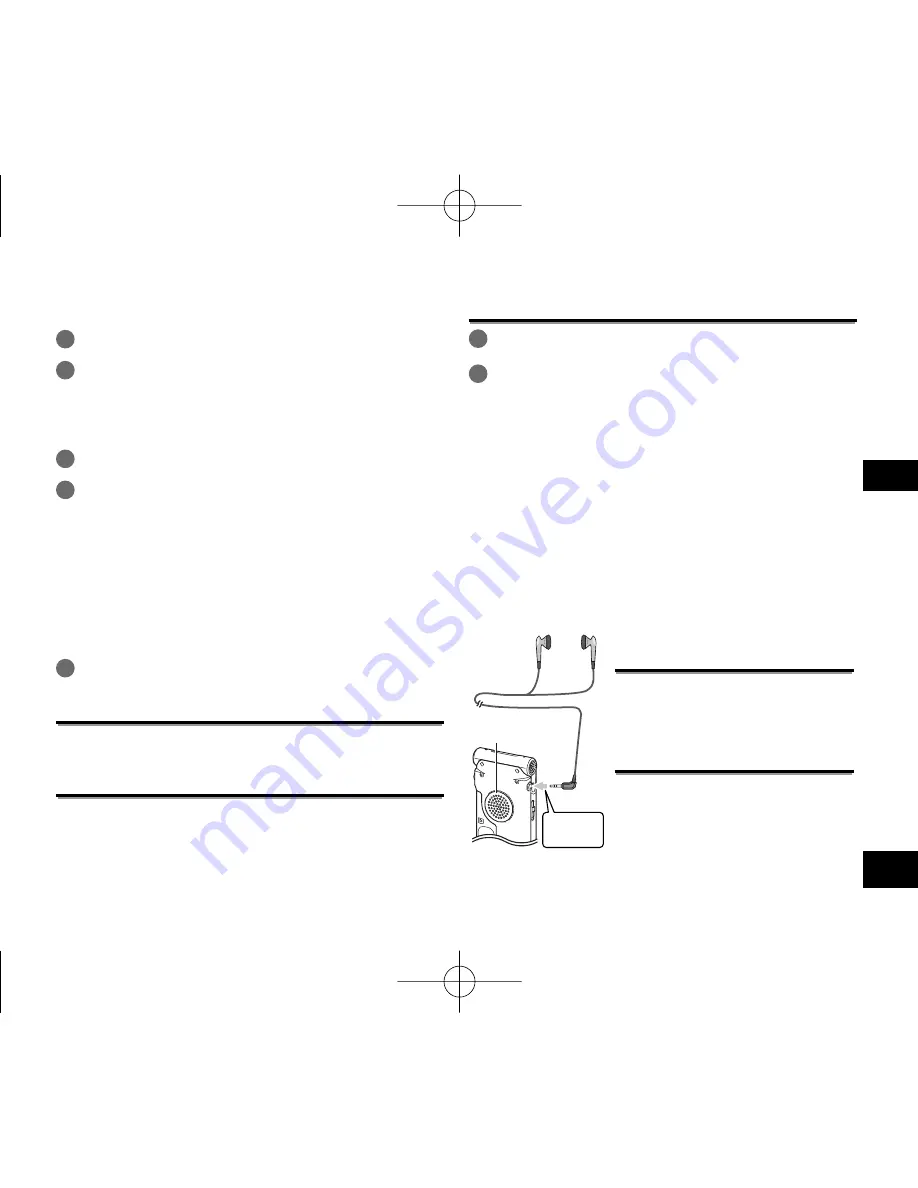
Écouter des données audio 

avec les écouteurs

Connectez des écouteurs stéréo (non fournis).
Type de fiche : mini-fiche stéréo ø 3,5 mm
Écouteurs supplémentaires recommandés :
Panasonic RP-HV154, RP-HJE120
(À partir de mai 2012)

Haut-parleur intégré

Insérez-le 
fermement.

Contrôler l’enregistrement 

en cours

Régler le volume :

Vous pouvez ajuster le volume en 
appuyant sur +, –, mais cela n’affecte 
pas le niveau d’enregistrement.

Écouter ce qui est lu

Le son est émis par le haut-parleur 
pendant la lecture. L’écoute peut être 
difficile dans les endroits bruyants du 
fait de la puissance de sortie du haut-
parleur. Le cas échéant, connectez des 
écouteurs stéréo (non fournis).

Enregistrer

Lire

1

Appuyez sur [F2 (FOLDER)].

2

Appuyez sur 

u

i

 pour choisir le dossier de 

destination de l’enregistrement et appuyez sur 

[

q

 OK] pour valider.

Pour un enregistrement au microphone, choisissez un dossier parmi 
les dossiers “A”, “B”, “C” et “D”. 

(Le réglage d’usine est “A”.)

3

Appuyez sur [REC 

*

] (l’enregistrement commence).

4

Appuyez sur [STOP 

g

/RETURN] pour arrêter 

l’enregistrement.

Pour mettre l’enregistrement en pause :

1

  Appuyez sur [REC 

*

] pendant l’enregistrement.

Le voyant d’enregistrement clignote.

2

  Appuyez à nouveau sur [REC 

*

] pour faire reprendre 

l’enregistrement.

1

Appuyez sur [

q

 OK] (la lecture commence).

Régler le volume

Montez le volume : Appuyez sur +.
Baissez le volume : Appuyez sur –.

Opérations pendant la lecture

Saut (passer une piste) : Appuyez sur 

u

i

.

Recul rapide/Avance rapide (Recherche) :
  Maintenez enfoncées les touches 

u

i

.

Pour arrêter : Appuyez sur [STOP 

g

/RETURN].

Véri

fi

 er les informations.

1

Appuyez sur [STOP 

g

/RETURN].

L’écran des informations apparaît.

2

Faites dé

fi

 ler l’écran des informations vers le haut 

ou le bas en uti ou –.

Pour quitter l’écran d’informations : 
Appuyez sur [STOP 

g

/RETURN].

VQT4J81̲RR-XS450̲420-E̲FR.indd   153

VQT4J81̲RR-XS450̲420-E̲FR.indd   153

2012/05/28   14:46:11

2012/05/28   14:46:11

Summary of Contents for RR-XS450

Page 1: ...uncionamiento Manual de Instruções IC Recorder Digitales Diktiergerät Registratore IC Magnétophone à puce Grabadora IC Gravador de IC RR XS450 RR XS420 ENGLISH DEUTSCH ITALIANO FRANÇAIS PORTUGUÊS ESPAÑOL Model No VQT4J81 RR XS450 420 E En indd 1 VQT4J81 RR XS450 420 E En indd 1 2012 05 29 9 35 40 2012 05 29 9 35 40 ...

Page 2: ...he United Kingdom and Ireland customers Sales and Support Information Customer Communications Centre For customers within the UK 0844 844 3899 For customers within Ireland 01 289 8333 For further support on your product please visit our website www panasonic co uk Direct Sales at Panasonic UK Order accessory and consumable items for your product with ease and confidence by phoning our Customer Com...

Page 3: ...ck using the Timer You can record at a specified time You can also set an alarm to sound or file to play back at a specified time Features Preparation Supplied accessories 2 Features 3 Part names 5 Screen display 6 Inserting the battery Charging 7 Turning the Power ON OFF 9 Hold function 10 Setting the clock 11 File and Folder 12 Selecting the folder 12 Selecting the folder or file in the list scr...

Page 4: ...es 35 Index function 38 Changing the playback speed 39 A B Repeat play 39 Playback from a specified position TIME SEARCH 40 Slight return playback 40 Repeat play REPEAT 41 Skip at regular intervals TIME SKIP 42 Shadowing 43 Making sound easier to hear VOICE EMPHASIS 44 Setting the playback EQ SOUND EQ 45 Using an SD Card 46 Using the file search function 47 Listening to music on this unit WMA MP3 ...

Page 5: ...SD card slot cover cmUSB plug lever cnStrap eyelet coSD card slot When cl is open cpUSB cover It is stored inside the unit when the unit is connected to a computer cqUSB plug 1Built in microphone 2Zoom stereo switch 3LCD display 4F1 F2 The F1 and F2 buttons operate the function shown in the display 5MENU 6 Volume up 7u Fast backward 8q OK 9LIST bk Volume down VQT4J81 RR XS450 420 E En indd 5 VQT4J...

Page 6: ...page 59 OVER indication page 16 Low cut filter page 26 Synchro recording page 37 Remaining recording time Input Built in microphone External microphone page 33 Line in page 35 Microphone sensitivity page 26 Recording level page 27 VAS page 31 Screen display during playback Repeat indication pages 39 41 Sound EQ page 45 Status indication page 39 Shadowing page 43 File name page 67 Playback elapsed ...

Page 7: ...plug into the computer USB cover Insert the USB plug straight in the same direction as that of the terminal Firmly insert the USB plug all the way in The USB cover will not impede insertion as it is stored inside the unit If the unit cannot be connected to the computer directly use the USB extension cable supplied A message is displayed on the screen The first time you connect the unit to your PC ...

Page 8: ...geable battery use the supplied rechargeable battery or the optional rechargeable battery page 2 If commercially sold batteries other than the above are used operation is not guaranteed Do not charge a dry cell battery If charging does not start slide the OPR HOLD switch to the ON side once and then to the OFF again If the temperature of this unit has risen an undesignated rechargeable battery has...

Page 9: ...on Set the current date and time when turning this unit on for the first time page 11 Turning the power OFF Slide the OPR HOLD switch to OFF side while the unit is in the stop state g Auto power off The power automatically turns off after a preset time the factory setting is 15 minutes elapses while recording is stopped If the power is turned off by the auto power off function slide the OPR HOLD s...

Page 10: ...or charge the rechargeable battery as soon as possible Please replace battery within approx 1 minute for preservation of the clock data Depending on the battery status or the operation content to use even if the power turns off due to the battery exhaustion this unit may be used for a while if turned on again However the unit may suddenly turn off during operation due to the low level of battery S...

Page 11: ...to set the date and press i 7 Press to set the clock indication method and press i 24h and AM PM are displayed for the 24 hour display and the 12 hour display respectively 8 Press to set the hour and press i 9 Press to set the minute To change the setting press u i to move between the items and then press again to make the setting 10 Press q OK to enter The date and time are set and the clock star...

Page 12: ...rded audio data from the starting point to the ending point is saved as a file The saved data is called a file Folder This is where files are stored This unit has the following folders A B C and D folders for microphone recording page 15 L folder for files recorded from other devices connected to this unit page 35 folder Recycle where deleted files are placed page 54 M folder for music page 48 OTH...

Page 13: ...9 If a folder exists on the second hierarchy under the folder e g Artist A select Artist A and press q OK Then the folder under Artist A is displayed For details of folder hierarchy see page 69 Pressing u several times on the screen in step 4 will switch the screen to screens in steps 2 or 3 Also it is possible to move among folder hierarchies to select folders and files When there is no file in t...

Page 14: ...ront of you emphasised Switch the microphone position depending on the use This unit has recording scenes page 20 for which the recommended recording settings are registered for each use and switching the microphone position also changes the recording scene Direct scene page 23 Do not switch the microphone position during recording The intended recording characteristics will not be obtained The mi...

Page 15: ...cording scene page 20 If the file size exceeds 2 GB during recording the recording stops tentatively at the point when the data reaches 2 GB Then the recording resumes with a new file Recording is not available during the interval approx 2 seconds from when the recording stops to when the recording resumes Note if your finger or an object touches this unit during recording the noise will be record...

Page 16: ...page 6 for other screen displays Note when recording This unit is equipped with a high sensitivity microphone Accordingly if a breath or wind directly hits the microphone during recording the wind cutting sound may be recorded or voice may be difficult to hear 1 This can be prevented by blocking the wind with your body so that the wind does not directly hit the unit Keep distance 2 During dictatio...

Page 17: ...inning of the file To return to the previous file press u within approx 1 second from the beginning of the file Fast backward Fast forward Search Press and hold u i To stop Press STOP g RETURN Playing Press u i to select Each time you press the file number changes Folder name Memory usage indication Screen display example while stopped File number Total number of files in the folder Remaining reco...

Page 18: ... or OTHER FOLDER To exit the information screen Press STOP g RETURN Playing Connect stereo earphones not supplied Plug type ø 3 5 mm stereo mini plug Recommended additional earphones Panasonic RP HV154 RP HJE120 the product number is correct as of May 2012 Listening to the audio using earphones Monitoring the recording in progress Adjusting the volume You can adjust the volume by pressing but the ...

Page 19: ... the MUSIC M or OTHER FOLDER are deleted immediately irrespective of the recycle bin settings The file numbers displayed on this unit are moved forward after deleting files page 67 Read only WMA MP3 music files transferred from the computer files that cannot be played by the unit subfolders pages 69 and 71 in the MUSIC folder created on the computer or subfolders in the OTHER FOLDER cannot be dele...

Page 20: ...is performed with the selected recording scene setting If you select USER in step 2 the state immediately before the recording scene was set is restored and the recording scene indication disappears If you individually change settings such as the recording mode when the recording scene is set the settings overwrite the USER settings and the recording scene indication disappears The recording scene...

Page 21: ... Recording mode 25 MP3 192 kbps MP3 320 kbps PCM 44 1 kHz MP3 64 kbps MP3 192 kbps MP3 192 kbps MP3 192 kbps Microphone sensitivity 26 HIGH HIGH HIGH HIGH HIGH HIGH HIGH Recording level 27 AUTO MANUAL MANUAL AUTO AUTO AUTO AUTO Low cut filter 26 ON OFF OFF ON ON ON OFF Recording peak limiter 28 OFF ON OFF OFF OFF OFF OFF Self timer recording 30 OFF OFF OFF OFF OFF OFF OFF VAS setting 31 OFF OFF OF...

Page 22: ... changed recording scene select LOAD page 20 To exit the setting screen press F2 CLOSE Initialising recording scene settings Returns individual recording scenes whose settings have been changed to the factory settings Press STOP g RETURN to stop the unit 1 Press MENU for approx 1 second or more 2 Press to select the recording scene you want to initialise and press q OK to enter 3 Press to select I...

Page 23: ...osition Select the desired recording scene from seven recording scenes page 24 Switch the microphone position when the unit is in the stopped state During an operation such as recording or playback the recording scene cannot be changed even by switching the microphone position If you wish to switch only the stereo and zoom functions of the microphone without linking the recording scenes set direct...

Page 24: ... recording scene To exit the setting screen press F2 CLOSE Setting direct scene setting to OFF Press STOP g RETURN to stop the unit 1 Press MENU 2 Press to select MIC REC MENU and press q OK to enter 3 Press to select DIRECT SCENE and press q OK to enter 4 Press to select SETTING and press q OK to enter 5 Press to select OFF and press q OK to enter To exit the setting screen press F2 CLOSE Direct ...

Page 25: ...ted recording mode is displayed You can change the sound quality This allows you to provide the best sound quality for the particular purpose Depending on the recording mode setting the sound quality and remaining recording time page 86 will differ High quality recording Long recording Recording format PCM 44 1 kHz MP3 320 kbps MP3 192 kbps MP3 128 kbps MP3 64 kbps MP3 32 kbps When the recording m...

Page 26: ...gh and for Low When the microphone position is ZOOM is displayed for High and for Low Switching microphone sensitivity Sound of low frequency range is reduced during microphone recording This is effective when reducing noise of air conditioning equipment etc while recording at a meeting etc LOW CUT FILTER Press STOP g RETURN to stop the unit 1 Press MENU 2 Press to select MIC REC MENU and press q ...

Page 27: ...to enter 3 Press to select REC LEVEL ADJ and press q OK to enter 4 Press to select MANUAL and press q OK to enter To exit the setting screen press F2 CLOSE The recording level is displayed Adjusting the recording level manually Set the recording level adjustment to MANUAL beforehand When the recording level adjustment is AUTO the unit does not enter the recording standby 1 Press and hold REC for 1...

Page 28: ...age 26 and recording EQ page 29 can be set Setting the recording level manually Setting the recording peak limiter to ON Even if the recording level adjustment is MANUAL when the excessive volume is input the recording level is automatically adjusted and the sound distortion is reduced Press STOP g RETURN to stop the unit 1 Press MENU 2 Press to select MIC REC MENU and press q OK to enter 3 Press ...

Page 29: ...ecording EQ includes 7 types of fixed mode and the USER mode with which you can set the recording level according to each frequency band 3 When the settings for the frequency band to change are all complete go to step 5 5 Press q OK to enter To exit the setting screen press F2 CLOSE The EQ mode name is not displayed after exiting the setting screen Pressing REC starts recording EQ mode Effect and ...

Page 30: ...ime and press q OK to enter The factory setting is OFF To exit the setting screen press F2 CLOSE When REC is pressed countdown starts Then recording starts after the set time The recording indicator blinks during countdown Once the self timer is set the setting is preserved until the self timer setting is set to OFF or the settings of this unit are initialised page 61 Pressing REC during countdown...

Page 31: ...ecording pause state the status is changed to normal recording pause state and lights up Preventing unnecessary recording VAS Set the recording level adjustment to AUTO beforehand page 27 Press STOP g RETURN to stop the unit 1 Press MENU 2 Press to select MIC REC MENU and press q OK to enter 3 Press to select VAS and press q OK to enter 4 Press to select ON and press q OK to enter The factory sett...

Page 32: ...phone audio data approx 3 seconds before recording are always updated and the unit is on standby 2 Press REC The recording indicator lights and recording is started continuing directly after the preserved audio data To stop Press STOP g RETURN The sound that occurs when the recording button is pressed is also recorded When the built in microphone is used etc When the recording level adjustment pag...

Page 33: ...recording by connecting an external microphone to the external microphone Line in jack of this unit Read the operating instructions for the connected device If the recording level is too low or high adjust the microphone sensitivity page 26 The built in microphone of this unit does not work if another device is connected to the external microphone Line in jack If the connected external microphone ...

Page 34: ...e 2 Start recording on the external device 3 Play the file that you want to copy on this unit Read the operating instructions for the connected device Use the connection cable that matches monaural stereo of the connected device Wrong connection may cause recording trouble i e Only 1 channel is copied The copied sound quality may differ from the sound quality of this unit Adjust the volume on this...

Page 35: ...inal of external device or the line output terminal of portable device select HIGH or LOW respectively The factory setting is HIGH 6 Press F2 CLOSE 7 Connect the external device L R Insert securely Audio Cable without resistor not supplied Audio device To LINE OUT audio out terminal To audio output headphone terminal Plug type ø 3 5 mm stereo mini plug Connect with the external device and slide th...

Page 36: ... line input sound is recorded Recording from other devices This unit has the following synchro recording function This function detects the silence between tracks etc and then records each track into different files such as a first track second track etc If detecting sound from the external device recording starts automatically If detecting silence for approx 2 seconds or more recording is paused ...

Page 37: ... recording setting beforehand 1 Perform steps 1 to 11 on pages 35 and 36 When connecting to the headphone output terminal of the external device the synchro recording may not function properly When approx 2 seconds or more of silence cannot be detected or depending on the combination of external devices the synchro recording may not function Selecting line recording mode The sound quality can be c...

Page 38: ... when the file is deleted or divided When the battery indicator shows blinking indexes cannot be added Also adding the index may be impossible on the border of and blinking During playback even if you press u at the position within approx 2 seconds after the index point playback does not stop at the point Deleting index Select a file which has Index to be deleted page 17 Press STOP g RETURN to sto...

Page 39: ... cue page 49 or timer playback page 55 When the playback speed is other than 100 voice emphasis page 44 does not work Changing the playback speed Playback repeats between the start point A and finish point B if those points are set 1 Press ERASE A B while playing The start point A is set and lighting and blinking are displayed 2 Press ERASE A B at the finish point B The display changes to lighting...

Page 40: ...rom a specified position TIME SEARCH Slight return playback This function returns a short amount of time during playback to enable you to listen again It is a useful function for language learning or if you miss hearing something 1 Press q OK during playback Each time the button is pressed playback rewinds by approx 3 seconds factory setting Setting the return time Put the unit into the stopped st...

Page 41: ...yback stops ONE Plays one file repeatedly FOLDER REPEAT Plays all files in the folder repeatedly FOLDER RANDOM Plays all files within the folder repeatedly in random order ALL REPEAT For the MUSIC M or OTHER FOLDER all files within the folder are played repeatedly For other folders the operation is the same as that for FOLDER REPEAT ALL RANDOM For the MUSIC M or OTHER FOLDER all files within the f...

Page 42: ...er 3 Press to select TIME SKIP and press q OK to enter 4 Press to select the time and press q OK to enter You can set the skip interval to 5 sec 10 sec 30 sec 1 min 5 min 10 min or 15 min The factory setting is 5sec To exit the setting screen press F2 CLOSE Skip at regular intervals TIME SKIP This function skips the set time using skip operation page 17 during playback This allows you to quickly m...

Page 43: ...o enter 4 Press to select the type of shadowing and press q OK to enter If you select ON small volume the volume will be approximately a third of the current volume during shadowing The factory setting is OFF To exit the setting screen press F2 CLOSE is displayed Using shadowing function 1 Perform A B repeat playback page 39 Shadowing is performed using no sound or small volume after A B repeat pl...

Page 44: ...t of noise reduction FOCUS FRONT Emphasises the sound at the front FOCUS LEFT Emphasises the sound at the left FOCUS RIGHT Emphasises the sound at the right The result may not be sufficient depending on the sound source Voice emphasis will not work in the following cases During fast slow playback page 39 During WMA file playback During playback of a file with a sampling frequency of less than 16 k...

Page 45: ...e sound EQ includes 6 types of fixed mode and the USER mode with which you can set the volume level according to each frequency band The sound EQ is effective only when listening with the earphones 3 When the settings for the frequency band to change are all complete go to step 5 5 Press q OK to enter To exit the setting screen press F2 CLOSE The selected sound EQ mode is displayed EQ mode Effect ...

Page 46: ...itch between the internal memory and SD card by pressing F2 FOLDER for more than 1 second when the stopped screen is displayed This unit is compatible with 2 GB microSD cards and 4 GB to 32 GB microSDHC cards As of May 2012 This unit may not operate correctly depending on the manufacturer or type of SD card For details on SD cards that are confirmed to operate correctly according to our manufactur...

Page 47: ... LIST for approx 1 second or more Go to step 2 if an SD card is inserted page 46 and step 3 if not 2 Press to select INT MEMORY internal memory or microSD CARD and press F1 SEARCH 3 Press to select the type of file search and press q OK to enter internal memory or SD card is displayed as the search target When CALENDAR SRCH is selected Press u i to select the recorded date and press q OK to enter ...

Page 48: ...sed and played back If subfolders are created number of files playable is reduced by the equivalent number of subfolders created Folder structure on this unit page 69 Copyright protected WMA MP3 music files cannot be played WMA MP3 music files with variable bit rate may be played but the playback elapsed time display or bit rate display may differ from the actuality or the repeat positions during ...

Page 49: ...ck is completed You can register tracks in the MUSIC M folder to a playlist and play them in the desired order Registering your favourite tracks to a playlist 1 Select the MUSIC M folder on the list screen page 13 You can also select OTHER FOLDER 2 Press to select the file or the folder and press F1 PLAYLIST to enter When selecting folders or selecting files by switching folders press u and you ca...

Page 50: ... playlist from P1 to P5 on the list screen page 13 2 Press to select the file that you want to erase and press F1 EDIT 3 Press to select ERASE FILE and press q OK to enter When cancelling all registered tracks 1 Press to select ERASE ALL and press q OK to enter 4 Press to select YES and press q OK to enter Even if files are erased from the playlist the original file is not deleted from the unit If...

Page 51: ...ting setting screen left 3 Press to select YES and press q OK to enter While the file is being divided the status indicator flashes Files in the MUSIC M folder OTHER FOLDER or recycle bin folder cannot be divided A file length of approx 2 seconds or more is necessary for dividing a file You cannot divide a file at the beginning of the file Divided files cannot be recovered It is recommended that y...

Page 52: ...tor flashes If you press F2 CLOSE before combining is complete the combine process is cancelled Combined files cannot be returned to their original state It is recommended that you make backup copies of the files in advance If indexed files are combined the indexing is erased The combined file is saved in the same folder as the previous files Files cannot be combined in following cases Files in th...

Page 53: ...is being copied the status indicator flashes Moving files Select MOVE in step 1 on the left to move files The operation is the same as that for file copy Editing Copying or moving files If you press F2 CLOSE before copying or moving is complete the process is cancelled Files in the MUSIC M folder OTHER FOLDER or recycle bin folder cannot be copied or moved When the battery indicator displays blink...

Page 54: ...tor flashes and the selected file is returned to the end of the original folder Press q OK to return to the screen in step 3 If FOLDER FULL CAN T RESTORE is displayed folder has reached the maximum recordable number 199 Delete files in the folder and then try the procedure again from the beginning Emptying the recycle bin folder When the recycle bin folder is emptied all of the files in the recycl...

Page 55: ...o select the setting and press q OK to enter Repeat steps 1 and 2 to complete the settings 5 Press to select OK and press q OK to enter To exit the setting screen press F2 CLOSE Be sure to perform the OK operation in step 5 If this operation is not performed the timer will not operate correctly If a button such as F2 CLOSE is pressed while setting the timer REGISTER SETTING may be displayed Select...

Page 56: ... sound FILE Plays a file The file list of the folder being selected is displayed Press to select the file and press q OK When selecting files by switching folders press u and you can move within hierarchies For details of file and folder selection methods see page 13 SOURCE 3 MIC Microphone recording LINE Records sound from an external device MODE 3 PCM 44 1kHz MP3 320kbps MP3 192kbps MP3 128kbps ...

Page 57: ...f the Hold function is on After setting the file to be played for timer playback if the set file is deleted the alarm sounds at the timer start time If a file shorter than the period from the start to end is specified for timer playback that file is played repeatedly When the file playback is assigned as playback source the files are played back at the scheduled time with the playback settings SOU...

Page 58: ...No operation beep ON Operation beep is ON The factory setting is ON When ON is selected press to select your preferred volume and press q OK to enter The factory setting is MIDDLE REC LED Recording indicator You can choose whether to set the recording indication light ON or OFF OFF Not lit ON Lit The factory setting is ON Even if it is set to OFF REC LED lights on blinks as a status indicator whil...

Page 59: ...battery when you forget to turn off the power AUTO POWER OFF 0 min OFF to 15 min The factory setting is 15min You can set the time in 1 minute increments When OFF is set the AUTO POWER OFF function does not operate BACKLIGHT Set the backlight lighting time when the button is pressed Lighting time OFF does not light 5 sec 15 sec always ON The factory setting is 15 sec The backlight may not light wh...

Page 60: ...AT All files on the internal memory or SD card are deleted Deleted files cannot be recovered 1 Select INTERNAL MEMORY or microSD CARD and press q OK to enter 2 Select YES and press q OK to enter Save necessary files to the computer or external devices before formatting When formatted files in the recycle bin are also deleted and cannot be restored Cancelling is not possible while formatting Do not...

Page 61: ...cept for the DATE TIME setting are restored to the default state Select YES press q OK to enter and the settings are initialised VERSION You can check the firmware version of this unit VQT4J81 RR XS450 420 E En indd 61 VQT4J81 RR XS450 420 E En indd 61 2012 05 29 9 35 48 2012 05 29 9 35 48 ...

Page 62: ...quirements of Windows Media Player Please consult Microsoft Corporation for details of Windows Media Player Microsoft Windows Windows Media and Windows Vista are registered trademarks or trademarks of Microsoft Corporation of the U S and other countries MPEG Layer 3 audio coding technology licensed from Fraunhofer IIS and Thomson IBM and PC AT are registered trademarks of International Business Ma...

Page 63: ...ied one Do not use the supplied cable with other devices Caution Use only the supplied USB extension cable with a ferrite core when connecting to computer The first time you connect the unit to your PC Because multiple Found New Hardware messages will appear do not disconnect the unit from your PC until all messages disappear Screen display during connection with PC ACCESS During connection During...

Page 64: ...ing the unit Double click the icon Windows XP Windows Vista Windows 7 on the task tray at the bottom of the computer screen and follow the on screen instructions to remove the unit The icon may not be displayed depending on the OS settings After the unit is removed this unit turns off When this unit is turned on after deleting etc files on this unit using the computer UPDATING FILE NAME is display...

Page 65: ...g folders of this unit The illustrations show Windows XP OS The display may differ depending on the OS 2 Right click to open the IC RECORDER G this unit Folder structure on this unit page 69 3 Right click to open the folder This unit s files are displayed Depending on the computer settings a file with the extension INX may be displayed This file contains index information If this file is deleted f...

Page 66: ...ames will be generated next time the unit is turned on The indications in the brackets are displayed when using the SD card The folders with changed names are shown in the OTHER FOLDER on this unit page 70 Connect this unit to a Computer beforehand page 63 Importing files recorded on this unit to a computer 1 Select the recorded file in this unit right click and select Copy 2 Select a folder in th...

Page 67: ...file deletion or editing Deleting combining a recorded file on this unit will move subsequent files forward and file numbers are automatically reassigned Example When 002_120925_0905A0 MP3 is deleted 001_120920_1720A0 MP3 002_120925_0905A0 MP3 003_121003_1233A0 MP3 004_121231_1915A0 MP3 001_120920_1720A0 MP3 002_121003_1233A0 MP3 003_121231_1915A0 MP3 File number parts of all file names following ...

Page 68: ... pages 48 71 File name File name in the MUSIC folder and order of playback If numbers are added at the beginning of file names in the MUSIC folder playback is performed from the file with the smallest number in priority Up to 3 digits of number can be identified If additional methods differ such as 1 01 001 then 001 to 999 takes the first priority 01 to 99 takes the second and 1 to 9 takes the thi...

Page 69: ...YLIST2 M3U OTHER FOLDER DATA The MUSIC folder is used when transferring WMA MP3 music files etc from the computer You can create subfolders in the MUSIC folder The structure example is shown as below Playback is available to the second hierarchy Files on the third hierarchy and after cannot be played File Folder First hierarchy Second hierarchy Third hierarchy Playlist files page 49 page 70 In MUS...

Page 70: ...r conditions are the same as for the MUSIC M folder page 48 When there are subfolders in OTHER FOLDER files up to the second level can be played Files transferred directly to the internal memory or an SD card cannot be played with this unit Transfer files to the MUSIC M folder or insert them in a folder and then transfer them g RECYCLE folder This is the recycle bin When the recycle bin function i...

Page 71: ...this unit This unit can play back MP3 WMA and PCM WAV music files Only PCM WAV files recorded on this unit Transferring music files to this unit from the computer Open MUSIC folder of this unit beforehand page 65 1 Select a music file right click and select Copy 2 Select MUSIC folder of this unit right click and select Paste to transfer to this unit Up to 199 of transferred files can be played on ...

Page 72: ... or delete a file PLEASE INSERT microSD CARD This is displayed when you attempt to format without the SD card inserted This is displayed when copying or moving a file within the LINE folder without the SD card inserted CAN T READ microSD CARD INSERT CARD AGAIN This is displayed when the SD card fails to be recognised or is broken page 46 Insert the card again CAN T READ INTERNAL MEMORY Format it o...

Page 73: ...dex at the same position This is displayed when you attempt to add the index while the battery indicator shows blinking CAN T CREATE ANY MORE FILES IN THIS FOLDER The file cannot be divided because the number of files in the folder has reached the limit 199 Delete unnecessary files and divide page 19 NOT ENOUGH SPACE FOR DIVIDING This is displayed when you attempt to divide a file when there is no...

Page 74: ...ation If the fragmentation advances file writing speed becomes slow and writing may not be performed properly CAN T DIVIDE REC TIME IS TOO SHORT This is displayed when you attempt to divide a file of a short recording time approx less than 2 seconds CAN T DIVIDE FILE AT THIS POSITION This is displayed when you attempt to divide a file at the position where file division is impossible around the st...

Page 75: ...ame for the original folder page 54 CAN T MOVE FILE EMPTY RECYCLE BIN This may be displayed when there is no free space on the SD card page 54 CAN T FORMAT The internal memory or the SD card may be damaged Consult your dealer CAN T ADD FILES PLAYLIST FULL This is displayed when you attempt to register files with the playlist with the number exceeding maximum number 99 of files that can be register...

Page 76: ...yed when the timer has failed such as when the SD card is not inserted or the recording is in progress during timer recording setting CAN T FILE IS OUTSIDE PLAY RANGE OF ALL SONG MODE MAX 3 000 SONGS This is displayed when you attempt to select files beyond the playback range max 3 000 files for all repeat random of MUSIC or OTHER FOLDER or when you attempt to set all repeat random while selecting...

Page 77: ...geable battery life is over Number of recharging times of supplied rechargeable battery Approx 300 Replace with a new specified rechargeable battery optional is displayed when the battery is recharged Cannot recharge batteries The temperature of this unit has risen Disconnect the unit from the computer and leave it for a while Then recharge the battery again Are you trying to recharge a battery ot...

Page 78: ...ng on the recording mode page 86 Select a suitable recording mode according to the purpose for use page 25 Is much data stored Delete unnecessary files Recording is suspended by itself VAS is functioning page 31 Howling occurs when listening to the recording in progress with earphones Turn down the volume page 17 Keep earphones and this unit separate page 18 When you are using an external micropho...

Page 79: ... during recording Recorded sound is distorted There is a noise at the beginning of sound Set the microphone sensitivity to LOW or keep the microphone distance farther away from the recording source page 26 If the sound is still distorted set the Low Cut filter setting to ON page 26 set the recording level adjustment to Manual and adjust the recording level before recording page 27 Recorded sounds ...

Page 80: ...he recording level set to 0 Adjust the recording level page 28 Playing No sound from the speaker There is no sound when you have connected earphones page 18 Cannot hear any sound Adjust the sound volume page 17 A file in the MIC_A to MIC_D LINE or RECYCLE folder cannot be played The file name was changed Only files named according to the file naming rules can be played in folder MIC_A through MIC_...

Page 81: ...en if they are transferred via Explorer Was the file erased after registered with the playlist Transfer the file as it was or delete the file name from the playlist page 50 Playback speed is too fast or slow You changed the playback speed page 39 There is no sound from the earphones or it is difficult to hear or noisy Ensure the plug is inserted firmly Wipe the plug clean The selected file changes...

Page 82: ...r recording start time comes the current recording is prioritised Stop the recording However if you are using the unit for operations other than recording the timer recording is prioritised Others The power cannot be turned on The battery may have run out Replace the battery with the new one or charge the rechargeable battery page 7 The power automatically turns off Did you set the AUTO POWER OFF ...

Page 83: ... up to the position where you want to divide it and then press STOP g RETURN page 51 This unit is not recognised by a computer Connect this unit with the computer properly page 63 Disconnect this unit from the computer and connect it again Disconnect all USB devices excluding the mouse and keyboard in normal operation and connect this unit alone If the computer is equipped with multiple USB termin...

Page 84: ...earch does not operate properly File search is for searching for files in the recording folder based on the file names assigned at the time of recording page 67 Therefore it cannot properly search for any file recorded when the clock was not set correctly renamed using a computer or moved to the MUSIC folder or another folder using a computer File search is executed only for the files in the selec...

Page 85: ...1kHz 20 Hz to 21 000 Hz MP3 320kbps 20 Hz to 20 000 Hz MP3 192kbps 20 Hz to 17 000 Hz MP3 128kbps 20 Hz to 7 500 Hz MP3 64kbps 20 Hz to 6 700 Hz MP3 32kbps Built in microphone S N 45 dB PCM 44 1 kHz Filter JIS A 1 For MUSIC M folder and OTHER FOLDER Specifications USB USB2 0 Hi Speed DC 5 V 500 mA Audio Output Earphone ø 3 5 mm 16 Ω Max 11 11 mW Speaker Output ø 20 mm 8 Ω 90 mW RMS Audio Input Ext...

Page 86: ...itor Recording indicator OFF recording level adjustment setting AUTO When using the internal memory 2 When audio is output from speaker Volume 11 Playback speed control 100 Specifications Standard recordable time may be less depending on the operating conditions RR XS450 When using the internal memory 4 GB Recording mode Recording time Bit rate PCM 44 1kHz Stereo approx 6 h 1411 kbps MP3 320kbps S...

Page 87: ...rect sunlight for a long period of time with doors and windows closed Do not attempt to recharge dry cell batteries Battery mishandling can cause electrolyte leakage which can damage items the fluid contacts and may cause a fire If electrolyte leaks from the batteries consult your dealer Wash thoroughly with water if electrolyte comes in contact with any part of your body Keep the AAA LR03 batteri...

Page 88: ...data cannot be played back however the data are not erased completely If you want to erase the data completely for security use a commercially sold data erasing software for computer Or format the internal memory or SD card and then record up to the end to clear off the data g Allergies Discontinue use if you experience discomfort with the earphones or any other parts that directly contact your sk...

Page 89: ... turn up the volume so high that you can t hear what s around you This unit may receive radio interference caused by mobile telephones during use If such interference occurs please increase separation between this unit and the mobile telephone CAUTION Danger of explosion if battery is incorrectly replaced Replace only with the type recommended by the manufacturer When disposing the batteries pleas...

Page 90: ... dirt with it and clean with a dry cloth Do not use solvents including benzine thinner alcohol kitchen detergent a chemical wiper etc This might cause the exterior case to be deformed or the coating to come off Maintenance VQT4J81 RR XS450 420 E En indd 90 VQT4J81 RR XS450 420 E En indd 90 2012 05 29 9 35 50 2012 05 29 9 35 50 ...

Page 91: ...cycling of old products and batteries please contact your local municipality your waste disposal service or the point of sale where you purchased the items Penalties may be applicable for incorrect disposal of this waste in accordance with national legislation For business users in the European Union If you wish to discard electrical and electronic equipment please contact your dealer or supplier ...

Page 92: ...of the nearest Authorised Service Centre Send or take the product to a Panasonic Authorised Service Centre together with your proof of purchase receipt as a proof of purchase date Please note that freight and insurance to and or from your nearest Authorised Service Centre must be arranged by you Note that home or pick up delivery service is available for the following products in the major metropo...

Page 93: ...6 Costa Rica 800 PANA737 800 7262737 El Salvador 800 PANA 800 7262 Guatemala 1 801 811 PANA 1 801 811 7262 Chile 800 390 602 From a cell phone 797 5000 Venezuela 800 PANA 800 800 7262 800 Uruguay 0 800 PANA 0 800 7262 Peru 0800 00726 Argentina 0800 333 PANA 0800 333 7262 0810 321 PANA 0810 321 7262 Mexico Service To obtain information in the Republic of Mexico contact us at email atencion clientes...

Page 94: ...während des Ladevorgangs abgebrochen werden Wenn die Statusanzeige erlischt ist der Ladevorgang abgeschlossen gTrennen des Gerätes Doppelklicken auf das Bildsymbol Windows XP Windows Vista Windows 7 in der Taskleiste am unteren Rand des Bildschirms und den Anweisungen auf dem Bildschirm zum Entfernen des Geräts folgen Je nach den im Betriebssystem vorgenommenen Einstellungen erscheint dieses Symbo...

Page 95: ...old Funktion Den Schalter OPR HOLD Schalter in die entgegengesetzte Richtung von HOLD schieben Einstellen der Uhr 1 MENU drücken 2 drücken um COMMON MENU auszuwählen und q OK zur Eingabe drücken 3 drücken um DATE TIME auszuwählen und q OK zur Eingabe drücken 4 zur Einstellung der Jahreszahl drücken und i drücken 5 zur Einstellung des Monats drücken und i drücken 6 zur Einstellung des Datums drücke...

Page 96: ...gedrückt halten Zu Schritt 2 gehen wenn eine SD Karte Seite 18 eingesetzt ist und zu 3 falls dies nicht der Fall ist 2 drücken um INT MEMORY interner Speicher oder microSD CARD auszuwählen und zur Eingabe q OK drücken 3 drücken um den Ordner auszuwählen und q OK zur Eingabe drücken Wenn Ordner im Ordner MUSIC oder OTHER FOLDER erstellt worden sind Schritt 3 zur Auswahl des Zielordners wiederholen ...

Page 97: ...cken um den Aufnahme Zielordner auszuwählen und q OK zur Eingabe drücken Für die Mikrofonaufnahme einen Ordner aus den Ordnern A B C und D wählen Die Werkseinstellung ist A 3 REC drücken Aufnahme startet 4 STOP g RETURN drücken um die Aufnahme zu stoppen Zum Pausieren der Aufnahme 1 REC während der Aufnahme drücken Aufnahmeanzeige blinkt 2 REC erneut drücken um mit der Aufnahme fortzufahren 1 q OK...

Page 98: ...ger gedrückt halten Der Bildschirm zum Auswählen des Orts der Aufnahme wird angezeigt 2 drücken um den Ort auszuwählen und q OK zur Eingabe drücken Bei Auswahl von USER den Schritt 3 überspringen 3 drücken um LOAD auszuwählen und q OK zur Eingabe drücken F2 CLOSE drücken um den Einstellungsbildschirm zu verlassen Beim Drücken von REC wird eine Aufnahme mit der ausgewählten Aufnahmeorts Einstellung...

Page 99: ...n 4 drücken um YES auszuwählen und q OK zur Eingabe drücken Der ausgewählte Aufnahme Ort wird wieder auf die Voreinstellung zurückgesetzt Zum Initialisieren des geänderten Aufnahmeorts LOAD auswählen F2 CLOSE drücken um den Einstellungsbildschirm zu verlassen Diese Funktion dient dazu die Aufnahmeszene in Verbindung mit dem Umschalten der Mikrofonposition umzuschalten Zum Zeitpunkt des Kaufs ist S...

Page 100: ... Aufnahmeformat PCM 44 1 kHz Hochwertige Aufnahme MP3 320 kbit s MP3 192 kbit s MP3 128 kbit s MP3 64 kbit s MP3 32 kbit s Lange Aufnahme Wenn der Aufnahmemodus auf MP3 32kbps eingestellt ist wird die Aufnahme monophon Einstellen der Direktszeneneinstellung auf OFF 1 MENU drücken 2 drücken um MIC REC MENU auszuwählen und q OK zur Eingabe drücken 3 drücken um DIRECT SCENE auszuwählen und q OK zur E...

Page 101: ...ken 4 drücken um MANUAL auszuwählen und q OK zur Eingabe drücken F2 CLOSE drücken um den Einstellungsbildschirm zu verlassen Manuelle Anpassung des Aufnahmepegels 1 REC für 1 Sekunde oder länger gedrückt halten Das Gerät geht in den Aufnahme Bereitschaftszustand über 2 Das Mikrofon zur Aufnahme auf die Tonquelle richten 3 u i drücken um den Aufnahmepegel anzupassen Anpassungsbereich liegt bei 0 bi...

Page 102: ...Einstellungsbildschirm zu verlassen Einstellung des Aufnahme Peak Limiters Aufnahme Spitzenwertbegrenzer auf ON 1 MENU drücken 2 drücken um MIC REC MENU auszuwählen und q OK zur Eingabe drücken 3 drücken um PEAK LIMITER auszuwählen und q OK zur Eingabe drücken 4 drücken um ON auszuwählen und q OK zur Eingabe drücken Die Werkseinstellung ist OFF F2 CLOSE drücken um den Einstellungsbildschirm zu ver...

Page 103: ... Mikrofon Audiodaten werden stets etwa 3 Sekunden vor der Aufnahme aktualisiert und das Gerät befindet sich im Standby 2 REC drücken Die Aufnahmeanzeigen leuchten und die Aufnahme beginnt direkt nach dem erhaltenen Audio Inhalt Beenden der Aufnahme STOP g RETURN drücken 1 MENU drücken 2 drücken um MIC REC MENU auszuwählen und q OK zur Eingabe drücken 3 drücken um PRE RECORD auszuwählen und q OK zu...

Page 104: ...äten 1 Den Mic Line Schalter auf LINE schieben 2 MENU drücken 3 drücken um LINE REC auszuwählen und q OK zur Eingabe drücken 4 drücken um LINE INPUT auszuwählen und q OK zur Eingabe drücken 5 drücken um die Einstellung auszuwählen und q OK zur Eingabe drücken Beim Anschluss an den Kopfhörer Anschluss eines externen Gerätes oder den Line Ausgang eines tragbaren Gerätes HIGH beziehungsweise LOW wähl...

Page 105: ...r Wiedergabegeschwindigkeit A B Wiederholwiedergabe 1 F1 SPEED während der Wiedergabe drücken 2 F1 SLOW oder F2 FAST zum Auswählen der Geschwindigkeit drücken und q OK zur Eingabe drücken Wiedergabegeschwindigkeit Die Wiedergabegeschwindigkeit kann in 10 Schritten für im Vergleich zur Normalgeschwindigkeit 100 schnellere Geschwindigkeiten angepasst werden und in 5 Schritten für im Vergleich zur No...

Page 106: ...estgelegten Position Um den Einstellvorgang abzubrechen F2 CLOSE drücken 1 MENU drücken Während der Wiedergabe zu Schritt 3 wechseln 2 drücken um PLAY MENU auszuwählen und q OK zur Eingabe drücken 3 drücken um REPEAT auszuwählen und q OK zur Eingabe drücken 4 drücken um Art der Wiedergabewiederholung auszuwählen und q OK zur Eingabe drücken Die Werkseinstellung ist OFF F2 CLOSE drücken um den Eins...

Page 107: ... 1 Sekunde oder länger gedrückt halten Der Modus wechselt zum Time Skip Modus und wird angezeigt Der Skip Modus wechselt jedes Mal wenn der Knopf gedrückt wird 2 u i drücken Bei jedem Drücken des Knopfes werden 5 Sekunden übersprungen Werkseinstellung Zum Wechseln des Sprungintervalls 1 MENU drücken Während der Wiedergabe zu Schritt 3 wechseln 2 drücken um PLAY MENU auszuwählen und q OK zur Eingab...

Page 108: ...zu Schritt 3 wechseln 2 drücken um PLAY MENU auszuwählen und q OK zur Eingabe drücken 3 drücken um VOICE EMPHASIS auszuwählen und q OK zur Eingabe drücken 4 drücken um die Art der Stimmverstärkung auszuwählen und q OK zur Eingabe drücken Die Werkseinstellung ist NORMAL F2 CLOSE drücken um den Einstellungsbildschirm zu verlassen Shadowing NORMAL Ton wird so wiedergegeben wie er aufgenommen wurde NO...

Page 109: ...MENU drücken Während der Wiedergabe zu Schritt 3 wechseln 2 drücken um PLAY MENU auszuwählen und q OK zur Eingabe drücken 3 drücken um SOUND EQ auszuwählen und q OK zur Eingabe drücken 4 drücken um den Ton EQ Modus zu wählen Bei der Wahl eines anderen Modus als USER fortfahren mit Schritt 5 Einstellung bei Auswahl von USER 1Nach Schritt 4 F1 EDIT drücken 2Auf u i drücken um das Frequenzband auszuw...

Page 110: ...ckplatzes öffnen 2 Die SD Karte einstecken und die Abdeckung des Batteriefachs SD Kartensteckplatzes schließen Die Karte in die korrekte Richtung ausrichten und sie vollständig einsetzen bis ein Klick Ton zu hören ist Zum Entfernen der SD Karte 1 Das Gerät ausschalten und die Abdeckung des Batteriefachs SD Kartensteckplatzes öffnen 2 Die SD Karte vorsichtig schieben 3 Wenn die SD Karte ein wenig h...

Page 111: ...n u drücken um sich innerhalb der Rangfolge der Hierarchieebenen zu bewegen Einzelheiten hinsichtlich der Datei und Ordnerauswahlmethoden sind auf Seite 4 zu finden 3 u i drücken um die Playlist auszuwählen und q OK zur Eingabe drücken Aus der PLAYLIST 1 bis 5 wählen Die Datei oder alle Dateien in dem Order werden in der ausgewählten Playlist registriert Wiedergabe von in einer Playlist registrier...

Page 112: ...en an dem die Datei geteilt werden soll 2 DIVIDE im Bearbeitungs Einstellungsbildschirm links auswählen 3 drücken um YES auszuwählen und q OK zur Eingabe drücken Während die Datei geteilt wird blinkt die Statusanzeige 1 COMBINE im Bearbeitungs Einstellungsbildschirm links auswählen 2 drücken um PREVIOUS FILE auszuwählen und q OK zur Eingabe drücken 3 drücken um die Datei die zusammengeführt werden...

Page 113: ...blinkt die Statusanzeige Verschieben von Dateien MOVE unter Schritt 1 links auswählen um die Daten zu verschieben Das Vorgehen ist das gleiche wie beim Kopieren einer Datei Bearbeiten Kopieren oder Verschieben von Dateien Papierkorbfunktion Zurückbewegen von Dateien aus dem Papierkorb zum ursprünglichen Ordner 1 Drücken von F2 FOLDER 2 u i drücken um auszuwählen und q OK zur Eingabe drücken Der Pa...

Page 114: ...e drücken 2 u i drücken um die Einstellung auszuwählen und q OK zur Eingabe drücken Die Schritte 1 und 2 zur Vervollständigung der Einstellungen wiederholen 5 drücken um OK auszuwählen und q OK zur Eingabe drücken F2 CLOSE drücken um den Einstellungsbildschirm zu verlassen Einstellpunkt Einzelheiten SETTING OFF Timer ist nicht aktiviert ON Timer ist aktiviert REPEAT ONCE Aufnahme oder Wiedergabe w...

Page 115: ... MODE PCM 44 1 kHz MP3 320 Kbit s MP3 192 Kbit s MP3 128 Kbit s MP3 64 Kbit s MP3 32 Kbit s REC TO Den Ordner auswählen in welchem die aufgenommene Datei gespeichert werden soll Falls ein SD Karten Ordner ausgewählt wurde die SD Karte einführen Allgemeines Menü Gemeinsame Einstellungsbetriebe 1 MENU drücken 2 drücken um COMMON MENU auszuwählen und q OK zur Eingabe drücken 3 drücken um den Einstell...

Page 116: ...stanpassung 1 L bis 10 H Die Werkseinstellung ist 5 RECYCLE BIN Wenn die Papierkorbfunktion benutzt wird werden gelöschte Dateien in den Papierkorb verschoben Bevor der Papierkorb geleert wird können gelöschte Dateien wiederhergestellt werden so dass Sie sich keine Sorgen über versehentliches Löschen von Dateien machen müssen OFF Die Papierkorbfunktion wird nicht benutzt ON Benutzen der Papierkorb...

Page 117: ...ion erhältlich Bei Microsoft Windows Windows Media und Windows Vista handelt es sich um eingetragene Marken bzw Marken der Microsoft Corporation in den Vereinigten Staaten und anderen Ländern Der Einsatz von MPEG Layer 3 Audiodecodierungs Technologie bei diesem Gerät erfolgt unter Lizenz von Fraunhofer IIS und Thomson Bei IBM und PC AT handelt es sich um eingetragene Marken von International Busin...

Page 118: ...tatur bei normalem Betrieb Wenn ein USB Verteiler USB Hub benutzt wird Wenn als USB Verlängerungskabel ein anderes als das mitgelieferte benutzt wird Wenn das Gerät an den Computer angeschlossen ist und der Computer gestartet bzw neu gestartet wird oder in den Bereitschaftszustand umschaltet kann es vorkommen dass der Computer dieses Gerät nicht erkennt Das Gerät einmal vom Computer trennen und da...

Page 119: ...wringen die Schmutzflecken damit abwischen und anschließend mit einem trockenen Tuch nachreiben Keine Lösungsmittel wie etwa Benzin Verdünner Alkohol Spülmittel chemikaliengetränkte Wischtücher etc verwenden Dies könnte zur Verformung des äußeren Gehäuses oder Ablösung der Beschichtung führen VQT4J81 RR XS450 420 E GE indd 119 VQT4J81 RR XS450 420 E GE indd 119 2012 05 28 14 49 50 2012 05 28 14 49...

Page 120: ...m versehentliches Verschlucken zu verhindern ACHTUNG Bei Austausch gegen einen ungeeigneten Ersatzakku besteht Explosionsgefahr Den Originalakku ausschließlich gegen einen Akku des vom Hersteller vorgeschriebenen Typs austauschen Beim Entsorgen verbrauchter Akkus die einschlägigen Umweltschutzbestimmungen einhalten über die Auskünfte von der zuständigen Behörde oder dem Fachhändler erhältlich sind...

Page 121: ...Sie sich bitte an Ihre örtlichen Verwaltungsbehörden Ihren Abfallentsorgungsdienstleister oder an die Verkaufseinrichtung in der Sie die Gegenstände gekauft haben Gemäß Landesvorschriften können wegen nicht ordnungsgemäßer Entsorgung dieses Abfalls Strafgelder verhängt werden Für geschäftliche Nutzer in der Europäischen Union Wenn Sie elektrische oder elektronische Geräte entsorgen möchten wenden ...

Page 122: ...OPR HOLD verso il lato OFF L indicatore di stato si illumina e ha inizio la ricarica Durante la ricarica portare l interruttore OPR HOLD in posizione ON può annullare la ricarica mentre questa è in corso Quando l indicatore di stato si spegne la ricarica è terminata gScollegamento dell unità Fare doppio clic sull icona Windows XP Windows Vista Windows 7 nella barra delle applicazioni sul lato infe...

Page 123: ... Per disattivare la funzione di blocco Far scorrere l interruttore OPR HOLD in direzione opposta a HOLD 1 Premere MENU 2 Premere per selezionare COMMON MENU quindi premere q OK per confermare 3 Premere per selezionare DATE TIME quindi premere q OK per confermare 4 Premere per impostare l anno quindi premere i 5 Premere per impostare il mese quindi premere i 6 Premere per impostare la data quindi p...

Page 124: ...l punto 2 se è inserita una scheda SD pagina 18 altrimenti al punto 3 2 Premere per selezionare INT MEMORY memoria interna o microSD CARD quindi premere q OK per confermare 3 Premere per selezionare la cartella quindi premere q OK per confermare Se sono state create delle cartelle nella cartella MUSIC o OTHER FOLDER ripetere il punto 3 per selezionare la cartella di destinazione 4 Premere per sele...

Page 125: ...mere q OK per confermare Per la registrazione microfonica selezionare una delle cartelle A B C e D L impostazione di fabbrica è A 3 Premere REC inizia la registrazione 4 Premere STOP g RETURN per arrestare la registrazione Per mettere in pausa la registrazione 1 Premere REC durante la registrazione L indicatore di registrazione lampeggia 2 Premere nuovamente REC per riprendere la registrazione 1 P...

Page 126: ... Premere per selezionare la scena quindi premere q OK per confermare Se si seleziona USER saltare il punto 3 3 Premere per selezionare LOAD quindi premere q OK per confermare Per uscire dalla schermata di impostazione premere F2 CLOSE Premendo REC la registrazione viene eseguita con l impostazione di scena di registrazione selezionata Registrazione della scena Applicazione LANG STUDY Registrazione...

Page 127: ... selezionata viene ripristinata sull impostazione di fabbrica Per selezionare la scena di registrazione inizializzata selezionare LOAD Per uscire dalla schermata di impostazione premere F2 CLOSE Scena diretta Questa funzione consente di cambiare la scena di registrazione in base alle variazioni della posizione del microfono Al momento dell acquisto MEETING è assegnata a STEREO e LECTURE è assegnat...

Page 128: ...C MODE quindi premere q OK per confermare 4 Premere per selezionare l impostazione frequenza di campionamento PCM bit rate MP3 quindi premere q OK per confermare L impostazione di fabbrica è MP3 192kbps Per uscire dalla schermata di impostazione premere F2 CLOSE La qualità del suono e il tempo di registrazione restante differiscono a seconda dell impostazione della modalità di registrazione Format...

Page 129: ...re 4 Premere per selezionare MANUAL quindi premere q OK per confermare Per uscire dalla schermata di impostazione premere F2 CLOSE Regolazione manuale del livello di registrazione 1 Tenere premuto REC per più di 1 secondo L unità entra in standby durante la registrazione 2 Direzionare il microfono verso la fonte sonora da registrare 3 Premere u i per regolare il livello di registrazione La gamma d...

Page 130: ...ata di impostazione premere F2 CLOSE Attivazione del limitatore di picchi in registrazione 1 Premere MENU 2 Premere per selezionare MIC REC MENU quindi premere q OK per confermare 3 Premere per selezionare PEAK LIMITER quindi premere q OK per confermare 4 Premere per selezionare ON quindi premere q OK per confermare L impostazione di fabbrica è OFF Per uscire dalla schermata di impostazione premer...

Page 131: ... confermare L impostazione di fabbrica è OFF Per uscire dalla schermata di impostazione premere F2 CLOSE Per registrare con la funzione di registrazione preliminare 1 Tenere premuto REC per più di 1 secondo L unità entra in modalità standby di registrazione preliminare Cambia a 1 sec 2 sec 3 sec e si arresta a 3 sec I dati audio del microfono vengono sempre aggiornati circa 3 secondi prima della r...

Page 132: ...ri dispositivi 1 Far scorrere l interruttore Mic Line su LINE 2 Premere MENU 3 Premere per selezionare LINE REC quindi premere q OK per confermare 4 Premere per selezionare LINE INPUT quindi premere q OK per confermare 5 Premere per selezionare l impostazione quindi premere q OK per confermare Quando si effettua il collegamento all uscita cuffie del dispositivo esterno o all uscita di linea del di...

Page 133: ...ato durante la riproduzione Le velocità di riproduzione normale più veloce e più lenta sono visualizzate rispettivamente come e 1 Premere ERASE A B durante la riproduzione Viene impostato il punto d inizio A e vengono visualizzati illuminati e lampeggiante 2 Premere ERASE A B nel punto finale B L indicazione cambia in illuminato e viene avviata la ripetizione della riproduzione Cancellazione della...

Page 134: ...ionare PLAY MENU quindi premere q OK per confermare 3 Premere per selezionare REPEAT quindi premere q OK per confermare 4 Premere per selezionare il tipo di ripetizione quindi premere q OK per confermare L impostazione di fabbrica è OFF Per uscire dalla schermata di impostazione premere F2 CLOSE OFF La riproduzione viene eseguita in successione dal file selezionato all ultimo file nella cartella e...

Page 135: ...ora quindi premere q OK per confermare È possibile impostare l intervallo di salto su 5 sec 10 sec 30 sec 1 min 5 min 10 min o 15 min L impostazione di fabbrica è 5sec Per uscire dalla schermata di impostazione premere F2 CLOSE Shadowing Impostazione dello shadowing 1 Premere MENU mentre è in corso la riproduzione andare al punto 3 2 Premere per selezionare PLAY MENU quindi premere q OK per confer...

Page 136: ...elezionare PLAY MENU quindi premere q OK per confermare 3 Premere per selezionare VOICE EMPHASIS quindi premere q OK per confermare 4 Premere per selezionare il tipo di enfatizzazione della voce quindi premere q OK per confermare L impostazione di fabbrica è NORMAL Per uscire dalla schermata di impostazione premere F2 CLOSE NORMAL Consente di riprodurre l audio così come è stato registrato NOISE C...

Page 137: ... tutte le impostazioni per la banda di frequenza da modificare andare al punto 5 5 Premere q OK per confermare Per uscire dalla schermata di impostazione premere F2 CLOSE Modalità EQ Effetti e applicazioni FLAT La funzione di equalizzazione del suono non è in uso Viene riprodotto il suono originale senza alcuna modifica BASS Enfatizza molto le basse frequenze CLEAR Enfatizza molto le alte frequenz...

Page 138: ...ella scheda SD 1 Spegnere l unità e aprire il coperchio dell alloggiamento della batteria scheda SD 2 Inserire la scheda SD e chiudere il coperchio dell alloggiamento della batteria scheda SD Allineare la scheda SD nella direzione corretta e inserirla completamente fino a quando si sente un clic Per rimuovere la scheda SD 1 Spegnere l unità e aprire il coperchio dell alloggiamento della batteria s...

Page 139: ...ezionano le cartelle o si selezionano i file sfogliando le cartelle premere u per spostarsi tra le gerarchie Per dettagli sui metodi di selezione di file e cartelle si veda pagina 4 3 Premere u i per selezionare la playlist quindi premere q OK per confermare selezionare da PLAYLIST 1 a 5 Il file o tutti i file all interno della cartella vengono registrati nella playlist selezionata Riproduzione di...

Page 140: ... file 2 Selezionare DIVIDE nella schermata di modifica delle impostazioni sinistra 3 Premere per selezionare YES quindi premere q OK per confermare Mentre l unità esegue la divisione del file l indicatore di stato lampeggia 1 Selezionare COMBINE nella schermata di modifica delle impostazioni sinistra 2 Premere per selezionare PREVIOUS FILE quindi premere q OK per confermare 3 Premere per seleziona...

Page 141: ...onfermare Mentre l unità esegue la copia del file l indicatore di stato lampeggia Spostamento di file Selezionare MOVE al passo 1 a sinistra per spostare i file L operazione è identica alla copia dei file Funzione cestino Ripristino dei file nel cestino nella cartella originale 1 Premere F2 FOLDER 2 Premere u i per selezionare quindi premere q OK per confermare Le cartelle del cestino si trovano r...

Page 142: ...zionare l impostazione quindi premere q OK per confermare Ripetere i punti 1 e 2 per completare le impostazioni 5 Premere per selezionare OK quindi premere q OK per confermare Per uscire dalla schermata di impostazione premere F2 CLOSE Voce di impostazione Dettagli SETTING OFF Timer non in funzione ON Timer in funzione REPEAT ONCE La registrazione o la riproduzione viene eseguita solo una volta DA...

Page 143: ...z MP3 320 kb sec MP3 192 kb sec MP3 128 kb sec MP3 64 kb sec MP3 32 kb sec REC TO Selezionare la cartella in cui salvare il file registrato Se è selezionata la cartella di una scheda SD inserire la scheda SD Menu comune Operazioni sulle impostazioni comuni 1 Premere MENU 2 Premere per selezionare COMMON MENU quindi premere q OK per confermare 3 Premere per selezionare la voce dell impostazione qui...

Page 144: ...golazione Regolazione del contrasto da 1 L a 10 H L impostazione di fabbrica è 5 RECYCLE BIN Quando si utilizza la funzione cestino i file eliminati vengono spostati nel cestino Prima di svuotare il cestino è possibile ripristinare i file eliminati in modo che non ci si debba preoccupare dei file eliminati per errore OFF Non usare la funzione cestino ON Usare la funzione cestino L impostazione di ...

Page 145: ...olgersi a Microsoft Corporation per i dettagli su Windows Media Player Microsoft Windows Windows Media e Windows Vista sono marchi o marchi registrati di Microsoft Corporation negli Stati Uniti d America e in altri Paesi Tecnologia di codifica audio MPEG Layer 3 su licenza da Fraunhofer IIS e Thomson IBM e PC AT sono marchi o marchi registrati di International Business Machines Corporation degli S...

Page 146: ...ne il mouse e la tastiera in condizioni normali di funzionamento Quando si utilizza un hub USB Quando si utilizza un cavo di prolunga USB diverso da quello in dotazione Il computer potrebbe non riconoscere l unità se essa è stata collegata al computer durante l avvio riavvio o mentre esso si trova in modalità standby Staccare l unità e ricollegarla al computer o ricollegare l unità dopo aver riavv...

Page 147: ... acqua togliere lo sporco e terminare la pulizia con un panno asciutto Non usare solventi compresi benzolo diluenti alcol detersivi da cucina detergenti chimici ecc Tali prodotti potrebbero deformare l involucro o rovinare la vernice VQT4J81 RR XS450 420 E It indd 147 VQT4J81 RR XS450 420 E It indd 147 2012 05 28 14 17 55 2012 05 28 14 17 55 ...

Page 148: ...bini per evitare che possano ingoiarle Precauzione Pericolo di esplosione se la batteria viene sostituita scorrettamente Sostituirla soltanto con il tipo consigliato dal produttore Per disfarsi delle batterie rivolgersi alle autorità locali o al rivenditore e chiedere il modo corretto di rottamazione Non scaldare e non esporre a fiamme libere Non lasciare le pile in un automobile esposta alla luce...

Page 149: ... il vostro comune i vostri operatori per lo smaltimento dei rifiuti o il punto vendita dove avete acquistato gli articoli Sono previste e potrebbero essere applicate sanzioni qualora questi rifiuti non siano stati smaltiti in modo corretto ed in accordo con la legislazione nazionale Per utenti commerciali nell Unione Europea Se desiderate eliminare apparecchiature elettriche ed elettroniche vi pre...

Page 150: ...eur OPR HOLD du côte ON 4 Faites glisser le commutateur OPR HOLD du côte OFF Le voyant d état s allume et le rechargement commence Faire glisser le commutateur OPR HOLD sur ON peut interrompre le chargement Le chargement est terminé lorsque l indicateur de fonctionnement s éteint gDébrancher l appareil Double cliquez sur l icône Windows XP Windows Vista Windows 7 de la barre des tâches au bas de l...

Page 151: ...llage Faites glisser le commutateur OPR HOLD à l opposé de HOLD Régler l horloge 1 Appuyez sur MENU 2 Appuyez sur pour sélectionner COMMON MENU et appuyez sur q OK pour valider 3 Appuyez sur pour sélectionner DATE TIME et appuyez sur q OK pour valider 4 Appuyez sur pour régler l année puis appuyez sur i 5 Appuyez sur pour régler le mois puis appuyez sur i 6 Appuyez sur pour régler la date puis app...

Page 152: ...D est insérée page 18 et à l étape 3 dans le cas contraire 2 Appuyez sur pour sélectionner INT MEMORY mémoire interne ou microSD CARD puis appuyez sur q OK 3 Appuyez sur pour sélectionner le dossier et appuyez sur q OK pour valider Si des dossiers ont été créés dans les dossiers MUSIC ou OTHER FOLDER répétez l étape 3 pour sélectionner le dossier cible 4 Appuyez sur pour sélectionner le fichier et...

Page 153: ... un enregistrement au microphone choisissez un dossier parmi les dossiers A B C et D Le réglage d usine est A 3 Appuyez sur REC l enregistrement commence 4 Appuyez sur STOP g RETURN pour arrêter l enregistrement Pour mettre l enregistrement en pause 1 Appuyez sur REC pendant l enregistrement Le voyant d enregistrement clignote 2 Appuyez à nouveau sur REC pour faire reprendre l enregistrement 1 App...

Page 154: ...hoisir la scène et appuyez sur q OK pour valider Si vous sélectionnez USER ignorez l étape 3 3 Appuyez sur pour sélectionner LOAD et appuyez sur q OK pour valider Pour quitter l écran de réglage appuyez sur F2 CLOSE Après une pression de REC l enregistrement a lieu avec le réglage de scène d enregistrement sélectionné Scène d enregistrement Application LANG STUDY Enregistrement de votre propre voi...

Page 155: ...r YES et appuyez sur q OK pour valider La scène d enregistrement sélectionnée reprend son réglage d usine Pour choisir la scène d enregistrement initiale sélectionnez LOAD Pour quitter l écran de réglage appuyez sur F2 CLOSE Scène en direct Cette fonction permet de changer la scène d enregistrement définie selon la position du microphone Lors de l achat MEETING est réglé sur STEREO et LECTURE est ...

Page 156: ...er MIC REC MODE et appuyez sur q OK pour valider 4 Appuyez sur pour sélectionner le réglage fréquence d échantillonnage PCM débit binaire MP3 et appuyez sur q OK pour valider Le réglage d usine est MP3 192kbps Pour quitter l écran de réglage appuyez sur F2 CLOSE La qualité sonore et le temps d enregistrement restant diffèrent selon le réglage du mode d enregistrement Format d enregistrement Enregi...

Page 157: ...puyez sur pour sélectionner MANUAL et appuyez sur q OK pour valider Pour quitter l écran de réglage appuyez sur F2 CLOSE Ajuster le niveau de l enregistrement manuellement 1 Maintenez enfoncé REC pendant 1 seconde ou plus L appareil passe en attente d enregistrement 2 Dirigez le microphone vers la source sonore à enregistrer 3 Appuyez sur u i pour régler le niveau de l enregistrement La plage de r...

Page 158: ...2 CLOSE Régler le limiteur de pic d enregistrement sur ON 1 Appuyez sur MENU 2 Appuyez sur pour sélectionner MIC REC MENU et appuyez sur q OK pour valider 3 Appuyez sur pour sélectionner PEAK LIMITER et appuyez sur q OK pour valider 4 Appuyez sur pour sélectionner ON et appuyez sur q OK pour valider Le réglage d usine est OFF Pour quitter l écran de réglage appuyez sur F2 CLOSE Régler l égaliseur ...

Page 159: ...s avant l enregistrement sont toujours mises à jour et l appareil passe en mode veille 2 Appuyez sur REC Le voyant d enregistrement s allume et l enregistrement commence directement après les données audio pré enregistrées Pour arrêter Appuyez sur STOP g RETURN Fonction de pré enregistrement PRE RECORD 1 Appuyez sur MENU 2 Appuyez sur pour sélectionner MIC REC MENU et appuyez sur q OK pour valider...

Page 160: ...ctuez les étapes de 1 à 11 gauche Enregistrer à partir d autres appareils 1 Faites glisser le commutateur Mic Line sur LINE 2 Appuyez sur MENU 3 Appuyez sur pour sélectionner LINE REC et appuyez sur q OK pour valider 4 Appuyez sur pour sélectionner LINE INPUT et appuyez sur q OK pour valider 5 Appuyez sur pour sélectionner le réglage et appuyez sur q OK pour valider Si vous connectez à la prise éc...

Page 161: ...ur à la vitesse normale Indication de l état pendant la lecture Les vitesses de lecture normale plus rapide et plus lente sont indiquées avec et 1 Appuyez sur ERASE A B pendant la lecture Le point de début A est spécifié et allumé et clignotant sont affichés 2 Appuyez sur ERASE A B au point de fin B L affichage devient allumé et la lecture répétée commence Annuler la lecture répétée A B Appuyez su...

Page 162: ...ure débute à partir de la position définie Appuyez sur F2 CLOSE pour arrêter le réglage avant d avoir terminé 1 Appuyez sur MENU Lors de la lecture passez à l étape 3 2 Appuyez sur pour sélectionner PLAY MENU et appuyez sur q OK pour valider 3 Appuyez sur pour sélectionner REPEAT et appuyez sur q OK pour valider 4 Appuyez sur pour sélectionner le type de lecture répétée et appuyez sur q OK pour va...

Page 163: ...puyez sur q OK pour valider Vous pouvez régler l intervalle de saut à 5 s 10 s 30 s 1 min 5 min 10 min ou 15 min Le réglage d usine est 5sec Pour quitter l écran de réglage appuyez sur F2 CLOSE Régler la répétition parallèle 1 Appuyez sur MENU Lors de la lecture passez à l étape 3 2 Appuyez sur pour sélectionner PLAY MENU et appuyez sur q OK pour valider 3 Appuyez sur pour sélectionner SHADOWING e...

Page 164: ...ppuyez sur MENU Lors de la lecture passez à l étape 3 2 Appuyez sur pour sélectionner PLAY MENU et appuyez sur q OK pour valider 3 Appuyez sur pour sélectionner VOICE EMPHASIS et appuyez sur q OK pour valider 4 Appuyez sur pour sélectionner l accentuation vocale puis appuyez sur q OK Le réglage d usine est NORMAL Pour quitter l écran de réglage appuyez sur F2 CLOSE NORMAL Joue le son comme enregis...

Page 165: ...s réglages pour chaque bande de fréquence à modifier sont terminés passez à l étape 5 5 Appuyez sur q OK pour valider Pour quitter l écran de réglage appuyez sur F2 CLOSE Mode d égaliseur Effet et application FLAT La fonction d égaliseur de son n est pas utilisée Vous entendez le son original sans aucun changement BASS Accentue fortement les sons graves CLEAR Accentue fortement les sons aigus HEAV...

Page 166: ... carte SD Insérer la carte SD 1 Éteignez l appareil et ouvrez le couvercle de la pile carte SD 2 Insérez la carte SD et refermez le couvercle de la pile carte SD Alignez la carte SD dans le bon sens et insérez la complètement jusqu à ce que se produise un clic Pour retirer la carte SD 1 Éteignez l appareil et ouvrez le couvercle de la pile carte SD 2 Appuyez doucement sur la carte SD 3 Lorsque la ...

Page 167: ...sier appuyez sur u et vous pourrez vous déplacer au sein des hiérarchies Pour des détails relatifs aux méthodes de sélection des fichiers et des dossiers voir la page 4 3 Appuyez sur u i pour sélectionner la liste de lecture et appuyez sur q OK pour valider Sélectionnez entre PLAYLIST 1 à 5 Le fichier ou tous les fichiers contenus dans le dossier sont enregistrés dans la liste de lecture sélection...

Page 168: ...er 2 Sélectionnez DIVIDE à l écran de réglage des modifications gauche 3 Appuyez sur pour sélectionner YES et appuyez sur q OK pour valider Pendant la division du fichier le voyant d état clignote 1 Sélectionnez COMBINE à l écran de réglage des modifications gauche 2 Appuyez sur pour sélectionner PREVIOUS FILE et appuyez sur q OK pour valider 3 Appuyez sur pour sélectionner le fichier à combiner e...

Page 169: ... copie du fichier le voyant d état clignote Déplacer des fichiers Sélectionnez MOVE à l étape 1 à gauche pour déplacer des fichiers L opération est identique à la copie d un fichier Modifier Copier ou déplacer des fichiers Fonction corbeille Restaurer des fichiers se trouvant dans la corbeille vers leur dossier d origine 1 Appuyez sur F2 FOLDER 2 Appuyez sur u i pour sélectionner et appuyez sur q ...

Page 170: ...er 2Appuyez sur u i pour sélectionner le réglage et appuyez sur q OK pour valider Répétez les étapes 1 et 2 pour terminer les réglages 5 Appuyez sur pour sélectionner OK et appuyez sur q OK pour valider Pour quitter l écran de réglage appuyez sur F2 CLOSE Élément réglé Détails SETTING OFF Le retardateur est désactivé ON Le retardateur est activé REPEAT ONCE L enregistrement ou la lecture est exécu...

Page 171: ...e MODE PCM 44 1 kHz MP3 320 ko s MP3 192 ko s MP3 128 ko s MP3 64 ko s MP3 32 ko s REC TO Sélectionnez le dossier dans lequel sauvegarder le fichier enregistré Si un dossier de la carte SD est sélectionné insérez la carte SD Menu commun Opération de réglages communs 1 Appuyez sur MENU 2 Appuyez sur pour sélectionner COMMON MENU et appuyez sur q OK pour valider 3 Appuyez sur pour sélectionner l élé...

Page 172: ...réglage d usine est 5 RECYCLE BIN Lorsque la fonction corbeille est utilisée les fichiers supprimés sont déplacés vers la corbeille Avant que la corbeille ne soit vidée les fichiers supprimés peuvent être restaurés de sorte que vous n ayez pas à vous inquiéter de supprimer des fichiers par erreur OFF Ne pas utiliser la fonction corbeille ON Utiliser la fonction corbeille Le réglage d usine est ON ...

Page 173: ...er l ordinateur doit posséder la configuration système requise pour Windows Media Player Pour plus de détails sur Windows Media Player s informer auprès de Microsoft Corporation Microsoft Windows Windows Media et Windows Vista sont des marques déposées ou non de Microsoft Corporation aux États Unis et ou dans d autres pays La technologie de codage audio MPEG Layer 3 est sous licence de Fraunhofer ...

Page 174: ...sont connectés à l ordinateur excluant la souris et le clavier en fonctionnement normal Lorsqu un concentrateur USB est utilisé Lorsqu un câble prolongateur USB différent de celui fourni est utilisé Lorsque l appareil est raccordé à l ordinateur il se peut que l ordinateur ne reconnaisse pas l appareil si vous faites démarrer ou redémarrer l ordinateur ou s il entre en mode veille Déconnectez l ap...

Page 175: ...is passez un chiffon sec N utilisez aucun solvant tel que benzène diluant alcool détergent de cuisine chiffon imprégné chimiquement etc L utilisation de ces produits peut causer la déformation du boîtier extérieur ou le détachement du revêtement VQT4J81 RR XS450 420 E FR indd 175 VQT4J81 RR XS450 420 E FR indd 175 2012 05 28 14 46 12 2012 05 28 14 46 12 ...

Page 176: ...une source de chaleur ou dans un feu Ne laissez pas la ou les batterie dans un véhicule exposé aux rayons du soleil pendant une période prolongée avec les portes et vitres fermées Veillez à utiliser le casque ou les écouteurs fournis avec l appareil ou recommandés Selon EN 50332 2 2003 1 Tension de sortie maximum sortie oreillette 150mV 2 Tension caractéristique de la bande large oreillettes 75mV ...

Page 177: ... auprès de votre mairie du service municipal d enlèvement des déchets ou du point de vente où vous avez acheté les articles concernés Le non respect de la réglementation relative à l élimination des déchets est passible d une peine d amende Pour les utilisateurs professionnels au sein de l Union européenne Si vous souhaitez vous défaire de pièces d équipement électrique ou électronique veuillez vo...

Page 178: ...OPR HOLD en la opción OFF Se encenderá el indicador de estado y se iniciará la recarga Mientras se está efectuando la carga si se cambia el interruptor OPR HOLD a la posición ON la carga se puede cancelar antes de que concluya Cuando el indicador de estado se apaga la carga se ha completado gDesconexión de la unidad Haga doble clic en el icono Windows XP Windows Vista Windows 7 en la bandeja de ta...

Page 179: ...e la grabación o la reproducción Para apagar la función de bloqueo Deslice el interruptor OPR HOLD a la posición contraria a HOLD Ajuste del reloj 1 Pulse MENU 2 Pulse para seleccionar COMMON MENU y pulse q OK para confirmar 3 Pulse para seleccionar DATE TIME y pulse q OK para confirmar 4 Pulse para establecer el año y pulse i 5 Pulse para establecer el mes y pulse i 6 Pulse para establecer el día...

Page 180: ...2 si ha introducido una tarjeta SD página 18 o al paso 3 en caso conatrario 2 Pulse para seleccionar INT MEMORY memoria interna o microSD CARD y luego pulse q OK para confirmar 3 Pulse para seleccionar la carpeta y pulse q OK para confirmar Si se han creado carpetas dentro de la carpeta MUSIC o en OTHER FOLDER repita el paso 3 para seleccionar la carpeta de destino 4 Pulse para seleccionar el arch...

Page 181: ...a grabación y pulse q OK para confirmar Para la grabación con micrófono seleccione una carpeta de entre las carpetas A B C y D El ajuste de fábrica es A 3 Pulse REC se inicia la grabación 4 Pulse STOP g RETURN para detener la grabación Para detener la grabación 1 Pulse REC durante la grabación El indicador de grabación parpadea 2 Pulse REC de nuevo para continuar con la grabación 1 Pulse q OK se i...

Page 182: ... 2 Pulse para seleccionar la situación para la grabación y pulse q OK para confirmar Si selecciona USER omita el paso 3 3 Pulse para seleccionar LOAD y pulse q OK para confirmar Para salir de la pantalla de ajustes pulse F2 CLOSE Cuando se pulsa REC se realiza una grabación con el ajuste seleccionado Situación para la grabación Aplicación LANG STUDY Grabación de su propia voz para practicar pronun...

Page 183: ...n seleccionado se devuelve a su ajuste de fábrica Para seleccionar la situación para grabación inicializada seleccione LOAD Para salir de la pantalla de ajustes pulse F2 CLOSE Situación directa Esta función sirve para cambiar la situación para la grabación vinculándola al cambio de posición del micrófono Cuando adquiera la unidad MEETING estará asignado a STEREO y LECTURE estará asignado a ZOOM Ca...

Page 184: ...to de grabación PCM 44 1 kHz Grabación de alta calidad Grabación larga MP3 320 kbps MP3 192 kbps MP3 128 kbps MP3 64 kbps MP3 32 kbps Si el modo de grabación está ajustado a MP3 32kbps la grabación será monoaural Configuración de la situación directa en OFF 1 Pulse MENU 2 Pulse para seleccionar MIC REC MENU y pulse q OK para confirmar 3 Pulse para seleccionar DIRECT SCENE y pulse q OK para confirm...

Page 185: ...nfirmar 4 Pulse para seleccionar MANUAL y pulse q OK para confirmar Para salir de la pantalla de ajustes pulse F2 CLOSE Ajuste manual del nivel de grabación 1 Pulse y mantenga pulsado REC durante 1 segundo o más La unidad pasará al modo de espera de grabación 2 Oriente el micrófono hacia la fuente de sonido que se vaya a grabar 3 Pulse u i para ajustar el nivel de grabación El margen de ajuste es ...

Page 186: ...a es OFF Para salir de la pantalla de ajustes pulse F2 CLOSE Ajuste del limitador de picos 1 Pulse MENU 2 Pulse para seleccionar MIC REC MENU y pulse q OK para confirmar 3 Pulse para seleccionar PEAK LIMITER y pulse q OK para confirmar 4 Pulse para seleccionar ON y pulse q OK para confirmar El ajuste de fábrica es OFF Para salir de la pantalla de ajustes pulse F2 CLOSE Ajuste de la grabación EQ 1 ...

Page 187: ...es pulse F2 CLOSE Para grabar utilizando la función de grabación anterior 1 Pulse y mantenga pulsado REC durante 1 segundo o más La unidad entra en el modo de espera de grabación anterior Cambia a 1 seg 2 seg 3 seg y se detiene en 3 seg Los datos de audio recogidos por el micrófono en los 3 segundos anteriores al inicio de la grabación aproximadamente se añaden siempre a ésta y la unidad se mantie...

Page 188: ...sde otros dispositivos 1 Deslice el interruptor Mic Line a la posición LINE 2 Pulse MENU 3 Pulse para seleccionar LINE REC y pulse q OK para confirmar 4 Pulse para seleccionar LINE INPUT y pulse q OK para confirmar 5 Pulse para seleccionar el ajuste y pulse q OK para confirmar Cuando realice la conexión con la terminal de auriculares de un dispositivo externo o con la terminal de salida de línea d...

Page 189: ... del estado durante la grabación La reproducción a velocidad normal reproducción rápida y reproducción lenta se muestran como y respectivamente 1 Pulse ERASE A B durante la reproducción Se establece el punto de inicio A y se muestran iluminado y parpadeando 2 Pulse ERASE A B en el punto final B La pantalla cambia a iluminado y comienza la reproducción de repetición Cancelación de la repetición A B...

Page 190: ...ajuste a mitad del proceso 1 Pulse MENU Cuando la reproducción esté en curso acuda al paso 3 2 Pulse para seleccionar PLAY MENU y pulse q OK para confirmar 3 Pulse para seleccionar REPEAT y pulse q OK para confirmar 4 Pulse para seleccionar el tipo de reproducción de repetición y pulse q OK para confirmar El ajuste de fábrica es OFF Para salir de la pantalla de ajustes pulse F2 CLOSE OFF La reprod...

Page 191: ...cionar la hora y pulse q OK para confirmar Puede establecer el intervalo de salto a 5 seg 10 seg 30 seg 1 min 5 min 10 min o 15 min El ajuste de fábrica es 5sec Para salir de la pantalla de ajustes pulse F2 CLOSE Configuración de la imitación 1 Pulse MENU Cuando la reproducción esté en curso acuda al paso 3 2 Pulse para seleccionar PLAY MENU y pulse q OK para confirmar 3 Pulse para seleccionar SHA...

Page 192: ...PHASIS 1 Pulse MENU Cuando la reproducción esté en curso acuda al paso 3 2 Pulse para seleccionar PLAY MENU y pulse q OK para confirmar 3 Pulse para seleccionar VOICE EMPHASIS y pulse q OK para confirmar 4 Pulse para seleccionar el tipo de voz resaltada y pulse q OK para confirmar El ajuste de fábrica es NORMAL Para salir de la pantalla de ajustes pulse F2 CLOSE NORMAL El sonido se reproduce tal c...

Page 193: ...s para la banda de frecuencia a cambiar se hayan completado vaya al paso 5 5 Pulse q OK para confirmar Para salir de la pantalla de ajustes pulse F2 CLOSE Modo EQ Efectos y aplicaciones FLAT La función del ecualizador de sonidos no está en uso Escuchará el sonido original sin cambio alguno BASS Enfatiza fuertemente el rango de los graves CLEAR Enfatiza fuertemente el rango de los agudos HEAVY Enfa...

Page 194: ...limentación y abra la cubierta de la ranura de la batería tarjeta SD 2 Introduzca la tarjeta SD y cierre la cubierta de la ranura de la batería tarjeta SD Alinee la tarjeta SD en la dirección correcta e introdúzcala completamente hasta que oiga el sonido clic Para retirar la tarjeta SD 1 Desconecte la alimentación y abra la cubierta de la ranura de la batería tarjeta SD 2 Empuje la tarjeta SD con ...

Page 195: ... de archivos cambiando de carpetas pulse u y podrá moverse dentro de las jerarquías Para detalles sobre la selección de archivos y carpetas acuda a la página 4 3 Pulse u i para seleccionar la lista de reproducción y pulse q OK para confirmar Seleccione en PLAYLIST 1 a 5 El archivo o todos los archivos dentro de la carpeta se registran en la lista de reproducción seleccionada Reproducción de pistas...

Page 196: ...o en el que desea dividir el archivo 2 Seleccione DIVIDE en la pantalla de ajustes de edición izquierda 3 Pulse para seleccionar YES y pulse q OK para confirmar Mientras el archivo está siendo dividido el indicador de estado parpadeará 1 Seleccione COMBINE en la pantalla de ajustes de edición izquierda 2 Pulse para seleccionar PREVIOUS FILE y pulse q OK para confirmar 3 Pulse para seleccionar el a...

Page 197: ...ivo está siendo copiado el indicador de estado parpadeará Movimiento de archivos Seleccione MOVE en paso 1 a la izquierda para mover los archivos La operación es la misma que para copiar un archivo Función de papelera de reciclaje Devolución de archivos dentro de la papelera de reciclaje a la carpeta original 1 Pulse F2 FOLDER 2 Pulse u i para seleccionar y pulse q OK para confirmar Las carpetas d...

Page 198: ...ra confirmar 2Pulse u i para seleccionar el ajuste y pulse q OK para confirmar Repita los pasos 1 y 2 para completar los ajustes 5 Pulse para seleccionar OK y pulse q OK para confirmar Para salir de la pantalla de ajustes pulse F2 CLOSE Ajuste Detalles SETTING OFF El temporizador no funciona ON El temporizador funciona REPEAT ONCE La grabación o reproducción se realiza en una sola ocasión DAILY La...

Page 199: ...o LINE Graba sonido desde un dispositivo externo MODE PCM 44 1 kHz MP3 320 kbps MP3 192 kbps MP3 128 kbps MP3 64 kbps MP3 32 kbps REC TO Seleccione la carpeta en la que va a guardar el archivo grabado Si selecciona una carpeta de tarjeta SD introduzca la tarjeta SD Menú común Operación de ajustes comunes 1 Pulse MENU 2 Pulse para seleccionar COMMON MENU y pulse q OK para confirmar 3 Pulse para sel...

Page 200: ... contraste 1 L a 10 H El ajuste de fábrica es 5 RECYCLE BIN Papelera de Reciclaje Cuando se utiliza la función de papelera de reciclaje los archivos eliminados se mueven a la papelera de reciclaje Antes de vaciar la papelera de reciclaje se pueden restaurar los archivos eliminados por ello no tiene que preocuparse por archivos que pueda eliminar por error OFF No utilizar la función de papelera de ...

Page 201: ...dia Player Para más detalles sobre Windows Media Player acuda a Microsoft Corporation Microsoft Windows Windows Media y Windows Vista son marcas registradas o marcas comerciales de Microsoft Corporation en Estados Unidos y otros países Tecnología de decodificación de audio MPEG Layer 3 de Fraunhofer IIS y Thomson IBM y PC AT son marcas registradas de International Business Machines Corporation de ...

Page 202: ...l ratón y el teclado en normal funcionamiento Cuando se usa un concentrador USB Cuando se utiliza un cable alargador de USB que no sea el incluido Cuando la unidad se conecta al ordenador si usted inicia reinicia el ordenador o éste entra en el modo de espera el ordenador puede no reconocer la unidad Desconecte la unidad y vuelva a conectarla al ordenador o vuelva a conectar la unidad después de r...

Page 203: ...ión Si tales interferencias resultan evidentes aumente la separación entre el producto y el teléfono móvil Mantenga las pilas AAA LR03 y las pilas recargables fuera del alcance de los niños pequeños para evitar que las ingieran CUIDADO Existe peligro de explosión si la batería se reemplaza mal Reemplácela por otra del tipo recomendado por el fabricante Cuando se deshaga de las baterías póngase en ...

Page 204: ...NASONIC 1800 726276 Costa Rica 800 PANA737 800 7262737 El Salvador 800 PANA 800 7262 Guatemala 1 801 811 PANA 1 801 811 7262 Chile 800 390 602 Desde teléfono Celular 797 5000 Venezuela 800 PANA 800 800 7262 800 Uruguay 0 800 PANA 0 800 7262 Perú 0800 00726 Argentina 0800 333 PANA 0800 333 7262 0810 321 PANA 0810 321 7262 Servicio en México Para obtener información en la República de México contáct...

Page 205: ...aparatos y baterías viejos por favor contacte a su comunidad local su servicio de eliminación de residuos o al comercio donde adquirió estos aparatos Podrán aplicarse penas por la eliminación incorrecta de estos residuos de acuerdo a la legislación nacional Para usuarios empresariales en la Unión Europea Si usted desea descartar aparatos eléctricos y electrónicos por favor contacte a su distribuid...

Page 206: ... o lado ON 4 Faça deslizar o interruptor OPR HOLD para o lado OFF O indicador de estado acende e o carregamento é iniciado Durante o carregamento fazer deslizar o interruptor OPR HOLD para o lado ligado ON pode cancelar o carregamento a meio Quando o indicador de estado se apagar o carregamento está concluído gDesligar a unidade do computador Clique duas vezes no ícone Windows XP Windows Vista Win...

Page 207: ...e a gravação ou reprodução Desactivar a função de Bloqueio Faça deslizar o interruptor OPR HOLD na direcção oposta de HOLD 1 Pressione MENU 2 Pressione para seleccionar COMMON MENU e pressione q OK para confirmar 3 Pressione para seleccionar DATE TIME e pressione q OK para confirmar 4 Pressione para seleccionar o ano e pressione i 5 Pressione para seleccionar o mês e pressione i 6 Pressione para d...

Page 208: ...l Adequado para a gravação de eventos tais como uma reunião ou espectáculo por um grande número de pessoas ZOOM Grava com o som à sua frente enfatizado Adequado para a gravação de eventos tais como uma palestra ou entrevista em que o som é emitido a partir de uma direcção específica Seleccionar a pasta ou o ficheiro no ecrã de lista 1 Pressione LIST durante cerca de 1 segundo ou mais Avance para o...

Page 209: ...tino da gravação e pressione q OK para confirmar Para a gravação de microfone seleccione uma pasta entre as pastas A B C e D A programação de fábrica é A 3 Pressione REC a gravação é iniciada 4 Pressione STOP g RETURN para parar a gravação Pausar a gravação 1 Pressione REC durante a gravação O indicador de gravação pisca 2 Pressione REC novamente para retomar a gravação 1 Pressione q OK a reproduç...

Page 210: ...ar o cenário de gravação 2 Pressione para seleccionar o cenário e pressione q OK para confirmar Se seleccionar USER salte o passo 3 3 Pressione para seleccionar LOAD e pressione q OK para confirmar Para sair do ecrã de definição pressione F2 CLOSE Ao pressionar REC a gravação é efectuada com a definição de cenário de gravação seleccionada Cenário de gravação Aplicação LANG STUDY Gravação da própri...

Page 211: ...mar É reposta a programação de fábrica da definição do cenário de gravação seleccionado Para seleccionar o cenário de gravação inicializado seleccione LOAD Para sair do ecrã de definição pressione F2 CLOSE Cenário directo Esta função é para mudar a cena de gravação ligada à mudança da posição do microfone No momento da compra MEETING é atribuída a STEREO e LECTURE é atribuída a ZOOM Alterar a defi...

Page 212: ...o de gravação PCM 44 1 kHz Gravação de alta qualidade MP3 320 kbps MP3 192 kbps MP3 128 kbps MP3 64 kbps MP3 32 kbps Gravação longa Quando o modo de gravação está definido para MP3 32kbps a gravação fica mono Cenário directo Definir a definição de cenário directo para OFF 1 Pressione MENU 2 Pressione para seleccionar MIC REC MENU e pressione q OK para confirmar 3 Pressione para seleccionar DIRECT ...

Page 213: ...mar 4 Pressione para seleccionar MANUAL e pressione q OK para confirmar Para sair do ecrã de definição pressione F2 CLOSE Ajustar manualmente o nível de gravação 1 Pressione e mantenha pressionado REC durante 1 ou mais segundos A unidade entra em espera da gravação 2 Aponte o microfone para a fonte de som a gravar 3 Pressione u i para ajustar o nível de gravação O intervalo de ajuste é de 0 a 30 A...

Page 214: ...ione F2 CLOSE Configurar o limitador do pico de gravação para ligado ON 1 Pressione MENU 2 Pressione para seleccionar MIC REC MENU e pressione q OK para confirmar 3 Pressione para seleccionar PEAK LIMITER e pressione q OK para confirmar 4 Pressione para seleccionar ON e pressione q OK para confirmar A programação de fábrica é OFF Para sair do ecrã de definição pressione F2 CLOSE Definir o EQ de gr...

Page 215: ...sione q OK para confirmar A programação de fábrica é OFF Para sair do ecrã de definição pressione F2 CLOSE Gravar utilizando a função de gravação anterior 1 Pressione e mantenha pressionado REC durante 1 ou mais segundos A unidade entra no modo de espera da gravação anterior Muda como 1 seg 2 seg 3 seg e pára em 3 seg Os dados de áudio do microfone cerca de 3 segundos antes da gravação são sempre ...

Page 216: ...ar o interruptor Mic Line para LINE 2 Pressione MENU 3 Pressione para seleccionar LINE REC e pressione q OK para confirmar 4 Pressione para seleccionar LINE INPUT e pressione q OK para confirmar 5 Pressione para seleccionar a definição e pressione q OK para confirmar Quando ligar a unidade ao terminal de auscultadores de um dispositivo externo ou ao terminal de saída de linha de um dispositivo por...

Page 217: ...elocidade normal Indicação de estado durante a reprodução A velocidade de reprodução normal a reprodução mais rápida e a reprodução mais lenta são apresentadas como e respectivamente 1 Pressione ERASE A B durante a reprodução O ponto de início A fica definido e aparecem as indicações com luz fixa e a piscar 2 Pressione ERASE A B no ponto de fim B O visor muda para aceso e a reprodução repetitiva c...

Page 218: ...tir da posição especificada Pressione F2 CLOSE para parar o processo de definição a meio 1 Pressione MENU Quando a reprodução estiver a decorrer avance para o passo 3 2 Pressione para seleccionar PLAY MENU e pressione q OK para confirmar 3 Pressione para seleccionar REPEAT e pressione q OK para confirmar 4 Pressione para seleccionar o tipo de reprodução com repetição e pressione q OK para confirma...

Page 219: ...cionar o tempo e pressione q OK para confirmar Pode definir o intervalo de salto para 5 seg 10 seg 30 seg 1 min 5 min 10 min ou 15 min A programação de fábrica é 5sec Para sair do ecrã de definição pressione F2 CLOSE Seguimento Definir o seguimento 1 Pressione MENU Quando a reprodução estiver a decorrer avance para o passo 3 2 Pressione para seleccionar PLAY MENU e pressione q OK para confirmar 3 ...

Page 220: ...ressione MENU Quando a reprodução estiver a decorrer avance para o passo 3 2 Pressione para seleccionar PLAY MENU e pressione q OK para confirmar 3 Pressione para seleccionar VOICE EMPHASIS e pressione q OK para confirmar 4 Pressione para seleccionar o tipo de ênfase vocal e pressione q OK para confirmar A programação de fábrica é NORMAL Para sair do ecrã de definição pressione F2 CLOSE NORMAL Rep...

Page 221: ...odução estiver a decorrer avance para o passo 3 2 Pressione para seleccionar PLAY MENU e pressione q OK para confirmar 3 Pressione para seleccionar SOUND EQ e pressione q OK para confirmar 4 Pressione para seleccionar o modo de EQ de som Quando seleccionar modos que não USER avance para o passo 5 Definição quando seleccionar USER 1 Depois do passo 4 pressione F1 EDIT 2 Pressione u i para seleccion...

Page 222: ...um cartão SD Introduzir o cartão SD 1 Desligue o aparelho e abra a tampa da ranhura da pilha cartão SD 2 Introduza o cartão SD e feche a tampa da ranhura da pilha cartão SD Alinhe o cartão SD na direcção correcta e introduza o totalmente até ouvir um clique Retirar o cartão SD 1 Desligue o aparelho e abra a tampa da ranhura da pilha cartão SD 2 Empurre cuidadosamente o cartão SD 3 Quando o cartão ...

Page 223: ...luídas numa lista de reprodução 1 Seleccione a lista de reprodução de P1 a P5 no ecrã de lista página 4 2 Pressione para seleccionar o ficheiro que pretende alterar e pressione F1 EDIT 3 Pressione para seleccionar CHANGE ORDER e pressione q OK para confirmar é acrescentado no lado esquerdo do nome de ficheiro seleccionado 4 Pressione para mover o ficheiro seleccionado para a posição pretendida e p...

Page 224: ...RN no ponto onde pretende dividir o ficheiro 2 Seleccione DIVIDE no ecrã de definições de edição esquerda 3 Pressione para seleccionar YES e pressione q OK para confirmar Enquanto o ficheiro está a ser dividido o indicador de estado pisca 1 Seleccione COMBINE no ecrã de definições de ediçã esquerda 2 Pressione para seleccionar PREVIOUS FILE e pressione q OK para confirmar 3 Pressione para seleccio...

Page 225: ... para confirmar Enquanto o ficheiro está a ser copiado o indicador de estado pisca Mover ficheiros Seleccione MOVE no passo 1 à esquerda para mover ficheiros A operação é igual à da cópia de ficheiros Função de reciclagem Repor ficheiros colocados na reciclagem na pasta original 1 Pressione F2 FOLDER 2 Pressione u i para seleccionar e pressione q OK para confirmar As pastas de reciclagem existem n...

Page 226: ...Pressione u i para seleccionar a definição e pressione q OK para confirmar Repita os passos 1 e 2 para concluir as definições 5 Pressione para seleccionar OK e pressione q OK para confirmar Para sair do ecrã de definição pressione F2 CLOSE Item de definição Detalhes SETTING OFF O temporizador não é activado ON O temporizador é activado REPEAT ONCE A gravação ou a reprodução é efectuada apenas uma ...

Page 227: ...kbps MP3 192 kbps MP3 128 kbps MP3 64 kbps MP3 32 kbps REC TO Seleccione a pasta na qual pretende guardar o ficheiro gravado Se seleccionar uma pasta no cartão SD introduza o cartão SD Menu comum Funcionamento de definições comuns 1 Pressione MENU 2 Pressione para seleccionar COMMON MENU e pressione q OK para confirmar 3 Pressione para seleccionar o item de definição e pressione q OK para confirma...

Page 228: ...10 H A programação de fábrica é 5 RECYCLE BIN Quando a função de reciclagem é utilizada os ficheiros eliminados são movidos para a reciclagem Antes de esvaziar a reciclagem é possível repor ficheiros eliminados para não ter de se preocupar com ficheiros eliminados por engano OFF Não utilizar a função de reciclagem ON Utilizar a função de reciclagem A programação de fábrica é ON FORMAT Todos os fic...

Page 229: ...mações sobre o Windows Media Player consulte a Microsoft Corporation Microsoft Windows Windows Media e Windows Vista são marcas comerciais ou marcas registadas da Microsoft Corporation nos E U A e noutros países Tecnologia de codificação de áudio MPEG Layer 3 licenciada pela Fraunhofer IIS e Thomson IBM e PC AT são marcas registadas da International Business Machines Corporation dos E U A Macintos...

Page 230: ... excluindo o rato e o teclado em funcionamento normal Quando é utilizado um hub USB Quando é utilizado um cabo de extensão USB que não o cabo incluído Quando a unidade está ligada ao computador se iniciar reiniciar o computador ou este entrar no modo de espera o computador pode não reconhecer a unidade Desligue a unidade e volte a ligá la ao computador ou volte a ligar a unidade depois de reinicia...

Page 231: ...ifique se de que utiliza os auscultadores internos ou externos recomendados Baseado na norma EN 50332 2 2003 1 Tensão máxima de saída saída de auriculares 150mV 2 Tensão de característica de banda larga auriculares 75mV Limpe a unidade com um pano seco macio Se a unidade estiver muito suja limpe a com um pano humedecido em água bem torcido e depois seque a com um pano seco Não utilize solventes in...

Page 232: ... 847 7262 Interior 55 5000 1200 Mexico D F e Area Metropolitana Manuseio de baterias usadas Cobrir os terminais positivo 4 e negativo 3 com uma fita isolante adesiva antes de depositar numa caixa destinada para o recolhimento O contato entre partes metálicas pode causar vazamentos gerar calor romper a blindagem e produzir fogo Não desmonte não remova o invólucro nem amasse a bateria O gás liberado...

Page 233: ...olha de resíduos ou o ponto de venda onde o produto foi adquirido De acordo com a legislacao nacional podem ser apçlicadas multas caso seja feita a eliminação incorrecta destes resíduos Para Uitlizadores Não Particulares da União Europeia Se pretender eliminar equipamentos eléctricos e electrónicos por favor contacte o seu Distribuídor ou Produtor para obter mais informações Informação sobre a eli...

Page 234: ...2 Panasonic Testing Centre Panasonic Marketing Europe GmbH Winsbergring 15 22525 Hamburg Germany EU En Ge It Fr Sp Pr VQT4J81 ZOOM STEREO ERASE A B MENU VOL F2 F1 STOP RETURN OPR HOLD MIC LINE USB REC LIST VQT4J81 RR XS450 420 E En indd 94 VQT4J81 RR XS450 420 E En indd 94 2012 05 29 9 35 50 2012 05 29 9 35 50 ...

Reviews: