background image

43

Page 1/5

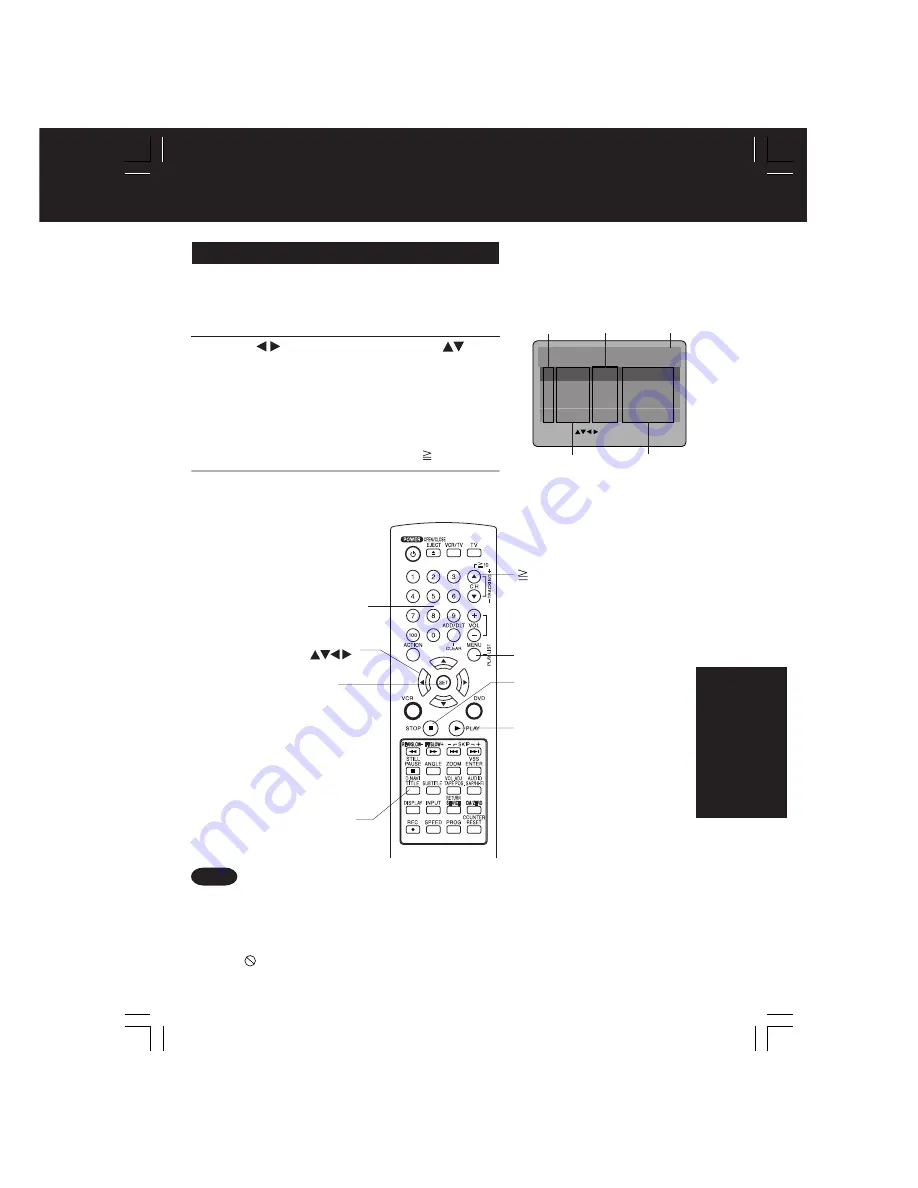
Play List

No.

Date

Length

Title

1

2002/12/24

5:15:41AM

00:01:00

Movie Picture
Playback

2

2002/12/25

4:31:49AM

00:03:12

Still Picture
Playback

3

2002/12/25

8:24:25AM

00:15:01

Hybrid Playback

SELECT:
SET   :SET

END:MENU

2002/12/25

12:45:00AM

00:03:00

Par tial Playback

4

1

Press 

PLAY LIST

in Play/Stop mode to display the Play List menu.

2

Press     

to select a page and

 press 


 to

select a title (Play List No.).
Then, 

press 

SET

 or 

PLAY

 to start playing.

If the DVD-RAM features a Play List, your preselected list of favorite scenes is displayed for easy
access. (Operation can vary according to how you edited the DVD-RAM.)

Play List

• “Pressing SET or PLAY” is not necessary when

using NUMBER keys.

Titles

Recording time
and date

Page No.

<Input

Example>

Using NUMBER keys starts playing automatically.

The number of available titles varies with each disc.

1 digit number

1 ••• 1

2 digit number

12 •••    10 

➛ 

➛ 

2

3

Press 

PLAY LIST

 to clear Play List menu.

Play List No.

Established
time length

(Example)

• Titles of Direct Navigator and Play List cannot be changed using this DECK.
• With Direct Navigator, up to 99 programs can be displayed. With Play List, up to 99 titles (999

scenes) can be displayed.

• While DVD MAIN MENU is displayed, Direct Navigator and Play List display will not appear even

if TITLE or MENU is pressed.

• When 

 appears on the screen while a button is being operated, it means that the

corresponding operation is prohibited by DECK or the disc.

Notes

DV

D

 Operation

   10

NUMBER

keys

PLAY LIST

SET

SELECT


D.NAVI

STOP

PLAY

*Important: if a remote control button does not work when pressed,

press the DVD button on the remote and try the button again.

D4734S-K P36-64 (040202).p65

2004/02/02, 15:13

43

Summary of Contents for PV-D4734S-K

Page 1: ...refully before attempting to connect operate or adjust this product Please save this manual LSQT0828 A For assistance please call 1 800 561 5505 or visit us at www panasonic ca As an ENERGY STAR Participant Panasonic has determined that this product or product model meets the ENERGY STAR guidelines for energy efficiency MULTI FORMAT PLAYBACK Ability to play back may depend on recording conditions ...

Page 2: ...na and cable system 4 WHEN THE UNIT IS PLUGGED IN Never expose the unit to rain or water DO NOT OPERATE if liquid has been spilled into the unit Immediately unplug the unit and have it inspected by a service technician Fire and shock hazards can result from electrical shorts caused by liquid contact inside Never drop or push any object through openings in the unit Some internal parts carry hazardo...

Page 3: ...THIS UNIT USES A VISIBLE LASER BEAM WHICH COULD CAUSE HAZARDOUS RADIATION EXPOSURE IF DIRECTED BE SURE TO OPERATE THE UNIT CORRECTLY AS INSTRUCTED WHEN THIS UNIT IS PLUGGED TO THE WALL OUTLET DO NOT PLACE YOUR EYES CLOSE TO THE OPENING OF THE DISC TRAY AND OTHER OPENINGS TO LOOK INTO THE INSIDE OF THIS UNIT USE OF CONTROLS OR ADJUSTMENTS OR PERFORMANCE OF PROCEDURES OTHER THAN THOSE SPECIFIED HERE...

Page 4: ...adjusts for optimum picture quality Manual Tracking Control to reduce picture noise Use during Playback and Slow Motion mode to reduce picture noise Press CH TRACKING on the remote control or on DECK until the picture clears up To return to Auto Tracking press POWER off then on again a few seconds later V Lock Control to reduce picture jitter In Still mode CH TRACKING operate as a V Lock control F...

Page 5: ...g and Instruction Displays 57 Before Requesting Service 58 59 Limited Warranty 60 Servicentre List 61 Index 62 63 DVD VCR Important Safeguards and Precautions 2 3 Before Using 4 DECK Cassette Information 6 7 Location of Controls 8 10 Displays On Screen Displays and Multi Function Display 11 Connections 12 15 Initial Setup for Basic Connections Ready to Play 16 17 VCR Reset Language Channels Clock ...

Page 6: ...ot write on label side of disc Never use record cleaning sprays benzine thinner static electricity prevention liquids or any other solvent Do not try to close disc tray when disc is not properly placed Disc tray Disc Prevent Accidental Tape Erasure Record Tab Cover the hole with cellophane tape To record again Break off the tab to prevent recording Screw driver DECK can play back discs bearing any...

Page 7: ...ut notice Definition of Terms DVD Angle Some DVD discs feature scenes simultaneously shot from different angles The ANGLE button can be used to view the scene from different angles ANGLE Indicator lights on DECK when a scene recorded at different angles is detected Chapter Number Titles are subdivided into numbered sections You can quickly search for a favorite scene using these numbers DVD A high...

Page 8: ...CR and DVD Functions Italic DVD Function Normal Others CHANNEL TRACKING V LOCK 10 pp 4 21 22 VOLUME p 28 MENU PLAY LIST p 38 43 DVD mode p 28 ACTION pp 18 52 SET VCR mode p 28 STOP pp 20 22 ADD DELETE CLEAR pp 19 39 NUMBER keys REWIND SEARCH SLOW pp 20 23 FAST FORWARD SEARCH SLOW pp 20 23 SKIP SKIP p 23 PAUSE STILL pp 20 23 Virtual Surround Sound V S S ENTER pp 23 28 TITLE DIRECT NAVIGATOR p 38 42...

Page 9: ...e e g an extended paper clip and applying moderate force insert it straight into the hole at the base of the tray The tray will eject a little Now pull the tray all the way out and remove the disc Over 2 inches Returns to factory setting Use if relocating DECK or if Initial Setup needs to be redone Make sure a tape is not inserted in the DECK Reset All Memory Functions Press and hold both VCR PLAY...

Page 10: ...omponent Video Output Connector Notes The screen may shift off center when using progressive output Please adjust the screen position if this occurs Refer to your TV manual If the television is not progressive compatible a progressive scan picture is not available Connect the Video Output or S Video Output connector see p 12 13 and set PROGRESSIVE OUT to OFF in the DVD Main Menu See p 55 AC Power ...

Page 11: ...mode Indicator Lights up when DECK is in VCR mode ANGLE Indicator Lights up when a scene recorded at different angles is detected See p 37 DVD only DVD mode Indicator Lights up when DECK is in DVD mode Multi Function Display Timer Indicator Lights up when DECK is set for Timer Recording or when One Touch Recording OTR is used Flashes when Timer Recording is set but a tape has not been inserted int...

Page 12: ...pplied 2 Connect DECK to TV with RF Coaxial Cable RF COAXIAL CABLE supplied a b DSS Receiver OUT IN IN Note to CABLE system installer This reminder is provided to call the CABLE system installer s attention to Article 820 40 of the NEC in USA and to the Canadian Electrical Code in Canada that provides guidelines for proper grounding and in particular specifies that the cable ground shall be connec...

Page 13: ...PONENT VIDEO OUT If your TV does not have COMPONENT VIDEO INPUT but has S VIDEO INPUT connect to S VIDEO OUT When in DVD mode set your TV to either COMPONENT VIDEO IN or S VIDEO IN Connections For DVD Only enjoying higher picture quality Other Connections Notes DVD VCR DECK DVD VCR DECK VHF UHF Cable Box VHF UHF With a Cable Box DECK Cable Box TV 2 1 3 Initial Setup Connection You can watch DVDs t...

Page 14: ... format used in CDs While CDs are recorded in 44 1 kHz 16 bit DVDs are recorded in 48 kHz 16 bit up to 96 kHz 24 bit If you have a Dolby Pro Logic Surround decoder you will obtain the full benefit of Pro Logic from the same DVD movies that provide full 5 1 channel Dolby Digital soundtracks as well as from titles with the Dolby Surround mark For information on Panasonic Dolby Pro Logic Surround Sou...

Page 15: ...r Center Speaker Subwoofer Decoder with Dolby Digital DTS processing OpticalDigital Audio Cable optional To Optical Digital Audio Input Connector 5 1 ch Surround system Amplifier Caution for optical digital audio output connector When connecting an amplifier with an Optical Digital Input Connector which does not contain the Dolby Digital or DTS receiver be sure to select PCM at Dolby Digital and P...

Page 16: ...s Initial Setup Ready to Play 2 1 If screen below does not appear check DECK TV connection and if TV is tuned to channel 3 try switching it to channel 4 To change VCR s output channel please refer to VCR s Output Channel on page 19 If wrong language is set do Reset All Memory Functions p 9 Plug VCR Power plug into an AC wall outlet Notes Select language Press 1 English Press 2 French Press 3 Spani...

Page 17: ...splay CLOCK screen Press to select the month and SET to set In the same manner select and set the date year time and DST Daylight SavingTime Press ACTION to start clock and exit Manual Clock Set 1 2 3 VCR ACTION SET SELECT Initial Setup Connection EJECT STOP EJECT dytoPlay AUTO CLOCK SET IS INCOMPLETE PLEASE SET CLOCK BY PRESSING ACTION KEY DST ON 1 1 2004 THU 12 00PM SET CLOCK SELECT SET SET END ...

Page 18: ...PONENT Video Output and S VIDEO OUT Please set TV to either RF INPUT or VIDEO INPUT and then press PROGRAM SELECT EXIT ACTION SET SET MENU SET UP VCR SET UP CLOCK SET UP CHANNEL IDIOMA LANGUE ENGLISH VCR S OUTPUT CH 3 ELEGIR SALIR ACTION FIJAR SET MENU PREPARAR VCR FIJAR RELOJ FIJAR CANAL LANGUE LANGUAGE ESPAÑOL SALIDA DE VCR CANAL 3 SELECT EXIT ACTION SET SET MENU SET UP VCR SET UP CLOCK SET UP C...

Page 19: ...select SET CLOCK and press SET and press SET to subtract or add hour s as necessary Important If a remote control button does not work when pressed press the VCR button on the remote and try the button again Only when Auto Clock is set 3 Press ACTION TIME ZONE ADJUST returns to 0 if clock is set manually I F YOU PRESS ACT I ON KEY VCR S OUTPUT CH SWITCHES TO CH 4 PLEASE TUNE YOUR TV TO CH 4 SELECT...

Page 20: ...ape VCR DVD EJECT CH REW SLOW FF SLOW PLAY PAUSE STILL VCR TV STOP REC SPEED Picture interruption may occur with some TVs FF and REW search speed may vary depending on current tape position After 10 minutes in search mode VCR returns to Play mode to protect the tape and the video heads Notes 3 Press REW SLOW or FF SLOW in Stop mode to rewind or fast forward a tape Press STOP to stop a tape Forward...

Page 21: ...CR button on the remote and try the button again Record on a Tape Remove loose or peeling labels from tapes to prevent tape jam Multi Function Display Record using DECK buttons 4 2 Select Channel Press REC to start recording Press STOP EJECT to stop This video recorder equipped with HQ High Quality system is compatible with existing VHS equipment Only use tapes with the mark Only tapes tested and ...

Page 22: ... 1 3 3 7 DVD REW SLOW FF SLOW PLAY PAUSE STILL STOP POWER OPEN CLOSE 10 NUMBER keys VSS MENU SET SELECT TITLE RETURN 1 Press POWER on the remote or DECK Press DVD to select DVD mode 2 If a disc is already inserted go to step 4 Depending on the disc playback may start automatically Press OPEN CLOSE and then place a disc into the disc tray 3 Hold disc by its edges only p 6 with printed side up and u...

Page 23: ...nding operation is prohibited by DECK or the disc Still Picture or Pause Press PAUSE STILL during play Press PLAY to release DVD DECK will enter still picture mode CD DECK will enter pause mode Frame by Frame Picture DVD Press PAUSE STILL in still mode Press PLAY to release Each press advances picture one frame Hold button down for consecutive frame advance Whether pictures are advanced by FRAME o...

Page 24: ...ning for recording time The Timer Indicator lights up on DECK You can set Timer Recording with the power on or off TIMER REC WILL START SOON appears on screen for 2 minutes before Timer Recording starts If DECK is in DVD mode no message appears but the VCR REC Indicator the VCR mode indicator and REC will flash on Multi function Display 2 P DT START STOP CH SPD 1 13 2 00p 3 20p 02 SLP 2 3 4 CANCEL...

Page 25: ... Timer Recording must be set to the Cable Box input channel and Cable Box must be manually set to the desired channel Cable Box power must be left on 2 minutes before Timer Recording is performed PLEASE PREPARE FOR TIMER REC appears and Timer Indicator flashes Be sure a cassette with record tab is loaded and DECK is in Stop mode If a power interruption occurs while programming the timer the timer ...

Page 26: ...nal being received is indicated with a mark while the selected audio mode is indicated with an arrow Receivable Broadcast Types MTS Broadcast VHS Hi Fi Stereo System Equipped with TV Noise Reduction for true MTS reproduction TV Noise Reduction is required for good stereo separation and audio fidelity is a registered trademark and is licensed by Technology Licensing Connection Make the Audio Video ...

Page 27: ...rrow indicates selection Refer to Receivable Broadcast Types on p 26 Arrow indicates selection Select HIFI L R or HIFI L or HIFI R to listen to stereo recordings in stereo sound Select NORMAL for monaural sound Display disappears after 5 seconds Press AUDIO SAP Hi Fi to display audio mode Display disappears after 5 seconds Press AUDIO SAP Hi Fi repeatedly to select desired mode Press AUDIO SAP Hi ...

Page 28: ... listed If your product is not listed then the remote is not compatible with that product Notes 2 Mode Unit DVD VCR TV DVD VCR TV All POWER INPUT NUMBER keys ENTER CH VOL EJECT OPEN CLOSE DISPLAY PLAY STOP FF SLOW REW SLOW VCR TV PAUSE STILL SKIP AUDIO CM ZERO SPEED REC TAPE POSITION PAGE COUNTER RESET After remote is set up you can select VCR DVD or TV for the desired function Press VCR DVD or TV...

Page 29: ...the power manually Panasonic 01 02 Quasar 01 02 RCA 03 GE 03 Zenith 04 Magnavox 05 Sylvania 05 Sharp 06 07 Sony 08 TV Brand Code Numbers Important Notes VCR Operation VCR POWER ENTER NUMBER keys TV DVD Toshiba 09 Sanyo 10 Fisher 10 JVC 11 Hitachi 12 Mitsubishi 07 13 Samsung 14 Gold Star 15 16 17 D4734S K P26 35 040202 p65 2004 02 02 15 13 29 ...

Page 30: ...Stop or Play mode and then press NUMBER keys to select recording number To calculate number see below Press FF SLOW or REW SLOW on the remote to start search Play begins at search end To search forward or back 1 index press FF SLOW or REW SLOW on the remote while screen left is displayed 10 sec To cancel press PLAY or STOP To Calculate Index Number Example 1 To go to rec 2 from rec 4 enter 3 and p...

Page 31: ... playback a recording over and over 3 2 1Press ACTION to display MENU Press to select SET UP VCR and press SET Play repeats at tape end or if unrecorded portion over 30 sec is detected Press ACTION to return to normal screen 4 Press to select REPEAT PLAY and press SET to set ON or OFF Note For repeat play in DVD mode see page 47 To find out the present tape position and amount of tape remaining 1 ...

Page 32: ...SELECT SET SET END ACT I ON SET UP VCR Press ACTION to display MENU Press to select AUTO VCR TV and press SET to set ON or OFF Press ACTION to return to normal screen 4 Note OFF Manual You select VCR or TV mode using the VCR TV button on the remote ON Auto VCR mode is automatically set when VCR is turned on or in Play mode For more on VCR TV selection see Record one station watch another and Selec...

Page 33: ...4 Press to select AUTO SHUT OFF Press SET repeatedly to change shut off time as shown below Press ACTION to return to normal screen Press ACTION to display MENU 2 Press to select SET UP VCR and press SET REPEAT PLAY OFF REMOTE WARN I NG ON AUTO SHUT OFF OFF FRONT DISPLAY ON AUTO VCR TV ON TAPE SELECT T 120 SELECT SET SET END ACT I ON SET UP VCR OFF 2 Hours 6 Hours 4 Hours The shut off countdown wi...

Page 34: ...ENU SET UP VCR SET UP CLOCK SET UP CHANNEL IDIOMA LANGUE ENGLISH VCR S OUTPUT CH 3 Multi Function Display Front Display can be set to ON OFF 4 3 1 ON When set to ON Multi Function Display is displayed OFF When set to OFF Multi Function Display is not displayed If a Timer Program is set Multi Function Display is displayed Press ACTION to display MENU Press to select FRONT DISPLAY and press SET to s...

Page 35: ...py Guard will result in poor quality recordings Connection Press STOP to stop dubbing Press PLAY then PAUSE immediately to enter PLAY PAUSE mode The operation of steps 4 and 5 must be done on the playing and recording VCRs at the same time Connect VIDEO OUT terminal on Playing VCR to VIDEO IN terminal on DECK To monitor the dubbing also connect TV as shown Connect L and R AUDIO OUT terminals on Pl...

Page 36: ... at the Settings for DVD Operation See p 52 Press SUB TITLE or NUMBER keys to select a desired language Subtitle Language DVD only Display disappears after 5 seconds When no subtitles are offered will be displayed instead of the language number Press SUB TITLE in Play mode to display the subtitle selection on screen You can change the audio soundtrack language selected at the Settings for DVD Oper...

Page 37: ...e 2 Press to select VOCAL and press AUDIO or to select as shown below Number of angle being played back You can enlarge specific portions of a picture and select the zoom ratio using the ZOOM button during DVD playback Press ZOOM repeatedly to change display as follows Picture Zoom DVD only You can enlarge the center portion of the image to one of 2 magnifications The subtitle cannot be enlarged o...

Page 38: ...isplay DVD MENU Press or NUMBER keys to select an item and press SET or PLAY to perform DVD Menu DVD only 2 Press or NUMBER keys to select a title and press SET or PLAY to start playing Disc Operation continued Pressing SET or PLAY is not necessary when using NUMBER keys Example Example Example TITLE MENU Castles Lovers Dogs Birds TITLE MENU Castles Lovers Dogs Birds DVD MENU 3 ANGLE 1 SUBTITLE 2 ...

Page 39: ...Y SELECT SET SET END ACTION DISC PROGRAM 1 6 11 16 5 8 2 7 12 17 15 6 3 8 13 18 1 13 4 9 14 19 3 2 5 10 15 20 2 CLEAR LAST CLEAR ALL START Notes Program Repeat Play CD only 4 Press SET to enter Select mode Cursor move to OFF 5 Press to select DISC DECK Information Screen DECK Information Screen 1 Do operation steps 1 through 5 at left on this page 2 Press DISPLAY to display Disc Information screen...

Page 40: ...ND ACTION DISC LANGUAGES AUDIO OUTPUT ST I LL MODE AUTO TV MODE 4 3 P a n S c a n PROGRESSIVE OUT OFF PLAY MODE Press to select RANDOM PLAY and press SET to begin random play To cancel press STOP during play then press CLEAR 3 PLAY MODE SELECT SET SET END ACTION PROGRAM PLAY RANDOM PLAY Ready Checklist DECK is in DVD mode press DVD STOP CLEAR ACTION SET SELECT D4734S K P36 64 040202 p65 2004 02 02...

Page 41: ...is pressed Some DVD Low volume level VOLUME ADJUST OFF Volume is at the original level VOLUME ADJUST ON Volume level is increased when played back Some DVDs are recorded in lower than average volume levels For these DVDs this DECK can be set so that the average volume is increased automatically While settings can be made with all discs they may have no effect with some discs Please set as you pref...

Page 42: ...corded titles is displayed Simply select a title number and start playback Operation can vary with disc used Direct Navigator Pressing SET or PLAY is not necessary when using NUMBER keys Program No Titles Recording time length Recording time and date Page No Input Example Using NUMBER keys starts playing automatically The number of available titles varies with each disc 1 digit number 1 1 2 digit ...

Page 43: ...Example Using NUMBER keys starts playing automatically The number of available titles varies with each disc 1 digit number 1 1 2 digit number 12 10 1 2 3 Press PLAY LIST to clear Play List menu Play List No Established time length Example Titles of Direct Navigator and Play List cannot be changed using this DECK With Direct Navigator up to 99 programs can be displayed With Play List up to 99 title...

Page 44: ...ble If the number entered is not on the disc the entry will have no effect Re enter the correct number For more details refer to the disc operation information To return to normal screen press DISPLAY repeatedly Example of DVD Video Example of DVD RAM When appears on the screen while a button is being operated it means that the corresponding operation is prohibited by DECK or the disc Ready Checkl...

Page 45: ...disc currently inserted is displayed 4 Elapsed playing time The screen may be changed by selecting the elapsed time Select the elapsed playing time xx xx xx and press SET Change the elapsed time by pressing NUMBER keys Enter time starting with seconds If the time entered is not on the disc the entry will have no effect Re enter the correct time e g press 0 1 2 3 4 5 SET for 01 23 45 press 3 0 SET ...

Page 46: ...x xx and press SET Change the elapsed time by pressing NUMBER keys Enter time starting with seconds If the time entered is not on the disc the entry will have no effect Re enter the correct time e g press 0 1 2 3 4 5 SET for 01 23 45 press 3 0 SET for 00 00 30 This function does not work with some discs 1 2 3 1 2 3 Direct Navigation PROGRAM PLAY LIST DVD Operation using On Screen Displays continue...

Page 47: ... desired mode during play by pressing and press SET 3 Play mode CD only See p 39 40 When Play mode is set p 39 40 the mode name is displayed 1 2 3 PROGRAM PLAY program play RANDOM PLAY random play normal play DVD Operation SET SELECT 1 Operating mode The current operation is displayed For repeat play in VCR mode see p 31 Note Important if a remote control button does not work when pressed press th...

Page 48: ...ntinued CHAPTER TITLE REPEAT PLAY DVD Video For your reference Important if a remote control button does not work when pressed press the DVD button on the remote and try the button again PROGRAM DISC REPEAT PLAY DVD RAM PROGRAM PLAY LIST ALL PLAY LIST REPEAT PLAY DVD RAM PLAY LIST OPEN CLOSE POWER FF PAUSE STOP PLAY NUMBER keys ACTION SET SELECT REW track track track TRACK REPEAT DISC REPEAT NORMA...

Page 49: ...A file During STOP mode Press SET or PLAY to start playback a b c d Press OPEN CLOSE to eject the disc The MP3 WMA JPEG MENU is closed automatically Press STOP to stop play Do steps 1 3 at left PLAY MODE NORMAL All MP3 WMA files are selected and played back one time only SINGLE REPEAT The selected MP3 WMA file is played back repeatedly FOLDER REPEAT The MP3 WMA files contained in the selected fold...

Page 50: ...JPEG MENU See p 49 Still picture Press STILL only SLIDE Press PLAY to release Forward Reverse File Skip Press SKIP or SKIP Each press skips a file Example REW SLOW FF SLOW Operation can be done when files are in order such as in the diagram below REW SLOW FF SLOW ROOT AAA DDD TTT UUU VVV WWW ZZZ 01 PIC Some JPEG format may not be played back Note Press STOP to return to the MP3 WMA JPEG MENU PLAY ...

Page 51: ...son multimedia REW SLOW FF SLOW PLAY STILL STOP SET SELECT ACTION ZOOM ANGLE SKIP SKIP JPEG Rotation Set rotation Press ANGLE repeatedly to change display as below Press STOP to return the MP3 WMA JPEG MENU During JPEG Playback You can rotate a JPEG picture using the ANGLE button on the remote during JPEG Playback screen The JPEG picture will be rotated 90 clockwise Operation can be done during Zo...

Page 52: ... on the disc can be set If a language not offered is set the original disc language will be selected AUDIO OUTPUT See p 53 You can set the audio output that comes from the digital audio output terminal STILL MODE See p 54 To select FIELD Field still or FRAME Frame still to prevent jitter or make small text or fine patterns clearly visible in a still picture When AUTO is set FIELD or FRAME is selec...

Page 53: ...hat doesn t have a built in Dolby Digital decoder dts selections Bitstream DTS bitstream is output Factory preset PCM When you have connected an amplifier that doesn t have a built in DTS decoder DRC Dynamic Range Compression selections OFF Normal audio range is selected Factory preset ON For dynamic sound even at low volume this is useful for late night listening Dolby Digital DVDs only Press to ...

Page 54: ... in Pan Scan will play in letterbox style 4 3 Letterbox Wide screen video data is played in Letterbox style top and bottom of screen has black margin 16 9 Set 16 9 when using Wide screen TV Set the screen display style for wide screen video material playback Set to reduce jitter in a displayed still picture or a motion picture 3 Press ACTION to exit this mode Press ACTION to exit this mode 3 Press...

Page 55: ...D MAIN MENU SELECT SET SET END ACTION DISC LANGUAGES AUDIO OUTPUT ST I LL MODE AUTO TV MODE 4 3 P a n S c a n PROGRESSIVE OUT OFF Notes If the television is not progressive compatible a progressive scan picture is not available Connect the Video Output or S Video Output connector see p 12 13 and set PROGRESSIVE OUT to OFF CONSUMERS SHOULD NOTE THAT NOT ALL HIGH DEFINITION TELEVISION SETS ARE FULLY...

Page 56: ...bi 8076 Polish 8083 Pashto Pushto 8084 Portuguese 8185 Quechua 8277 Rhaeto Romance 8279 Romanian 8285 Russian 8365 Sanskrit 8368 Sindhi 8372 Serbo Croatian 8373 Singhalese Code Language 8375 Slovak 8376 Slovenian 8377 Samoan 8378 Shona 8379 Somali 8381 Albanian 8382 Serbian 8385 Sundanese 8386 Swedish 8387 Swahili 8465 Tamil 8469 Telugu 8471 Tajik 8472 Thai 8473 Tigrinya 8475 Turkmen 8476 Tagalog ...

Page 57: ... or tape is at its end 2 minutes before a Timer Recording is about to begin If you press REC on the remote control or DECK and a cassette is inserted with no record tab If you press PLAY FF REW or REC on the remote control or DECK without a cassette inserted If you press STOP or POWER during a Timer Recording visible in VCR mode only If head cleaning becomes necessary while playing back a tape If ...

Page 58: ... on and tuned to channel to be recorded Set recording start stop times correctly p 24 Timer recording may not be performed or continued if a power interruption occurs before or during a Timer Recording even after power is restored Select channel 3 or 4 on TV to match VCR output channel 3 or 4 p 16 or select LINE Set VCR TV selector to VCR Adjust TRACKING control in either direction p 4 Try Head Cl...

Page 59: ... p 9 DVD CD Play fails to start even when PLAY is pressed Picture is distorted during rapid advance or rapid reverse No Forward Reverse Scene Search play Solution This DECK cannot play discs other than DVDs and CDs The disc may be dirty and require cleaning The picture will be somewhat distorted at times this is normal Some discs may have sections which prohibit Forward Reverse Scene Search p 23 A...

Page 60: ...ity or detracts from the performance nor does it cover any product which is used commercially Dry cell batteries are also excluded from coverage under this warranty This warranty is extended to the original end user purchaser only A purchase receipt or other proof of date of original purchase is required before warranty service is performed THIS EXPRESS LIMITED WARRANTY IS IN LIEU OF ALL OTHER WAR...

Page 61: ...y insured and preferably in the original carton Include details of the defect claimed and proof of date of original purchase Telephone 905 624 5505 Fax 905 238 2360 Web www panasonic ca Richmond British Columbia Panasonic Canada Inc 12111 Riverside Way Richmond BC V6W 1K8 Tel 604 278 4211 Fax 604 278 5627 Calgary Alberta Panasonic Canada Inc 6835 8th St N E Calgary AB T2E 7H7 Tel 403 295 3955 Fax ...

Page 62: ...ation of Controls Remote DECK 8 10 MMulti Brand Control 28 29 Multi Function Display Front Display ON OFF Feature 34 O On Screen Displays VCR 11 One Touch Recording 21 DECK VCR P PLAY button Playback a Tape 8 20 POWER button 8 PROG button PROGRAM 8 24 Program Clear Review Replace 25 Q Quality Picture 4 R REC button Record on a Tape 8 21 Record Tab 6 Remote Sensor 9 Remote Warning 34 Repeat Play 31...

Page 63: ... Viewing 37 O OPEN CLOSE button 8 22 Optical Digital Audio Output 10 15 P PLAY button Play a Disc 8 22 Play List 43 Program Play For CD 39 Progressive Scan 10 13 55 DVD R Random Play For CD 40 Repeat Play 47 48 Resume Function 23 RETURN button 8 22 Rotation 51 S SKIP l or SKIP l button Forward Reverse Chapter Track 8 23 Slide show 50 SLOW SLOW button Slow Motion Picture 8 23 STILL PAUSE button Sti...

Page 64: ...24 8447 Calgary 6835 8th Street N E Calgary Alberta T2E 7H7 403 295 3955 Vancouver 12111 Riverside Way Richmond BC V6W 1K8 604 278 4211 Panasonic Canada Inc 5770 Ambler Drive Mississauga Ontario L4W 2T3 905 624 5010 www panasonic ca K Printed in Indonesia LSQT0828 A S0104 1024 D4734S K P36 64 040202 p65 2004 02 02 15 13 64 ...

Page 65: ...ultérieure Pour de l aide composez le 1 800 561 5505 ou visitez notre site Internet à www panasonic ca Réglage initial Raccordements Fonctions de base Fonctions du magnétoscope Fonctions du DVD Références LSQT0828 A À titre de participant au programme ENERGY STAR Panasonic assure que cet appareil ou ce modèle satisfait aux normes d efficacité énergétique du programme Lecture multiformat La capacit...

Page 66: ...ériode prolongée débrancher tout équipement des prises de courant ainsi que l antenne ou le câble 4 Avec l appareil branché Ne jamais exposer l appareil à la pluie et le protéger de l eau NE PAS UTILISER l appareil si un liquide a été répandu à l intérieur Le débrancher immédiatement et le faire vérifier par un technicien qualifié Le déversement d un liquide à l intérieur de l appareil peut causer...

Page 67: ...VISIBLE LEQUEL PEUT CAUSER DES RADIATIONS DANGEREUSES SE CONFORMER AUX INSTRUCTIONS DU PRÉSENT MANUEL LORSQUE CET APPAREIL EST BRANCHÉ SUR LE SECTEUR NE PAS APPROCHER LES YEUX DE L OUVERTURE DU PLATEAU DU DISQUE NI DES AUTRES OUVERTURES POUR REGARDER À L INTÉRIEUR DE L APPAREIL L UTILISATION DE COMMANDES OU LE RECOURS À DES RÉGLAGES AUTRES QUE CEUX INDIQUÉS DANS CE MANUEL PEUVENT PRÉSENTER DES RIS...

Page 68: ... le centre de service Panasonic agréé le plus près voir page 61 LE NETTOYAGE DES TETES PEUT ETRE NECESSA I RE I NSERER UNE CASSETTE DE NETTOYAGE OU CONSULTER LE MANUEL F I N PLAY Réglage numérique automatique de l image Cette fonction contrôle automatiquement le signal de sortie vidéo en vue de réduire la distorsion selon l état de la bande Pistage numérique automatique Cette fonction analyse cons...

Page 69: ... DVD Magnétoscope Avertissements et directives 57 Guide de dépannage 58 59 Garantie 60 Liste des centres de service 61 Index 62 63 DVD Magnétoscope Importantes mesures de sécurité 2 3 Avantl utilisation 4 Informations Appareil disque cassette 6 7 Emplacement des commandes 8 10 Affichages à l écran et sur le combiné 11 Raccordements 12 15 Raccordements réglage initial Prêt pour la lecture 16 17 Mag...

Page 70: ...umide eau seulement Pour essuyer les disques toujours déplacer le chiffon de l orifice central vers le bord extérieur Si les disques sont essuyés suivant un mouvement circulaire cela risque de provoquer des rayures circulaires qui engendreront des parasites DVD RAM DVD R Nettoyer uniquement avec un nettoyeur pour disque DVD RAM Ne jamais utiliser de tissus nettoyeurs pour CD etc Plateau du disque ...

Page 71: ...e de la touche d angle ANGLE Le voyant ANGLE s allume sur le combiné lorsqu une scène enregistrée sous plusieurs angles est détectée Numéro de chapitre Ces numéros sont enregistrés sur les disques DVD Un titre est subdivisé en plusieurs sections chacune ayant un numéro et il est possible de repérer rapidement des passages spécifiques d une présentation vidéo à l aide de ces numéros DVD Ce terme re...

Page 72: ... p 37 Sous titres p 36 Titre Direct Navigator Navigateur direct p 38 42 Mode d entrée p 35 Enregistrement p 21 Affichage p 11 44 Vitesse p 21 Sélecteur magnétoscope télé p 21 Mode téléviseur p 28 Syntonisation Pistage balayage vertical 10 p 4 21 22 Menu Play List Liste de lecture p 38 43 Augmentation diminution du volume p 28 Sélection Saut Saut p 23 Mode DVD p 28 Lecture p 20 22 Rendu ambiophoniq...

Page 73: ...ombiné 2 1 3 Refaire le Réglage initial Prêt pour lecture page 16 Si le disque ne peut être éjecté Couper d abord le contact Introduire ensuite une petite tige rigide un trombone déplié par exemple dans l orifice sous le plateau Le plateau devrait se dégager Il est alors possible de tirer le plateau et de retirer le disque Plus de 2 pouces de long Arrêt Éjection p 20 Lecture p 20 Interrupteur Plat...

Page 74: ... acheminé à la prise de sortie de signal composante vidéo Nota L image à l écran du téléviseur peut ne plus être centrée lors du balayage progressif Dans ce cas faire les ajustements nécessaires sur le téléviseur Consulter le manuel d utilisation du téléviseur Dans le cas où le téléviseur ne serait pas compatible avec le balayage progressif l image à balayage progressif ne pourra être affichée Uti...

Page 75: ...scope Indicateur haute fidélité Apparaît lorsque le signal haute fidélité est présent en mode lecture Indicateur d angle S allume lorsqu une scène enregistrée sous plusieurs angles de prise de vue est détectée Voir p 37 DVD seulement Affichage de l horloge état canal vitesse de défilement Affiche l heure du jour Affiche brièvement l état de l appareil sur pression d une touche de fonction un numér...

Page 76: ...Téléviseur Câble AV vendu séparément 2 Relier le combiné au téléviseur à l aide du câble coaxial RF Câble coaxial RF fourni a b RÉCEPTEUR DSS OUT IN IN Note à l intention de l installateur du câble Ne pas oublier de rappeler au technicien installant le câble que le Code canadien de l électricité contient des directives quant à la mise à la terre de l installation il précise en outre que le câble d...

Page 77: ... Pour utiliser le mode PROGRESSIVE PROG le téléviseur doit pouvoir accepter et afficher le signal du balayage progressif Consulter le manuel d utilisation du téléviseur Nota DVD Magnétoscope IN IN VIDEO AUDIO R L OUT TÉLÉVISEUR IN 2 IN 1 CÂBLO SÉLECTEUR OUT IN OUT2 OUT1 Séparateur 2 voies CÂBLOSÉLECTEUR OUT Commutateur A B DVD MAGNÉTOSCOPE IN VHF UHF Avec deux câblosélecteurs DVD MAGNÉTOSCOPE CÂBL...

Page 78: ...iné ainsi que les autres appareils à être raccordés hors circuit avant d effectuer les raccordements Ne pas obstruer les orifices de ventilation des appareils et les disposer de façon que l air circule librement Lire les instructions avant d effectuer un raccordement Bien respecter les codes de couleur lors du raccordement des câbles audio et vidéo Raccordement à un amplificateur 2 canaux stéréoph...

Page 79: ...Dolby Digital ou le train de bits DTS est envoyé par le connecteur de sortie audio numérique OPTICAL Si l appareil est raccordé à un récepteur avec décodeur Dolby Digital ou à un récepteur avec décodeur DTS il sera possible de profiter du son d une salle de cinéma dans son salon Un câble audio numérique optique vendu séparément sera nécessaire pour pouvoir utiliser un récepteur avec décodeur Dolby...

Page 80: ...téléviseur puis si le téléviseur est syntonisé sur le canal 3 essayer le canal 4 Avant de changer le canal de sortie du magnétoscope se reporter à la section du canal de sortie à la page 19 Pour modifier la sélection de la langue d affichage se reporter à la section Réinitialisation de toutes les fonctions en mémoire à la page 9 Réglage initial Prêt pour la lecture 2 1 Suite à la page suivante SEL...

Page 81: ...de réglage de l horloge Appuyer sur pour sélectionner le mois puis sur SET pour régler De la même manière sélectionner et régler la date l année l heure et l heure avancée d été Appuyer sur ACTION pour activer l horloge et quitter Réglage manuel de l horloge 1 2 3 Réglage initial Raccordements Important Si une touche de la télécommande ne fonctionne pas appuyer sur la touche VCR de la télécommande...

Page 82: ...2 Appuyer sur ACTION pour afficher le menu 1 Appuyer sur pour sélectionner REGLAGE CANAL puis appuyer sur SET 1 Appuyer sur pour sélectionner REGLAGE HORLOGE puis appuyer sur SET Les touches de programmation de la télécommande ne sont pas fonctionnelles lorsque les sorties COMPONENT VIDEO OUT ou S VIDEO OUT sont utilisées Sélectionner RF INPUT ou VIDEO INPUT sur le téléviseur et appuyer sur PROG 2...

Page 83: ...uppression d un canal Pour ajouter un canal Sélectionner le canal au moyen des touches numériques puis appuyer sur ADD DLT Pour supprimer un canal Sélectionner le canal au moyen des touches CH ou des touches numériques puis appuyer sur ADD DLT Réglageautomatiqueà l heureavancée d été Ce combiné permet le réglage automatique de l horloge à l heure avancée voir à la page 17 Au printemps Premier dima...

Page 84: ...téristiques offrent de meilleurs résultats en modes SP ou SLP Le son sera mis en sourdine Pour réduire la distorsion se reporter à la section Commande de pistage manuel à la page 4 Après 3 minutes en mode arrêt sur image ou ralenti l appareil passe en mode arrêt pour protéger la bande et les têtes vidéo Nota Nota 3 Appuyer sur STOP pour interrompre la lecture Arrêt sur image Appuyer sur PAUSE STIL...

Page 85: ...rement sur bande Insérer un disque pendant un enregistrement Appuyer sur DVD puis sur PLAY La vitesse sélectionnée est confirmée à l écran du téléviseur et sur l afficheur multifonction Pour ne pas enregistrer certains passages appuyer sur PAUSE STILL pour interrompre l enregistrement et appuyer de nouveau pour poursuivre l enregistrement ll n est pas possible de visionner un autre canal durant un...

Page 86: ...es touches numériques amorce automatiquement la lecture 6 7 Appuyer sur STOP pour arrêter la lecture Appuyer sur OPEN CLOSE pour éjecter le disque 1 DVD interactif Peut comporter un choix d angles de prises de vue de scénarios etc Tenir le disque par ses bords page 6 côté imprimé sur le dessus et le placer sur le plateau en se servant des guides de position Le plateau accepte les disques de 8 cm 3...

Page 87: ...hera pas Toutefois la fonction de poursuite sera disponible Fonction de poursuite Renduambiophoniquevirtuel V S S Les effets ambiophoniques ne sont disponibles que dans le mode DVD S il y a lieu désactiver les circuits d effets ambiophoniques sur les autres appareils Avec certains disques le circuit VSS n aura aucun effet ou pourrait ne pas fonctionner adéquatement Désactiver le circuit VSS si cel...

Page 88: ... de programmation Appuyer sur PROG pour mettre fin à la programmation 3 Pour les autres paramètres appuyer sur SET pour régler les heures de DÉBUT et de FIN le canal CA ou l entrée LIGNE voir page 35 et la vitesse de défilement SP SLP Puis appuyer sur pour sélectionner 1 Appuyer sur pour régler 2 Pour programmer la DATE d enregistrement appuyer sur pour sélectionner 1 31 une fois ou QUOTIDIEN LUN ...

Page 89: ...endant un enregistrement ou la lecture l enregistrement différé n a pas lieu Appuyer sur PROG pour afficher l écran de programmation 4 Fonctions du magnétoscope Important Si une touche de la télécommande ne fonctionne pas appuyer sur la touche VCR de la télécommande et essayer à nouveau Révision modification ou annulation de la programmation Aucunenregistrementencours Remplacement d un programme A...

Page 90: ...econde langue peut être captée Sélectionner STEREO ou 2 VOIE Émission multivoie stéréo Transmission multivoie de signaux sonores en télévision Sélectionner le mode audio STEREO Si le signal stéréophonique est faible et que l affichage scintille il est recommandé de sélectionner le mode MONO pour obtenir une meilleure réception 2 VOIE Voie audio secondaire Émission comportant une deuxième voie audi...

Page 91: ...eporter à la section Types de signaux de télédiffusion Voir à la page 26 La flèche indique la sélection Sélectionner HIFI G D ou HIFI G ou HIFI D pour l écoute des enregistrements faits en stéréophonie ou NORMAL pour ceux en monophonie L affichage disparaît après 5 secondes 1 2 3 Important Si une touche de la télécommande ne fonctionne pas appuyer sur la touche VCR de la télécommande et essayer à ...

Page 92: ...seurs des marques listées Si l appareil ne répond pas aux commandes ce modèle ne peut pas être commandé par la télécommande 2 Programmation de la fonction de commande multimarque Suite à la programmation de la télécommande il est possible de sélectionner le mode magnétoscope DVD ou téléviseur selon l appareil à actionner Utilisation de la télécommande multimarque Appuyer sur la touche VCR DVD ou T...

Page 93: ...d Star 15 16 17 Fonctions du magnétoscope Touches numériques Mode téléviseur Interrupteur Certains fabricants utilisent plusieurs codes pour une même marque Si l appareil ne répond pas avec le premier code essayer avec le code suivant Il est possible qu il soit nécessaire d établir manuellement le contact sur certains téléviseurs Nota Entrée Mode DVD Mode magnétoscope PV D4734S K F P26 35 040202 p...

Page 94: ...mmande pendant l affichage de l écran illustré ci contre 10 secondes 6 1 5 7 2 3 4 1 7 5 3 4 6 2 Recherche de programme par index 1 2 Pour annuler appuyer sur PLAY ou STOP Si une recherche de programme par index est lancée à proximité d un signal d index il est possible que ce signal ne soit pas pris en compte Nota Saut de pauses publicitaires Il est possible de sauter de 1 à 3 minutes d enregistr...

Page 95: ...a durée restante en fonction de la vitesse de défilement s affichent La durée restante affichée peut ne pas être exacte Affichage de position de la bande et de la durée restante 2 Appuyer sur TAPE POSITION pour détecter la position actuelle de la bande Appuyer surTAPE POSITION ou attendre 5 secondes pour revenir à l écran normal Pour connaître la position actuelle de la bande et la durée restante ...

Page 96: ...sion pendant le visionnement d une autre et Sélectionner les canaux sur le combiné à la page 21 NON manuelle Pour la sélection du mode magnétoscope ou télé avec la touche VCR TV de la télécommande OUI automatique Pour la sélection automatique du mode magnétoscope lors de la mise en marche du magnétoscope ou en mode lecture 4 Appuyer sur ACTION pour revenir à l écran normal Nota Activation En mode ...

Page 97: ...n est pas possible durant la lecture ou l enregistrement Nota Appuyer sur ACTION pour afficher le menu Appuyer sur pour sélectionner REGLAGE CANAL puis appuyer sur SET Appuyer sur pour sélectionner AVIS SIGNAL FAIBLE puis appuyer sur SET pour sélectionner OUI ou NON Appuyer sur ACTION pour revenir à l écran normal Appuyer sur ACTION pour revenir à l écran normal Appuyer sur pour sélectionner REGLA...

Page 98: ...sage d erreur ne s affiche dans le cas où une touche non valide serait pressée Appuyer sur ACTION pour revenir à l écran normal Mode d entrée Action Pause Arrêt sur image Arrêt Réglage Sélection Enregistrement L afficheur multifonction AFFICHEUR peut être activé désactivé 4 3 1 OUI À la position OUI l afficheur multifonction est activé NON À la position NON l afficheur multifonction est désactivé ...

Page 99: ...F UHF OUT Téléviseur OUT VHF UHF DVD Magnétoscope VIDEO AUDIO1 L R Magnétoscope Caméscope HiFi VIDEO AUDIO L R L indication L1 ou L2 s allume sur l afficheur environ 4 secondes lorsque LIGNE1 ou LIGNE2 est sélectionnée LIGNE1 Pour les raccordements audio vidéo à l arrière de l appareil LIGNE2 Pour les raccordements audio vidéo à l avant de l appareil 1 2 Relier la prise VIDEO OUT du magnétoscope d...

Page 100: ... ne change pas c est que le disque utilisé n offre pas le choix de la langue Après le retrait du disque la langue réglée initialement pour les sous titres est automatiquement sélectionnée Si cette langue n est pas disponible sur le disque la langue définie comme étant la langue prioritaire du disque est sélectionnée Avec un disque DVD RAM le sous titrage ne peut être qu activé ou désactivé Il n es...

Page 101: ...électionnant un des deux taux disponibles Utiliser les touches et pour déplacer la position vers le haut le bas la gauche ou la droite X 1 0 grandeur originale 1re pression 2e pression 3e pression X 1 5 ZOOM 1 X 2 0 ZOOM 2 Bonjour Bonjour Bonjour Bonjour ZOOM 1 ZOOM 1 ZOOM 2 ZOOM 2 Bonjour Bonjour Important Si une touche de la télécommande ne fonctionne pas appuyer sur la touche DVD de la télécomm...

Page 102: ...varier les instructions suivantes devraient s appliquer à toutes les situations Appuyer sur MENU en mode lecture pour afficher le menu du disque DVD MENU DVD 3 ANGLE 1 SOUS TITRE 2 AUDIO MENU DVD 3 ANGLE 1 SOUS TITRE 2 AUDIO Appuyer sur ou sur les touches numériques pour sélectionner un titre Appuyer sur SET ou PLAY pour amorcer la lecture Lors de l utilisation des touches numériques il n est pas ...

Page 103: ...plage programmée Appuyer sur pour amener le curseur sur EFFACER DERNIERE puis appuyer sur SET La touche CLEAR de la télécommande permet également de supprimer la dernière plage programmée Pour supprimer tous les programmes Appuyer sur pour amener le curseur sur EFFACER TOUT puis appuyer sur SET Les programmes sont également supprimés après coupure du contact ou retrait du disque Nota Effectuer les...

Page 104: ...ION pour afficher le menu Appuyer sur pour sélectionner MODE DE LECTURE Appuyer sur SET pour afficher Appuyer sur pour sélectionner LECTURE ALEATOIRE Appuyer sur SET pour amorcer la lecture dans un ordre aléatoire Pour annuler appuyer sur STOP pendant la lecture puis sur CLEAR MODE DE LECTURE SEL REGLER SET FIN ACTION Action Arrêt Effacement Réglage Sélection PV D4734S K F P36 64 040202 p65 2004 0...

Page 105: ...ée ON oui Volume monté à la lecture Fonctions du DVD À ON oui Pendant la lecture d un DVD le volume moyen est augmenté À OFF non Le niveau du volume enregistré sur le disque demeure inchangé Bien que ces paramétrages puissent être effectués avec tous les disques il se peut qu ils n aient aucun effet sur certains disques Établir les paramètres selon les préférences Lorsque des appareils audio sont ...

Page 106: ...ppuyer sur pour sélectionner un titre No de programme Puis appuyer sur SET ou PLAY pour lancer la lecture Si le DVD RAM utilisé comporte la fonction de Navigateur direct une liste des titres enregistrés s affiche Il suffit de sélectionner un titre et de lancer la lecture L opération peut varier selon le disque utilisé Direct Navigator Navigateur direct Lors de l utilisation des touches numériques ...

Page 107: ...ur direct ne peuvent être affichés et ce même si la touche TITLE ou MENU a été pressée Lorsque apparaît sur l écran lors d une pression sur une touche cela signifie que l action correspondante n est pas possible sur le disque ou sur le combiné Important Si une touche de la télécommande ne fonctionne pas appuyer sur la touche DVD de la télécommande et essayer à nouveau 2 Appuyer sur pour sélectionn...

Page 108: ...voir pages 44 48 Appuyer sur ou pour sélectionner une rubrique Appuyer sur SET pour régler Appuyer sur ou les touches numériques pour sélectionner le réglage puis appuyer sur SET Lorsque des numéros sont affichés numéro de titre etc il est également possible d utiliser les touches numériques Si le numéro entré ne correspond à aucune entité sur le disque la saisie n aura aucun effet Entrer le bon n...

Page 109: ...an en sélectionnant la durée écoulée Sélectionner la durée de lecture écoulée xx xx xx et appuyer sur SET Changer l indication de la durée écoulée au moyen des touches numériques Entrer la durée en commençant par les chiffres des secondes Si le temps entré ne correspond pas aux données sur le disque le réglage n aura aucun effet Recommencer le réglage Exemple pour 01 23 45 appuyer sur 0 1 2 3 4 5 ...

Page 110: ...e Sélectionner la durée de lecture écoulée xx xx xx et appuyer sur SET Changer l indication de la durée écoulée au moyen des touches numériques Entrer la durée en commençant par les chiffres des secondes Si le temps entré ne correspond pas aux données sur le disque le réglage n aura aucun effet Recommencer le réglage Exemple pour 01 23 45 appuyer sur 0 1 2 3 4 5 SET pour 00 00 30 appuyer sur 3 0 S...

Page 111: ...ture programmée Lecture aléatoire Lecture normale LECTURE REPRISE NON 2 REGLER SET FIN DISPLAY LECTURE REPRISE DISQUE LECTURE ALEATOIRE 3 Nota Pour la lecture en reprise en mode magnétoscope voir à la page 31 Réglage Sélection 1 1 Mode d opération Le mode d opération courant s affiche Mode de lecture en reprise DVD Vidéo CHAPITRE TITRE NON normal DVD RAM PROGRAMME PROGRAMME DISQUE NON normal PLAY ...

Page 112: ...rrupteur Lecture en reprise d un chapitre ou d un titre DVD Vidéo TITRE chapitre chapitre chapitre REPRISE DE CHAPITRE REPRISE DE TITRE LECTURE NORMALE Position de lecture Lecture en reprise d une plage ou d un disque CD plage plage plage REPRISE DE PLAGE REPRISE DE DISQUE LECTURE NORMALE Position de lecture Lecture en reprise d un disque ou d un programme DVD RAM PROGRAMME PROGRAMME PROGRAMME PRO...

Page 113: ...our aller à l écran du répertoire précédent 5 Appuyer sur ACTION pour rappeler le menu principal DVD Appuyer de nouveau sur ACTION pour rappeler le menu MP3 WMA JPEG Lecture de fichiers MP3 WMA Recherche avant arrière Appuyer sur FF SLOW ou sur REW SLOW pendant la lecture Appuyer sur PLAY pour annuler La vitesse de recherche lente au début augmente avec chaque pression sur la touche jusqu à 5 pres...

Page 114: ...ge Appuyer sur STILL diaporama seulement Appuyer sur PLAY pour désactiver Saut de fichier avance recul Appuyer sur SKIP ou sur SKIP Sur chaque pression un fichier est sauté Exemple REW SLOW FF SLOW Cette opération peut être effectuée lorsque les fichiers sont dans l ordre comme dans le schéma ci dessous REW SLOW FF SLOW Il se pourrait que certains fichiers JPEG ne puissent être pris en charge Nota...

Page 115: ...MA JPEG Pendant la lecture de fichiers JPEG Il est possible pendant la lecture d un fichier JPEG de tourner une image JPEG à l aide de la touche ANGLE de la télécommande L image est tournée de 90 dans le sens horaire Cette opération peut se faire de pair avec l agrandissement de l image voir plus haut Le rapport hauteur largeur peut varier lors de l affichage d une image ayant subi une rotation Fo...

Page 116: ...r Le paramétrage demeure en mémoire même après coupure du contact jusqu à ce qu il soit modifié Cela signifie que le combiné fonctionne toujours selon les mêmes paramètres surtout avec des disques DVD Liste des préparatifs S assurer que le combiné est en mode DVD en appuyant sur DVD Sélections AUDIO Réglage d usine Anglais Pour sélectionner la langue des dialogues Français Espagnol Anglais Japonai...

Page 117: ...ns DRC NON Dynamique normale Réglage d usine OUI Pour un rendu dynamique même à faible volume utile pour une écoute nocturne DVD Dolby Digital seulement Appuyer sur ACTION pour rappeler le menu du DVD et passer à l étape 2 pour définir un autre paramètre Ou appuyer sur ACTION à deux reprises pour quitter Effectuer le paramétrage en fonction du type d amplificateur raccordé à la prise de sortie aud...

Page 118: ...ter ce mode Appuyer sur ACTION pour afficher le menu Appuyer sur pour sélectionner TYPE D ECRAN Appuyer sur SET à répétition pour sélectionner le mode Voir ci dessous 2 Pan Scan 4 3 Réglage d usine L image grand écran est présentée dans le format Pan Scan les côtés gauche et droit de l image sont rognés Les données vidéo qui ne sont pas dans le format Pan Scan sont lues dans le format Letterbox Le...

Page 119: ...nu principal DVD Dans le cas où le téléviseur ne serait pas compatible avec le balayage progressif l image à balayage progressif ne pourra être affichée Utiliser alors la sortie vidéo ou la sortie S Vidéo p 12 13 et régler le paramètre SORTIE PROGRESSIVE sur NON IL EST À NOTER QUE TOUS LES TÉLÉVISEURS À HAUTE DÉFINITION NE SONT PAS ENTIÈREMENT COMPATIBLES AVEC CET APPAREIL ET DANS CE CAS POURRAIT ...

Page 120: ...5 Panjabi 8076 Polonais 8083 Afghan Pachto 8084 Portugais 8185 Quechua 8277 Rhéto Roman 8279 Roumain 8285 Russe 8365 Sanscrit 8368 Sindhi 8372 Serbo Croate 8373 Singhalais Code Langue 8375 Slovaque 8376 Slovène 8377 Samoan 8378 Shona 8379 Somali 8381 Albanais 8382 Serbe 8385 Soudanais 8386 Suédois 8387 Swahili 8465 Tamoul 8469 Télougou 8471 Tadjik 8472 Thaïlandais 8473 Tigrigna 8475 Turkmène 8476 ...

Page 121: ...it nécessaire Si une touche de fonction autre que STOP EJECT ou POWER est pressée pendant que le combiné est en mode verrouillage du magnétoscope Lors d une pression sur toute touche invalide de la télécommande en mode téléviseur Dans le cas où la touche PLAY est pressée et que le disque lu en mode DVD est sale ou rayé Un disque dont le numéro de région ne correspond pas à celui du combiné a été m...

Page 122: ...nregistrement différé ne puisse commencer ou continuer si le courant est coupé avant ou pendant l enregistrement même si le courant est rétabli par la suite Sélectionner sur le téléviseur le même canal 3 ou 4 p 16 que celui sélectionné comme canal de sortie sur le combiné ou sélectionner LIGNE Mettre le sélecteur VCR TV à VCR Utiliser la commande de pistage TRACKING p 4 Vérifier si le nettoyage de...

Page 123: ... plateau complètement et enlever le disque p 9 DVD CD La lecture ne peut être amorcée même lorsque la touche PLAY est pressée L image est distordue pendant l avance et le recul rapides La recherche de scène avant arrière n est pas possible durant la lecture La langue des dialogues et ou des sous titres ne correspond pas à celle qui a été sélectionnée Aucun sous titre n est affiché Aucune autre lan...

Page 124: ...r l usage pour lequel il a été conçu ou utilisé à des fins commerciales cette garantie devient nulle et sans effet Les piles sèches ne sont pas couvertes sous cette garantie Cette garantie est octroyée à l utilisateur original seulement La facture ou autre preuve de la date d achat original sera exigée pour toute réparation sous le couvert de cette garantie CETTE GARANTIE LIMITÉE ET EXPRESSE REMPL...

Page 125: ...ence dans le carton d origine et l expédier port payé et assuré au centre de service Inclure la description détaillée de la panne et la preuve de la date d achat original N de téléphone 905 624 5505 N de télécopieur 905 238 2360 Site Internet www panasonic ca Richmond Colombie Britannique Panasonic Canada Inc 12111 Riverside Way Richmond BC V6W 1K8 Tél 604 278 4211 Téléc 604 278 5627 Calgary Alber...

Page 126: ...61 MMode audio Lecture enregistrement 27 N Nettoyage des têtes 4 P Piles 4 R Raccordement 12 15 Réception d émissions multivoie Stéréo 2 VOIE Mono 26 Recherche de programme par index 30 Réglage automatique à l heure avancée d été 19 Réglage initial Prêt pour la lecture 16 17 Réinitialisation de toutes les fonctions en mémoire 9 Révision modification ou annulation de la programmation 25 S Saut de p...

Page 127: ...e audio optique numérique 10 15 Prise de sortie vidéo composant 10 13 R Recherche de scène avant arrière 23 Rotation 51 S Saut avant arrière d un chapitre ou d une plage 23 Sélection du type d écran 54 Signal du balayage progressif 10 13 55 Sortie audio Sélection de la sortie sonore 53 T Touche ACTION 8 52 Touche ANGLE 8 37 51 Touche AUDIO 8 36 Touche CLEAR 8 39 50 Touche DISPLAY 8 44 Touche DVD 8...

Page 128: ...8447 Calgary 6835 8th Street N E Calgary Alberta T2E 7H7 403 295 3955 Vancouver 12111 Riverside Way Richmond BC V6W 1K8 604 278 4211 Panasonic Canada Inc 5770 Ambler Drive Mississauga Ontario L4W 2T3 905 624 5010 www panasonic ca K Imprimé en Indonésie LSQT0828 A S0104 1024 PV D4734S K F P36 64 040202 p65 2004 02 02 15 15 64 ...

Reviews: