2. 8. Removal of P-P.C.Board / B-P.C.Board
1. Remove the Top Cover according to the section 2.2 "Removal of Top Cover".
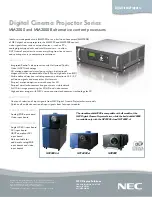
2. Loosen the 2 screws and remove the Lamp unit.
3. Unscrew the 3 screws and remove the Lamp house.
4. Unscrew the 1 screw and remove the Lamp socket.
5. Unscrew the 5 screws and remove the Ballast block.
* Remove the P2 connector.
6. Unscrew the 2 screws and remove the P-P.C.Board.
Lamp house
Lamp socket
Ballast block
P-P.C.Board
XYN3+F6FJ
XTBT969FJK
XTW3+8PFJ
XYN3+F6FJ
DIS-8
Summary of Contents for PT_AT6000E
Page 8: ...1 Name and function 1 1 Projector body Top and front view Back and bottom view INF 2 ...
Page 9: ...1 2 Control Panel 1 3 Rear terminals 1 4 Remote control INF 3 ...
Page 11: ... MENU MENU 2 2 Note The default settings may be different depending on the picture menu INF 5 ...
Page 16: ...4 7 Inquiry commands Refer to Operating Instructions of PT AE8000 PT AT6000 INF 10 ...
Page 75: ......