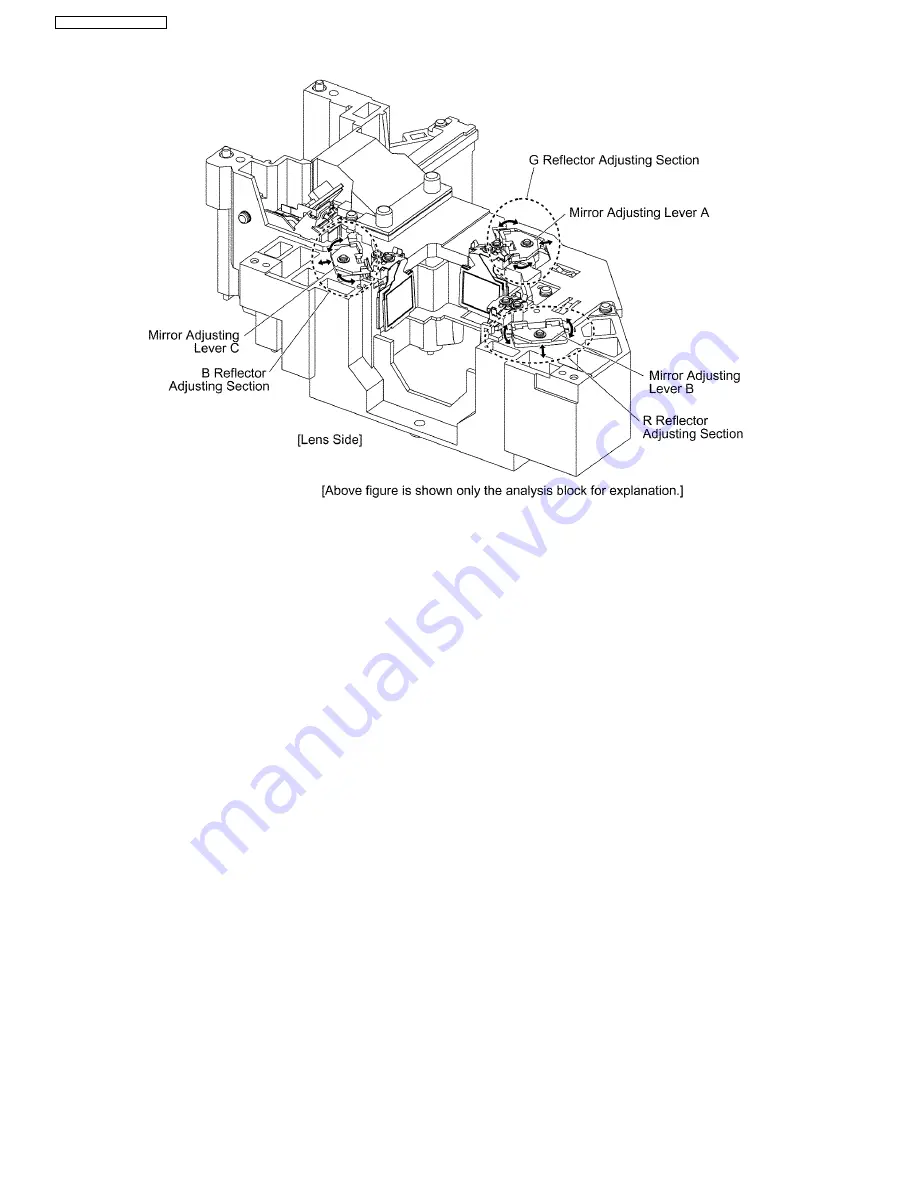
7.4.3.2. G Reflector Adjustment
1. Turn on the power and display 100 % white pattern on the screen.
2. Loosen the 1 screw fixing the mirror adjusting lever A just until the lever can be shifted.
3. Adjust the mirror adjusting lever A position to minimize color unevenness on the screen by shifting the lever in arrow directions.
4. Tighten the 1 screw.
7.4.3.3. R Reflector Adjustment
1. Turn on the power and display 100 % white pattern on the screen.
2. Loosen the 1 screw fixing the mirror adjusting lever B just until the lever can be shifted.
3. Adjust the mirror adjusting lever B position to minimize color unevenness on the screen by shifting the lever in arrow directions.
4. Tighten the 1 screw.
7.4.3.4. B Reflector Adjustment
1. Turn on the power and display 100 % white pattern on the screen.
2. Loosen the 1 screw fixing the mirror adjusting lever C just until the lever can be shifted.
3. Adjust the mirror adjusting lever C position to minimize color unevenness on the screen by shifting the lever in arrow directions.
4. Tighten the 1 screw.
7.5. Software for Adjustment
7.5.1. Outline
·
This projector needs computer-aided adjustments.
·
After the software adjustments, this projector must be turned off and on again to memorize the settings.
·
Connect the cable between the projector and a PC as shown below.
·
Updating the software will change the version number.
26
PT-AE2000U / PT-AE2000E
Summary of Contents for PT-AE2000E
Page 2: ...2 PT AE2000U PT AE2000E ...
Page 3: ...3 PT AE2000U PT AE2000E ...
Page 8: ...3 2 Self Check Display and Contents 8 PT AE2000U PT AE2000E ...
Page 31: ...8 Troubleshooting 31 PT AE2000U PT AE2000E ...
Page 32: ...32 PT AE2000U PT AE2000E ...
Page 33: ...33 PT AE2000U PT AE2000E ...
Page 34: ...34 PT AE2000U PT AE2000E ...
Page 35: ...35 PT AE2000U PT AE2000E ...
Page 36: ...36 PT AE2000U PT AE2000E ...
Page 37: ...37 PT AE2000U PT AE2000E ...
Page 38: ...38 PT AE2000U PT AE2000E ...
Page 39: ...39 PT AE2000U PT AE2000E ...
Page 40: ...40 PT AE2000U PT AE2000E ...
Page 47: ...11 Schematic Diagram PT AE2000U PT AE2000E 47 ...
Page 48: ...11 1 A P C Board 1 8 A P C Board TXANP01VKF5 1 8 PT AE2000U PT AE2000E 48 ...
Page 49: ...11 2 A P C Board 2 8 A P C Board TXANP01VKF5 2 8 PT AE2000U PT AE2000E 49 ...
Page 50: ...11 3 A P C Board 3 8 A P C Board TXANP01VKF5 3 8 PT AE2000U PT AE2000E 50 ...
Page 51: ...11 4 A P C Board 4 8 A P C Board TXANP01VKF5 4 8 PT AE2000U PT AE2000E 51 ...
Page 52: ...11 5 A P C Board 5 8 A P C Board TXANP01VKF5 5 8 PT AE2000U PT AE2000E 52 ...
Page 53: ...11 6 A P C Board 6 8 A P C Board TXANP01VKF5 6 8 PT AE2000U PT AE2000E 53 ...
Page 54: ...11 7 A P C Board 7 8 A P C Board TXANP01VKF5 7 8 PT AE2000U PT AE2000E 54 ...
Page 55: ...11 8 A P C Board 8 8 A P C Board TXANP01VKF5 8 8 PT AE2000U PT AE2000E 55 ...
Page 64: ...PT AE2000U PT AE2000E 64 ...
Page 65: ...13 Terminal guide of ICs and transistors PT AE2000U PT AE2000E 65 ...
Page 66: ...14 Exploded Views PT AE2000U PT AE2000E 66 ...
Page 67: ...PT AE2000U PT AE2000E 67 ...
Page 68: ...PT AE2000U PT AE2000E 68 ...
Page 69: ...PT AE2000U PT AE2000E 69 ...


