background image

Sending Documents

55

Direct Transmission

B

asi

c O

p

er

at

io

ns

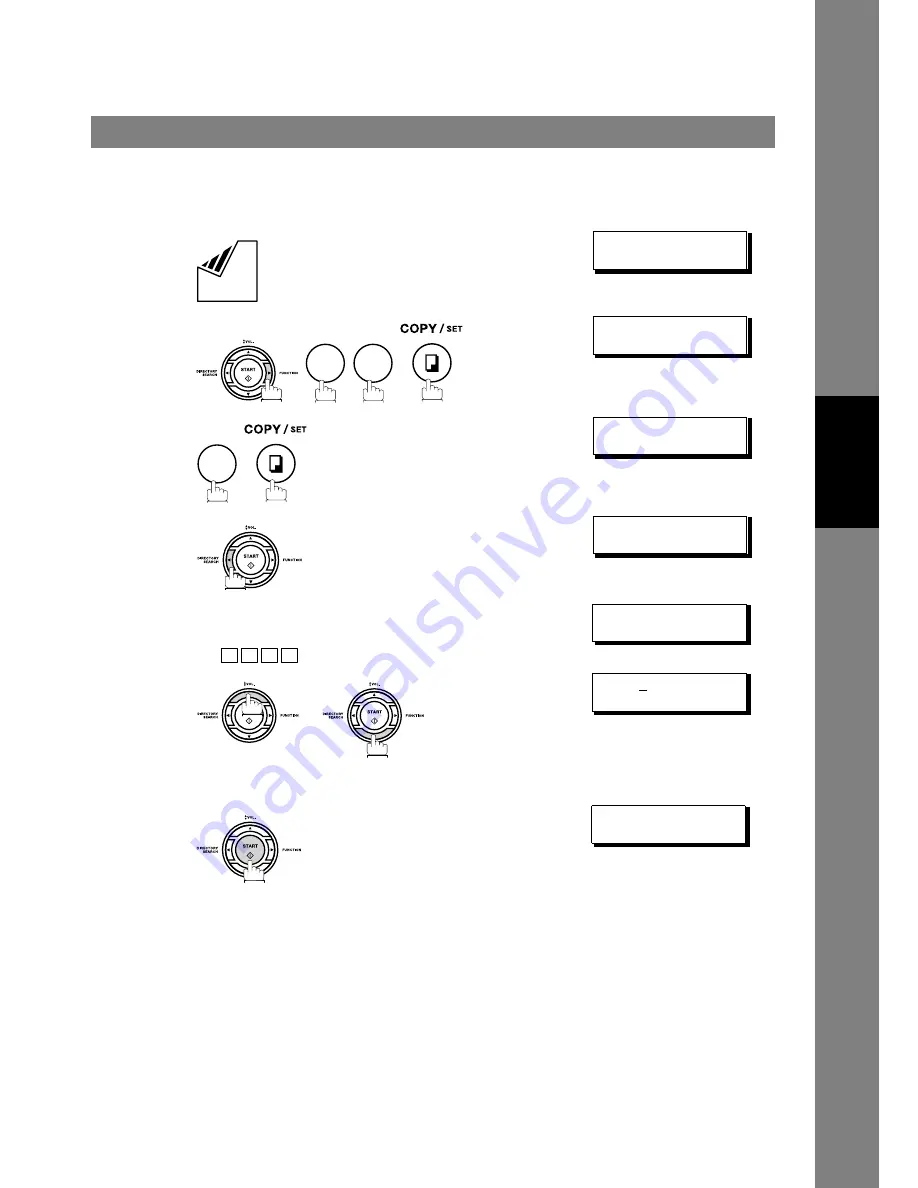
Directory Search Dialling (Direct Transmission)

Directory Search dialling allows you to dial a full telephone number by searching the station name entered in 
One-Touch keys or Abbreviated dialling numbers.

1

 Set document(s) face down.

ENTER STATION(S)
THEN PRESS START 00%

2


MEMORY XMT=ON
1:OFF 2:ON

3


ENTER STATION
                 00%

4

ENTER LETTER(S)

5

Enter the full station name or part of a station name by 
using the Character keys.  (See page 12)

Ex:

 for searching 

PANASONIC

ENTER LETTER(S)
PANA

6

 or 

repeatedly until the display shows the station name you 
want to send to.

[010] PANASONIC
5553456

7

The full number (e.g. 5553456) will be dialled.

* DIALLING *    
PANASONIC

8

9

1

P A N A

Summary of Contents for Panafax UF-5100

Page 1: ...c Operations Advanced Features Network Features Printout Journals and Lists Problem Solving Appendix Operating Instructions Facsimile Model No English Before operating this equipment please read these instructions completely and keep these operating instructions for future reference For Facsimile ...

Page 2: ...venience space is provided below to record information you may need in the future Model No Serial No Date of Purchase Dealer Address Telephone Number Supplies Telephone Number Service Telephone Number Model and Serial Number Copyright 2005 by Panasonic Communications Co Ltd All rights reserved Unauthorized copying and distribution is a violation of law The contents of this Operating Instructions a...

Page 3: ...wer Cord 22 Setting the Dialling Method Tone or Pulse 24 Adjusting the Volume 25 User Parameters 26 General Description 26 Setting the Date and Time 26 Setting Your LOGO 27 Setting Your Character ID 28 Setting Your ID Number Fax Telephone Number 29 One Touch Abbreviated Dialling Numbers 30 Entering One Touch Abbreviated Dialling Numbers 30 Editing One Touch Abbreviated Dialling Numbers 32 Printing...

Page 4: ...nterface Mode 66 Print Reduction 68 Receiving Oversize Documents 69 Substitute Memory Reception 70 Print Collation Mode 70 Making Copies 71 Timer Controlled Communications 72 General Description 72 Deferred Transmission 72 Deferred Polling 73 Polling 74 General Description 74 Setting the Polling Password 74 Preparing to be Polled 75 To Poll Documents from Another Station 76 Program Keys 77 General...

Page 5: ...al Description 93 Setting the RCV To Memory Password 93 Setting RCV To Memory 93 Printing Out Documents 94 Distinctive Ring Detector DRD 95 General Description 95 Fax Cover Sheet 96 General Description 96 To use the Fax Cover Sheet 96 PIN Code Access 98 General Description 98 Selecting the Access Method Prefix or Suffix 98 Dialling with a PIN Code 99 Fax Forward 100 Setting Fax Forward 100 Selecti...

Page 6: ...ocument with Sub address 116 Journals and Lists 117 General Description 117 Transaction Journal 117 Individual Transmission Journal IND XMT JOURNAL 118 Communication Journal COMM JOURNAL 121 One Touch Abbreviated and Directory Search List 123 Program List 126 FAX Parameter List 127 Toner Cartridge Order Forms 128 Troubleshooting 129 Information Codes 133 Clearing a Recording Paper Jam 136 Clearing...

Page 7: ...MAY RESULT IN HAZARDOUS RADIATION EXPOSURE THE MAINS PLUG ON THIS EQUIPMENT MUST BE USED TO DISCONNECT THE MAINS POWER PLEASE ENSURE THAT THE SOCKET OUTLET IS INSTALLED NEAR THE EQUIPMENT AND SHALL BE EASILY ACCESSIBLE MAKE SURE THAT THE MACHINE IS INSTALLED IN A SPACIOUS OR WELL VENTILATED ROOM SO AS NOT TO INCREASE THE AMOUNT OF OZONE IN THE AIR SINCE OZONE IS HEAVIER THAN AIR IT IS RECOMMENDED ...

Page 8: ...sic safety precautions should always be followed to reduce the risk of fire electric shock and injury to persons including the following DO NOT USE THIS PRODUCT NEAR WATER FOR EXAMPLE NEAR A BATH TUB WASH BOWL KITCHEN SINK OR LAUNDRY TUB IN A WET BASEMENT OR NEAR A SWIMMING POOL AVOID USING A TELEPHONE OTHER THAN A CORDLESS TYPE DURING AN ELECTRICAL STORM THERE MAY BE A REMOTE RISK OF ELECTRIC SHO...

Page 9: ...achine Do not install the machine near heating or an air conditioning unit Avoid exposure to direct sunlight Install the machine on a flat surface leave at least 4 inches 10 cm of space between the machine and other objects Do not block the ventilation openings Do not place heavy objects or spill liquids on the machine ...

Page 10: ...vidual XMT Journal 7 Directory Sheet Set Mode 1 User Parameters Date Time Logo Character ID ID Number Fax Telephone Number 2 One Touch Abbreviated Numbers 3 Program Keys 4 Fax Parameters 5 7 Not Used 8 Maintenance Cleaning Printer Roller Toner Order Forms Select Mode 1 Communication Journal OFF ON INC 2 Not Used 3 Cover Sheet OFF ON 4 Password XMT OFF ON 5 RCV to Memory OFF ON 6 8 Not Used 9 Memor...

Page 11: ...untry s regulation or specification Recording Paper Sub Tray Recording Paper Tray Document Sub Tray ADF Door Control Panel Document Return Tray Printer Cover Handset Available as an option see page 146 Recording Paper Cassette Standard 250 sheets Recording Paper Cassette Available as an option see page 146 For UF 6100 only ...

Page 12: ...e into energy saving mode See page 38 Used to set Normal Lighter or Darker See page 42 Used to set Standard Fine Super Fine or Halftone See page 42 Used to turn the verification stamp On or OFF Lights when the verification stamp is set to ON Blinks when the machine is transmitting a document or receiving Lights when trouble occurs Keypad Used for manual number dialling entering phone numbers and n...

Page 13: ...ered station for multi station communication Confirm the current communication modes e g Page number ID Dialled Telephone number File number when the unit is ON LINE One Touch Keys 01 28 Used for One Touch Dialling See pages 49 and 53 Program Keys P1 P4 Used to enter long dialling procedures or Group Dialling Number keys See pages 77 to 82 Character Keys The One Touch Keys and Program Keys are ser...

Page 14: ...of the telephone line cable and power cord may differ depending on each country s regulation or specification 2 The Telephone Line Cable Adapter is available in certain countries only Machine Toner Cartridge Recording Paper Tray Telephone Line Cable Power Cord Operating Instructions CD ROM For UF 6100 only Telephone Line Cable Adapter See Note ...

Page 15: ...ulation or specification Handset Cord Available as an Option Handset Available as an Option Recording Paper Tray Hook the projections into the square holes on the machine Final Installed View Handset Cradle Available as an Option Hook the projections into the square holes on the machine Connect the cable into the HANDSET jack on the machine ...

Page 16: ...1 Unpack the Toner Cartridge and rock it back and forth as shown for 5 or 6 times to even the toner inside 2 Remove the protective seal Note Pull on the seal slowly and straight out 3 Open the Printer Cover TonerCartridge Printer Cover ...

Page 17: ...ooves in the machine as shown and insert the Toner Cartridge into the machine Note Lock the Toner Cartridge into place by pressing the handle down and then pushing towards the rear of the machine 5 Close the Printer Cover 6 If you are replacing the Toner Cartridge it is recommended to clean the Printer Roller to maintain good printing quality To clean the Printer Roller follow the procedure on pag...

Page 18: ...he results you are looking for For detailed recommended paper specifications See page 145 How to Load the Recording Paper How to Load the Recording Paper 1 Lift up the Paper Cassette slightly and slide it out from the machine 2 Remove the Paper Cassette Cover 3 1 Remove the Shipping Screw securing the Pressure Plate 2 Store the screw by attaching it to the post provided under the Paper Cassette Co...

Page 19: ...ween the Paper Width Guide and the right side of tray If it does not the paper may feed into the printer incorrectly resulting in a paper jam Caution Make sure that the paper is set under the metal Paper Separation Clips and that it does not exceed the Maximum Paper Capacity Mark You can load about 250 sheets 75g m weight For paper specification see page 145 2 Re install the Paper Cassette Cover 3...

Page 20: ...nto the appropriate paper length slots Letter or Legal and slide the guide towards the back of the cassette until it locks in place 5 Load the paper into the Paper Cassette Slide the paper width guide to the left until it lightly touches the stack of paper without bending the paper The paper must fit squarely and firmly between the Paper Width Guide and the right side of tray If it does not the pa...

Page 21: ...lot 4 Swing the Paper Separation Clip downward to latch it in place 2 1 Load the paper into the Paper Cassette Slide the paper width guide to the left until it lightly touches the stack of paper without bending the paper The paper must fit squarely and firmly between the Paper Width Guide and the right side of tray If it does not the paper may feed into the printer incorrectly resulting in a paper...

Page 22: ...able into the telephone jack supplied by the telephone company and the other end into the LINE jack on the left side of the machine NOTE 1 Your machine uses little power and you should keep it ON at all times If the power is turned OFF for too long the clock contents may be lost 2 The shape of the telephone line cable and power cord may differ depending on each country s regulation or specificatio...

Page 23: ... Power Cord 23 Installing Your Machine External Telephone Optional You can connect an additional standard single line telephone to the machine To connect the telephone break off the protective tab on the TEL jack Telephone Line Cable Adapter ...

Page 24: ...ou need to change the dialling method to Tone or Pulse follow the procedure below NOTE 1 For some countries this feature is not available depending on the country s regulation The display may not show this feature 1 SET MODE 1 8 ENTER NO OR 2 FAX PARAMETER 01 99 NO 3 06 DIALLING METHOD 2 TONE 4 for PULSE or for TONE 06 DIALLING METHOD 1 PULSE or 06 DIALLING METHOD 2 TONE 5 7 4 0 6 1 2 ...

Page 25: ... the volume of the key touch tone and the volume of the buzzer in the Fax Parameter No 10 KEY BUZZER VOLUME See page 36 Setting the Monitor Volume 1 You will hear the dial tone through the speaker MONITOR 2 repeatedly to raise the volume or repeatedly to lower the volume MONITOR VOLUME LOW HIGH MONITOR VOLUME LOW HIGH 3 Setting the Ringer Volume 1 Standby DD MMM YYYY 15 00 00 2 repeatedly to raise...

Page 26: ...standby the display will show the date and time Once the standby display is set it will automatically be updated General Description Setting the Date and Time 1 SET MODE 1 8 ENTER NO OR 2 1 USER PARAMETERS PRESS SET TO SELECT 3 DATE TIME 1 01 2002 00 00 4 Enter the new date and time Ex Date 12th Month March Year 2005 Time 3 00 PM If you make a mistake use or to move the cursor over the incorrect n...

Page 27: ...DE 1 8 ENTER NO OR 2 1 USER PARAMETERS PRESS SET TO SELECT 3 repeatedly until display shows LOGO 4 Enter your LOGO max 25 characters and digits by using the Character keys Ex If you make a mistake use or to move the cursor one space beyond the incorrect character press then re enter the new character If more than 19 characters are entered the left side characters will scroll off the display LOGO P...

Page 28: ...racters of Å Ä Ö Ü Æ è and é cannot be used for Character ID Setting Your Character ID 1 SET MODE 1 8 ENTER NO OR 2 1 USER PARAMETERS PRESS SET TO SELECT 3 repeatedly until display shows CHARACTER ID 4 Enter your Character ID max 16 characters and digits by using the Character keys Ex If you make a mistake use or to move the cursor beyond the incorrect character press then re enter the new charact...

Page 29: ... beginning of the ID number to indicate the following digit s for your country code Ex 1 201 555 1212 1 for U S A country code 81 3 111 2345 81 for Japan country code Setting Your ID Number Fax Telephone Number 1 SET MODE 1 8 ENTER NO OR 2 1 USER PARAMETERS PRESS SET TO SELECT 3 repeatedly until display shows ID NO 4 Enter your ID max 20 digits by using the keypad and key to enter a space between ...

Page 30: ... enter a One Touch key follow the steps below 1 SET MODE 1 8 ENTER NO OR 2 1 ONE TOUCH 2 ABBR NO 3 ONE TOUCH PRESS ONE TCH OR 4 Ex 01 ENTER TEL NO 5 Enter the telephone number up to 36 digits including pauses and spaces Ex 01 9 555 1234 6 01 ENTER NAME 9 555 1234 7 Enter the station name using character keys up to 15 characters Ex 01 SALES DEPT 9 555 1234 8 To record another number repeat step 4 t...

Page 31: ...igit Ex 9 PAUSE 5551234 3 You can search for an unused One Touch key or ABBR number by pressing or in step 3 or 4 To set an Abbreviated Dialling Number follow the steps below 1 SET MODE 1 8 ENTER NO OR 2 1 ONE TOUCH 2 ABBR NO 3 ABBR ENTER NO OR 4 Ex 001 to 100 022 ENTER TEL NO 5 Enter the telephone number up to 36 digits including pauses and spaces Ex 022 9 555 2345 6 022 ENTER NAME 9 555 2345 7 E...

Page 32: ...h ABBR dialling number 1 1 ONE TOUCH 2 ABBR NO 2 Select for One Touch Dialling number Select for ABBR Dialling Number Ex ONE TOUCH PRESS ONE TCH OR 3 Enter the station you wish to change Ex 01 SALES DEPT 9 555 1234 4 then enter a new telephone number See Note 1 Ex 01 SALES DEPT ENTER TEL NO 01 SALES DEPT 9 555 3456 5 01 SALES DEPT 9 555 3456 6 then enter a new station name See Note 1 Ex 01 ENTER N...

Page 33: ...ttings of One Touch ABBR Dialling number 1 1 ONE TOUCH 2 ABBR NO 2 Select for One Touch Dialling number Select for ABBR Dialling Number Ex ONE TOUCH PRESS ONE TCH OR 3 Enter the station you wish to erase Ex 01 SALES DEPT 9 555 1234 4 01 SALES DEPT ENTER TEL NO 5 To return to standby press ONE TOUCH PRESS ONE TCH OR 7 2 1 2 1 STOP ...

Page 34: ...d line and place it over the One Touch key under the Directory Sheet Cover To print out a directory sheet follow the steps below Printing Out a Directory Sheet 1 PRINT OUT 1 7 ENTER NO OR 2 Your machine prints out the directory sheet PRINTING DIRECTORY SHEET DIRECTORY SHEET DATE dd mmm yyyy TIME 15 00 201 555 1212 AMERICA AFRICA ASIA CANADA BRAZIL JAPAN PANASONIC HEAD OFFICE 201 555 1212 6 7 dotte...

Page 35: ...er these parameters return to their preset values Home position Other parameters can only be changed by the procedure described below NOTE 1 To scroll the Fax Parameters in Step 2 or 4 press or 2 To print out a Fax Parameter List see page 127 General Description Setting the Fax Parameters 1 SET MODE 1 8 ENTER NO OR 2 FAXPARAMETER 01 99 NO 3 Enter Fax Parameter number from the Parameter Table Ex fo...

Page 36: ... the printing position of the header Inside Inside TX copy area Outside Outside TX copy area No print Header is not printed 2 Outside 3 No print 08 HEADER FORMAT 1 Logo ID No Selecting the header format 2 From To 09 RCV D TIME PRINT 1 Invalid Selecting whether the machine prints the received date time remote ID percentage of reduction and page number on the bottom of each received page 2 Valid 10 ...

Page 37: ...om 70 to 100 This parameter functions only when fixed print reduction is selected on Fax Parameter No 24 100 100 26 POLLING PASSWORD Setting a 4 digit password for secured polling 27 POLLED FILE SAVE 1 Invalid Selecting whether the machine retains the polled document in memory even after the document is polled once 2 Valid 28 STAMP AT MEM XMT 1 Invalid Selecting whether the machine stamps the orig...

Page 38: ...memory by using F8 5 RCV TO MEMORY When F8 5 is set to On this parameter will not be shown on the LCD display See page 93 38 ACCESS CODE Enter a 4 digit Access Code to secure the machine from unauthorized use See page 91 39 PIN CODE ACCESS 1 None Selecting the access method Prefix or Suffix to dial a number with PIN Code See page 98 2 Suffix 3 Prefix 42 CONF FILE SAVE 1 Invalid Selecting whether t...

Page 39: ...tion of the Cover Sheet parameter in the Select Mode See page 96 2 On 57 COUNTRY CODE Selecting the country code when installing your machine 58 LANGUAGE Selecting the language to be shown on the display and reports 63 PC FAX RCV MODE For UF 6100 only 1 Print Selecting how the machine will execute the received Fax document s If the setting is set to either Upload or Upload Print the machine cannot...

Page 40: ... folded Coated e g glossy paper etc Chemically processed e g pressure sensitive paper carbon coated paper etc or made of cloth or metal Document Size Singlesheet 0 06 mm 45 g m2 to 0 15mm 112g m2 Multiplesheets 0 06 mm 45 g m2 to 0 10mm 75g m2 Document Thickness MaximumSize MinimumSize Direction Direction 2000 mm 148 mm 128 mm 257 mm See Note ABC abcdefghijklmnopqrstuvwxyzabcdef abcdefghijklmnopqr...

Page 41: ...document on the ADF When you set a document on the ADF the display message will change from date and time standby to the following message You can now change basic transmission settings or begin the dialling procedure ENTER STATION S THEN PRESS START 00 NOTE 1 The document limitation to send multiple pages is as follows Please note that although the size and thickness meets the specifications you ...

Page 42: ...hine is preset to Standard resolution which is suitable for most documents If you want to send it with more detail change the setting to Fine Super Fine or Halftone Press to NOTE 1 To change the preset Contrast position change the setting of Fax Parameter No 01 See page 36 2 To change the preset Resolution position change the setting of Fax Parameter No 02 See page 36 General Description Contrast ...

Page 43: ... stamp on the document if it is successfully stored in memory In this case the Verification Stamp is not a confirmation that the document was successfully transmitted If you wish to disable the use of the Verification Stamp when storing document in memory change the setting of Fax Parameter No 28 See page 37 2 To change the preset Verification Stamp position change the setting of Fax Parameter No ...

Page 44: ... COMM JOURNAL OFF a Communication Journal will not be printed out When you set COMM JOURNAL ON a Communication Journal is printed out automatically after every communication When you set COMM JOURNAL INC a Communication Journal is printed out automatically only if the communication has failed 1 SELECT MODE 1 9 ENTER NO OR 2 COMM JOURNAL INC 1 OFF 2 ON 3 INC 3 for OFF or for ON Always print out or ...

Page 45: ...ns You have to retrieve the document immediately You want to take advantage of Dual Operation design Use Direct Transmission if The memory is full You want to send the document immediately Use Voice Mode Transmit if You want to send the document after talking with the other party You want to send the document after listening to a voice prompting General Description ...

Page 46: ...g documents the remaining documents on the ADF will be ejected The machine prompts you whether to transmit the successfully stored documents or to cancel the transmission Press to cancel or press to transmit MEMORY OVERFLOW INFO CODE 870 See the Specifications on page 144 for the image memory capacity If no action is taken within 10 seconds the machine will start transmitting the stored documents ...

Page 47: ...ments change the setting of Fax Parameter No 31 INC FILE SAVE to Valid in advance See page 37 Then the following display will appear and you can select whether to save the file as an incomplete file for editing and retry or delete the file manually SAVE AS INCOMP FILE 1 YES 2 NO 5 If you would like to print a Communication Journal COMM JOURNAL after stopping a transmission press when the display s...

Page 48: ...ing the digit Ex 9 PAUSE 5551234 3 This feature is called Quick Memory Transmission If you wish to store all the document s into memory first before transmitting change the Fax Parameter No 82 QUICK MEMORY XMT to Invalid See page 39 1 Set document s face down ENTER STATION S THEN PRESS START 00 2 Enter a telephone number from the keypad Up to 36 digits You can also designate more that one destinat...

Page 49: ...arameter No 82 QUICK MEMORY XMT to Invalid See page 39 1 Set document s face down ENTER STATION S THEN PRESS START 00 2 Press a One Touch key Ex 01 Station name 5551234 3 The document is stored into memory with a file number Then starts dialling the telephone number immediately after storing the first page See Note 1 The remaining page s continue to store into memory STORE NO 002 PAGES 001 05 DIAL...

Page 50: ...RY XMT to Invalid See page 39 1 Set document s face down ENTER STATION S THEN PRESS START 00 2 ENTER LETTER S 3 Enter the full station name or part of a station name by using the Character keys Ex for searching PANASONIC ENTER LETTER S PANA 4 or repeatedly until the display shows the station name you want to send to 010 PANASONIC 5553456 5 The document is stored into memory with a file number Then...

Page 51: ...on is disabled if multiple stations are set 1 Set document s face down ENTER STATION S THEN PRESS START 00 2 Dial by any combination of the following methods One Touch Dialling Abbreviated Dialling Manual Number Dialling press after each station is entered Up to 12 stations Directory Search Dialling press after each station is entered For details see pages 48 to 50 Ex If you want to confirm the nu...

Page 52: ... in the middle of dialling press represented by a The dialling method will be changed from Pulse to Tone after dialling the digit Ex 9 PAUSE 5551234 3 To stop the transmission press The display shows COMMUNICATION STOP 1 YES 2 NO Press to stop the transmission The Communication Journal will not print out regardless of the printout mode setting of the Communication Journal Direct Transmission 1 Set...

Page 53: ...y pressing a single key To set up the One Touch keys see page 30 1 Set document s face down ENTER STATION S THEN PRESS START 00 2 MEMORY XMT ON 1 OFF 2 ON 3 ENTER STATION 00 4 Press a One Touch key Ex The display will show the One Touch number and station name The full number e g 5551234 will then be dialled 01 Station name 5551234 DIALLING Station name 8 9 1 ...

Page 54: ...built in auto dialler with a 3 digit abbreviated code To program an abbreviated dialling number see page 31 1 Set document s face down ENTER STATION S THEN PRESS START 00 2 MEMORY XMT ON 1 OFF 2 ON 3 ENTER STATION 00 4 Press and a 3 digit code Ex The display will show the ABBR number and station name The full number e g 5553456 will then be dialled 010 Station name 5553456 DIALLING Station name 8 ...

Page 55: ...numbers 1 Set document s face down ENTER STATION S THEN PRESS START 00 2 MEMORY XMT ON 1 OFF 2 ON 3 ENTER STATION 00 4 ENTER LETTER S 5 Enter the full station name or part of a station name by using the Character keys See page 12 Ex for searching PANASONIC ENTER LETTER S PANA 6 or repeatedly until the display shows the station name you want to send to 010 PANASONIC 5553456 7 The full number e g 55...

Page 56: ...ill not print out regardless of the printout mode setting of the Communication Journal 2 For some countries the handset may not be available because of the country s regulation or specification Voice Mode Transmission 1 Set document s face down ENTER STATION S THEN PRESS START 00 2 Lift the fax handset or the external telephone and dial the telephone number from the keypad Ex PHONE OFF HOOK DIALLI...

Page 57: ...x 9 PAUSE 5551234 2 If you are using Pulse dialling and you wish to change to Tone dialling in the middle of dialling press represented by a The dialling method will be changed from Pulse to Tone after dialling the digit Ex 9 PAUSE 5551234 1 Set document s face down ENTER STATION S THEN PRESS START 00 2 You will hear dial tone through the monitor speaker MONITOR 3 Dial the telephone number from th...

Page 58: ...ing or printing received documents ON LINE PC MODE ON LINE PRT MODE PRINTING PC DATA ON LINE MEM XMT ID Identification ON LINE RCV ID Identification PRINTING MEMORY RCV D DOC 2 Set document s face down ENTER STATION S THEN PRESS START 00 3 Dial by any combination of the following methods One Touch Dialling Abbreviated Dialling Manual Number Dialling press after each station is entered Up to 12 sta...

Page 59: ...our machine is on line the ON LINE lamp is blinking or printing received documents ON LINE PC MODE ON LINE PRT MODE PRINTING PC DATA ON LINE MEM XMT ID Identification ON LINE RCV ID Identification PRINTING MEMORY RCV D DOC 2 Set document s face down ENTER STATION S THEN PRESS START 00 3 MEMORY XMT ON 1 OFF 2 ON 4 ENTER STATION 00 5 Dial by using any one of the following methods One Touch Dialling ...

Page 60: ...0 Transmission Reservation To cancel the direct transmission reservation 1 Make sure the document is on the ADF DIRECT XMT RESERVED 01 Station name 2 CANCEL XMT RESERVE 1 YES 2 NO 3 and then remove the document from ADF 1 ...

Page 61: ...right hand corner of the display if it is a memory transmission file WAIT TO DIAL NO 001 01 Station name To redial the last dialled number through memory 1 Set document s face down ENTER STATION S THEN PRESS START 00 2 TEL NO 5551234 3 The document is stored into memory with a file number Then dials the last dialled number STORE NO 002 PAGES 001 01 DIALLING NO 002 5551234 To redial the last dialle...

Page 62: ...signal simply press START to receive manually See page 63 Fax Parameter No 17 set to 1 Tel dd mmm yyyy 15 00 RCV MODE TEL 00 You receive both voice and fax calls Fax Tel Auto Switching Mode Unit will answer the incoming call then distinguishes whether it is voice or fax call If it is a fax call the unit will receive automatically if it is a voice call the unit will signal ring through the speaker ...

Page 63: ...one press on the control panel of your fax machine Telephone Mode 1 Change Fax Parameter No 17 RECEIVE MODE to 1 Tel See page 36 1 When your telephone rings lift the handset of the External Telephone If you hear a beep from the phone it means someone wants to send a fax Or if the caller answers and says he she wants to send a fax then 2 Remove any document from the ADF 3a If you answered the call ...

Page 64: ...Tel Auto Switching Mode 1 Change Fax Parameter No 17 RECEIVE MODE to 3 Fax Tel SW See page 36 If it is a Fax call 1 Your machine will answer the call when a call is received then distinguish whether it is a voice or fax call 2 Your machine begins to receive the documents If it is a Voice call 1 Your machine will answer the call when a call is received then distinguish whether it is a voice or fax ...

Page 65: ...e it will immediately begin to receive documents automatically when a call is received Setting the Fax Mode Operation of Fax Mode Your machine will begin receiving automatically when a fax call is received Fax Mode 1 Change Fax Parameter No 17 RECEIVE MODE to 2 Fax See page 36 ...

Page 66: ...by your Local Phone company are not compatible with this feature For the operation of your TAM please refer to the User s Guide of the TAM TAM Telephone Answering Machine Interface Mode Installing your TAM 1 1 Remove the telephone line cable of your TAM from the wall jack 2 Plug the telephone line cable of your TAM into the TEL jack on the rear of the fax machine as shown Note The connecting metho...

Page 67: ...tgoing Message recorded in your TAM to the calling station During the time the TAM is answering the call your fax machine will be monitoring the line to distinguish whether it is a voice or fax call 2 Your TAM continues to record a message ICM after playing the OGM Sample of OGM Hello this is Smith Sorry I am unable to take your call Please leave your message after the beep or if you are calling t...

Page 68: ... single page If the received document is extremely long over 39 longer than the recording paper the document will be divided into separate pages and print without reduction 2 Fixed Reduction You can pre determine the reduction ratio from 70 to 100 in 1 steps The document s you receive will be reduced to the fixed ratio regardless of size Selecting the Print Reduction Mode Set Fax Parameters as sho...

Page 69: ...he next page NOTE 1 If the reduction method is set to the Automatic Reduction mode the document is printed out with no reduction when printing out separate pages If the reduction method is set to Fixed Reduction mode the document is printed out by the ratio you set in Fax Parameter No 25 See page 37 Receiving Oversize Documents Transmitted Document Received Document The receiving document is divid...

Page 70: ...l print in Reverse Order Stacking Non Collation Mode whenever one of the above requirements is not met NOTE 1 If the memory overflows the machine will stop receiving and release the communication line The document s stored in the memory up to that moment will be printed out 2 If you wish to turn off the substitute reception function change the setting of Fax Parameter No 22 to Invalid See page 37 ...

Page 71: ...py with Super Fine resolution it will be reduced slightly even if the reduction ratio is set to 100 in order to fit the data on one page 3 You can change the Contrast and Resolution without Standard Resolution in Copy Mode 4 If you experience a memory overflow error while making copies you may turn Off the Memory XMT feature temporarily by pressing However the printed copies will not be collated 1...

Page 72: ...last step DEF DIRECT XMT RSV D 01 Station name General Description Deferred Transmission 1 Set document s face down ENTER STATION S THEN PRESS START 00 2 DEFERRED COMM 1 2 ENTER NO OR 3 DEFERRED XMT START TIME 4 Enter the start time from the keypad Use a 4 digit 24 hour clock Ex 11 30 p m and ENTER STATION S THEN PRESS START 5 Dial by any combination of the following methods One Touch Dialling Abb...

Page 73: ...time from the keypad Use a 4 digit 24 hour clock Ex 3 30 a m and DEFERRED POLLING PASSWORD 4 Enter a 4 digit polling password Ex and ENTER STATION S THEN PRESS START 5 Dial by any combination of the following methods One Touch Dialling Abbreviated Dialling Manual Number Dialling press after each station is entered Up to 12 stations Directory Search Dialling press after each station is entered For ...

Page 74: ...ng request will be refused automatically NOTE 1 Polling might not function with all fax machines We suggest you attempt a trial polling before you actually poll important documents 2 If a password is not set in the polled station you may poll the other station even though your machine has a password General Description Setting the Polling Password To set the polling password follow the steps below...

Page 75: ...ve documents even when set to be polled 2 Only 1 polled file can be stored in memory If you need to add document s into the same polled file see page 89 3 If you have set the polling password in Fax Parameter No 26 the password will appear on the display You can still change the password temporarily by overwriting it with a new one Preparing to be Polled 1 Set document s face down ENTER STATION S ...

Page 76: ...l change the password temporarily by overwriting it with a new one To Poll Documents from Another Station 1 POLLING NO 1 POLLING 2 POLLED 2 POLLING PASSWORD 1234 3 Enter a 4 digit polling password See Note 2 Ex POLLING PASSWORD 1111 4 ENTER STATION S THEN PRESS START 5 Dial by any combination of the following methods One Touch Dialling Abbreviated Dialling Manual Number Dialling press after each s...

Page 77: ... NO OR 2 PROGRAM P PRESS PROGRAM KEY 3 Ex PROGRAM P1 NAME ENTER NAME 4 Enter the station name up to 15 characters by using the Character keys See page 12 Ex PROG A and ENTER STATION S THEN PRESS START 5 Enter the station numbers by using One Touch Key or and 3 digit code Ex and You may use the or keys to review the entered station s before going to next step If you find an error press to erase the...

Page 78: ... 5 DEFERRED XMT START TIME 6 Enter the starting time using 4 digits Ex 11 30 p m and ENTER STATION S THEN PRESS START 7 Enter the station by any combination of the following methods One Touch Dialling Abbreviated Dialling Directory Search Dialling press after each station is entered For details see pages 48 to 50 Ex 01 Station name 5551234 8 You can now set other Program Keys by repeating the proc...

Page 79: ...10 00 p m and DEFERRED POLLING PASSWORD 7 Enter a 4 digit polling password Ex and The polling password appears if it has been previously set ENTER STATION S THEN PRESS START 8 Enter the station by any combination of the following methods One Touch Dialling Abbreviated Dialling Directory Search Dialling press after each station is entered For details see pages 48 to 50 Ex 01 Station name 5551234 9 ...

Page 80: ...ter a 4 digit polling password Ex and The polling password appears if it has been previously set ENTER STATION S THEN PRESS START 7 Enter the station by any combination of the following methods One Touch Dialling Abbreviated Dialling Directory Search Dialling press after each station is entered For details see pages 48 to 50 Ex 01 Station name 5551234 8 You can now set other Program Keys by repeat...

Page 81: ... Enter the station name up to 15 characters by using the Character keys See page 12 Ex PROG A and P1 PROG A ENTER TEL NO 5 Enter a telephone number up to 36 digits including pauses and spaces Ex P1 PROG A 9 555 1234 6 You can now set other Program Keys by repeating the procedures from Step 3 or return to standby by pressing PROGRAM P PRESS PROGRAM KEY 7 3 3 SET 9 PAUSE 5 5 5 1 2 3 4 STOP ...

Page 82: ...r group dialling Telephone number and station name for One Touch key Changing or Erasing the Program Key Settings To erase the settings in a Program Key 1 PROGRAM 1 4 ENTER NO OR 2 PROGRAM P PRESS PROGRAM KEY 3 Press the Program key you want to erase Ex PROGRAM P1 DELETE 1 YES 2 NO 4 DELETING PROGRAM P1 5 You can now erase other Program Keys by repeating the procedures from Step 3 or return to sta...

Page 83: ... List 1 EDIT FILE MODE 1 6 ENTER NO OR 2 1 FILE LIST PRESS SET TO SELECT 3 FILE LIST 1 PRINT 2 VIEW 4 PRINTING FILE LIST FILE LIST DATE dd mmm yyyy TIME 15 00 1 2 3 4 5 6 FILE COMM TYPE CREATED TIME START TIME PAGES DESTINATION S No 001 DEFERRED XMT DD MMM 13 20 20 30 001 002 MEM DEF XMT DD MMM 13 20 22 30 003 011 012 013 016 017 PANASONIC HEAD OFFICE 201 555 1212 1 File number If the file is now ...

Page 84: ...THE KEYS TO SCROLL EACH FILE 5 or repeatedly until the display shows a file you want to edit 6 9 1 2 Sample display Type of File XMT Transmission POLL Polling POLLED Polled RCV TO MEM Receive to Memory PC JOB PC Interface Job JOURNAL Journal Report Status nn nn Start time IN PRG In progress REDIAL Waiting to redial INCOMP Incomplete file File Number Entered station Number of pages 001 XMT 10 00 P0...

Page 85: ...t to change Ex ENTER FILE NO OR FILE NO 001 4 See Note 2 DEFERRED XMT START TIME 22 30 5 Enter a new start time Ex 6 00 a m If you do not have to change the time skip to step 6 DEFERRED XMT START TIME 06 00 6 01 Station name 5551234 7 To delete the station s press or key until the station you want to delete appears Then press or Enter the station s you want to add ENTER STATION S THEN PRESS START ...

Page 86: ...ot change the start time and or stations in the file while it is being sent or waiting to redial 2 If the file is not a Deferred Communication File the following message is shown on the display SET DEFERRED COMM 1 YES 2 NO Press to change the type of the file for deferred communication file 1 ...

Page 87: ...ing message is shown on the display DELETE ALL FILES 1 YES 2 NO Press to delete all files Deleting a File 1 EDIT FILE MODE 1 6 ENTER NO OR 2 ENTER FILE NO OR FILE NO 3 Enter the file number or use or to select the file that you want to delete Ex See Note 2 ENTER FILE NO OR FILE NO 001 4 DELETE FILE NO 001 1 YES 2 NO 5 Enter the next file number you want to delete or press to return to standby DELE...

Page 88: ... it is being sent Printing Out a File 1 EDIT FILE MODE 1 6 ENTER NO OR 2 ENTER FILE NO OR FILE NO 3 Enter the file number or use or to select the file that you want to print Ex ENTER FILE NO OR FILE NO 001 4 Your machine will print the file The document s will remain in memory even after printing the file PRINTING PAGE 001 003 9 4 0 0 1 ...

Page 89: ...r waiting to redial Adding Documents into a File 1 Set document s face down ENTER STATION S THEN PRESS START 05 2 EDIT FILE MODE 1 6 ENTER NO OR 3 Enter the file number or use or to select the file that you want to add Ex ENTER FILE NO OR FILE NO ENTER FILE NO OR FILE NO 001 4 Your machine will start storing the document s into a file STORE NO 001 PAGES 002 10 9 5 0 0 1 ...

Page 90: ...7 To retry the incomplete file print a File List first to verify the file number See page 83 Then follow the steps below NOTE 1 To confirm or change the entered telephone number for the file see page 83 and 85 Retry an Incomplete File 1 EDIT FILE MODE 1 6 ENTER NO OR 2 ENTER FILE NO OR FILE NO 3 Enter the file number or use or to select the file that you want to retry Ex ENTER FILE NO OR FILE NO 0...

Page 91: ...e in order to use the machine again Registering the Access Code does not affect the use of the machine in any other way NOTE 1 To erase the Access Code enter the Access Code and press and follow the procedure above to step 3 then press and General Description Setting the Access Code 1 SET MODE 1 8 ENTER NO OR 2 FAXPARAMETER 01 99 NO 3 38 ACCESS CODE 4 Enter a 4 digit Access Code Ex 38 ACCESS CODE ...

Page 92: ...the Access Code Ex DD MMM YYYY 15 00 ACCESS CODE DD MMM YYYY 15 00 ACCESS CODE 2 Now you can operate the machine normally DD MMM YYYY 15 00 00 Operating Your Machine with the Access Code Restrict access of Fax Parameters only 1 SET MODE 1 8 ENTER NO OR 2 INPUT ACCESS CODE 3 Enter a 4 digit Access Code Ex INPUT ACCESS CODE 4 Now you can operate the machine normally FAX PARAMETER 01 99 NO 1 2 3 4 7 ...

Page 93: ...release the line The machine will not answer the next incoming call until there is space available in the memory General Description Setting the RCV To Memory Password 1 SET MODE 1 8 ENTER NO OR 2 FAXPARAMETER 01 99 NO 3 37 RCV TO MEMORY 4 Enter a 4 digit RCV to Memory Password Ex 37 RCV TO MEMORY 1234 5 Setting RCV To Memory 1 SELECT MODE 1 9 ENTER NO OR 2 RCV TO MEMORY OFF 1 OFF 2 ON 3 PRINT 3 R...

Page 94: ... step 4 3 Once the RCV TO MEMORY feature is set to On the password cannot be changed Fax Parameter No 37 will not be shown on the LCD display If you wish to change the password set RCV TO MEMORY feature to Off first Then change the password See page 93 Printing Out Documents 1 SELECT MODE 1 9 ENTER NO OR 2 RCV TO MEMORY ON 1 OFF 2 ON 3 PRINT 3 RCV TO MEMORY PRINT 1 OFF 2 ON 3 PRINT 4 INPUT PASSWOR...

Page 95: ...llowing table shows a typical example with 2 telephone numbers on a single phone line Ex Specified Ring Pattern Double Ring The following illustration shows a typical set up with your machine set to detect Specified Ring Double Ring NOTE 1 Riiing means a long ringing sound and Ring means a short ringing sound 2 The specified ring pattern may differ depending on the each country s regulation or spe...

Page 96: ...transmission modes 3 The Fax Cover Sheet is not counted in the number of pages column of the journals General Description To use the Fax Cover Sheet 1 Set document s face down ENTER STATION S THEN PRESS START 00 2 SELECT MODE 1 9 ENTER NO OR 3 COVER SHEET OFF 1 OFF 2 ON 4 for OFF Cover Sheet is not attached or for ON Cover Sheet is attached COVER SHEET OFF 1 OFF 2 ON or COVER SHEET ON 1 OFF 2 ON 5...

Page 97: ...e To SALES DEPT 3 Message From PANASONIC 201 555 1212 4 02 Page s Following This Cover Page 1 Starting time of communication 2 Recorded name in the One Touch ABBR No or dialled telephone number 3 Your LOGO up to 25 characters and ID Number Up to 20 digits 4 The number of pages to follow This information is not shown when transmitting by Direct Transmission Mode ...

Page 98: ... enter a PIN code before any dialling NOTE 1 This feature is available in certain countries only General Description Selecting the Access Method Prefix or Suffix 1 SET MODE 1 8 ENTER NO OR 2 FAX PARAMETER 01 99 NO 3 39 PIN CODE ACCESS 1 NONE 4 for suffix code or for prefix code 39 PIN CODE ACCESS 2 SUFFIX or 39 PIN CODE ACCESS 3 PREFIX 5 7 4 3 9 2 3 ...

Page 99: ...ted Dialling Manual Number Dialling press after each station is entered up to 12 stations Directory Search Dialling press after each station is entered For details see pages 48 to 50 Ex If you want to confirm the number of stations you have entered press 01 Station name 5551234 010 Station name 5553456 2 STN S ARE SET ADD MORE OR START 3 ENTER PIN CODE 4 Ex up to 36 digits ENTER PIN CODE 9876 5 Yo...

Page 100: ...to Invalid when you would like to edit the telephone number 2 If the communication to transfer a received document s fails the received document will print out and then is erased from memory even if the Fax Parameter No 31 INC FILE SAVE is set to Valid If you wish to save the document into memory in case of communication failure set your machine to Receive To Memory See page 93 3 It is not possibl...

Page 101: ...match is found your machine will start receiving the document If a match is not found your machine will cancel the reception and an Information Code 406 will be recorded on the Journal NOTE 1 When the Selective Reception is set your machine can receive only from those stations which are programmed in the built in auto dialler 2 If your ID number has not been set your machine might not be able to r...

Page 102: ... set a 4 digit receiving password in advance The password must be shared with the other compatible Panafax machine s If the password in your machine does not match the receiving password in the other compatible Panafax machine s the reception will fail Once you set password reception and set the parameter to ON it stays until you change the setting to OFF You can only use password transmission and...

Page 103: ...or details 2 To change the password press in step 4 Then re enter a new one Setting Password Transmission 1 SET MODE 1 8 ENTER NO OR 2 FAXPARAMETER 01 99 NO 3 43 PASSWORD XMT 4 Enter a 4 digit Transmission Password Ex and press 43 PASSWORD XMT 1 OFF 1234 5 for OFF password is not checked or for ON password is checked 43 PASSWORD XMT 1 OFF 1234 or 43 PASSWORD XMT 2 ON 1234 6 7 4 4 3 1 2 3 4 SET 1 2...

Page 104: ...e the setting 2 To change the password press in step 4 Then re enter a new one Setting Password Reception 1 SET MODE 1 8 ENTER NO OR 2 FAX PARAMETER 01 99 NO 3 44 PASSWORD RCV 4 Enter a 4 digit Transmission Password Ex and press 44 PASSWORD RCV 1 OFF 1234 5 for OFF password is not checked or for ON password is checked 44 PASSWORD RCV 1 OFF 1234 or 44 PASSWORD RCV 2 ON 1234 6 7 4 4 4 1 2 3 4 SET 1 ...

Page 105: ...MT OFF 1 OFF 2 ON 4 for OFF password is not checked or for ON password is checked PASSWD XMT OFF 1 OFF 2 ON or PASSWD XMT ON 1 OFF 2 ON 5 ENTER STATION S THEN PRESS START 6 Dial by any combination of the following methods One Touch Dialling Abbreviated Dialling Manual Number Dialling press after each station is entered Up to 12 stations Directory Search Dialling press after each station is entered...

Page 106: ...annot be selected for each reception It is always OFF or ON until you change the setting Using Password Transmission 7 If your machine s Transmission Password coincides with the other station s Transmission Password your machine starts sending the document When transmission is completed PASSWORD XMT returns to standard setting OFF or ON Using Password Reception ...

Page 107: ...2 Up to 10 Mailbox files can be stored in memory So you can receive the confidential fax using 10 different confidential codes 3 If the memory overflows the machine will stop receiving and release the line 4 If confidential faxes were received in the mailbox of UF 733 you cannot poll those documents The UF 733 is designed to print out the received confidential document locally only General Descrip...

Page 108: ...CONFIDENTIAL XMT CONF CODE 4 Enter a 4 digit Confidential Code Ex CONFIDENTIAL XMT CONF CODE 2233 5 ENTER STATION THEN PRESS START 6 Dial by any one of the following methods One Touch Dialling Abbreviated Dialling Manual Number Dialling Directory Search Dialling Ex 01 Station name 5551234 7 If necessary inform the receiving person and tell them the Confidential Code 2 2 1 2 2 3 3 ...

Page 109: ...file will be erased automatically at the center station after being polled Polling a Confidential Document from a Remote Station s Mailbox 1 CONF COMM 1 5 ENTER NO OR 2 CONFIDENTIAL POLL CONF CODE 3 Enter a 4 digit Confidential Code Ex CONFIDENTIAL POLL CONF CODE 2233 4 ENTER STATION THEN PRESS START 5 Dial by any one of the following methods One Touch Dialling Abbreviated Dialling Manual Number D...

Page 110: ...me confidential mailbox 2 Up to 10 Mailbox files can be stored in memory So you can receive the confidential fax using 10 different confidential codes 3 If the memory overflows the machine will stop receiving and release the line 4 You can verify whether the unit has received a confidential fax by printing out the File List See page 83 Receiving a Confidential Document to Your Machine s Mailbox CO...

Page 111: ...ter being polled change the setting of Fax Parameter No 42 CONF FILE SAVE to Valid Storing a Confidential Document in Your Machine s Mailbox 1 Set document s face down ENTER STATION S THEN PRESS START 00 2 CONF COMM 1 5 ENTER NO OR 3 CONFIDENTIAL POLLED CONF CODE 4 Enter a 4 digit Confidential Code Ex CONFIDENTIAL POLLED CONF CODE 2233 5 The document s will be stored into memory If necessary infor...

Page 112: ... erased automatically after being printed out even if the setting of Fax Parameter No 42 CONF FILE SAVE is changed to Valid Printing Out a Confidential Document from Your Machine s Mailbox 1 CONF COMM 1 5 ENTER NO OR 2 PRINT CONF FILE CONF CODE 3 Enter the Confidential Code of the document you want to print out Ex PRINT CONF FILE CONF CODE 2233 4 The machine will print out the confidential documen...

Page 113: ...its Confidential Code and the other is to delete all confidential files in memory Deleting a Confidential Document Stored in Your Machine s Mailbox To delete a file using Confidential Code 1 CONF COMM 1 5 ENTER NO OR 2 DELETE CONF FILE CONF CODE 3 Enter a 4 digit Confidential Code Ex DELETE CONF FILE CONF CODE 2233 4 DELETING CONF CODE 2233 To delete all confidential files in memory 1 CONF COMM 1 ...

Page 114: ...0 6000 6100 7000 7100 8000 8100 9000 see note 1 Sub Addressing Reception DX 600 800 UF 4000 4100 5100 6000 6100 7000 7100 8000 8100 9000 and DP 1810F 1820E 1820P 2000 2310 2330 2500 3000 3010 3030 3510 3520 3530 4510 4520 4530 6010 6020 6030 with Internet Fax You can send a document with Sub address information to the desired recipient by the following methods By registering the Sub address inform...

Page 115: ...uch or to select ABBR NO Ex ONE TOUCH PRESS ONE TCH OR 3 Ex 01 ENTER TEL NO 4 Enter the telephone number press then enter the Sub address Up to 20 digits Up to 36 digits including telephone number pauses spaces FLASH and Sub address Ex Telephone number 5551234 Sub address 2762 Enter as 01 5551234s2762 5 Enter the station name See page 30 Ex SALES DEPT 01 SALES DEPT 5551234s2762 6 7 2 1 2 1 SUB ADD...

Page 116: ... 2 Ex 01 Station name 5551234s2762 3 The document is stored into memory and your machine starts to dial the number of the station and sends the document s with Sub addressing information STORE NO 001 PAGES 001 01 1 Set document s face down ENTER STATION S THEN PRESS START 00 2 Enter the telephone number press then enter the Sub address up to 20 digits Up to 36 digits including telephone number pau...

Page 117: ...age 36 General Description Transaction Journal 1 PRINT OUT 1 7 ENTER NO OR 2 JOURNAL 1 PRINT 2 VIEW 3a To print a Journal PRINTING JOURNAL 3b To view a Journal JOURNAL VIEW 1 XMT ONLY 2 ALL 4 Select the viewing mode to view transmission transactions only to view all transactions Ex You can view the transactions in the journal by pressing or Press to return to standby USE THE KEYS TO SCROLL EACH RE...

Page 118: ...ndividual Transmission Journal contains the information on the latest transmission Individual Transmission Journal IND XMT JOURNAL 1 PRINT OUT 1 7 ENTER NO OR 2 6 IND XMT JOURNAL PRESS SET TO PRINT 3 PRINTING IND XMT JOURNAL 6 6 ...

Page 119: ...04 00 00 00 XMT 342345676 dd mmm 17 57 0800420000000 05 STOP 000 005 00 00 34 XMT 12324567 dd mmm 18 35 0210260200000 06 OK 001 001 006 00 00 20 XMT 44567345 dd mmm 18 44 C8044B03C0000 07 408 003 007 00 02 14 XMT 2345678 dd mmm 18 55 0040440A30080 31 OK 002 002 050 00 00 31 XMT 0245674533 dd mmm 08 35 C8044B03C1000 32 OK 003 003 051 00 01 32 XMT 0353678980 dd mmm 08 57 C8044B03C1000 13 PANASONIC H...

Page 120: ...econd 3 digit number represents the total number of pages that were attempted to be transmitted Asterisk indicates that the quality of some received copies was poor 6 File number 001 to 999 If the communication is stored into memory a file number is assigned for each communication 7 Duration of communication 8 Type of communication XMT means Transmission RCV means Reception POL means Polling PLD m...

Page 121: ...12 Sample COMM JOURNAL Communication Journal COMM JOURNAL COMM JOURNAL DATE dd mmm yyyy TIME 15 00 1 2 3 MODE MEMORY TRANSMISSION START dd mmm 14 50 END dd mmm 15 00 FILE NO 050 4 5 6 7 8 9 10 STN COMM ONE TOUCH STATION NAME TEL NO PAGES DURATION NO ABBR NO 001 OK 01 SERVICE DEPT 001 001 00 01 30 002 OK 02 SALES DEPT 001 001 00 01 25 003 407 03 ACCOUNTING DEPT 000 001 00 01 45 004 BUSY 021 111 123...

Page 122: ...ng the documents into memory for transmission but successfully stored document s was sent R OK indicates that the Confidential Communication was successful 3 digit Info Code See page 133 Information Codes indicates that the communication has failed In this case the machine will print out the attached report with first page of your document as shown on the previous page 7 Abbreviated number or mark...

Page 123: ...st of the telephone numbers you have stored One Touch Abbreviated and Directory Search List 1 PRINT OUT 1 7 ENTER NO OR 2 2 ONE TCH ABBR LIST PRESS SET TO PRINT 3 1 ONE TOUCH ABBR NO 2 DIR SEARCH 4 for One Touch ABBR Number List for Directory Search List PRINTING ONE TOUCH ABBR LIST PRINTING DIR SEARCH LIST 6 2 1 2 ...

Page 124: ...AME TELEPHONE NO 01 SERVICE DEPT 121 555 1234 02 SALES DEPT 222 666 2345 03 ACCOUNTING DEPT 313 333 3456 NO OF STATIONS 03 4 PANASONIC HEAD OFFICE 201 555 1212 ABBR NO LIST DATE dd mmm yyyy TIME 15 00 1 2 3 ABBR NO STATION NAME TELEPHONE NO 001 ENG DEPT 888 555 1234 002 PURCHASE DEPT 999 666 2345 003 REGULATION DEPT 777 333 3456 NO OF STATIONS 003 4 PANASONIC HEAD OFFICE 201 555 1212 ...

Page 125: ...1234 P PURCHASE DEPT 002 555 666 2345 R REGULATION DEPT 003 777 333 3456 S SALES DEPT 01 121 555 1234 SERVICE DEPT 02 222 666 2345 NO OF STATIONS 006 4 PANASONIC HEAD OFFICE 201 555 1212 1 One Touch number or Abbreviated number nn One Touch number nnn Abbreviated number 2 Station name recorded in the machine Up to 15 characters 3 Telephone number recorded in the machine Up to 36 digits 4 Number of...

Page 126: ...IMER ABBR NOS P1 TIMER XMT XMT 12 00 001 P2 TIMER POLL POLL 19 00 002 P3 PROG A POLL 001 002 PANASONIC HEAD OFFICE 201 555 1212 1 Program key 2 Program name Up to 15 characters 3 Type of communication XMT indicates transmission POLL indicates polling ABBR GRP indicates that the Program key is programmed as a group key ONE TOUCH indicates that the Program key is programmed as a One Touch key 4 Time...

Page 127: ...NG SETTING 7 01 CONTRAST HOME 1 Normal 2 Lighter 3 Darker 1 1 02 RESOLUTION HOME 1 Standard 2 Fine 3 S Fine 4 Halftone Fine 5 Halftone S Fine 2 1 99 MEMORY SIZE 8MB 6 PANASONIC HEAD OFFICE 201 555 1212 1 Parameter number 2 Description HOME means home position setting 3 Selection 4 Current setting indicates code or password is not set When the code or password is set it is shown in parenthesis 5 St...

Page 128: ...________________ Bill to ________________________________ ______________________________________ ________________________________________ ______________________________________ ________________________________________ Attention _____________________________ Attention ______________________________ Phone No _____________________________ Phone No ______________________________ Customer ID __________...

Page 129: ...receiving party that they have a problem If copy is NG clean the Document Scanning Area 138 Transmitted document is blank 1 Make sure the document is set face down 2 Check own copy quality If copy is OK your machine has no problem report to the receiving party that they have a problem If copy is NG clean the Document Scanning Area 138 During Reception No recording paper The information code 010 wi...

Page 130: ...dge may be running out of toner Replace the Toner Cartridge 16 Faint print You may need to choose a different paper for the best possible print quality 145 Communication No dial tone 1 Check the connection of the telephone line 2 Check the telephone line 142 No auto answer 1 Check the connection of the telephone line 2 Check the Reception mode setting 3 If the Fax Parameter No 13 AUTO JRNL PRINT i...

Page 131: ...p at the end of the OGM and before the tape advances to the end of last ICM Your TAM only uses a single cassette tape to give OGM and record ICM Set Fax Parameter No 20 SILENT DETECTION to Invalid And instruct the calling party to press twice on their touch tone phone during the OGM to start up your fax machine remotely 37 Cannot receive from a machine that does not send CNG signal a short beep to...

Page 132: ...uble In Unattended Fax Mode OUT Mode Fax machine will not start to receive with the telephone answering machine in the auto answer mode Increase the ring count for detection on the telephone answering machine Mode Symptom Cause Action page ...

Page 133: ... open Close the ADF Door 400 During initial handshake receiving station did not respond or communication error occurred 1 Check with the other party 2 Reload the document and send again 401 Remote station required a Receiving Password to receive the document Remote station does not have Confidential Mailbox Remote station requires the sending unit s ID Number Fax Telephone Number Check the remote ...

Page 134: ...rty 495 Telephone line disconnected Check with the other party 501 502 Communication error occurred using the internal V 34 Modem Check with the other party 540 541 542 543 544 Communication error occurred while transmitting 1 Reload the document and send again 2 Check with the other party 550 Telephone line disconnected Check with the other party 554 555 Communication error occurred while receivi...

Page 135: ...ring or for help on Information Codes that appear on your machine but are not listed above please contact your local Panasonic Authorized Dealer 815 Mailbox is full Install Optional Flash Memory Card 146 870 Memory overflow occurred while storing documents into memory for transmission Transmit documents without storing into memory 52 Info Code Meaning Action page ...

Page 136: ...r wrinkled paper and reload the recording paper into the paper cassette To clear the jam Info Code 007 1 1 Open the Printer Cover 2 Remove the Toner Cartridge 3 Remove the jammed paper Note 1 If at all possible try removing the jammed paper from inside of the unit first as shown in the upper figure to prevent toner that has not been fused on the paper from rubbing off and dirtying the Fuser Roller...

Page 137: ...ing 137 Problem Solving If a document becomes jammed in the machine the display will show the Information Code 030 or 031 Clearing a Document Jam To clear the jam 1 1 Open the ADF Door 2 Remove the jammed document ...

Page 138: ...f the copy is black or has black lines the document Scanning Area is probably dirty and must be cleaned Cleaning the Document Scanning Area To clean the Scanning Area 1 Open the ADF Door 2 Wipe the Scanning Area gently with a soft cloth gauze wet with ethyl alcohol Be sure to use a clean cloth the scanning area can be easily scratched ADF Door Scanning Area ...

Page 139: ...ndby PRINTING CLEANING CHARTS 3 Load the Cleaning Charts into the cassette face down See Note 1 4 1 CLEAN ROLLER 3 PRINT ORDER FORM 5 The Machine will feed out the charts and clean the printer roller CLEANING PRINTER ROLLER 7 8 1 1 PRINTER ROLLER CLEANING CHART HOW TO LOAD THE CLEANING CHARTS 1 REMOVE THE PAPER CASSETTE If multiple cassette configuration REMOVE THE UPPER PAPER CASSETTE 2 SET THESE...

Page 140: ... you adjust the ADF Adjusting the Automatic Document Feeder ADF To adjust the ADF 1 Slide the Pressure Adjusting Lever to the desired position depending on the condition Position Condition To prevent no feed trouble Standard position To prevent multiple feed trouble 1 2 3 ...

Page 141: ...should be replaced or refilled with ink NOTE 1 Please contact your local Panasonic dealer to purchase a new stamp See page 146 Verification Stamp for order number Verification Stamp To remove the stamp 1 Open the ADF Door 2 1 Remove by pulling the Stamp Assembly upward 2 Remove the Stamp Replace the stamp with a new one ADF Door 2 ...

Page 142: ...g the Telephone Line Cable from the telephone jack that was supplied by the telephone company 2 Plug a different regular telephone into the same telephone jack 3 Check for dial tone through the handset If there is still no dial tone report it to your local telephone company or Call from another telephone to this number If the telephone does not ring report it to your local telephone company ...

Page 143: ... Size Document Thickness Up to 20 pages 257 x 364 mm 0 06 to 0 12 mm Up to 30 pages A4 or Letter size 0 06 to 0 10 mm Please note that although the size and thickness meets the specifications you might not be able to set 30 pages with some types of papers Scanning Method Sheet Feeding with CCD type image sensor Effective Scanning Width 208 mm Scanner Resolution Standard 8 pels mm x 3 85 lines mm F...

Page 144: ...mage No 1 using Standard Resolution Power Supply 120VAC 60 Hz Single Phase 100V Version 220 240 VAC 50 60 Hz Single Phase 200V Version Power Consumption 200 V Version 100 V Version Standby Sleep Mode On Less than 2 4 Wh 1 2 Wh Standby Energy Saver On Approx 6 5 Wh 6 0 Wh Standby Energy Saver Off Approx 22 Wh 21 Wh Room temperature 25 C Transmission Approx 17 W 17 W Reception Approx 480 W 460 W Cop...

Page 145: ...lored paper NOTE 1 It is possible that the paper could meet all of the specifications listed above and still not print well because of the variations in paper manufacturing Therefore we recommend that you test the paper thoroughly before purchasing Basic Weight 60 to 90 g m2 Cut Edge Conditions Cut with sharp blades no visible frayed edges Grain Long grain Moisture Content 3 7 to 5 3 by weight Opa...

Page 146: ...r for availability A Options B Supplies Order No Picture Description UE 403176 Handset Kit UE 409070 250 sheets Letter Legal A4 Size Paper Cassette with the Feeder Unit For UF 6100 only Order No Picture Description DZHT000004 Verification Stamp UG 3350 Toner Cartridge ...

Page 147: ...lts in the internal parts becoming accessible in normal use In this instance users should have the equipment repaired or dispose of If the power supply cord and or telephone line cord of this equipment are damaged they must be replaced by the special cords supplied by an Authorized Panasonic service centre CAUTION denotes hazards that could result in minor injury or damage to the machine When you ...

Page 148: ...THE CUT OFF PLUG IS INSERTED INTO ANY 13 AMP SOCKET If a new plug is to be fitted please observe the wiring code as shown below If in any doubt please consult a qualified electrician WARNING THIS APPLIANCE MUST BE EARTHED IMPORTANT The wires in this mains lead are coloured in accordance with the following code As the colours of the wires in the main lead of this appliance may not correspond with t...

Page 149: ...uipment at the other end of the call and or variations in line conditions may mean that it will not always be possible to communicate at the higher speeds for which this machine has been designed Neither Telecom or Panasonic New Zealand can accept responsibility should this situation arise IMPORTANT NOTICE Under power failure conditions this telephone may not operate Please ensure that a separate ...

Page 150: ...either the Communication Journal Relay Transmission Report or the Confidential XMT Report CONTRAST Signifies the scanning sensitivity in terms of lightness and darkness of your original transmitting pages Cover Sheet A Fax Cover Sheet can be attached to your transmit document s that shows the recipient s name originator s name and number of pages attached DDD Direct Distance Dialling A telephone s...

Page 151: ...nits of measure are based on the ITU T Image No 1 Individual Transmission Journal A report that is printed by the transmitting unit stating information regarding the last document transaction Information code A code that is internally generated by your Fax stating a specific operational error or machine failure Initial sending station In a relay network the station that is originating the document...

Page 152: ...re increases Selective reception A function that can be set so that your unit will receive from only those machines programmed into your dialler Sleep Mode The lowest power state that the machine enters after the specified time without actually turning off Station name Alphanumeric ID which can be programmed for each One Touch dialling and Abbreviated dialling number Stored documents Documents tha...

Page 153: ...153 Appendix ITU T Image No 1 All specifications are based on the ITU T Image No 1 The sample shown below is not to scale ...

Page 154: ...rectory Search List 125 Directory Sheet 34 Distinctive Ring Detector DRD 95 Document Jam 137 Document Size 143 Document Thickness 144 E Edit File Mode 83 F Fax Tel Auto Switching Mode 64 Fax Forward 100 Fax Mode 65 FAX Parameter List 127 Fax Parameter Table 36 File List 83 Fixed Reduction 68 Function Key List 10 G Group Dialling 77 H Header Format 36 Header Print 36 I ID Number 29 Image Memory Cap...

Page 155: ...Password 104 Reception Modes 62 Recording Paper Jam 136 Redialling 61 Reduction Ratio 37 Resolution 42 Retry an Incomplete File 90 Ringer Volume 25 S Scanner Resolution 144 Selective Reception 101 Sub Address Password 39 Sub Addressing 114 Substitute Memory Reception 70 T TAM Interface Mode 66 Telephone Mode 63 Toner Cartridge 16 Toner Cartridge Order Forms 128 Transaction Journal 117 Transmission...

Page 156: ...For Service Call For Customer Support Panasonic Communications Co Ltd Fukuoka Japan http www panasonic co jp global Printed in Philippines March 2005 PJQMC0235ZA T0305 0 ...

Reviews: