


C/A SKIP
ADD/DLT
TAPE
COUNTER RESET
SPEED
POSITION
PAUSE
SLOW
REC
VOL
C H
TRACKING
ZERO/
1
4
7
100
2
5
8
0
3
6
9
DISPLAY
ENTER
SAP/Hi-Fi
INDEX
LIGHT
PROG
FF
REW
PLAY
STOP
INPUT
VCR/TV
SELECT
SELECT
CABLE
DSS
TV
EJECT
ACTION
VCR
POWER
SET
SET
M/A
SKIP
STOP 1 2 : 0 0AM
ABC
0 : 0 0 : 3 0
SP
Repeat Play
a
b
Zero Search
To quickly return to specific tape counter location.
d
Return to normal screen.
Press ACTION twice.
4
1
Display menu.
Press ACTION.*
Display SET UP VCR.
2
1) Press
to select.
2) Press to display.
3
1) Press
to select
“REPEAT PLAY.”
2) Press to set.
REPEAT
PLAY
: OFF
T I ME STAMP : ON
REMOTE WARN I NG : ON
AUTO SHUT-OFF : ON
SELECT : KEY
SET : KEY
END : ACT I ON KEY
- - - - - -
SET UP VCR
- - - - - -
SET UP V
SET UP VCR
SET UP FEATURE
SET C LOCK
SET UP CHANNEL
I D I OMA / LANGUE : ENGL I SH
SELECT : KEY
SET : KEY
- - - - - - - - -
MENU
- - - - - - - - -
Display Counter.
Press DISPLAY during playback.
Reset to “0:00:00.”
Press COUNTER
RESET at the desired
position.
Return to “0:00:00.”
Press ZERO/ C/A SKIP
in Stop mode.
• The VCR will go into FF
or REW mode and stop at
the last point the Counter
was set to 0:00:00.
c
Continue playback, rewind, or fast forward.
*Important:
If the remote control POWER, ACTION,
PROG, CH / , INDEX/ M/A SKIP,
NUMBERED keys, INPUT, TAPE
POSITION, or ADD/ DLT button does
not work when pressed, press the VCR
button on the remote and try the button
again.
ACTION
SET
SET
SELECT
SELECT
SET
SET
SELECT
SELECT
COUNTER RESET
Set to see a recording over and over.
Set ON or OFF.
• Playback repeats when tape end is
reached or unrecorded portion over
30 seconds is detected.
DISPLAY
a
DISPLAY
d
ZERO/
C/A SKIP
b
COUNTER
RESET
ACTION
PLAY 1 2 : 0 0AM
0 : 0 0 : 0 0
SP
:PLAY
:STOP
:FF
2
3
SELECT/
SET
1
4
ACTION
C/A SKIP
ZERO/
1
Insert pre-recorded
tape.
2
Insert blank tape
with record tab.
Put in Standby mode.
Press REC, then
PAUSE immediately.
3
Select LINE mode.
Press INPUT.
(See “Selecting
the Input Mode” below.)
and
and
Put in Standby mode.
Press PLAY, then
PAUSE at starting point.
4
Start dubbing.
Press PAUSE.
Start dubbing.
Press PAUSE.
Stop dubbing.
Press STOP.
Stop dubbing.
Press STOP.
Our Vacation
Caution:
Unauthorized exchanging and/or copying of copyrighted recordings may be copyright infringement.
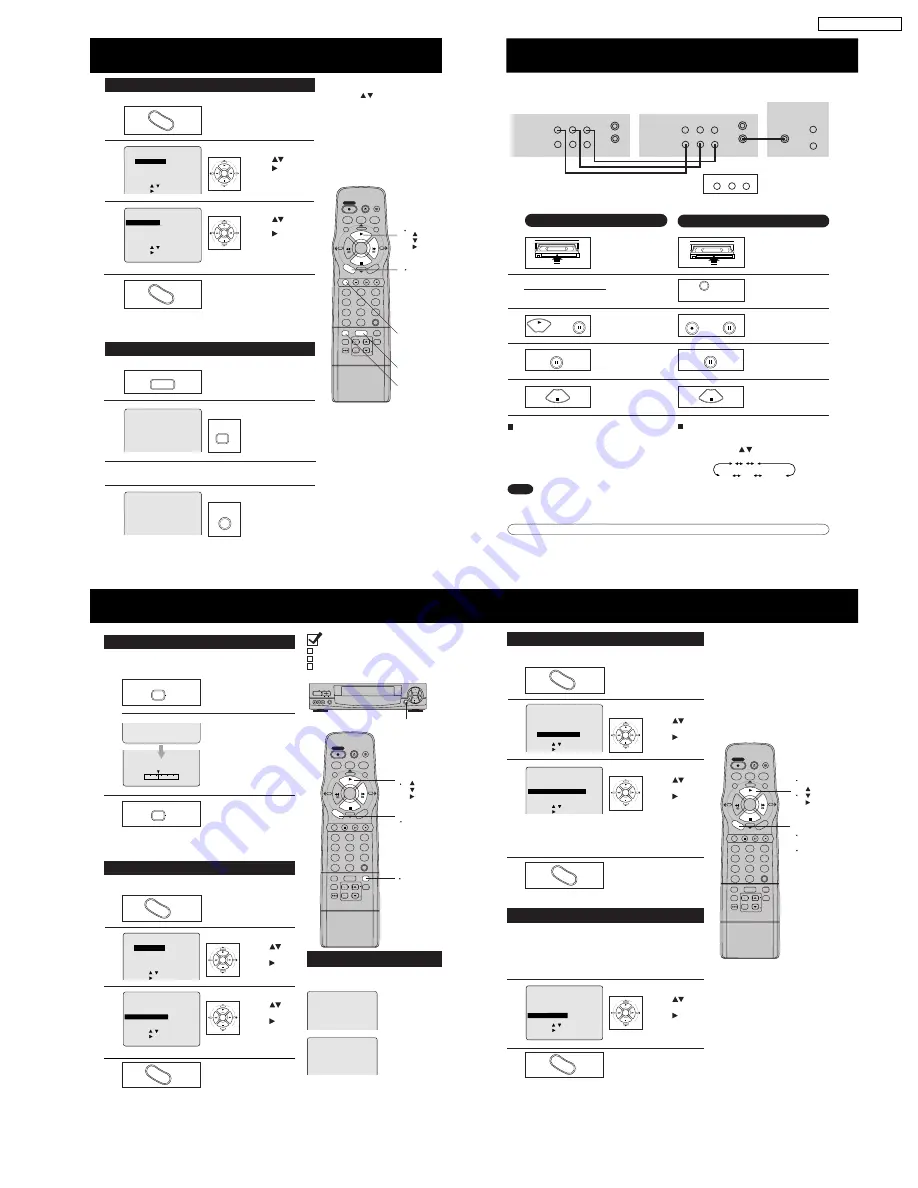
Connections you’ll need to make. (Choose front or rear connection.)
Playing (Source) VCR
Recording (Editing) VCR
5
To Monitor Dubbing on Your TV
1
Turn your TV on and tune to the Recording
VCR channel (CH3 or CH4).
2
Set the VCR/ TV Selector on the Recording
VCR to “VCR.”
INPUT
PLAY
PAUSE
PAUSE
REC
PAUSE
PAUSE
Note
Dubbing tapes protected with Copy Guard
will have poor quality results.
STOP
STOP
1
2
3
125
LINE1
(CABLE)
69
(TV)
or
LINE2
Selecting the Input Mode
Method 1: Press INPUT.
Channel Number <--> LINE1 <--> LINE2
Method 2: Press CH / . Display will change as below.
• “LINE1” or “LINE2” displays on Multi-Function Display
(about 4 sec.) when LINE1 or LINE2 is selected.
• LINE1: For rear audio/video connection.
LINE2: For front audio/video connection.
Recording (Editing) VCR
Playing (Source) VCR
TV for Monitoring
OUT TO TV
VIDEO
R-AUDIO-L
IN 1
OUT
MONO
OUT TO TV
VIDEO
R-AUDIO-L
IN 1
OUT
VHF/
UHF
VIDEO IN
AUDIO IN
MONO
IN FROM ANT.
IN FROM ANT.
or
Front of VCR
VIDEO IN 2 L-AUDIO IN 2-R
C/A SKIP
ADD/DLT
TAPE
COUNTER RESET
SPEED
POSITION
PAUSE
SLOW
REC
VOL
C H
TRACKING
ZERO/
1
4
7
100
2
5
8
0
3
6
9
DISPLAY
ENTER
SAP/Hi-Fi
INDEX
LIGHT
PROG
FF
REW
PLAY
STOP
INPUT
VCR/TV
SELECT
SELECT
CABLE
DSS
TV
EJECT
ACTION
VCR
POWER
SET
SET
M/A
SKIP
STOP
EJECT
REW
FF
POWER
VCR/TV
CHANNEL
VIDEO IN 2 L-AUDIO IN 2-R
MONO
/
ACTION
PLAY
REC
Check list before you begin.
All connections are made.
VCR is plugged in.
TV is turned on and set to the VCR channel
(CH 3 or 4).
• VCR Lock is canceled automatically after 24
hours if clock is set.
VCR Lock Feature
All operations are prohibited except timer
recording and tape eject. Useful for families with
small children.
Tape Position Display Feature
To find out the present tape position.
Tape position cannot be found for C-Cassette type and tape
of less than 60 minutes.
VCR LOCK ACT I VATED
VCR LOCK OFF
TAPE
POSITION
REC
b
c
SELECT/
SET
:PLAY
:STOP
:FF
a
d
ACTION
1
Detect Tape Position.
Press TAPE POSITION.*
TAPE
POSITION
To turn ON:
In Stop mode,
hold down REC on
the VCR without a
cassette inserted
for 7 seconds.
To turn OFF:
Repeat above.
• Detecting tape position is only
displayed when cassette is first
inserted.
• It takes several seconds for
correct indication to appear.
• Indication is standard.
Return to normal
screen.
Press TAPE POSITION.
2
TAPE
POSITION
DETECTING TAPE POSITION
d
Remote Warning ON/OFF Feature
If Multi-brand feature is used (page 20),and this feature is set to on, a warning
appears whenever an invalid key is pressed in TV, DSS, or Cable mode.
a
Display menu.
Press ACTION.
Display SET UP VCR.
b
1) Press
to
select.
2) Press to
display.
c
1) Press
to
select.
2) Press to set.
SET UP V
SET UP VCR
SET UP FEATURE
SET C LOCK
SET UP CHANNEL
I D I OMA / LANGUE : ENGL I SH
SELECT : KEY
SET : KEY
- - - - - - - - -
MENU
- - - - - - - - -
REPEAT PLAY : OFF
T I ME STAMP : ON
REMOTE
WARN I NG
: ON
AUTO SHUT-OFF : ON
SELECT : KEY
SET : KEY
END : ACT I ON KEY
- - - - - -
SET UP VCR
- - - - - -
Return to normal
screen.
Press ACTION twice.
ACTION
SET
SET
SELECT
SELECT
SET
SET
SELECT
SELECT
ACTION
Set ON or OFF.
• “OFF” --> Remote Warning will
not appear even if
invalid key is pressed.
BEG I N END
1
2
C/A SKIP
ADD/DLT
TAPE
COUNTER RESET
SPEED
POSITION
PAUSE
SLOW
REC
VOL
C H
TRACKING
ZERO/
1
4
7
100
2
5
8
0
3
6
9
DISPLAY
ENTER
SAP/Hi-Fi
INDEX
LIGHT
PROG
FF
REW
PLAY
STOP
INPUT
VCR/TV
SELECT
SELECT
CABLE
DSS
TV
EJECT
ACTION
VCR
POWER
SET
SET
M/A
SKIP
Weak Signal Display ON/OFF Feature
When “ON” is selected, picture is displayed even when broadcast
signal is weak or nonexistent.
2
3
b
SELECT/
SET
:PLAY
:STOP
:FF
1
4
c
ACTION
Set ON or OFF.
1) Press
to
select.
2) Press to set.
a
b
Return to normal
screen.
Press ACTION twice.
c
Repeat step “a” and “b” on page 36 to
display SET UP VCR.
REPEAT PLAY : OFF
T I ME STAMP : ON
REMOTE WARN I NG : ON
AUTO
SHUT-OFF
: ON
SELECT : KEY
SET : KEY
END : ACT I ON KEY
- - - - - -
SET UP VCR
- - - - - -
SET
SET
SELECT
SELECT
ACTION
1
Display menu.
Press ACTION.
2
1) Press
to
select.
2) Press to
display.
Set ON or OFF.
3
1) Press
to
select.
2) Press to set.
Return to normal
screen.
Press ACTION twice.
4
Display SET UP CHANNEL.
SET UP VCR
SET UP FEATURE
SET C LOCK
SET UP
SET UP CHANNEL
I D I OMA / LANGUE : ENGL I SH
SELECT : KEY
SET : KEY
- - - - - - - - -
MENU
- - - - - - - - -
• ON --> Picture is displayed regardless of signal condition, and
may not always be clearly visible.
OFF --> Screen turns solid blue when signal is absent or weak.
• If VCR is connected to equipment which has blue back feature,
selecting ON will have no effect on the other equipment.
ACTION
SET
SET
SELECT
SELECT
SET
SET
SELECT
SELECT
ACTION
Auto Shut-Off Feature
When “ON” is selected, VCR shuts itself off when playback of a blank
portion of tape continues or no signal (except when LINE is selected) is
detected for over 5 minutes.
SELECT : KEY
SET : KEY
- - - -
SET UP CHANNEL
- - - -
ANTENNA : CABLE
AUTO SET
CHANNEL CAPT I ON
WEAK S
S I GNAL
D I SPLAY
: OFF
CABLE / DSS BOX SET UP
VCR Plus+ CH SET UP
Tape Operation (continued)
Copying Your Tapes (Dubbing)
Special VCR Features
9
PV-9661 / PV-9662
Summary of Contents for Omnivision PV-9661
Page 272: ...5 2 MECHANISM SECTION 5 2 1 Disassembly Method Fig J1 1 23 PV 9661 PV 9662...
Page 273: ...5 2 2 EJECT Position Confirmation Fig J1 2 24 PV 9661 PV 9662...
Page 284: ...6 ADJUSTMENT PROCEDURES 6 1 SERVICE FIXTURES AND TOOLS 35 PV 9661 PV 9662...
Page 291: ...6 4 TEST POINTS AND CONTROL LOCATION 42 PV 9661 PV 9662...
Page 311: ...PV 9661 PV 9662 62...
Page 330: ...10 EXPLODED VIEWS 10 1 MECHANISM TOP SECTION 81 PV 9661 PV 9662...
Page 331: ...10 2 MECHANISM BOTTOM SECTION 82 PV 9661 PV 9662...
Page 332: ...10 3 CASSETTE UP COMPARTMENT SECTION 83 PV 9661 PV 9662...
Page 333: ...10 4 CHASSIS FRAME AND CASING PARTS SECTION 84 PV 9661 PV 9662...
Page 334: ...10 5 PACKING PARTS AND ACCESSORIES SECTION 85 PV 9661 PV 9662...


