background image

Edit mode

89

VQT0N70

ª

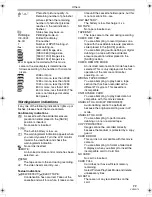
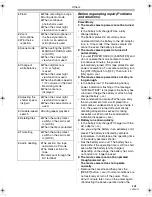
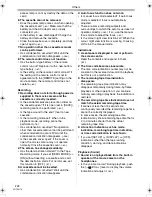
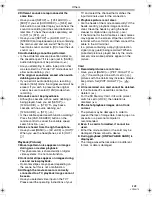
When neither image nor sound from 
the movie camera is output to the TV 
set

Check that the plugs are inserted as far as they 
go.

Check the connected terminal.

When no image is presented on the TV even if 
set [BASIC] >> [AV JACK] >> [OUT/

Ë

], set to 

[OUT]. (

-96-

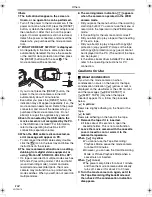
Recording the contents of other 
equipment

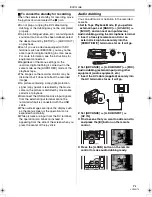
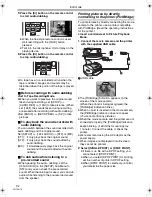
You can dub the contents of other equipment to a 
DV cassette or card, and can record TV 
programs.

Set to Tape Playback Mode.

1

Connect the movie camera and other 
equipment.

Connect the movie camera and other 
equipment by using the


AV cable 

1

.

If the recorder has an S-Video terminal, then 
also connect an S-Video cable 

2

 (optional). It 

allows you to record clearer image.

2

Set [BASIC] >> [AV JACK] >> [IN/OUT]. 
(Movie camera) 

3

Set [ADVANCE] >> [REC STDBY] >> [YES]. 
(Movie camera)(Only when the Tape 
Recording Mode)

The icon appears.

4

Turn the power on and start playback. 
(Other equipment) 

5

Start recording. (Movie camera) 

Recording on a tape:
Move the joystick up to start recording.

Or, while pressing the [

¥

REC] button on the 

remote controller, press the [

1

] button.

Recording on a card:
Press the [PHOTO SHOT] button.

6

Move the joystick of the movie camera 
down or press the [

] button on the remote 

controller to stop recording.

While analog input pictures are being 
recorded on a tape or when the movie 
camera is in recording standby mode, the 
photoshot recording is disabled.

7

Stop playback. (Other equipment) 

Do not plug or unplug the cable during recording 
or the recording may not be completed properly.

Carefully read the operating instructions for your 
TV set and video equipment.

By operating as [SETUP] or [ADVANCE] >> 
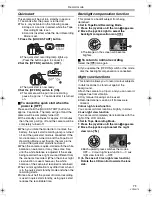
[AUDIO REC], set the recording sound mode 
([12bit] or [16bit]).

If a picture (bilingual video, etc.) containing main 
sound and sub sound has been dubbed, select 
the desired sound by [SETUP] >> [AUDIO OUT] 
on playback.

If a picture containing a copyright protection 
signal (copy guard) is recorded, the message 
“COPY PROTECTED” appears when recording 
it on a tape and the picture is distorted by 
mosaic-like patterns at playback.

When wide images are input, the display such 
as the menu screen or the operation icon is 
expanded horizontally.

If, during recording, an operation such as cue 
playback or slow motion playback is performed 
on external equipment, mosaic-like patterns 
may appear on the picture at playback.

If pictures are recorded when TV broadcasting 
signals are weak or pictures are affected by 
noise, they may be distorted or may not even be 
played back.

If both the S-Video cable and the AV cable are 
connected, S -Video signal are input 
preferentially.

The size of still pictures recorded on a card from 
the external input becomes [640]. (This is not 
mega-pixel still-picture recording.) 

When recording still pictures on a card, you 
cannot record sound.

1

2

[VIDEO OUT]

[AUDIO OUT]

[S-VIDEO OUT]

AV/

S-VIDEO

STOP

V

/REW

STILL ADV

VOL

¥

REC

A.DUB

PLAY

PAUSE

FF/

W

STILL ADV

T

W

GS250GC.book  89 ページ  2004年12月18日 土曜日 午後1時35分

Summary of Contents for NV-GS250GC

Page 1: ...使用說明書 Operating Instructions 數位攝錄放影機 Digital Video Camera Model No NV GS250GC 使用前 請仔細閱讀本說明書 Before use please read these instructions completely VQT0N70 R ...

Page 2: ...攝像機 Windows 是美國 Microsoft 公司的商標或註冊商 標 SD 徽標是商標 Leica 是 Leica microsystems IR GmbH 公司的註 冊商標 Dicomar 是 Leica Camera AG 公司的 註冊商標 使用說明書中的所有其他公司和產品名稱都是各 個公司的商標或註冊商標 錄製在 SD 記憶卡上的檔案 本攝像機可能無法回放由其他設備錄製和創建的 檔案 反之亦然 為此 請預先檢查設備的相容 性 讓記憶卡遠離兒童的接觸範圍 以防止兒童吞 服 參照頁 參照頁頁碼的兩側標有短划線 例如 00 菜單操作流程用 表示 ª 警告 若要防止電擊 請勿卸下機身的前蓋 或後蓋 機身沒有用戶可維修的部件 需要維修時 請聯係授權的維修人員 請僅使用推薦的附件 由於本設備使用時會變熱 請在空氣流通的 地方進行操作 不要將此設備安置在狹窄的 空間內 例如書櫃或類似的地方 ...

Page 3: ...0 快速啟動 21 逆光補償功能 21 夜視功能 21 肌膚柔和模式 22 長焦微距功能 22 淡入 淡出功能 22 消除風聲噪音功能 23 使用內置視頻閃光燈 23 自拍計時器拍攝 24 錄製供寬銀幕電視使用的影像 24 畫面穩定器功能 24 連續拍照 24 在不同情況下拍攝 場景模式 25 用自然色彩拍攝 白平衡 26 手動對焦調整 26 手動快門速度 光圈調整 27 重播模式 重播錄影帶 28 慢動作重播 逐格重播 28 變速搜索功能 29 在電視機上重播 29 重播記憶卡 30 刪除記憶卡上錄製的檔案 30 格式化記憶卡 31 保護記憶卡上的檔案 31 在記憶卡上寫入列印資料 DPOF 設定 31 編輯模式 從錄影帶錄製到記憶卡上 32 複製到 DVD 錄影機或 VCR 中 配音 32 錄製其他設備中的內容 33 用 DV 電纜錄製 數位配音 34 配音 34 直接連接到印表機上列...

Page 4: ...光鏡組件 VW LF43WE 10 直流視頻照明 VW LDC10E 11 直流視頻照明 VW LDH3E 12 直流視頻照明的燈泡 VZ LL10E 13 直流視頻照明的燈泡 VW LL3E 14 立體聲變焦麥克風 VW VMH3E 15 立體聲麥克風 VW VMS2E 16 視頻閃光燈 VW FLH3E 17 三腳架 VW CT45E 18 DV 電纜 VW CD1E 19 防護袋 VW SJ05E 在某些國家和地區有些附件可能無法使用 部件的識別和操作 ª 攝錄放影機 1 內置視頻閃光燈 23 2 拍攝燈 39 3 麥克風 內置 立體聲 20 23 4 手柄帶 單觸自由式手柄帶 6 5 鏡頭 LEICA DICOMAR 6 白平衡感測器 26 7 遙控感測器 15 8 鎖止鍵 6 9 鎖止蓋 6 10 音頻視頻輸入 輸出端子 AV 32 僅使用提供的 AV 電纜或耳機 否則可能不能 ...

Page 5: ...憶卡存取指示燈 10 32 DV 端子 DV 34 33 記憶卡插槽蓋 9 34 記憶卡插槽 10 35 錄影帶盒倉 9 36 錄影帶彈出桿 OPEN EJECT 9 37 錄影帶倉蓋 9 38 變焦桿 W T 20 音量桿 s VOLr 28 39 拍照鍵 PHOTO SHOT 18 40 智能式附件座 立體聲變焦麥克風 VW VMH3E 可選件 或者直 流視頻照明 VW LDH3E 可選件 應當安裝在這 個地方 當安裝供智能式附件座使用的附件時 由本產品 供電 在安裝或者取下附件時 請把取景器 1 拉伸 出來 41 三腳架座 這是一個孔眼 用於把攝錄放影機安裝到可選的 三腳架 VW CT45E 上 關於如何把三腳架安裝 到攝錄放影機上 請仔細閱讀使用說明書 由於 LCD 生產技術的限制 在取景器熒屏上 可能會有一些微小的亮點或者暗點 但這不 是故障 不影響拍攝的圖片 由於 LCD 生產...

Page 6: ...E 可選件 中的 MC 保護鏡或 ND 濾鏡 不能把其 他的附件安裝到遮光罩上 鏡頭蓋除外 當安裝長焦轉換鏡頭 VW LT4314NE 可選件 或廣角轉換鏡頭 VW LW4307ME 可選件 時 應當首先卸下鏡頭遮光罩 如果把 2 個鏡頭附件 如 ND 濾鏡和長焦轉換鏡頭 安裝上去 並且把 W T 桿壓向 W 方向時 影 像的四個角就會變暗 暈影 安裝鏡頭蓋 安裝鏡頭蓋以保護鏡頭的表面 1 取下手柄帶 把鏡頭蓋吊帶的一端穿過手柄帶 安裝部分上的小孔 然後把鏡頭蓋穿過鏡頭蓋 吊帶 取下的鏡頭蓋可以挂在鏡頭蓋固定器上 如果手 柄帶作為手挂帶使用時 它就不能挂在上面 要安上或者取下鏡頭蓋 可以用兩個手指指尖捏 住鏡頭蓋的兩端 單觸自由式手柄帶 ª 用作手挂帶 如果將手柄帶作為手挂帶來使用 就可以更加容 易地攜帶或操作攝錄放影機 1 捏住兩側的突出點 2 打開鎖止蓋 1 按壓鎖 止鍵 3 取下手柄...

Page 7: ...在打開的 LCD 顯示屏上一邊觀看影像 一邊 進行拍攝 1 將手指放到 LCD 顯示屏的打開部位 並朝箭頭 所示方向往外拉出 LCD 顯示屏 取景器將關閉 它能打開至 90o 2 調整 LCD 顯示屏的角度 達到您滿意的程度 它能朝鏡頭方向轉動 180o 1 或者朝取景器方 向轉動 90o 2 可以從菜單調整 LCD 顯示屏的亮度和色彩級別 如果強力打開或轉動 LCD 顯示屏 攝錄放影機可 能會被損壞或造成故障 檢查記憶卡插槽蓋是否已經關上 當LCD顯示屏朝鏡頭方向轉動180o 進行自拍時 LCD 顯示屏和取景器會同時 使用取景器 ª 拉伸出取景器 1 拉出取景器 並捏住延長的凸起部分 把取景 器拉出 ª 拉升取景器 1 捏住取景器延長的凸起部分 使取景器提升起 來 ª 調整視野 1 滑動目鏡校正器的旋鈕調整焦距 可以從菜單調整取景器的亮度 1 1 3 2 OPEN 2 90o 1 180...

Page 8: ...一個空隙 由於電源線是專為攝錄放影機設計的 不要在 其他設備上使用本電源線 或者不要在本攝錄 放影機上使用其他設備的電源線 ª 裝入電池 把電池頂靠在電池座上 並滑動電池 直到發出 哢噠一聲 ª 取下電池 在推動 PUSH BATT 鍵的同時 滑動電池 或 DC 輸入線 把其取下 請用手握住電池 以防掉到地上 充電時間和可拍攝時間 下表所列出的時間為在 25oC 的溫度下和 60 的 濕度下的時間 該表謹作為指導 如果溫度高於 或低於規定值 則充電時間將會變長 A 充電時間 B 最大連續可拍攝時間 C 間斷拍攝時間 1 提供的電池 CGA DU12 7 2 V 1150 mAh A 2 h 25 min B 2 h 5 min 1 h 55 min C 1 h 5 min 1 h CGA DU14 7 2 V 1360 mAh A 2 h 45 min B 2 h 20 min 2 h 1...

Page 9: ...錄影帶 在插入錄影帶時 請按圖示方向插入 然後牢 牢插入直到不能繼續前進為止 取出錄影帶時 應筆直地向外抽出 3 按動 PUSH 標記 1 以關閉錄影帶倉 4 只有在錄影帶倉完全座合以後 才能關閉錄影 帶倉蓋 使用後 一定要把錄影帶完全倒回去 取出錄影 帶 並放到錄影帶盒內 應當豎直存放錄影帶 盒 48 如果在攝錄放影機的鏡頭或主要的元件上形成了 水汽凝結 即使沒有顯示出水汽凝結報警 也可 能在磁頭或錄影帶上已經形成了水汽凝結 此時 不要打開錄影帶倉蓋 47 ª 當錄影帶倉不能露出時 完全關閉錄影帶倉蓋 然後再重新完全打開 檢查電池電量是否已經耗盡 ª 當錄影帶倉不能座合時 將 OFF ON 開關設置為 OFF 然後再設置為 ON 檢查電池電量是否已經耗盡 ª 插入 取出錄影帶 當錄影帶倉正在運作時 不要觸動任何部分 除 PUSH 標記以外 當插入先前已經錄製過的錄影帶時 請使用空白 搜索...

Page 10: ...開關或者模式轉盤 ª SD 記憶卡 在 SD 記憶卡標簽上指示出來的存儲容量 相當 於用於保護和管理版權以及可以作為常規內存供 攝錄放影機 個人電腦或者其他設備使用的容量 的總和 ª 有關 SD 記憶卡上的寫保護開關 SD 記憶卡上有一個寫保護開關 如果這個開關 被移到 LOCK 您就不能往記憶卡上寫入 消 抹記憶卡上的資料或者是對它實行格式化 如果 把這個開關移回到原來的位置上 就可以進行這 些操作 打開攝錄放影機 如果在鏡頭蓋未取下的情況下打開攝錄放影機 自動白平衡調整可能無法正常工作 請取下鏡頭 蓋後 再打開攝錄放影機 ª 接通電源的方法 1 在按動鍵 1 的同時 將 OFF ON 開關設置為 ON 電源指示燈點亮 ª 關閉電源的方法 1 在按動鍵 1 的同時 將 OFF ON 開關設置為 OFF 電源指示燈熄滅 選擇模式 轉動模式轉盤選擇所需的模式 1 轉動模式轉盤 將您想要的模式...

Page 11: ...錄影帶拍攝模式 AUTO MANUAL FOCUS 開關設置為 AUTO 2 錄影帶拍攝模式 AUTO MANUAL FOCUS 開關設置為 MANUAL 3 錄影帶重播模式 4 記憶卡拍攝模式 AUTO MANUAL FOCUS 開關設置為 AUTO 1 向上移動選擇 2 向下移動選擇 3 向左移動選擇 4 向右移動選擇 5 推動中心部位 進行確定 3 長焦微距 22 4 肌膚柔和模式 22 2 漸變 22 1 逆光補償 21 3 夜視 0 勒克斯夜視 21 4 拍攝檢查 18 1 3 2 4 5 OFF 4 白平衡 快門速度 光圈或增益值 26 1 選擇 調整 26 2 選擇 調整 26 3 重播 暫停 28 4 停止 28 2 回捲 回捲搜索重播 28 1 快進 快進搜索重播 28 3 長焦微距 22 4 肌膚柔和模式 22 1 逆光補償 21 OFF OFF OFF ...

Page 12: ...言 1 設置 LANGUAGE 中文 使用菜單熒屏 關於每個單獨的菜單 請參見 37 1 按 MENU 鍵 顯示出與模式轉盤所選模式相對應的菜單 當菜單正在顯示時 不要切換模式轉盤 2 上下移動控制桿選擇頂級菜單 3 向右移動或按下控制桿 設定選擇 4 上下移動控制桿 選擇子菜單 5 向右移動或按下控制桿 設定選擇 6 上下移動控制桿 選擇要設定的項目 7 按壓控制桿確定設定 4 白平衡 快門速度 光圈或增益值 26 1 選擇 調整 26 2 選擇 調整 26 3 重播 停止 30 4 消抹 30 2 重播前一個圖片 30 1 重播後一個圖片 30 OFF OFF MENU ...

Page 13: ...按壓控制桿確定設定 時鐘功能從 00 秒開始計數 ª 關於日期 時間 日期和時間功能是由內置鋰電池驅動的 在正式錄製之前一定要檢查時間 因為內置時鐘 不是十分準確 ª 給內置鋰電池充電 如果在攝錄放影機啟動時顯示出 0 或 則 說明內置鋰電池電量已經耗盡 將 AC 適配器與 攝影機連接或者把電池安裝到攝影機上 則內置 鋰電池將被充電 將攝錄放影機放置大約 24 小 時 電池就能驅動日期和時間大約 6 個月 即 便 OFF ON 開關設置為 OFF 電池也會被充 電 調整 LCD 顯示屏 取景器 ª 調整亮度及色彩級別 1 設置 設定 LCD設定 或 EVF設定 是 2 上下移動控制桿 選擇要調整的項目 LCD 設定 LCD 顯示屏的亮度 LCD 顯示屏的色彩級別 EVF 設定 取景器的亮度 3 左右移動控制桿 移動表示亮度的豎條數量 4 按 MENU 鍵或控制桿 完成設置 為了調整取景器的...

Page 14: ...ª 遙控器 使用隨機提供的遙控器可以控制本攝錄放影機幾 乎所有的功能 1 日期 時間鍵 DATE TIME 37 2 熒屏顯示鍵 OSD 29 3 錄製鍵 REC 33 34 4 配音鍵 A DUB 35 5 方向鍵 π 13 6 慢動作 逐格快進鍵 E D E 反向 D 正向 28 7 變焦 音量鍵 ZOOM VOL 8 搜索鍵 VAR SEARCH 29 9 菜單鍵 MENU 13 10 拍照鍵 PHOTO SHOT 11 回捲 回捲搜索鍵 6 12 暫停鍵 13 停止鍵 14 拍攝啟動 停止鍵 START STOP POWER LCD STOP OSD V REW STILL ADV DATE TIME VOL ZOOM REC PHOTO SHOT START STOP A DUB PLAY PAUSE FF W STILL ADV ENTER VAR SEARCH MENU T ...

Page 15: ... 遙控 VCR1 或 VCR2 2 在遙控器上設置 VCR1 同時按 D 和 1 VCR2 同時按 E 和 2 ª 關於鈕扣型電池 當鈕扣型電池的電量耗盡時 請用一塊新電池更 換 部件號 CR2025 電池在正常情況下大約 可以使用一年 但要根據使用的頻度決定 使鈕扣型電池遠離兒童的接觸範圍 如果攝錄放影機的遙控模式和遙控器的遙控模式 相互不能匹配 將出現 遙控 在給攝錄放影 機通電後 第一次使用遙控器的時候會出現 檢查遙控模式 42 並且不能進行操作 請 設置相同的遙控模式 遙控器僅限於室內使用 在室外或強光下使用 即使遙控器處於可用範圍之內 攝錄放影機也有 可能不能正常操作 處於 1 米以內時 可以在攝錄放影機的遙控感測 器 LCD 顯示屏一側 的旁邊進行操作 注意事項 如果更換電池的操作方法不正確 會有發生 爆炸的危險 更換時 只允許使用由設備製 造廠推薦的相同或同等型號的電池 用過...

Page 16: ...的自由式遙控器連接到攝錄放 影機上 1 把帶麥克風的自由式遙控器插入 REMOTE 端 口 插入的深度應儘可能的深 ª 切換麥克風 按動帶麥克風的自由式遙控器上的 TALK 鍵 遙 控器上的麥克風就會啟動 代替攝錄放影機上的 麥克風 當正按著這個鍵時 會出現 並且啟動遙控 器上的麥克風 我們建議使用麥克風時保持離開嘴巴約 10 釐米 的距離 ª 關於夾子 位於背面一側 當把夾子別到衣服口袋上或者其他地方時 一定 要小心不要碰翻三腳架 使攝錄放影機從架子上 掉下來 帶麥克風的自由式遙控器上的 PHOTO SHOT 鍵 不能按下一半 如果遙控器的針式插頭沒有牢牢插入 REMOTE 端口 其插入的深度應儘可能的深 可能無法確 保正常的操作 在使用前 要確保該插頭已經牢牢地插入到端口 其插入的深度應儘可能的深 1 2 3 4 5 REMOTE MIC ...

Page 17: ...遙控器 14 設置 SP LP 模式 17 ª 關於自動模式 將 AUTO MANUAL FOCUS 開關設置為 AUTO 色彩平衡 白平衡 和對焦將會自動調 整 自動白平衡 50 自動對焦 50 根據光源和場景 色彩平衡和對焦可能不能調 整 在這種情況下 手動調整白平衡和對焦 場景模式設置 25 白平衡設置 26 快門速度設置 27 光圈 增益值設置 27 對焦設置 26 ª 拍攝模式 可以切換錄影帶拍攝模式 設置為錄影帶拍攝 重播模式 1 設置 基本功能 或 進階功能 拍攝速度 SP 或 LP 如果選擇了 LP 模式 則攝錄時間將會是 SP 模式 的 1 5 倍 但是有一些功能將不能使用 對於重大事件的拍攝 我們建議使用 SP 模式 為了完全發揮 LP 模式的性能 我們建議使用標 有 LP 模式的松下錄影帶 不可把音頻信號複製到用LP模式錄製的影像上 34 在 LP 模式下 圖片的質量...

Page 18: ...錄影帶時 間會比實際剩餘錄影帶時間短 2 至 3 分鐘 在錄影帶上錄製影像的同時 在記憶卡 上錄製靜態圖片 可以在將影像錄製到錄影帶上的同時錄製靜態圖 片 設置為錄影帶拍攝模式 1 在把影像錄製到錄影帶上的同時 完全按下 PHOTO SHOT 鍵 關於錄製到記憶卡上的靜態圖片數量 請參見 52 在往記憶卡上錄製圖片時 拍攝啟動 停止鍵會 失效 可以為要錄製的靜態圖片選擇圖片質量 19 要錄製的圖片尺寸是 640 為了以較高的質量錄製靜態圖片 我們建議使用 記憶卡拍攝模式 如果使用廣角模式 則不能將影像錄製到記憶卡 上 如果半按 PHOTO SHOT 鍵 該鍵不起作用 檢查拍攝 被拍攝的最後的影像將被重播 2 到 3 秒鐘 檢查完畢後 攝錄放影機將設置為拍攝暫停 設置為錄影帶拍攝模式 1 在拍攝暫停中按控制桿直到圖標 1 出現 2 向下移動控制桿 選擇拍攝檢查指示 空白搜索功能 搜索已經錄製...

Page 19: ...使用三腳架和遙控器拍攝到沒有抖動的穩定 的圖片 關於錄製到記憶卡上的靜態圖片數量 請參見 52 無法錄製聲音 在往記憶卡上錄製資料的過程中 不要操作模式 轉盤 當存取燈點亮時 不要插入或取出記憶卡 可能降低其他產品的質量或者不能回放在本攝錄 放影機上錄製的資料 如果設置 圖片質量 根據圖片內容在 重播的影像上會出現馬賽克圖案的雜訊 當 圖片尺寸 設定成除 640 以外時 被設置為百 萬像素的拍攝模式 當圖片尺寸設定成除 640 以外時 物體周圍的 場景拍攝得比在 640 中的場景更寬一些 ª 在記憶卡拍攝模式下熒屏上的顯示內容 1 靜態圖片尺寸 2 可錄製的靜態圖片數量 當沒有可以錄製的圖片 會有紅燈閃爍 3 靜態圖片質量 ª 漸進式拍照 可以錄製靜態圖片 就像那些有較高影像質量的 圖片和格圖片一樣 不能切換漸進功能開 關 在錄影帶拍攝模式下 根據所使用的其他功能 漸進功能可能無效 43 ...

Page 20: ... 當變焦速度很快時 物體可能難以對焦 當變焦放大率是 1k 時 攝錄放影機可以對距離 鏡頭大約 4 釐米的物體進行對焦 ª 數位變焦功能 如果變焦放大率超過 10 倍 則數位變焦功能將啟 動 數位變焦功能允許選擇的放大率為從 20k 到 500k 1 設置 進階功能 數位變焦 20k 或 500k 關 僅光學放大 最高 10k 20k 最高 20k 500k 最高 500k 數位變焦放大率越大 影像質量越差 當使用記憶卡拍攝模式時 不能使用數位變焦功能 ª 使用變焦麥克風功能 該功能與變焦操作相結合 麥克風會以長焦拍攝 的方式清晰地收集遠處的聲音 或以廣角拍攝的 方式收集近處的聲音 設置為錄影帶拍攝模式 1 設置 進階功能 變焦麥克風 開 ª 關於變速變焦功能 當把 W T 桿推到頭時 可以從 1k 變焦到 10k 最 多在 1 3 秒內 變焦速度的變化取決於 W T 桿的移動量 對於帶麥...

Page 21: ... 時 如果正在拍攝的場景的光源與上次拍攝時的 不同 則需要一些時間 直到白平衡調整好 當使用彩色夜景功能時 上一次拍攝的場景的 白平衡被保留了下來 變焦放大率和在快速啟動待機模式中的 以及在 拍攝開始時的不同 由於在快速啟動待機狀態中使用的電量是正常拍 攝時的一半 因此 使用快速啟動可以減少在拍 攝圖片的期間內所花費的時間 逆光補償功能 這個功能將防止逆光物體變得黑暗 設置為錄影帶 記憶卡拍攝模式 1 按控制桿直到出現 1 圖標 2 向右移動控制桿 選擇逆光補償指示 熒屏上的影像將變得更亮 ª 恢復正常拍攝 再次選擇 指示 如果您操作了 OFF ON 開關或模式轉盤 則逆 光補償就會被取消 夜視功能 本項功能可使您拍攝暗處的彩色物體 使它在背 景上突出出來 將攝錄放影機安裝到三腳架上 就可以拍攝到沒 有振動的影像 只能使用手動對焦 所拍攝的場景看起來似乎是缺少了邊框 彩色夜視功能 可以把黑...

Page 22: ...清晰 長焦微距功能 只是在被攝物體上聚焦 而使背景變得模糊 可 使影像給人留下深刻的印象 本攝錄放影機可以 在大約 40 釐米的距離上對物體進行對焦 設置為錄影帶 記憶卡拍攝模式 1 按控制桿直到出現 1 圖標 2 向上移動控制桿 選擇長焦微距指示 如果放大率是 10k 或更小 則它將自動設置 為 10k ª 取消長焦微距功能 再次選擇 指示 如果得不到更準確的焦距 請手動調整焦距 在下列的情況下 長焦微距功能會被取消 變焦的放大率變得低於 10k 操作 OFF ON 開關或者模式轉盤 淡入 淡出功能 淡入 影像和聲音漸漸出現 淡出 影像和聲音漸漸消失 設置為錄影帶拍攝模式 1 按控制桿直到出現 1 圖標 2 向左移動控制桿 選擇漸變指示 3 按拍攝啟動 停止鍵 開始拍攝 淡入 開始拍攝時 影像 聲音完全消失 然後漸漸出 現 拍攝暫停 淡出 影像 聲音逐漸消失 影像 聲音完全消失後 拍 攝...

Page 23: ... ßA 並且調整了快門速度 光圈或增益 ßA ßAi 或 ßAj 指示可能 消失 視頻閃光燈可能不能點亮 使用視頻閃光燈 要把快門速度固定到 1 750 秒 或者比 1 500 更快一些 在黑暗的地方 圖片可能沒有對準焦點 在這種 情況下 請手動調整焦距 如果視頻閃光燈在白色背景前點亮 圖片可能會 顯得暗一些 轉換鏡頭 可選件 可能會擋住閃光燈 並且導致 出現暈影的效果 不要使閃光燈與安裝的 ND 濾鏡 可選件 一起使 用 在禁止使用閃光燈的地方 請將閃光燈設置為 不要用手或者其他任何方法把閃光燈擋住 ª 當不使用視頻閃光燈時 設置 進階功能 閃光燈 ª 調整視頻閃光燈的亮度 1 設置 進階功能 閃光強度選擇 選擇想要 的亮度級別 ßj 如果亮度太高 ßj 或 ßAj 指示出 現 ßd0 在正常錄製時 ß 或 ßA 指示出現 ßi 如果亮度不足 ßi 或 ßAi 指示出 現 ª 減低紅眼功...

Page 24: ... 重播出來的影像也是 有變化的 請參照您電視機的使用說明書 這一功能並不能加寬拍攝的範圍 在電視機的熒屏上重播影像時 在某些情況下 日期 時間指示可能被消抹掉 根據電視機的情況 圖片的質量可能會降低 當把寬屏電影的圖片輸入到個人電腦中時 根據 使用的軟體 輸入的圖片有可能顯示得不正確 如果您使用的電視的寬高比是 4 3 時 我們不建 議您使用寬銀幕模式 影像被垂直拉長 畫面穩定器功能 可以減輕在拍攝過程中由於手的抖動而使影像發 生晃動的情況 設置為錄影帶拍攝模式 1 設置 進階功能 光學防震功能 開 ª 取消畫面穩定器功能 設置 進階功能 光學防震功能 關 在記憶卡拍攝模式下拍攝靜態圖片時 半按 PHOTO SHOT 鍵 增加畫面穩定器功能的效 果 MEGA OIS 使用三腳架時 我們建議您關掉畫面穩定器 在下列情況下 畫面穩定器功能可能不能有效地 發揮作用 當使用了數位變焦時 當使用了轉...

Page 25: ...運動模式 這一模式的用途是拍攝運動場景或有快速移 動的場景 2 肖像模式 這一模式的用途是使人物在背景中突出出來 3 低照度模式 這一模式的用途是使黑暗的場景拍攝得較為 明亮 4 聚光燈模式 這一模式的用途是拍攝晚會上或劇院裡處於 聚光燈下的目標 5 海灘及雪地模式 這一模式的用途是在滑雪場和海灘等耀眼處 拍攝影像 ª 取消場景模式功能 設置 基本功能 場景模式 關 或將 AUTO MANUAL FOCUS 開關設置為 AUTO 運動模式 對拍攝的圖片進行慢動作重播或重播暫停時 此模式可消除攝錄放影機的晃動 在正常重播時 影像的移動可能會不流暢 由於重播影像的顏色和亮度可能會變化 所以 要避免在熒光燈 水銀燈或鈉燈下拍攝 如果在強光下拍攝 或者被拍攝的物體反光很 強 會出現垂直光線 如果亮度不夠 運動模式將無法工作 5 指示將閃爍 如果在室內使用此模式 熒屏會發生閃爍 肖像模式 如果在室內...

Page 26: ...色 時 向上移動控制桿選擇 指示 ª 關於 指示閃爍的說明 選擇手動調整模式時 閃爍說明以前調整的白平衡被保存 此設置將被 保存直到白平衡被再次重新調整 當白平衡不能在手動調整模式下進行設置時 在手動調整模式下無法在暗處正常調整白平衡 在這種情況下 要使用自動白平衡模式 在手動調整模式下設置時 設置完成後 將保持點亮 ª 關於白平衡感測器 白平衡感測器能在拍攝時檢測光源的類型 拍攝時不要遮蓋白平衡感測器 否則將無法正常 工作 ª 關於黑平衡調整 這是 3CCD 系統功能之一 當白平衡在手動調整 模式下設置時自動調整黑色 當調整黑平衡時 熒屏將暫時變黑 1 黑平衡調整 閃爍 2 白平衡調整 閃爍 3 調整完成 點亮 手動對焦調整 如果因條件所致難以自動對焦 可以手動調整焦 距 設置為錄影帶 記憶卡拍攝模式 1 將 AUTO MANUAL FOCUS 開關設置為 MANUAL 2 將 AUTO...

Page 27: ...拍攝時 熒屏的色彩可能會改變或 閃爍 在這種情況下 手動將快門速度調整到 1 50 或 1 100 手動光圈 增益調整 如果該值不能變為 OPEN 則無法調整增益 值 如果增益值增加 則熒屏上的雜訊就會增加 根據變焦放大率的不同 光圈值可能沒有顯示 ª 快門速度的範圍 1 50 1 8000 秒 錄影帶拍攝模式 1 2 1 2000 秒 記憶卡拍攝模式 快門速度越接近 1 8000 就越快 ª 光圈 增益值的範圍 CLOSE 關閉 F16 F1 7 OPEN 打開 0dB 18dB 數值越接近 CLOSE 影像越暗 數值越接近 18dB 影像越亮 帶 dB 的數值為增益值 ª 記憶卡慢速快門模式 如果快門速度設置為 1 2 1 3 1 6 或 1 12 記 憶卡慢速快門模式將會啟動 如果操作 OFF ON 開關或模式轉盤 則慢速快 門模式將被取消 在慢速快門模式下 白平衡是固定的 用手動對...

Page 28: ... OFF 在設置 USB 功能 網路攝影 後連接 USB 電 纜 反復重播模式被取消 ª 音頻設置 當重播錄影帶時如果聽不到想要的聲音 請在 設定 12bit 音頻 中檢查設置情況 當用 12bit 錄製或配音 並設置了 設定 12bit 音頻 混合 時 不管 音頻輸出 中 設置是什麼 聲音將會以立體聲重播 慢動作重播 逐格重播 設置為錄影帶重播模式 只能用遙控器進行慢 動作重播 慢動作重播 如果影像是以 SP 模式錄製的 則將以正常速度的 1 5 重播 如果影像是以 LP 模式錄製的 則將以正常速度的 1 3 重播 1 按遙控器上的 E 鍵或 D 鍵 如果慢動作重播持續 10 分鐘以上 重播將自動 停止 10 分鐘的慢動作重播相當於 SP 模式 下重播 2 分鐘或者 LP 模式下重播 3 分鐘 逐格重播 1 在重播過程中 按遙控器上的 鍵 2 按遙控器上的 E 鍵或 D 鍵 重播暫停時 ...

Page 29: ...電視機 如果電視機上有 S 視頻端子 還要連接一根 S 視頻電纜 2 可選件 這樣就可以欣賞到更 美麗的影像 2 打開本攝錄放影機 將模式轉盤設置為錄影帶 重播模式 3 選擇電視機的輸入頻道 4 向上移動控制桿 選擇 1 圖標開始重播 圖像和聲音都輸出到電視機中 5 向下移動控制桿 選擇 圖標停止重播 只要插入 S 視頻電纜 就必須也插入 AV 電纜 使用 AC 適配器可以免除電池用光的煩惱 根據電視機的不同 即使攝錄放影機與電視機連 接正確也可能不顯示任何圖像 在這種情況下 設置 基本功能 AV 插孔 輸入 輸出 ª 如果沒有影像或聲音輸出到電視機中 檢查插頭的插入深度是否足夠 檢查連接端子 如果即使設置了 基本功能 AV插孔 輸出 Ë 電視機上也不出現影像時 將其設置為 輸 出 40 檢查電視機的輸入設定 輸入開關 有關更詳細 的說明 請查閱電視機的使用說明書 ª 在電視機上顯示熒屏信...

Page 30: ...移動控制桿 顯示出 下一個或前一個多熒屏 ª 關於靜態圖片的相容性 本攝錄放影機符合JEITA Japan Electronics and Information Technology Industries Association 制定的統一標準 DCF Design rule for Camera File system 本攝錄放影機所支持的檔案格式為 JPEG 並不 是所有 JPEG 格式的檔案都可以重播 如果重播不符合規格的檔案 文件夾 檔案名稱 可能不會顯示 攝錄放影機會降低在其他產品上錄製或建立的資 料的品質 或根本無法重播 其他產品也會降低 在本攝錄放影機上錄製的資料的品質 或根本無 法重播 刪除記憶卡上錄製的檔案 刪除的檔案不能恢復 設置為圖片重播模式 1 左右移動控制桿選擇要刪除的檔案 可以在多屏顯示中選擇一個檔案 選擇檔案後 按下控制桿顯示操作圖標 2 向下移動控制桿選擇...

Page 31: ...檔案被鎖定 如果記憶卡被格式化 這 些檔案也會被刪除 設置為圖片重播模式 1 設置 基本功能 保護 是 2 移動控制桿選擇需要鎖定的檔案 然後按下控 制桿 指示 1 出現 所選檔案被鎖定 再次按 下控制桿 鎖定將被取消 2 個或更多的檔案可以被接連鎖定 ª 完成設定 按 MENU 鍵 在記憶卡上寫入列印資料 DPOF 設定 可以將需要列印的圖片資料 列印份數及其他信 息 DPOF 資料 寫在記憶卡上 設置為圖片重播模式 1 設置 進階功能 DPOF 設定 設定 2 移動控制桿選擇需要設置的檔案 然後按下控 制桿 顯示 DPOF 中設置的列印份數 1 3 上下移動控制桿選擇列印份數 然後按下 選擇範圍為 0 至 999 所選的複製數量可以用 支持 DPOF 的印表機列印 2 個或更多的檔案可以被接連設置 ª 完成設定 按 MENU 鍵 在其他攝錄放影機上做成的 DPOF 設定 本攝錄 放影機...

Page 32: ...明 書 將已錄製好的錄影帶放入攝錄放影機中 將未錄 製的 DVD RAM 或錄影帶放入 DVD 錄影機或 VCR 中 1 連接攝錄放影機和錄影機 用 AV 電纜連接起來 用 AV 電纜 1 連接攝錄放影機和錄影機 如果錄影機上有 S 視頻端子 還要連接一根 S 視頻電纜 2 可選件 這樣就可以複製到更 清晰的影像 用可選的 DV 電纜進行連接 僅適用於有 DV 插孔 的設備 2 打開攝錄放影機 設置為錄影帶重播模式 3 選擇電視機和錄影機的輸入頻道 4 向上移動控制桿選擇 1 圖標 開始重播 影像和聲音被再現出來 5 開始錄製 6 向下移動控制桿選擇 圖標 停止重播 7 停止錄製 有關更詳細的說明 請參見電視機和錄影機的使 用說明書 不需要功能指示或日期 時間指示時 可以按遙 控器上的 OSD 鍵 用以取消指示 用 DV 電纜連接攝錄放影機和錄影機時 這些 指示不會出現 ª 攝錄放影機既沒...

Page 33: ...片 雙語視頻等 中含有主音和次音 重播 時要用 設定 音頻輸出 選擇需要的聲音 如果錄製的圖片中含有版權保護信號 複製保護 在錄影帶上錄製時會出現 禁止複製 的資訊 重播時圖片會有馬賽克圖案干擾 當輸入寬銀幕影像時 諸如菜單熒幕或操作圖標 那樣的顯示被水平拉長 如果錄製時在外部設備上進行快進搜索重播或慢 動作重播等操作 則在重播時圖片上會出現馬賽 克圖案 如果錄製圖片時電視廣播信號弱或圖片受到雜訊 干擾 圖片會失真 甚至無法重播 如果既連接 S 視頻電纜也連接 AV 電纜 則 S 視頻 信號將優先輸入 錄製在記憶卡上的來自外部輸入的靜態圖片尺寸 變為 640 錄製的靜態圖片不是百萬像素的 在記憶卡上錄製靜態圖片時將無法錄音 ª 類比 數位轉換 在設置 進階功能 DV 輸出 開 時 可 以將其他設備以類比形式輸入的視頻信號以數位 形式輸出到通過 DV 插孔連接的其他數位視頻設備 中 1 將D...

Page 34: ...細的說明 請參見所連接設備的使用說明書 不管錄影機上菜單的設置是什麼 數位複製都要 採用與重播錄影帶相同的 音效選擇 模式進行 錄影機顯示屏上的影像會失真 但不影響錄製的 影像 如果攝錄放影機錄製的圖片中含有版權保護信號 複製保護 則在重播時會有馬賽克圖案造成圖 片失真 斷開 USB 電纜 因為連接 USB 電纜會無法錄製外 部輸入端的輸入信號 當輸入寬銀幕影像時 諸 如菜單熒幕或操作圖標那樣的顯示被水平拉長 當輸入寬銀幕影像時 諸如菜單熒幕或操作圖標 那樣的顯示被水平拉長 圖片從 DV 端口輸入的時候 當按下控制桿的中心部 位時 操作圖標開始閃爍而不是從熒屏邊上顯現 配音 可以在所錄製的錄影帶上加上音樂或解說 設置為錄影帶重播模式 如果執行外部輸入 設 置 基本功能 AV 插孔 輸入 輸出 然後連接輸入設備 用麥克風插孔進行配音 1 將自由式遙控器或外置麥克風牢牢插入 REMOTE MI...

Page 35: ...圖片 PictBridge 直接連接攝錄放影機與印表機來列印圖片時 要 使用與 PictBridge 相容的印表機 仔細閱讀印表 機的使用說明書 插入記憶卡 並設置為圖片重播模式 1 用隨機提供的 USB 電纜來連接攝錄放影機和印 表機 1USB 電纜 攝錄放影機熒屏上出現 PictBridge 的指示 當正在識別印表機時 PictBridge 指示閃爍 攝錄放影機中沒有插入記憶卡時 PictBridge 指 示不出現 不能列印圖片 攝錄放影機和印表機之間的連接不正確時 PictBridge 指示將持續閃爍 閃爍約 1 分鐘 請連接電纜或檢查印表機 我們建議用 AC 適配器作為電源 採用多屏顯示影像時 不能列印 2 選擇 單張列印 或 DPOF 列印 如果沒有帶 DPOF 設定的文件 則無法選擇 DPOF 列印 當為列印選擇 DPOF列印 時 請在DPOF設定 中設置列印數量 選擇 DPO...

Page 36: ...尺寸規格 4a5 英吋 5a7 英吋 4a6 英吋 A4 不能設置為印表機不支持的紙張尺寸 7 設置 列印 是 開始列印 ª 中途停止列印時 向下移動控制桿 列印時應避免以下的操作 這些操作會影響正常 列印 斷開 USB 電纜 取出記憶卡 轉動模式轉盤 關閉電源 檢查印表機的紙張尺寸 列印質量等設置 不能列印無法在攝錄放影機上重播的圖片 如果在錄影帶拍攝 重播模式下連接攝錄放影機 和印表機 則在 LCD 顯示屏上就會出現 WEB 或 WEB 指示 但不能列印圖片 ...

Page 37: ... 請參見關於個人電腦連接的使用說明 書 數位變焦 20 變焦麥克風 20 日期 時間 39 初始設定 40 3 設定 淡入淡出 22 音效選擇 39 拍攝燈 39 顯示 39 遙控 15 操作音 39 LCD AI 14 LCD 設定 13 EVF 設定 13 示範模式 40 AV 插孔 40 節電 39 4 LANGUAGE 12 ª 錄影帶重播菜單 1 基本功能 日期 時間 39 AV 插孔 34 USB 功能 請參見關於個人電腦連接的使用說明 書 2 進階功能 空白尋像 18 拍攝速度 17 拍攝待機 34 音效選擇 39 配音輸入選擇 34 拍攝資料 40 圖片質量 19 DV 輸出 33 重複播放 28 3 設定 12bit 音頻 35 音頻輸出 40 顯示 39 遙控 15 LCD AI 14 LCD 設定 13 EVF 設定 13 節電 39 4 LANGUAGE 12 ...

Page 38: ...連拍模式 24 閃光燈 23 防紅眼功能 23 閃光強度選擇 23 光學防震功能 24 快門效果 19 日期 時間 39 初始設定 40 3 設定 拍攝燈 39 顯示 39 遙控 15 操作音 39 LCD AI 14 LCD 設定 13 EVF 設定 13 節電 39 4 LANGUAGE 12 ª 圖片重播菜單 1 基本功能 日期 時間 39 保護 31 2 進階功能 DPOF 設定 31 記憶卡格式化 31 3 設定 顯示 39 遙控 15 LCD 設定 13 EVF 設定 13 LCD AI 14 節電 39 4 LANGUAGE 12 2048 ...

Page 39: ...2 tracks 的方式進行 錄音 可以較高的質量錄音 如果複製 音頻信號 則原有的音頻信號將被擦除 ª 拍攝燈 設置為 開 錄製時能使拍攝燈點亮 說明錄製 正在進行中 設置為 關 即使正在進行錄製 指示燈也不亮 ª 顯示 設置為 開 顯示模式可以轉換到所有功能 設 置為 關 可以轉換到最低顯示 ª 操作音 設置為 開 將按以下的方式發出確認 報警操 作音 一聲嘟音 開始錄製時 打開電源時 兩聲嘟音 暫停錄製時 兩聲嘟音四次 當插入的錄影帶的防止擦除滑塊設置為 SAVE 時 發生水汽凝結時以及其他情況時 請查看熒 屏上顯示的內容 ª 節電 關 當 5 分鐘內沒有進行任何操作 則自 動設置為待機模式 在待機模式下 閃爍 並且在按下拍攝啟動 停 止鍵後開始錄製所用的時間比平時要 長 5 分鐘 當 5 分鐘內沒有進行任何操作 攝錄 放影機將自動關閉以保護錄影帶或防 止電池用盡 當使用攝錄放影機時...

Page 40: ...放時將顯示錄製時採用的設置 快 門速度 光圈 增益值和白平衡設置 26 等 當 AUTO MANUAL FOCUS 開關設置為 AUTO 出現 AUTO 指示 如果沒有資料 顯示器上出現 如果在其他的設備上回放攝錄放影機上的攝錄放 影機資料 有時不能正常顯示設置信息 ª 音頻輸出 這一菜單的功用是轉換重播的聲音 立體聲 立體聲 主音和次音 L 左聲道的聲音 主音 R 右聲道的聲音 次音 其他菜單 ª 初始設定 根據功能的結合 當菜單不能選擇時 設置為 是 可將菜單恢復到出廠時的設置情況 語言設定不能恢復到出廠時的設定狀態 ª 示範模式 如果設置為 示範模式 開 而未插入錄影帶 或記憶卡 攝錄放影機將自動設置為介紹功能的 示範模式 如果按下或操作任何一個鍵子 示範 模式將被取消 如果 10 分鐘左右未進行任何操 作 示範模式將自動開始 要終止示範模式 可 插入一盤錄影帶或記憶卡 或設置為 示...

Page 41: ...漸變 黑色 22 彩色夜視功能 21 0 勒克斯夜視功能 21 ß ßA 視頻閃光燈打開 23 視頻閃光燈關閉 23 ßi ßAi 視頻閃光燈 設置為 i 23 ßj ßAj 視頻閃光燈 設置為 j 23 紅眼減低 23 變焦麥克風 20 消除風聲噪音 23 使用帶麥克風的自由式遙控麥克 風 16 支持智能式附件座的外置麥克風 5 支持智能式附件座的外置麥克風 降噪 5 5 運動模式 場景模式 25 肖像模式 場景模式 25 低照度模式 場景模式 25 聚光燈模式 場景模式 25 海灘和雪地模式 場景模式 25 自動白平衡 26 室內模式 白熾燈下拍攝 26 室外模式 26 白平衡調整模式 26 網路攝影模式 拍攝 36 重播指示 拍攝正在進行中 1 重播 28 暫停 28 5 快進 快進搜索重播 28 6 回捲 回捲搜索重播 28 D E 慢動作重播 28 1 2 逐格重播 28 2k5...

Page 42: ...指示 如果以下指示亮起或閃爍 請檢查攝錄放影機 確認性指示 Y 插入的錄影帶的防意外擦除滑塊位於 SAVE 位置 沒有插入錄影帶 0 內置電池的電量不足 13 自拍時出現警告 報警指示 將LCD顯示屏轉 向取景器方向 檢查警告 報警指示 沒有插入記憶卡 REMOTE 選擇的遙控模式不正確 15 2END 在拍攝時錄影帶到達終點 攝像頭不乾淨 47 文本指示 3 檢測到露水 3 取出錄影帶 發生了水汽凝結 取出錄影帶 稍等片刻 錄影帶倉打開時需要一定的時間 但這不是 故障 47 電量不足 電池的電量不足 請進行充電 8 未插入錄影帶 沒有插入錄影帶 9 錄影帶結束 在拍攝時錄影帶到達終點 檢查拍攝標簽 攝像時錄影帶的防意外擦除滑塊處於 SAVE 位置 配音或數位複製時錄影帶的防意外擦除滑塊 處於 SAVE 位置 檢查遙控模式 選擇的遙控模式不正確 此資訊只在通電後 遙控器第一次工作時顯示 1...

Page 43: ...場景模式 上選擇項 目 無法操作 動態 DV 模式 在 MotionDV 模式中 試圖改變 數位變焦 設定 翻轉 LCD 顯示屏 在 0 勒克斯夜視模式中 當 LCD 顯示屏沒 有翻轉時 出現該指示 當 LCD 顯示屏朝鏡頭方向旋轉 180 時 LCD 顯示屏的亮度不能調整 無法同時使用的功能 因攝錄放影機的規格問題有些功能被禁止或無法 選擇 下表所示為被條件限制功能的例子 功能 禁止功能的條件 漸近 同時在錄影帶和記憶卡上 拍攝時 當使用數位變焦時 10k 或更高 在錄影帶拍攝模式下快門 速度為 1 750 或者更快時 在錄影帶拍攝模式下當增 益值增加時 在錄影帶拍攝模式下閃光 燈處於 的位置上 致 使亮度不足時 使用了彩色夜視功能時 在錄影帶拍攝模式下當使 用場景模式的肖像 模式時 使用寬銀幕模式時 數位變焦 寬銀幕模式 漸變 當使用記憶卡拍攝模式時 逆光補償 當設置光圈 增益時 當使...

Page 44: ... 適配器給電池充電 8 0 是否在極冷的地方使用電池 環境溫度對電池 有影響 在寒冷地方 電池的工作時間會變短 0 電池是否快用壞了 電池有一定的壽命 根據 使用情況 如果即使電池充足電 工作時間仍 太短 則電池已到壽命 不能再用 5 即使打開電源 攝錄放影機也不能工作 攝錄放影機不能正常工作 0 請取出錄影帶 然後按 RESET 鍵 46 如果 仍不能恢復正常狀態 請關閉電源 然後 大 約 1 分鐘后 再次打開電源 在存取指示燈亮 的情況下進行上述操作 會破壞記憶卡上的資 料 6 無法取出錄影帶 0 打開錄影帶倉蓋時 電源指示燈是否點亮 10 一定要保證電池和 AC 適配器連接正確 8 0 電池在使用時是否放電 請給電池充電 然後 取出錄影帶 0 完全關閉錄影帶倉蓋 再重新完全打開 9 7 除取出錄影帶外 無法進行任何操作 0 是否出現水汽凝結 請等待直到水汽凝結指示 消失 47 8 遙...

Page 45: ...指示可能會暫時消失 如果繼續進行一般的拍 攝或重播 指示就會恢復 4 剩餘錄影帶時間指示與實際剩餘錄影帶時間不 相符 0 如果連續拍攝不足 15 秒的場景 剩餘錄影帶時 間將無法正確顯示 0 有時剩餘錄影帶時間指示所顯示的剩餘錄影帶 時間會比實際剩餘錄影帶時間短 2 至 3 分鐘 5 不能出現模式指示 剩餘錄影帶時間指示或時 間碼指示等功能指示 0 如果設置為 設定 顯示 關 除錄影帶 運行狀態 警告和日期指示外 其他指示都消 失了 重播 聲音 1 不能從攝錄放影機的內置揚聲器或耳機中重播 聲音 0 音量是否太低 重播時 推動 s VOLr 桿 顯示音量指示並進行調整 28 2 同時再現不同的聲音 0 是否設置為 設定 12bit音頻 混合 如 果設置為 音效選擇 12bit 並在已經錄製 的錄影帶上進行配音 可以聽到拍攝時的聲音 以及後來的複製的聲音 如要聽單獨的聲音 設置為 ST1 或...

Page 46: ...方面 1 指示消失 熒屏凍結或無法進行操作 0 關閉攝錄放影機的電源 如果電源無法關閉 請按 RESET 鍵 或者拆下電池或 AC 適配器 後 再重新安裝 然後重新打開電源 如果仍 不能恢復正常的操作 則拔下電源線 向出售 攝錄放影機的經銷商諮詢 2 顯示 請按重置鍵 0 自動檢測到攝錄放影機有缺陷 請取出錄影帶 或記憶卡 以保護資料 然後用尖端 A 按 RESET 鍵 攝錄放影機將被啟動 0 如果不按 RESET 鍵 攝錄放影機會在一分鐘 後自動關閉 0 甚至在按 RESET 鍵以後 指示仍會反復出現 在這種情況下 攝錄放影機需要維修 拔下電 源線 向出售攝錄放影機的經銷商諮詢 不要 試圖自行修理機器 3 即使連接了 USB 電纜 攝錄放影機也不能被個 人電腦識別 0 是否安裝了 USB 驅動程序 更詳細的信息 請 參考個人電腦連接部分的使用說明書 單獨的說 明書 4 拔下 USB 電纜...

Page 47: ... 局部出現馬賽克雜訊或聲音中斷 出現黑色或藍色的馬賽克水平條紋 即使清潔磁頭後也不能正常重播 一個可能的原因是拍攝時磁頭是髒的 所以無法 正常拍攝 請清潔磁頭 重新拍攝和重播 如果 可以正常重播 說明磁頭是乾淨的 重要拍攝前 一定要進行試拍 以保證拍攝的正常進行 如果清潔後磁頭很快又變髒 問題可能出在錄影 帶上 在這種情況下 請用其他的錄影帶 重播時圖片或聲音可能會暫時中斷 但這不是攝 錄放影機的故障 一個可能的原因是有汙物或 灰塵黏在磁頭上 造成重播中斷 ª 關於攝錄放影機 長時間使用攝錄放影機 機體會變熱 但這不是 故障 要使攝錄放影機遠離蜂窩電話 微波爐 電視機 和視頻遊戲機等帶有磁性的設備 如果使用時將攝錄放影機放在電視機上或靠近電 視機 影像或聲音就會因電磁波輻射而失真 揚聲器或大型電機產生的強磁場會損壞錄製在錄 影帶上的內容 或者使影像失真 微處理機等數位電路產生的電磁波輻射會...

Page 48: ...電池充完電後 操作時間仍很短 說明 電池已用壞 請購買新的電池 ª 關於 AC 適配器 如果電池發熱 充電時間會比平時長 如果電池溫度極高或極低 CHARGE 指示燈會 持續閃爍 電池可能沒有被充電 電池溫度降低 或升高到一定程度後 充電將自動進行 因此 請等待一會兒 如果即使充電後指示燈仍持續閃 爍 電池或 AC 適配器可能失效 此時應向經銷 商咨詢 如果在收音機附近使用 AC 適配器 收音機的接 收會受到干擾 AC 適配器應與收音機保持 1 米 以上的距離 使用 AC 適配器時 可能會產生嗡嗡聲 但這是 正常的現象 使用後一定要從 AC 電源插座上拔下 AC 電源線 如果仍保持連接 會消耗少量的電量 一定要保持 AC 適配器和電池的清潔 ª 關於錄影帶 絕對不能將錄影帶放在高溫環境中 錄影帶可能會損壞 回放時會產生馬賽克雜訊 錄影帶用後保存時 一定要將錄影帶回捲到起始 處 然後取出 如...

Page 49: ...拭 如果攝錄放影機處於非常寒冷的地方 剛打開電 源時 LCD 顯示屏會比平時暗 但隨著內部溫 度的升高 其將恢復正常的亮度 取景器 祛除取景器內的灰塵時 要先拆下取景器 如果 灰塵難以祛除 可以用水浸濕棉簽後清除 然後 用幹棉簽擦拭取景器 清潔取景器的內部時 要持續按動 1 握住眼罩 2 將其拉出 ª 定期檢查 為保持最高的影像質量 建議每用 1000 個小時 更換一次磁頭等易損件 但這取決於溫度 濕 度和灰塵等工作條件 LCD 顯示屏熒屏的製造採用了極高的精密技 術 總像素約達到 113 000 有效像素超過 99 99 無效像素只有 0 01 不起作用或 始終亮 但這不是故障 不影響拍攝的圖片 取景器熒屏的製造採用了極高的精密技術 總像素約達到 113 000 有效像素超過 99 99 無效像素只有 0 01 不起作用或 始終亮 但這不是故障 不影響拍攝的圖片 256 1 2 ...

Page 50: ...的白色 通過識別陽 光下的白色和熒光燈下的白色 攝錄放影機可以 在其他顏色之間調整平衡 由於白色是所有顏色 光 的基準色 攝錄放影機 如果能識別基準色白色 就可以在自然色調下攝 像 ª 自動對焦 自動對焦功能可使對焦鏡頭在攝錄放影機內自動 前後移動 將物體調到焦點處 自動對焦具有如下特點 進行調整 使物體的豎線看得更清晰 使具有較高對比度的物體處於焦點處 焦點只處於熒屏中心 由於這些特點 自動對焦在以下情況下不能正常 工作 要用手動對焦模式進行拍攝 拍攝的物體一端距離攝錄放影機較近 另一端較 遠 由於自動對焦在影像的中心進行調整 所以無 法對同時處於前景和背景的物體進行對焦 拍攝的物體位於肮髒或有灰塵的玻璃後 由於焦點在髒玻璃上 所以無法對玻璃後的物 體進行對焦 拍攝的物體被有閃光表面的物體或反射強光的物 體所包圍時 由於攝錄放影機的焦點落在有閃光表面的物體 或反射強光的物體上 拍攝的物體...

Page 51: ... 75 ohm 音頻輸出電平 線路 316 毫伏 600 ohm 視頻輸入電平 1 0 Vp p 75 ohm S 視頻輸入電平 Y 輸入 1 0 Vp p 75 ohm C 輸入 0 3 Vp p 75 ohm 音頻輸入電平 線路 316 mV 10 kohm 或更高 麥克風輸入 麥克風靈敏度 s50 dB 0 dB 1 V Pa 1 kHz 立體 聲微型插孔 USB 記憶卡讀 寫器功能 USB 2 0 相容 Hi Speed 無版權保護支持 PictBridge 相容 數位介面 DV 輸入 輸出端 IEEE1394 4 針 視頻閃光燈 GN 5 5 外廓尺寸 約 81 mm 寬 k73 mm 高 k144 mm 深 重量 約 500 g 不帶提供的電池 DV 錄影帶和鏡頭蓋 約 600 g 帶提供的電池 DV 錄影帶和鏡頭蓋 工作溫度 0oC 40oC 工作濕度 10 80 記憶卡存儲...

Page 52: ...0 Hz 耗電量 19 W DC 輸出 DC 7 9 V 1 4 A 攝錄放影機工作時 DC 8 4 V 0 65 A 電池充電時 SD 記憶卡 可選件 上可拍攝的最大靜態圖片數量 圖片尺寸 640 1280 1600 2048 圖片質量 32 MB 220 440 47 76 30 47 18 29 64 MB 440 880 98 158 63 98 39 62 128 MB 880 1760 187 302 121 187 75 119 256 MB 1760 3520 390 628 252 390 158 248 512 MB 3520 7040 774 1246 502 774 314 493 1 GB 7040 14080 1550 2495 1006 1550 629 989 ...

Page 53: ...U S A SD Logo is a trademark Leica is a registered trademark of Leica microsystems IR GmbH and Dicomar is a registered trademark of Leica Camera AG All other company and product names in the operating instructions are trademarks or registered trademarks of their respective corporations Files recorded on SD Memory Card It may not be possible to play back the files on this Movie Camera recorded on a...

Page 54: ... reduction function 77 Using the built in video flash 77 Self timer recording 78 Recording images for wide screen TVs 78 Image stabilizer function 79 Continuous Photoshot 79 Recording in various situations Scene mode 80 Recording in natural colours White balance 80 Manual focus adjustment 81 Manual shutter speed aperture adjustment 82 Playback mode Playing back tape 83 Slow motion playback frame b...

Page 55: ...ight bulb for video DC light VW LL3E 14 Stereo zoom microphone VW VMH3E 15 Stereo microphone VW VMS2E 16 Video flash VW FLH3E 17 Tripod VW CT45E 18 DV cable VW CD1E 19 Jacket pouch VW SJ05E Some optional accessories may not be available in some countries Parts identification and handling ª Camera 1 Built in video flash 77 2 Recording lamp 96 3 Microphone built in stereo 74 77 4 Grip belt One touch...

Page 56: ... OPEN EJECT 61 37 Cassette cover 61 38 Zoom lever W T 74 Volume lever s VOLr 83 39 Photoshot button PHOTO SHOT 71 40 Smart accessory shoe The stereo zoom microphone VW VMH3E optional or the video DC light VW LDH3E optional should be mounted here When using an accessory for the smart accessory shoe the power is supplied from this product When mounting or removing the accessory extend the viewfinder...

Page 57: ...e it counterclockwise 1 In order to fit it put into slot 2 and then rotate it clockwise Fit the MC protector or the ND filter of the Filter Kit VW LF43WE optional in front of the lens hood Do not fit the other accessories on the hood Except for the lens cap When fitting the tele conversion lens VW LT4314NE optional or the wide conversion lens VW LW4307ME optional first remove the lens hood When 2 ...

Page 58: ... belt attachment part press the lock cover 1 and check if the grip belt is securely locked ª To use as a grip belt Adjust the belt length so it fits your hand 1 Adjust the belt length and the pad position 1 Flip the belt 2 Adjust the length 3 Fix the belt Using the LCD monitor You can record the image while viewing it on the LCD monitor opened 1 Put a finger on the LCD monitor open part and pull t...

Page 59: ...e cannot guarantee the quality of this product If the DC input lead is connected to the AC adaptor then the battery will not get charged Remove the DC input lead from the AC adaptor 1 Connect the AC mains lead to the AC adaptor and the AC mains socket 2 Put the battery on the battery mount by aligning the mark and then securely plug it in ª Charging lamp Lights up Charging Goes off Charging comple...

Page 60: ...arging time B Maximum continuously recordable time C Intermittent recordable time The intermittent recordable time refers to recordable time when the recording and stopping operations are repeated 1 h 10 min indicates 1 hour 10 minutes The battery CGA DU12 is supplied The times shown in the table are rough estimates The times indicate the recordable times when the viewfinder is used The times in p...

Page 61: ...assette completely remove it and put it in a case Store the case in an upright position 106 When condensation is formed on the lens or the main unit of the movie camera even if no condensation alarm is indicated condensation may have formed on the heads or the cassette tape Do not open the cassette cover 104 ª When the cassette holder does not come out Close the cassette cover completely and then ...

Page 62: ...he camera accesses the card reading recording playback erasing etc the access lamp lights up If the following operations are performed when the access lamp is lit then the card or the recorded data may be damaged or the camera may malfunction Opening the card slot cover and inserting or removing the card Operating the OFF ON switch or the mode dial ª SD Memory Card The memory capacity indicated on...

Page 63: ...e joystick up down left or right to select an item or file and then push in the centre to set it ª Joystick and screen display Push the centre of the joystick and icons will be displayed on the screen Each push switches the display as follows depending on the mode In the Tape playback mode or the Picture playback mode the icons will be automatically displayed on the screen 1 Tape recording mode AU...

Page 64: ...e MENU button The menu corresponding to the mode selected by the mode dial is displayed Do not switch the mode dial when the menu is displayed 2 Move the joystick up or down in order to select the top menu 3 Move the joystick right or press it to set the selection 4 Move the joystick up or down in order to select the sub menu 3 Tele macro 76 4 Soft skin mode 76 1 Backlight compensation 75 4 White ...

Page 65: ...de or Card Recording Mode 1 Set BASIC CLOCK SET YES 2 Move the joystick left or right in order to select the item to be set Then move the joystick up or down to set the desired value The year will change as follows 2000 2001 2089 2000 The 24 hour clock is used 3 Press the joystick to determine the setting The clock function starts at 00 seconds ª About date time The date and time function are driv...

Page 66: ... as bright as the normal Press this button again and the lamp will go off and the brightness will revert back to the original brightness This will not affect the images to be recorded If you turn on the camera when the AC adaptor is used the POWER LCD function will automatically be activated ª Changing the picture quality on the LCD monitor 1 Set SETUP LCD AI DYNAMIC or NORMAL DYNAMIC The image on...

Page 67: ...e battery holder 2 Set the button type battery with its i mark facing upward and get the battery holder back in place ª Remote control usable range The distance between the remote control and the camera Within approx 5 m Angle Approx 10o up and 15o down left and right STOP OSD V REW STILL ADV DATE TIME VOL ZOOM REC PHOTO SHOT START STOP A DUB PLAY PAUSE FF W STILL ADV ENTER VAR SEARCH MENU T W 1 2...

Page 68: ...e same remote control mode The remote control is intended for indoor operation Outdoors or under strong light the movie camera may not operate properly even within the usable ranges Within a 1 metre range you can operate the remote control from beside the remote control sensor LCD monitor side of the movie camera Free style remote control with mic This controller can be used from different high an...

Page 69: ...using the camera to fall off the table The PHOTO SHOT button on the free style remote control with mic cannot be pressed halfway If the pin plug of the control is not inserted securely into the REMOTE terminal as far as it will go normal operation may not be ensured Before using make sure that the plug is inserted securely into the terminal as far as it will go ...

Page 70: ...UAL FOCUS switch to AUTO and colour balance white balance and focusing will be adjusted automatically Auto white balance 108 Auto focusing 108 Colour balance and focus may not be adjusted depending on light sources or scenes If so manually adjust the white balance and focus Scene mode setting 80 White balance setting 80 Shutter speed setting 82 Iris gain value setting 82 Focus setting 81 ª Recordi...

Page 71: ... tape time is indicated in minutes When it reaches less than 3 minutes the indication starts flashing During a 15 second or shorter recording the remaining tape time indication may not be displayed or the remaining tape time may not be displayed correctly In some cases the remaining tape time indication may display remaining tape time that is 2 to 3 minutes shorter than the actual remaining tape t...

Page 72: ...ocusing only If you set OIS to ON then the image stabilizer function will be more effective MEGA OIS will be indicated The iris gain value is fixed and this camera focuses on the subject automatically 1 Shutter chance mark The white lamp flashes Focusing The green lamp lights up When in focus No mark When focusing is unsuccessful The shutter chance mark is indicated as follows when the PHOTO SHOT ...

Page 73: ...48 2048k1512 1600 1600k1200 1280 1280k960 640 640k480 ª Select the picture quality for photoshot images 1 Set BASIC PICT QUALITY select the desired picture quality High picture quality Normal picture quality You can also change the picture quality on ADVANCE PICT QUALITY in the tape recording mode ª Recording with a shutter operation effect You can add a shutter operation simulating sound 1 Set AD...

Page 74: ...tion cannot be used ª To use the zoom microphone function Interlocked with the zooming operation the microphone will collect sounds clearly far away with the tele shot or those in the vicinity with the wide angle shot Set to Tape Recording Mode 1 Set ADVANCE ZOOM MIC ON ª About the variable speed zoom function When pushing the W T lever as far as it will go you can zoom from 1k to 10k in 1 3 secon...

Page 75: ...d When the colour night view function is used however the white balance of the scene last recorded is retained The zoom magnification may differ from when it is in the quick start standby mode and when the recording starts Since about half the power of normal recording is used in quick start standby using quick start reduces the recordable time Backlight compensation function This protects a backl...

Page 76: ...e Select the icon again If the background or anything else in the scene has colours similar to the skin colour they will also be smoothed If the brightness is insufficient the effect may not be clear Tele macro function By focusing only on the subject and blurring the background the image can be impressive This camera can focus on the subject at a distance of approx 40 cm Set to Tape Card Recordin...

Page 77: ...d and the picture will be recorded You cannot use the built in video flash unless the card is inserted in the movie camera The movie camera even when its video flash has been turned off automatically determines if the flash is necessary by detecting the ambient brightness If it determines that the flash is necessary the indication lights up in yellow When the ß ßi ßj indication or the ßA ßAi ßAj i...

Page 78: ...ithout using the flash Carefully read the operating instructions for the video flash Self timer recording You can record still pictures on a card using the timer Set to Card Recording Mode 1 Set BASIC SELF TIMER YES 2 Press the PHOTO SHOT button After the recording lamp and the indication flashes for approx 10 seconds recording will start After recording the self timer will be cancelled You cannot...

Page 79: ...s used When a conversion lens is used When the camera is shaken greatly When you record a moving subject while tracking it Continuous Photoshot Records still pictures continuously at a certain interval Set to Card Recording Mode 1 Set BASIC PICTURE SIZE 640 2 Set ADVANCE BURST MODE ON 3 Press and hold the PHOTO SHOT button ª To stop continuous photoshot midway through Release the PHOTO SHOT button...

Page 80: ...s of the playback image may change If you record a subject illuminated with strong light or a highly reflective subject vertical lines of light may appear If the brightness is insufficient the sports mode does not function The 5 indication flashes If this mode is used indoors the screen may flicker Portrait mode If this mode is used indoors the screen may flicker If so change the scene mode settin...

Page 81: ...nual adjustment mode in dark places If so use the auto white balance mode During setting in the manual adjustment mode When the setting is completed it will keep lit ª About the white balance sensor The white balance sensor detects the type of light source during recording Do not cover the white balance sensor during recording or it may not function properly ª About the black balance adjustment Th...

Page 82: ...creen may change or flickers If so adjust the shutter speed manually to 1 50 or 1 100 Manual iris gain adjustment If the value does not become OPEN you cannot adjust the gain value If the gain value is increased the noise on the screen increases Depending on the zoom magnification there are iris values that are not displayed ª Shutter speed range 1 50 1 8000 seconds Tape Recording Mode 1 2 1 2000 ...

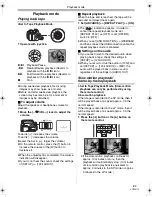
Page 83: ...rs In order to cancel the repeat playback mode set REPEAT PLAY OFF or set OFF ON switch to OFF When you set USB FUNCTION WEBCAM and then connect the USB connection cable the repeat playback mode is canceled ª Settings on the audio If you cannot listen to the desired audio when playing back a tape check the settings in SETUP 12bit AUDIO When you record or dub the audio in 12bit and set SETUP 12bit ...

Page 84: ...back only 1 3k LP mode slow motion playback only 2k 5k 10k 20k ª To return to normal playback Press the VAR SEARCH button or 1 button on the remote control Images may be shown in a mosaic like pattern The sound is muted during search This function is canceled when the operation icon is displayed Playback on TV Images recorded by this camera can be played back on a TV Insert a recorded tape into th...

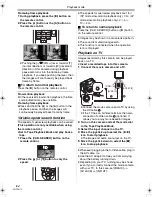
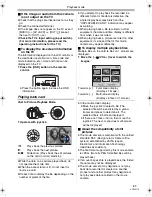
Page 85: ...ARD indication may appear as warning When playing back a file recorded on other equipment the date and time display is different from when it was recorded When playing back a picture recorded on other equipment its size and that of this movie camera may appear differently ª To display multiple playback files Multiple files on the card 6 files on 1 screen are displayed 1 Move the s VOLr lever to sw...

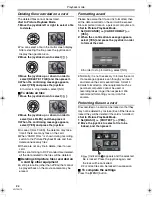
Page 86: ... files recorded on a card by other equipment A still picture file other than JPEG that cannot be played back on the movie camera may be erased Formatting a card Please be aware that if a card is formatted then all the data recorded on the card will be erased Store important data on a personal computer etc Set to Picture Playback Mode 1 Set ADVANCE CARD FORMAT YES 2 When the confirmation message ap...

Page 87: ...and then press it You can select from 0 to 999 Selected number of pictures can be printed as you set the number of prints with the printer supporting DPOF 2 or more files can be set in succession ª To complete the settings Press the MENU button DPOF setting made on another camera may not be recognised by this camera Please perform the DPOF settings on your movie camera ª To set so that all picture...

Page 88: ...ce a recorded cassette in the movie camera and an unrecorded DVD RAM or cassette in the DVD recorder or VCR 1 Connect the movie camera and the recorder Connecting with the AV cable Connect the movie camera and the recorder by using the AV cable 1 If the recorder has an S Video terminal then also connect an S Video cable 2 optional It allows you to copy clearer image Connecting with the optional DV...

Page 89: ...shot recording is disabled 7 Stop playback Other equipment Do not plug or unplug the cable during recording or the recording may not be completed properly Carefully read the operating instructions for your TV set and video equipment By operating as SETUP or ADVANCE AUDIO REC set the recording sound mode 12bit or 16bit If a picture bilingual video etc containing main sound and sub sound has been du...

Page 90: ...UT OFF If set to ON the image may be disturbed Using the DV Cable for Recording Digital Dubbing By connecting other digital video equipment with DV terminal and the movie camera by using the DV cable VW CD1E optional 1 high image quality dubbing can be done in digital format Set to Tape Playback Mode Player recorder 1 Connect the movie camera and digital video equipment with the DV cable 2 Set ADV...

Page 91: ... external input terminal cannot be recorded while it is connected with the USB cable When wide images are input the display such as the menu screen or the operation icon is expanded horizontally While pictures are input from the DV terminal the operation icon blinks on instead of appearing from the side of the screen when you press the center of the joy stick Audio dubbing You can add music or nar...

Page 92: ... and you can check the pre recorded sound When the line input is used you can dub audio while listening to the pre recorded sound from the speaker Printing pictures by directly connecting to the printer PictBridge To print pictures by directly connecting the movie camera to the printer use a printer compatible with PictBridge Read the operating instructions for the printer Insert a card and set to...

Page 93: ...ed on the printer 7 Set PRINT YES to start printing ª When you stop printing halfway Move the joystick down Avoid the following operations during printing These operations disable proper printing Disconnecting the USB cable Removing the card Switching the mode dial Turning off the power Check the settings for the paper size quality of print etc on the printer You cannot print pictures that cannot ...

Page 94: ...uctions for PC connection D ZOOM 74 ZOOM MIC 74 DATE TIME 96 INITIAL SET 97 3 SETUP FADE COLOUR 77 AUDIO REC 96 REC LAMP 96 DISPLAY 96 REMOTE 68 BEEP SOUND 96 LCD AI 66 LCD SET 66 EVF SET 66 DEMO MODE 97 AV JACK 96 POWER SAVE 96 4 LANGUAGE 64 ª TAPE PLAYBACK MENU 1 BASIC DATE TIME 96 AV JACK 91 USB FUNCTION Refer to the operating instructions for PC connection 2 ADVANCE BLANK SEARCH 72 REC SPEED 7...

Page 95: ...LASH LEVEL 78 OIS 79 SHTR EFFECT 73 DATE TIME 96 INITIAL SET 97 3 SETUP REC LAMP 96 DISPLAY 96 REMOTE 68 BEEP SOUND 96 LCD AI 66 LCD SET 66 EVF SET 66 POWER SAVE 96 4 LANGUAGE 64 ª PICTURE PLAYBACK MENU 1 BASIC DATE TIME 96 PROTECT 86 2 ADVANCE DPOF SET 87 CARD FORMAT 86 3 SETUP DISPLAY 96 REMOTE 68 LCD SET 66 EVF SET 66 LCD AI 66 POWER SAVE 96 4 LANGUAGE 64 2048 ...

Page 96: ...t 5 minutes passed without any operation the standby mode automatically will be set In the standby mode blinks and it takes time more than usual to start recording after you press the recording start stop button 5 MINUTES When about 5 minutes passed without any operation the movie camera automatically turns off to protect the tape or to prevent the battery from running down When you use the movie ...

Page 97: ...ion ª DEMO MODE If you set to DEMO MODE ON without inserting a cassette and a card the movie camera is automatically set to the demonstration mode for introducing its functions If any button is pressed or operated the demonstration mode is cancelled If no operations take place for approx 10 minutes the demonstration mode automatically starts To terminate the demonstration mode insert a cassette or...

Page 98: ...le remote control with mic is used 68 External microphone supporting the smart accessory shoe 56 External microphone supporting the smart accessory shoe LOW CUT 56 5 Sports mode Scene mode 80 Portrait mode Scene mode 80 Low light mode Scene mode 80 Spotlight mode Scene mode 80 Surf snow mode Scene mode 80 Auto white balance 81 Indoor mode recording under incandescent lamp 81 Outdoor mode 81 White ...

Page 99: ...sette and wait for a while It takes some time until the cassette holder opens but this is not a malfunction 104 LOW BATTERY The battery is low Recharge it 59 NO TAPE No tape is inserted 61 TAPE END The tape came to the end during recording CHECK REC TAB You are attempting to record pictures on a tape with the accidental erasure prevention slider placed in the SAVE position You are attempting audio...

Page 100: ...witch is set to AUTO CAN NOT OPERATE MOTION DV MODE You are attempting to change D ZOOM setting during MotionDV Mode REVERSE THE LCD MONITOR At the time of 0 Lux night view mode when LCD monitor is not reversed it displays When the LCD monitor is rotated by 180 towards the lens the brightness of the LCD monitor cannot be adjusted Functions cannot be used simultaneously Some functions in the movie ...

Page 101: ...e In cold places the operating time of the battery becomes shorter Has the battery worn out The battery has a limited life If the operating time is still too short even after the battery is fully charged depending on the usage the battery has worn out and can no longer be used 5 The movie camera cannot be operated though powered up The movie camera does not operate normally Remove the cassette and...

Page 102: ...ation starts For normal use set this function to OFF 97 3 A cassette cannot be inserted Has condensation occurred Wait until the condensation indication disappears 4 Auto focus function does not work Is manual focus mode selected If auto focus mode is selected focus is automatically adjusted There are some recording subjects and surroundings for which the auto focus does not operate correctly 108 ...

Page 103: ... not a malfunction 2 Horizontal stripes appear on images during cue and review playback Horizontal stripes may appear depending on the scene but this is not a malfunction 3 Although the movie camera is correctly connected to a TV playback images cannot be seen Have you selected video input on the TV Please read the operating instructions of your TV and select the channel that matches the input ter...

Page 104: ...rts the movie camera may malfunction at a point where the mode switches When you edit do not record in multiple modes 6 The warning alarm indication appears when the camera is operated in the WEB camera mode Did you press the menu button or the recording start stop button You cannot use the menu or record onto the tape card in the WEB camera mode Is the setting for the remote control correct Did y...

Page 105: ...by dirt or dust that momentarily adheres to the heads ª About the movie camera When the movie camera is used for a long time the camera body becomes warm but this is not a malfunction Keep the movie camera away from magnetized equipment such as a cellular phones microwave ovens TVs and video game equipment If you use the movie camera on or near a TV images or sounds may be disturbed due to electro...

Page 106: ...if the terminals are deformed Attaching a deformed battery to the movie camera or AC adaptor may damage the movie camera or AC adaptor After use be sure to take the cassette out and detach the battery from the movie camera or pull out the AC mains lead from AC mains socket The battery should be stored in a cool place free from humidity with as constant temperature as possible Recommended temperatu...

Page 107: ...t strongly vibrate it The card may break or the contents of the card may be destroyed or erased After use be sure to remove the card from the movie camera for storage After use or when storing or carrying the card put it in the storage case Do not allow dust water or foreign substances to adhere to the terminals on the back of the card Moreover do not touch the terminals with your hand ª Folder st...

Page 108: ...ay become bluish or reddish under the influence of light sources To avoid such phenomena adjust the white balance White balance adjustment determines the white colour under different light sources By recognizing which is the white colour under sunlight and which is the white colour under a fluorescent lamp the movie camera can adjust the balance among the other colours Since white colour is the re...

Page 109: ...ding a subject in dark surroundings The movie camera cannot focus correctly because the light information that comes through the lens decreases considerably Recording a fast moving subject As the focus lens inside moves mechanically it cannot keep up with a fast moving subject Recording a subject with little contrast A subject with little contrast such as a white wall may become blurry because the...

Page 110: ... p 75 ohm Audio output level Line 316 mV 600 ohm Video input level 1 0 Vp p 75 ohm S Video input level Y Input 1 0 Vp p 75 ohm C Input 0 3 Vp p 75 ohm Audio input level Line 316 mV 10 kohm or more Mic input Mic sensitivity 50 dB 0 dB 1 V Pa 1 kHz Stereo mini jack USB Card reader writer function USB 2 0 compliant Hi Speed No copyright protection support PictBridge compliant Digital interface DV inp...

Page 111: ...bject being photographed Power source AC 110 240 V 50 60 Hz Power consumption 19 W DC output DC 7 9 V 1 4 A Movie camera operation DC 8 4 V 0 65 A Battery charging Maximum number of still pictures recordable on an SD Memory Card optional PICTURE SIZE 640 1280 1600 2048 PICT QUALITY 32 MB 220 440 47 76 30 47 18 29 64 MB 440 880 98 158 63 98 39 62 128 MB 880 1760 187 302 121 187 75 119 256 MB 1760 3...

Page 112: ...VQT0N70 F1204Ke0 3500 A C Matsushita Electric Industrial Co Ltd Web site http www panasonic co jp global Tc ...

Reviews: