background image

25

Precautions

To ensure high quality, precise printing, always observe 
the following points. Failure to observe these points can 
not only result in poor quality prints, but also paper jams, 
malfunctions and breakdowns of the Digital Photo Printer.

ª

Ink Cassette/Paper Set Notes

Use Ink Cassette/Paper Sets that bear the 

 mark.

Use the Ink Cassette with the paper provided in the 
same box. One Ink Cassette is designed to provide 
enough Ink Film to print the number of sheets provided 
in that Ink Cassette/Paper Set.

Do not store the Ink Cassettes or paper under high 
temperatures, high humidity, or direct sunlight. Doing so 
could result in a deterioration of printing quality. They 
may also become unusable.

Do not forcibly pull the Ink Film or paper. Do not allow finger 
prints or dust to get attached, and do not get water on them.

Do not reuse printed paper or Ink Cassettes that have 
already been used up.

Do not open the Ink Cassette/Paper Set package 
immediately, to become familiar with the surrounding 
temperature before using it. If the Ink Cassette/Paper 
Set has been stored at a low temperature, condensation 
could form when brought into a warmer room.

If the Ink Cassette/Paper Set is defective due to a 
manufacturing error on the part of Panasonic, we will 
replace the Ink Cassette/Paper Set with an equivalent 
Ink Cassette/Paper Set. Panasonic shall not bear any 
responsibility beyond replacing the product.

ª

Ink Cassette Notes

Do not remove the label from the Ink Cassette.

Before inserting an Ink Cassette, take up any slack in 
the Ink Film. Take up slack by pressing your finger in the 
hole with the arrow on it, and turning the spool in the 
direction of the arrow.

Make sure that the Ink Cassette is oriented properly, 
and insert it all the way in.

If you change the Ink Cassette type after selecting 
pictures in Card Input, you must reselect the pictures.

If you change the Ink Cassette type after storing pictures 
in Video Input, the Input screen may return. To display a 
stored still picture, press the Display button.

When the power is turned on while a used up Ink 
Cassette is inserted, it will take some time when the 
start screen displays. Shutting the power off when the 
start screen displays may not immediately turn off the 
printer. (When the start screen appears and the display 
disappears, then the power can be turned off)

ª

Paper/Paper Cassette Notes

Do not fold or bend the paper. Lay it flat, smooth it out, 
and insert it into the Paper Cassette with the print side 
(the glossy side of the paper with no markings on it) up.

Do not load too much paper in the Paper Cassette. No 

more than 25 sheets of 9 

×

 12 cm printing paper, or 36 

sheets of the other types of paper should be loaded.

Do not dirty the print side (white side) of the paper.

When printing on the back side of paper with another 
printer, the ink may not easily dry depending on the type 
of printer used.

Dust and humidity damage the paper. Remove all 
remaining paper from the Paper Cassette, return them 
to their original bag, and store them flat.

ª

Before, During, and After Printing

Do not write on the paper before printing on it.

Do not forcibly pull out the Ink Cassette or paper, shake 
the printer, or add more paper while printing is in 
progress.

Removing the Paper Cassette while printing is in 
progress could result in a paper jam in which the 
jammed paper cannot be pulled out. The jammed paper 
can only be removed when the Paper Cassette is 
inserted.

While printing is in progress, no other buttons besides 
the Display/Cancel button used to cancel multiple prints 
will work.

The printer will make a little noise when printing, but this 
is not malfunction.

Printing 2 or more pages, or printing in cold or hot 
temperatures may take a little more time.

If ink or paper runs out while printing is in progress, it is 
unnecessary to press the print button again after you 
replace the ink or paper.

If you print a dark image with this Digital Photo Printer, it 
may become a lighter print by the AGC (Auto Gain 
Control).

When paper is bent or wrinkled, it may fall out of the 
paper exit tray (located above the Paper Cassette).

Do not allow more than 10 sheets of printed paper in the 
paper exit tray, as doing so may lead to a paper jam.

ª

Notes on Using 10 

×

×

×

×

 15 cm printing 

paper

When printing borderless prints, select [With trim]. A 
blank border can be created around the top, bottom, left 
and right sides of a picture when selecting [Without trim].

When printing with borderless paper, the top, bottom, 
left and right sides of the picture will be cut off.

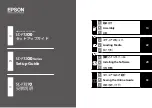
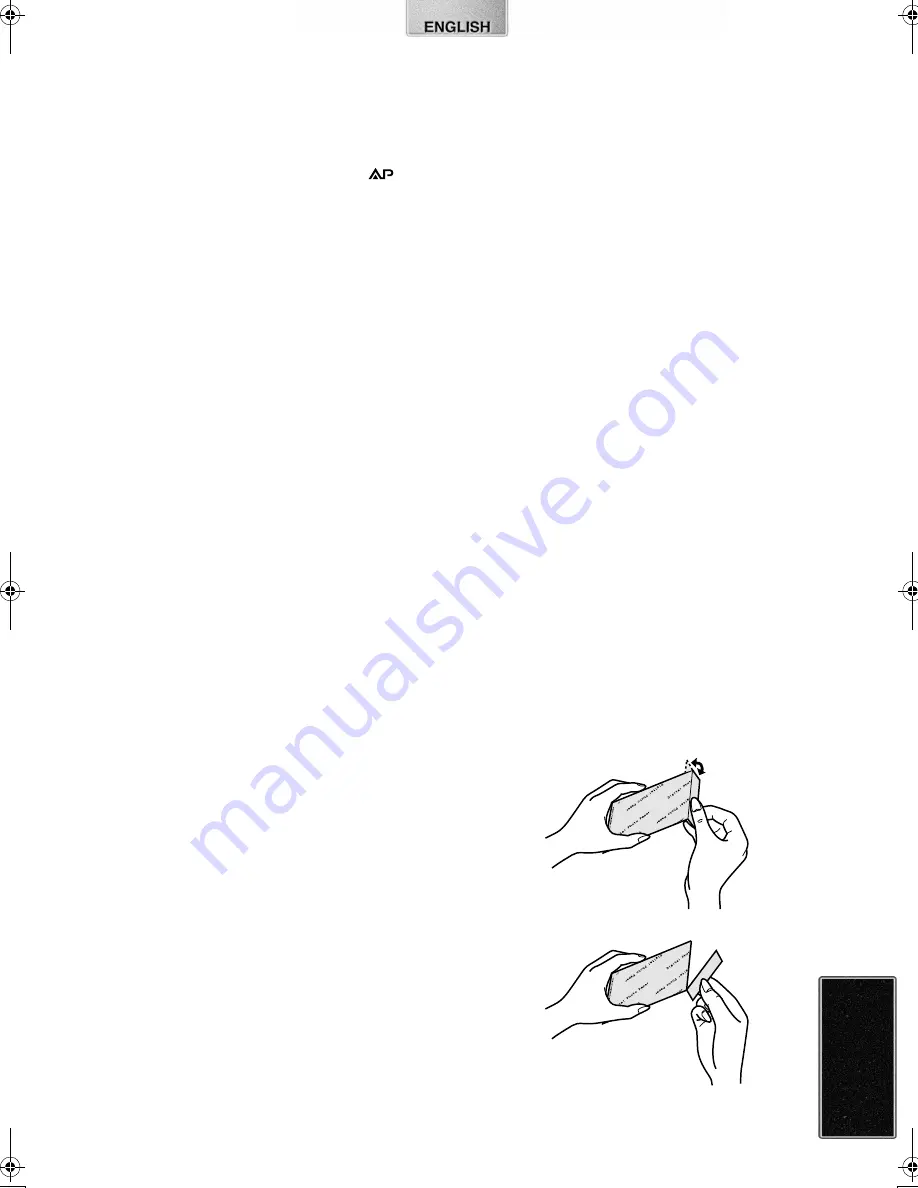
Cutting Borderless Paper After Printing

1

Fold in both directions along the perforation 
lines.

2

Tear along the perforation lines.

There are perforation lines on both ends of the 
borderless paper. Be sure to tear off both sides.

1

2

9063‑VP430.book  25 ページ  2001年8月31日 金曜日 午後9時9分

Summary of Contents for NV-APD1E

Page 1: ...Inbetriebnahme des Gerätes vollständig durch Lire intégralement ces instructions avant d utiliser l appareil 肱確焼 穉 肱確焼 穉 肱確焼 穉 肱確焼 穉捏 捏 捏 捏羊篏鶫鎧漾字菟 羊篏鶫鎧漾字菟 羊篏鶫鎧漾字菟 羊篏鶫鎧漾字菟 VQT9463 Digital Photo Printer Operating Instructions Bedienungsanleitung Mode d emploi 肱確漾字菟 肱確漾字菟 肱確漾字菟 肱確漾字菟 Model No NV APD1E EN B ...

Page 2: ...have recorded and created can be used for your personal entertainment only Under copyright laws other materials cannot be used without obtaining permission from the holders of the copyrights Other names company names and product names printed in these instructions are trademarks or registered trademarks of the companies concerned Important Information except Clamp Filter for S VIDEO Cable In order...

Page 3: ... ELECTRICAL SHOCK IF THE CUT OFF PLUG IS INSERTED INTO ANY 13 AMPERE SOCKET If a new plug is to be fitted please observe the wiring code as shown below If in any doubt please consult a qualified electrician ªIMPORTANT The wires in this mains lead are coloured in accordance with the following code Blue Neutral Brown Live As the colours of the wires in the mains lead of this appliance may not corres...

Page 4: ... 15 Card Input 15 Video Input 15 Returning a Multiple Screen To a Single screen 15 Printing Multiple Screen Shots of Different Pictures 16 Card Input 16 Video Input 16 Creating a Personalized Picture Calendar 17 Card Input 17 Video Input 17 Altering the Colour of Holidays and Special Days 17 Enlarging Part of a Picture and Printing Zoom Card Input Only 18 Title Functions Inserting Illustrations an...

Page 5: ...ses Use to exit MENU 7 STAND BY Lamp Í When the Power Cable is connected the STAND BY lamp lights up Printer is on STAND BY 8 LCD Monitor 9 Paper Cassette Insert Location 10 PC Card Eject Button Use to eject PC cards 11 PC Card Insert Location 12 SD Memory Card MultiMedia Card Insert Location 13 Ink Cassette Eject Lever Pull forward to eject ink cassettes 14 Ink Cassette Insert Location 15 System ...

Page 6: ...on the MENU screen to Video 2 Turn on the Digital Video Camera 3 Perform the automatic printing operations from the Digital Video Camera for details refer to the Digital Video Camera s manual ªSynchronized Functions When both 1 and 2 of the above diagram are connected the following synchronized functions can be performed 1 Pressing the printer s Memory button An Image is stored to memory and the v...

Page 7: ...ev 6 0RGB Full Colour Images compatible Some types cannot be fully used Inserting Paper Attaching the Paper Guard 1 Open the lid of the paper cassette included 1 spread out 2 and stand up or push down 3 When using 9 12 cm printing paper or 16 Pre Cut Adhesive paper stand up 3 When using 10 15 cm printing paper push down 3 2 Face the white print side of the paper up and insert under 4 5 is the perf...

Page 8: ...the label on the ink cassette When all of the ink film in an Ink Cassette has been used up replace the Ink Cassette with a new one Used Ink Cassettes cannot be reused MENU Interface 1 MENU Categories The Digital Photo Printer is divided into 4 major categories 2 MENU Contents Select the specific MENU you desire here 3 Description Control Display The presently selected MENU s description as well as...

Page 9: ...s complete Some image on the display may be unsteady depending on the card being used If The picture is unreadable or The card can t be used error message appears or if x symbol appears even though the image is stored turn off the power remove the card and re insert it A white border may appear around the card s image but this will not affect the printed image ªAbout Multi Page Tiff File Multi Pag...

Page 10: ...ete Press the print button again For Video Input press the DISPLAY button and re display the stored image Press the Print button If installing a different Ink Cassette before reprinting when using a card re select the image ªPrinting Multiple Copies of a Single Image Enter the number of prints in Number under OPTION on the MENU The Digital Photo Printer can continuously print up to 10 copies of th...

Page 11: ...memory will be lost if the power is turned off If With date is selected under Date the date will appear on all indexed pictures However dates cannot be verified on the LCD Monitor Printing With a DPOF Card For Card Input Only When a DPOF card that contains pictures and print counts set with a Digital Video Camera or a Digital Still Camera is inserted printing can be automatically be performed Sele...

Page 12: ...mages could be found within the designated search period a A picture wasn t found message will appear To print all images that were found as a batch return to the MENU screen and select Selected pictures under Batch in BASIC The selected pictures can also be viewed as a Slide Show Copying Erasing Images from a Card For Card Input Only Images can be mutually copied to or erased from SD Memory Multi...

Page 13: ...press A 5 Confirm the picture and press A Press B to cancel Titles recorded to cards can be used in Panasonic video cameras with Title Functions However some camera types may not be able to use stamps Only titles can be recorded to cards Pictures containing both titles and images cannot be recorded Erasing Titles From Cards Titles recorded on cards can be deleted 1 Select Card under BASIC on the M...

Page 14: ...h to record press B Confirm the still picture and press A To reenter a picture into memory press B Press C while the video is playing to cancel Viewing Slideshows The Digital Photo Printer can automatically display a continuous show of selected pictures within a card To view DPOF configured pictures insert a card with DPOF settings Select the INPUT method To view all pictures or DPOF configured pi...

Page 15: ... an Ink Cassette for 16 Pre Cut Adhesive paper is inserted the screen will automatically be divided into 16 sections If the Ink Cassette is removed the screen will not automatically return to a single screen ªVideo Input 1 Select Multi under FUNCTION on the MENU screen and press A 2 Choose Picture 2 Picture 4 Picture 9 or Picture 16 and press A 3 While watching the screen press D at the scene you ...

Page 16: ...ctures in Step 3 and press A to go to the MENU screen 2 Select Batch under BASIC on the MENU screen and choose Selected pictures Ex Selecting 4 pictures and 8 pictures Selected pictures 1 4 will be printed on the first sheet and selected pictures 5 8 will be printed on the second sheet ªVideo Input 1 Select Album under FUNCTION on the MENU screen and press A 2 Choose 2 pictures 4 pictures 9 pictur...

Page 17: ...ile watching the screen press D at the scene you wish to print repeat once more for 2 month calendars and press C to print To reenter pictures into memory when creating 1 month and 12 month calendars press B Then press D to store a new picture to memory For 2 month calendars pressing 1 in the memory screen after pictures have been stored will delete them one at a time Tips For Card Input Video Inp...

Page 18: ...r Horizontal Print with the 21 buttons and press A Pressing D after pressing the A button returns you to Step 3 The frame alignment displays either Vertical Print or Horizontal Print 5 Press C to print The picture that was magnified displays on the screen after you press C Press A to bring up the MENU screen Zoom cannot be used simultaneously with any function other than Standard under FUNCTION Th...

Page 19: ...d it will display after the preset illustration Created titles Illustrations Characters Stamps can be recorded onto cards To delete created title displays Illustrations Characters Stamps select Don t indicate or Clear in Display under EFFECT ªVideo Input 1 Select Illust under EFFECT on the MENU screen and press A 2 Choose an illustration and press A The example to the left shows the Happy Birthday...

Page 20: ...a new one Inserting Characters and Printing You can insert characters stored within the Digital Photo Printer onto pictures and print Select the INPUT method For Card Input display the picture you wish to print in the Single Screen Display For Video Input use a still picture 1 Select Type under EFFECT on the MENU screen and press A 2 Insert characters Press A each time you select a character After...

Page 21: ...nd press A 21 Buttons Change Character s Colour 6 Press C to print Turning the power off will delete all inputted characters Characters may appear disfigured in the LCD Monitor but will not be so when printed The size of characters is restricted by the number of characters Character fonts cannot be altered Created titles Illustrations Characters Stamps can be recorded onto cards To delete created ...

Page 22: ...frame up down left or right with the cursor buttons and press A 5 Press C to print Press A to bring up the MENU screen Created titles Illustrations Characters Stamps can be recorded onto cards To delete created title displays Illustrations Characters Stamps select Don t indicate or Clear in Display under EFFECT Print in Sepia Tone The Digital Photo Printer can print pictures in Sepia tone Select t...

Page 23: ... Dates DATE PRINTING It prints the picture with recorded date in the lower right corner 1 1 1 1 Select Date under OPTION on the MENU screen and press A 2 2 2 2 Select With date and press A ªTrimming The Digital Photo Printer can trim the horizontal or vertical edges of a picture and stretch it so that the picture fills up the entire print space 1 Select Trim under OPTION on the MENU screen and pre...

Page 24: ...ust Configure 1Adjust the darkness of the colour 2Clarify dark portions 3Set Remove screen saver All LCD Monitor adjustments will remain in effect until new adjustments are made LCD Monitor adjustments will have no effect on print quality Adjusting the SHARP will not cause any changes on the LCD Monitor When adjusted pictures are recorded to cards all adjustments will be lost Pictures cannot be ma...

Page 25: ...n appears and the display disappears then the power can be turned off ªPaper Paper Cassette Notes Do not fold or bend the paper Lay it flat smooth it out and insert it into the Paper Cassette with the print side the glossy side of the paper with no markings on it up Do not load too much paper in the Paper Cassette No more than 25 sheets of 9 12 cm printing paper or 36 sheets of the other types of ...

Page 26: ... Sliding back the switch permits such operations ªNotes on Storing Settings to the Photo Printer s Memory When the following settings are configured they will remain stored until they are altered again even if the power is turned off If the Photo Printer s power is turned off by disconnecting the Power Cable instead of pressing the power button all configurations will be lost Input under BASIC Cre...

Page 27: ...he printer becomes extremely cold as may occur in cold environments the LCD Monitor may display images darker than usual when the power is turned on Normal brightness will return once the internal temperature rises The LCD Monitor is made of high precision technology It contains over 99 99 quality pixels However a minuscule amount of pixels less than 0 01 may contain defects or may constantly emit...

Page 28: ...ing so could cause paper jams or other malfunctions Use the special Ink Cassette Paper Set when printing 15 Can the Digital Photo Printer print images continuously 15 If Number is selected under OPTION on the MENU screen up to 10 sheets can be printed continuously Do not allow more than 10 sheets of printed paper collect in the paper exit tray as doing so may lead to a paper jam 16 How many sheets...

Page 29: ...nd change over to the INPUT screen 8 The printer does not respond when a button is pressed 8 1 The internal temperature of the printer is too high Wait 8 2 Printing is in progress Wait until printing is complete 9 Paper jams occur frequently 9 1 More than 36 sheets of paper or 25 sheets of 9 12 cm printing paper have been loaded in the Paper Cassette 9 2 The paper is creased or curled 10 The MENU ...

Page 30: ...occurred Remove the jammed paper and insert the specified printing paper Paper jam has occurred Remove the jammed paper There is no paper cassette Insert the Paper Cassette Ink cassette is incorrect Use the specified Ink Cassette There is no ink Replace the Ink Cassette with a new one Paper is incorrect Set properly Insert the specified printing paper correctly Set paper Insert paper into the Pape...

Page 31: ...de Single Screen Multiple Screen Album Multi Frame Calendar Zoom Title Character Input Sepia Print Stamp Batch Print Index Date Print Date Search Trimming Card Storage Card Erase Card Copy Slide Show DPOF Digital Print Order Format compatible Print Head Film thermal head 16 13 dots mm 410 dpi Input Socket S VIDEO IN Socket Y luminance signal 1Vp p 75 ohm C colour signal 0 3Vp p 75 ohm rear 1 VIDEO...

Page 32: ...VQT9463 S0901Kz0 1100 A Printed in Japan Matsushita Electric Industrial Co Ltd Web site http www panasonic co jp global ...

Reviews: