background image

Useful Information

For assistance, please visit http://www.panasonic.com/phonehelp

89

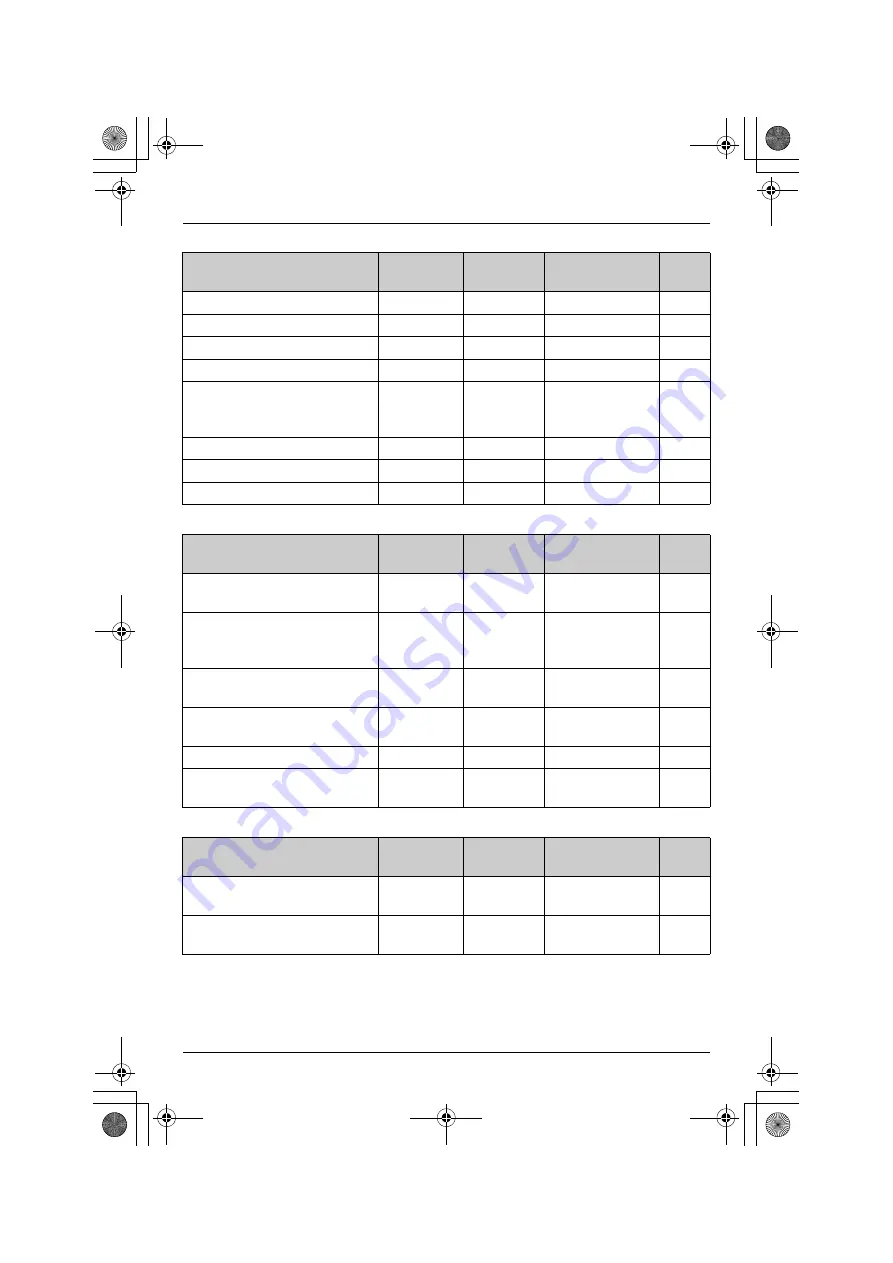
Answering system features

Link to Cell feature

Bluetooth compatible headset

Feature

Feature 
code

Operating 
unit

Default setting

Page

Call screening

*2

{

3

}{

1

}{

0

}

^

On

58

Greeting check

{

3

}{

0

}{

3

}

^

51

Greeting record

{

3

}{

0

}{

2

}

^

51

Message playback

{

3

}{

0

}{

0

}

Y

53

Recording mode

*2

{

3

}{

0

}{

9

}

^

Standard 
recording 
60min

58

Recording time

*2

{

3

}{

0

}{

5

}

^

3min

58

Remote code

*2

{

3

}{

0

}{

6

}

^

11

57

Ring count

*2

{

2

}{

1

}{

1

}

^

4 rings

57

Feature

Feature 
code

Operating 
unit

Default setting

Page

Set Area Code

*2

(For cellular calls)

{

8

}{

0

}{

0

}

^

60

Discoverable

*2


(Turning on the discoverable 
mode)

{

6

}{

2

}{

0

}

^

Off

66

Ringer tone

*2*3

(For cellular phones)

{

6

}{

2

}{

9

}

Y

^

Tone 3

65

Ringer volume

*2*3

(For cellular phones)

{

6

}{

2

}{

8

}

Y

^

High

64

TAD (cell)

*2*3

{

6

}{

3

}{

0

}

^

Off

65

TAD ring count

*2*3

(For cellular phones)

{

6

}{

3

}{

1

}

^

4 rings

66

Feature

Feature 
code

Operating 
unit

Default setting

Page

Headset list

*3

(Selecting a headset)

{

6

}{

2

}{

2

}

^

70

Registration

 (Registering a 

headset)

{

6

}{

2

}{

1

}

^

70

TH112(e).book  Page 89  Thursday, June 8, 2006  11:07 AM

Summary of Contents for KX-TH112 - Cordless Phone - Operation

Page 1: ...g Instructions before using the unit and save for future reference For assistance visit our website http www panasonic com phonehelp for customers in the U S A or Puerto Rico Charge the handset battery for 6 hours before initial use 2 Line Expandable Digital Cordless Answering System Model No KX TH112 Operating Instructions TH112 e book Page 1 Thursday June 8 2006 11 07 AM ...

Page 2: ...ence calls 37 Call share 39 F Monitoring Monitoring feature 40 Audio monitor 40 Programmable Settings Ringer settings 41 Other settings 44 Registering a unit 48 i Answering System Answering system feature 50 Setting up the answering system 50 Listening to messages using the base unit 52 Listening to messages using the handset 53 Voice memo 54 Remote operation 55 Answering system settings 57 Using ...

Page 3: ...s located page 40 N Customize ring You can connect an audio device to the handset using the included audio cable and record songs to be used as the handset ringer tone page 42 N Changing the device name You can customize the name for the handset and base unit page 44 N Link to Cell feature This feature allows you to make or answer cellular calls using the handset or base unit if your cellular phon...

Page 4: ...ptor for base unit Order No PQLV206X A 4 wire telephone line cord with green plugs Order No PQJA10088Z A 2 wire telephone line cord with transparent plugs Order No PQJA10075Z A Battery Order No HHR P104 A Handset cover Order No PQYNTHA19R A Audio cable Order No PQJA10165Z Accessory item Order number Rechargeable nickel metal hydride Ni MH battery HHR P104 Corded headset KX TCA86 KX TCA88HA KX TCA9...

Page 5: ...compatible to this product For more details and the list of compatible cellular phones please visit www panasonic com CompatibleCellPhones L References in these operating instructions to a charger or other handsets are for accessory handset users only Handsets optional max 8 including handset sold with KX TH112 base unit Other Bluetooth compatible devices optional max 10 Cordless handset KX THA19 ...

Page 6: ...he product 11 To reduce the risk of electric shock do not disassemble the product Take the product to an authorized service center when service is required Opening or removing covers may expose you to dangerous voltages or other risks Incorrect reassembly can cause electric shock when the product is subsequently used 12 Unplug the product from power outlets and refer servicing to an authorized ser...

Page 7: ... the battery ies and or the conductive material to overheat and cause burns L Charge the battery ies provided or identified for use with the product only in accordance with the instructions and limitations specified in this manual WARNING L To prevent the risk of fire or electrical shock do not expose the product to rain or any type of moisture L Unplug the product from power outlets if it emits s...

Page 8: ...e generating devices such as fluorescent lamps and motors L The product should be kept free from excessive smoke dust high temperature and vibration L The product should not be exposed to direct sunlight L Do not place heavy objects on top of the product L When you leave the product unused for a long period of time unplug the product from the power outlet L The product should be kept away from hea...

Page 9: ... page 11 Connecting the AC adaptor Connect the AC adaptor then raise the antennas L Use only the included Panasonic AC adaptor PQLV206 Note L The AC adaptor must remain connected at all times It is normal for the adaptor to feel warm during use L The AC adaptor should be connected to a vertically oriented or floor mounted AC outlet Do not connect the AC adaptor to a ceiling mounted AC outlet as th...

Page 10: ...single line telephone jack Note L Make sure you connect the telephone line cord into LINE1 2 telephone jack To 2 line telephone jack RJ14C 4 wire telephone line cord with green plugs Click Line 1 Line 2 To single line telephone jacks RJ11C 2 wire telephone line cord with transparent plugs 4 wire telephone line cord with green plugs Click 2 wire telephone line cord with transparent plugs To single ...

Page 11: ... a 2 line telephone jack For this connection please purchase a Panasonic 2 line splitter page 4 Example DSL line is line 2 To connect to 2 single line telephone jacks Example DSL line is line 2 LINE 2 LINE 1 2 line splitter 2 wire telephone line cord with transparent plugs 4 wire telephone line cord with green plugs To 2 line telephone jack RJ14C Noise filter Line 1 Line 2 To single line telephone...

Page 12: ... recyclable powers the product you have purchased Please call 1 800 8 BATTERY 1 800 822 8837 for information on how to recycle this battery Battery charge Place the handset on the base unit for 6 hours before initial use While charging the charge indicator on the handset lights in amber When the battery is fully charged the indicator lights in green Base unit Note L If you want to use the handset ...

Page 13: ...he base unit the less time you may actually talk using the handset L After the handset is fully charged displaying Charge completed it may be left on the base unit without any ill effect on the battery L The battery level may not be displayed correctly after you replace the battery In this case place the handset on the base unit and let charge for 6 hours Battery icon Battery level 1 Fully charged...

Page 14: ...onference D HOLD E MEMO F LINE SELECT G ANSWER ON ANSWER ON indicator H EDIT I ERASE J STOP K MESSAGE L Antenna M Speaker N TRANSFER INTERCOM O IN USE indicator P Display Q CELLULAR SELECT 1 2 3 4 5 R Charge contacts S TONE T PAUSE REDIAL U SP PHONE Speakerphone SP PHONE indicator V MUTE W FLASH CALL WAIT X MIC Microphone Y Navigator key V Z MENU SET ...

Page 15: ...cator Message indicator K Receiver L Soft keys M OFF N MUTE CLEAR O HOLD INTERCOM P FLASH CALL WAIT Q Charge contacts The handset joystick can be used to navigate through menus and to select items shown on the display by pushing it up down left or right It can also be used to select the center soft key icon page 18 by pressing down on the center of the joystick B C D E F G H I J K M L N O P Q A TH...

Page 16: ......

Page 17: ...r phone s battery level It may not be displayed depending on the cellular phone s capability L2 L1 L2 L1 ANSWER L1 L2 MESSAGE FULL Displayed item Meaning 1 Battery level indicator for the handset located in the upper right of the display This icon is also displayed in the lower right representing a connected cellular phone s battery level It may not be displayed depending on the cellular phone s c...

Page 18: ...ous features and settings Note L The menu icons shown in these operating instructions vary slightly from the actual icons shown on the display You are using a cellular line The number of bars indicates the signal strength of the cellular line Depending on a connected cellular phone s capability these bars may not be displayed Displayed item Meaning LINE1 LINE2 Base unit Menu icon Menu feature d Ph...

Page 19: ...f you select a language you cannot read press MENU 1 1 0 1 and SET to change the display language to English Symbol Meaning Operate with the base unit Y Operate with the handset Symbol Meaning For base unit d G A f F h The symbols to the left represent the base unit menu icons For handset d G i f F h The symbols to the left represent the handset menu icons Example Ringer volume Push the joystick o...

Page 20: ...he handset or base unit 1 MENU center of joystick i h i SELECT 2 Date and time i SELECT 3 Enter the current month day and year by selecting 2 digits for each Example May 15 2006 0 5 1 5 0 6 4 Enter the current hour and minute 12 hour clock format by selecting 2 digits for each Example 9 30 0 9 3 0 5 Press to select AM or PM 6 SAVE i OFF 1 MENU i h i SET 2 Date and time i SET 3 Enter the current mo...

Page 21: ...he other party 2 When you finish talking press OFF or place the handset on the base unit or charger Note L Use the speakerphone in a quiet environment L To switch to the receiver press C Adjusting the receiver speaker volume Push or V while talking Making a call using the redial list The last 10 phone numbers dialed are stored in the redial list 1 REDIAL 2 Push or V to select the desired number L ...

Page 22: ...he handset is off the base unit press LINE1 or LINE2 twice on the handset If the handset is on the base unit simply lift it Adjusting the speaker volume Press or V while talking Making a call using the redial list The last 10 phone numbers dialed are stored in the redial list 1 REDIAL 2 Press or V to select the desired number L To erase the displayed number press ERASE 3 SP PHONE PAUSE button for ...

Page 23: ...in step 1 L To change the line selection see page 46 Auto talk This feature allows you to answer a call by simply lifting the handset off the base unit or charger You do not need to press C To activate this feature see page 45 Temporary ringer off While the handset is ringing for an outside call you can turn the ringer off temporarily by pressing OFF Using the base unit 1 SP PHONE L The called lin...

Page 24: ...ssing FLASH allows you to use special features of your host PBX such as transferring an extension call or accessing optional telephone services such as Call Waiting Note L To change the flash time see page 46 For Call Waiting service users Y To use Call Waiting you must subscribe to your telephone service provider s Call Waiting service This feature allows you to receive calls while you are alread...

Page 25: ...f select V E off 3 SELECT Note L Depending on the condition and quality of your telephone line this feature may emphasize existing line noise If it becomes difficult to hear turn this feature off Using the other line during a call When a call is being received on the other line during a conversation the interrupt tones sound page 43 k or l on the handset or LINE1 or LINE2 on the base unit flashes ...

Page 26: ...rom an audio device page 42 L If you select No Ringer ID default the handset uses the ringer tone you selected on page 41 when a call is received from that caller L If you select No Light up ID default the handset uses the ringer indicator color you selected on page 43 when a call is received from that caller Character table for entering names Note L To enter another character that is located on t...

Page 27: ...first phonebook entry starting with the initial L and go to step 3 L If there is no item corresponding to the letter you selected the next item is displayed 3 Push V to select the desired item Editing items in the handset phonebook Y 1 Find the desired item page 27 i EDIT 2 Edit the name if necessary page 26 i NEXT 3 Edit the phone number if necessary i NEXT 4 Select the desired ringer ID i NEXT 5...

Page 28: ...dy order in memory is different in the copy destination unit from the sending unit the ringer ID will not be copied properly This is not necessary if the ringer ID is set to use a preset melody L Light up ID settings for phonebook items are not copied to the base unit L The melodies and songs for ringer ID are not copied to the base unit Copying an item 1 MENU center of joystick i d i SELECT 2 COP...

Page 29: ...aracter or number you want to erase then press ERASE Enter the appropriate character or number Note L Press and hold ERASE to erase all characters or numbers Finding and calling a base unit phonebook item Phonebook items can be searched for alphabetically by scrolling through the phonebook items or by initial Once you have found the desired item press SP PHONE to dial the phone number L You can al...

Page 30: ...3 Find the desired item page 29 i SET Note L When storing a calling card access number and your PIN in the phonebook as one phonebook item press PAUSE to add pauses after the number and PIN as necessary page 22 L If you have rotary or pulse service you need to press before pressing MENU in step 1 to change the dialing mode temporarily to tone Copying base unit phonebook items You can copy one or a...

Page 31: ...splay If you subscribe to both Caller ID and Call Waiting with Caller ID services the 2nd caller s information is displayed after you hear a Call Waiting tone page 24 Note L Please contact your telephone service provider for details and availability of this service in your area Talking Caller ID Y This feature lets you know who is calling without looking at the display When a call comes in the han...

Page 32: ...isplayed Caller list Caller information for the last 50 different callers is logged in the caller list You can use this list to return missed calls Missed calls If a call is not answered the unit treats the call as a missed call The number of missed calls is shown on the display This lets you know if you should view the caller list to see who called while you were out Viewing the caller list and c...

Page 33: ...ired format 1 Local phone number 2 Area code Local phone number 3 1 Area code Local phone number 4 SP PHONE Caller ID number auto edit feature Once you call back an edited number the unit will remember the Area Code and Format of the Edited Number Next time when someone calls from the same Area Code caller information will be customized by the unit as follows When the call is being received the Ca...

Page 34: ... NEXT 4 Select the desired ringer ID i NEXT 5 Select the desired light up ID i NEXT i SAVE i OFF 1 MENU i G i SET 2 Select the desired item L To edit the number press EDIT repeatedly until the phone number is shown in the desired format 3 to save L Enter the name if necessary page 26 i SET 4 Select the ringer ID if necessary i SET 2 times i STOP Erasing caller information Y Erasing a selected item...

Page 35: ...TERCOM L Even if you call all handsets only the handset user who answers first can take the intercom call 3 When you finish talking press SP PHONE Note L You can also locate a misplaced handset by paging it handset locator Answering intercom calls Y When the unit is being paged it rings and displays the extension number of the paging party 1 Press C or s to answer the page 2 When you finish talkin...

Page 36: ...et user who answers first can take the transferred call 3 Wait for the paged party to answer L If the paged party does not answer press LINE1 or LINE2 that is flashing to return to the outside call 4 To complete the transfer press SP PHONE Note for handset and base unit L If the paged party does not answer within 1 minute after you hang up your phone rings and the call is returned to your phone Yo...

Page 37: ...r line and then combine the calls to establish a conference call 1 During an outside call press HOLD 2 times 2 To answer a 2nd call press LINE1 or LINE2 To make a 2nd call press LINE1 or LINE2 then dial the phone number 3 When the 2nd call is connected press CONF to make a conference call L To hang up only one line press LINE1 or LINE2 for the party with which you want to continue talking L To put...

Page 38: ...ss CONF to make a conference call L To leave the conference press OFF The other 2 parties can continue the conversation 1 During an outside call press INTERCOM 2 To page a handset enter its extension number 1 to 8 To page all handsets press 0 3 When the paged party answers press CONF on the base unit to make a conference call L To leave the conference press SP PHONE The other 2 parties can continu...

Page 39: ...l privacy Y Call privacy allows you to prevent other users from joining your conversations with outside callers To allow other users to join your conversations leave this feature off Press PRIVACY during an outside call L When this feature is turned on PRIVACY is shown in the top of the display L To turn this feature off press PRIVACY again PRIVACY disappears from the display Note L While you are ...

Page 40: ...ing Default Deny i SAVE i OFF 1 MENU i h i SET 2 Monitor access i SET 3 Select the desired setting Default Deny i SET i STOP Audio monitor This feature allows you to listen to the audio in a room where the handset or base unit is located Monitoring audio in a room Y 1 MENU center of joystick i F i SELECT 2 Select the desired unit i SELECT L You can listen to the audio 3 Press OFF to stop monitorin...

Page 41: ...d songs for the handset ringer tone from an audio device page 42 1 MENU center of joystick i f i SELECT 2 Ringer tone i SELECT 3 Select the desired line 4 Select the desired item Default Line 1 Tone 1 Line 2 Tone 2 i SAVE i OFF Note L If you subscribe to a distinctive ring service such as IDENTA RING select a tone tone 1 to 3 for the handset ringer tone If you select a melody or a song you cannot ...

Page 42: ...CT 4 Record i SELECT 5 Start playing the audio device 6 Press REC to start recording 7 To stop recording press STOP L To listen to the recording select Playback then press SELECT L To re record select Retry press SELECT then start from step 5 8 Save i SELECT 9 Enter the desired name max 15 characters page 26 10 SAVE i OFF 11 Disconnect the audio cable from the handset Note L The total recording ti...

Page 43: ... i f i SELECT 2 Ring color i SELECT 3 Select the desired color Default Color 1 i SAVE i OFF Interrupt tone Y This tone lets you know when you receive a call while you are on the other line on an intercom call or monitoring a room 2 The tone sounds 2 times On The tone sounds for as long as the line rings Off Turns this feature off 1 MENU center of joystick i f i SELECT 2 Interrupt tone i SELECT 3 S...

Page 44: ... OFF 1 MENU i h i SET 2 Time adjustment i SET 3 Select the desired setting Default Caller ID auto i SET i STOP Changing the handset base unit name Y Each handset and the base unit can be given a customized name Bob Kitchen etc this is useful when you have multiple units 1 MENU center of joystick i h i SELECT 2 Device name i SELECT 3 Enter the desired the name max 10 characters page 26 Default Hand...

Page 45: ...talk Y When this feature is turned on you can answer a call by lifting the handset off the base unit or charger without pressing C 1 MENU center of joystick i h i SELECT 2 Auto talk i SELECT 3 Select the desired setting Default Off i SAVE i OFF Note L If you subscribe to Caller ID service and want to view the caller s information on the handset display after lifting up the handset to answer a call...

Page 46: ...ult Auto i SET i STOP Note L You can select a line manually regardless of the line selection mode by pressing LINE1 or LINE2 Flash time The flash time depends on your telephone exchange or host PBX L You only need to program this setting once using either the handset or base unit Important L The setting should stay at 700 ms unless pressing FLASH fails to pick up the Call Waiting call 1 MENU cente...

Page 47: ...h as registering units The default setting is 7262 Important L If you change the PIN please make note of your new PIN The unit does not reveal the PIN to you 1 MENU i h i SET 2 Set PIN i SET 3 To change the PIN for the first time skip to step 4 To change the PIN enter the current 4 digit PIN i SET 4 Enter the new 4 digit PIN i SET 5 Enter the new 4 digit PIN again i SET i STOP If you forget the PI...

Page 48: ...reregistered If for some reason the handset is not registered to the base unit register the handset Important L Before registering a compatible Panasonic handset to the base unit we recommend you change the PIN page 47 so that other Bluetooth devices in the area are not accidentally registered at the same time L If you have already canceled the handset registration at the previous base unit perfor...

Page 49: ...ENU center of joystick i h i SELECT 2 Registration i SELECT 3 Deregistration i SELECT 4 3 3 5 i OK Deregistering another device The base unit can cancel a registered unit Bluetooth cellular phone Bluetooth headset 1 MENU i h i SET 2 Deregistration i SET 3 Select the desired device i SET 4 3 3 5 i SET i STOP Handset Base unit TH112 e book Page 49 Thursday June 8 2006 11 07 AM ...

Page 50: ...ystem is turned on To record additional messages erase unnecessary messages page 52 L If less than 10 minutes of recording time are available the unit announces the remaining recording time when operating the answering system L Messages are retained even if a power failure occurs Setting up the answering system Turning the answering system on Press LINE SELECT repeatedly to select the desired line...

Page 51: ...om the MIC 5 To stop recording press STOP 6 Press STOP when finished Playing back the greeting message 1 MENU i A i SET 2 Greeting check i SET 3 Select the desired line 4 STOP Erasing your greeting message 1 MENU i A i SET 2 Greeting check i SET 3 Select the desired line 4 Press ERASE while your greeting message is playing 5 STOP Pre recorded greeting message If you erase or do not record your own...

Page 52: ...ting a message Press L If pressed within the first 5 seconds of a message the previous message will be played Skipping a message Press Pausing a message Press STOP L To resume playback press MESSAGE L To stop playback completely press STOP again Calling back Caller ID subscribers only If Caller ID information was received for the call you can call the caller back while listening to the message Pre...

Page 53: ...back Y Calling back Caller ID subscribers only If Caller ID information was received for the call you can call the caller back while listening to the message Press LINE1 or LINE2 during playback Note L To edit the number before calling back press EDIT to select the desired format page 33 L If you have registered a cellular phone to the base unit page 59 you can call the caller back by pressing CAL...

Page 54: ...elf or someone else max 3 minutes This memo can be played back later either directly with the base unit or remotely 1 MEMO 2 After the base unit beeps speak clearly about 20 cm 8 inches away from the MIC 3 To stop recording press STOP 9 Stop playback 2 0 Turn answering system off 4 or CLEAR i YES Erase this message during playback 5 Erase all messages 1 8 Turn answering system on for line 1 only 2...

Page 55: ... a specific operation or press 2 to listen to more available operations Operations are presented by voice guidance in the following order Play back all messages Play back new messages Record a message Erase all messages Record your greeting message Note L If you do not press any dial keys within 10 seconds after a voice guidance prompt the unit disconnects your call L If less than 10 minutes of re...

Page 56: ...h the greeting message L You can hang up or if you call from a touch tone phone you can enter your remote code and begin remote operation page 55 Skipping the greeting message to leave a message You can leave a message just as any outside caller can Call your phone number then press to skip the greeting message and record your message after the beep 1 7 Record a greeting message for line 1 only 2 ...

Page 57: ...a flat rate bundle service that includes Caller ID Call Waiting Voice Mail and unlimited local regional long distance calls please note the following L To use the Voice Mail service provided by your telephone service provider rather than the unit s answering system turn off the answering system page 50 This unit does not have an indicator to indicate if there are new messages in your mailbox servi...

Page 58: ...improved sound quality but the total recording capacity is reduced 1 MENU i A i SET 2 Recording mode i SET 3 Select the desired item Default Standard recording 60min i SET i STOP Call screening This feature allows you to monitor a message from the speaker when the answering system is recording the message 1 MENU i A i SET 2 Call screening i SET 3 Select the desired item Default On i SET i STOP Mes...

Page 59: ...phone within the range of the base unit L While you are on a cellular call the battery of your cellular phone is being consumed We recommend charging your cellular phone during the call Registering a cellular phone Important L For more details and the list of compatible cellular phones please visit www panasonic com CompatibleCellPhones L Before registering a Bluetooth device to the base unit we r...

Page 60: ...ith your cellular phone the connection will be lost After returning within closer to the base unit s range you need to reconnect the cellular phone to the base unit Some cellular phones lose connection after usage please check the specification of your cellular phone for more details L When registering an additional cellular phone to the base unit cellular phones already connected to the base unit...

Page 61: ...isplay flashes rapidly 1 Press C or CELL 2 When you finish talking press OFF When a cellular phone is connected and the base unit receives a call the corresponding CELLULAR SELECT button flashes rapidly 1 Press SP PHONE or the CELLULAR SELECT button 1 to 5 that is flashing 2 When you finish talking press SP PHONE Note for handset and base unit L When you receive a call from a land line and a cellu...

Page 62: ...ssing LINE1 or LINE2 instead of CELL 1 MENU i G i SET 2 Press or V to select the desired caller information 3 Press the desired CELLULAR SELECT button 1 to 5 L When you call back the caller information indicated by y if you press SP PHONE select the desired cellular phone i SET 4 When you finish talking press SP PHONE Note L If the cellular line is already being used or you want to select the land...

Page 63: ...alking press OFF to end the land line call 4 To return to the cellular call press C 1 To put the cellular call on hold press HOLD 2 To make a land line call dial the phone number then press LINE1 or LINE2 To answer a land line call press LINE1 or LINE2 3 When you finish talking press SP PHONE to end the land line call 4 To return to the cellular call press the CELLULAR SELECT button 1 to 5 that is...

Page 64: ...nit before programming Ringer settings for cellular calls Y Ringer volume You can change the ringer volume heard when a cellular call is received You can change it for the handset and base unit individually 1 MENU center of joystick i f i SELECT 2 Ringer for cell i SELECT 3 Ringer volume i SELECT 4 Select the desired volume Default High i SAVE i OFF 1 MENU i f i SET 2 Ringer for cell i SET 3 Ringe...

Page 65: ...from one of the registered cellular phones 1 Press the desired CELLULAR SELECT button 1 to 5 2 Assign Base HS i SET 3 Select the desired unit then press Default All L The selected units are indicated by Q L To cancel a selected unit press again 4 SET i STOP Answering system settings for cellular calls Setting the answering system for a cellular call This feature allows the base unit to answer cell...

Page 66: ...ndset KX THA19 You can also switch a cellular call between a cellular phone and base unit Transferring a cellular call Y 1 During a cellular call press INTERCOM to put the call on hold 2 To page the base unit press 0 To page another handset enter its extension number 1 to 8 L If you do not wish to announce the transfer skip to step 4 3 Wait for the paged party to answer L If the paged party does n...

Page 67: ...unit L If the paging party hangs up before you answer the page Incoming call is displayed Press C on the handset or the CELLULAR SELECT button 1 to 5 that is flashing on the base unit to take the transferred call Switching a cellular call between a cellular phone and the base unit From a cellular phone to the base unit If you answer a cellular call using a cellular phone you can transfer it to the...

Page 68: ... conference call L To hang up only one line press the desired line button or the desired CELLULAR SELECT button 1 to 5 for the party with which you want to continue talking L To put both lines on hold press HOLD To talk with only land line caller press the line button that is flashing To talk only with the cellular caller press the CELLULAR SELECT button 1 to 5 that is flashing To resume both line...

Page 69: ... the paged party answers press CONF to make a conference call L To leave the conference press SP PHONE The other 2 parties can continue the conversation Note for handset and base unit L The cellular call can be put on hold by pressing HOLD Only the person who placed the call on hold can resume the full conference by pressing CONF on the handset or CONF on the base unit Base unit TH112 e book Page ...

Page 70: ...dset Important L For more details please visit www panasonic com CompatibleCellPhones 1 Your headset Enter the registration mode of your headset each headset s instructions vary 2 Base unit MENU i h i SET 3 Bluetooth i SET 4 Headset i SET 5 Registration i SET 6 Enter the PIN of your headset Refer to the operating instructions provided with your headset i SET Note L To cancel a headset from the bas...

Page 71: ...itch to the handset speakerphone press s To return to the headset press C Additional accessories Sales and support information L To order replacement accessories call 1 800 332 5368 L TTY users hearing or speech impaired users can call 1 866 605 1277 Wall mounting optional By purchasing the optional wall mounting adaptor PQKL10078Z1 you can mount the base unit on a wall Belt clip optional By purch...

Page 72: ...set and the base unit away from all electrical appliances and try again L Another handset or base unit user tried to send phonebook items to you but there was an error Have the other user re send the items to you page 28 30 Error 8 handsets have already been registered L 8 handsets have already been registered to the base unit The deregistered handset number is still retained in the base unit To r...

Page 73: ...w minutes and try again Phonebook full L There is no space to store new items in the phonebook Erase unnecessary items page 27 30 Please lift up and try again L A handset button was pressed while the handset was on the base unit or charger Lift the handset and press the button again System is busy Please try again later L The resources available for wireless communication making or answering calls...

Page 74: ...ne and connect a known working telephone If the working telephone operates properly contact our service personnel to have the unit repaired If the working telephone does not operate properly contact your telephone service provider Recharge battery is displayed and I cannot perform the following operations recording or erasing a customized ringer editing a title for a customized ringer L The batter...

Page 75: ...later I cannot redial by pressing REDIAL L If the last number dialed was more than 48 digits long the number will not be redialed correctly Dial the number manually I cannot have a conversation using the headset L Make sure that an optional headset is connected properly page 71 L If SP phone is displayed on the handset press C to switch to the headset L Your optional Bluetooth headset is not regis...

Page 76: ...your base unit is connected to a telephone line with DSL service we recommend connecting a noise filter between the base unit and the telephone line jack Contact your DSL provider for details L The name display service may not be available in some areas Contact your telephone service provider for details L Other telephone equipment may be interfering with this unit Disconnect the other equipment a...

Page 77: ...not turned on for the line you wish to record messages from Select the desired line or both lines by pressing LINE SELECT repeatedly then turn the answering system on page 50 56 L The recording time is set to Greeting only Select a different setting page 58 L The message memory is full Erase unnecessary messages page 52 L The answering system is activated for both lines and the 1st caller is leavi...

Page 78: ...le to connect it to the base unit L Confirm that you have registered your cellular phone to the base unit using the cellular phone page 59 Refer to the operating instructions of your cellular phone for registration L Confirm that your cellular phone is turned on L Confirm that the Bluetooth feature of your cellular phone is turned on You may need to turn this feature on depending on your cellular ...

Page 79: ...llow green but I cannot make cellular calls with the handset or base unit L The cellular phone is being used separately from your system I can make or answer cellular calls but cannot hear a sound L The Bluetooth technology on your cellular phone may not be functioning normally Turn off and on your cellular phone L Disconnect and connect the base unit AC adaptor and try again I cannot switch cellu...

Page 80: ...out a decimal point e g 03 is a REN of 0 3 If this equipment causes harm to the telephone network the telephone company will notify you in advance that temporary discontinuance of service may be required But if advance notice isn t practical the telephone company will notify the customer as soon as possible Also you will be advised of your right to file a complaint with the FCC if you believe it i...

Page 81: ...io frequency energy and if not installed and used in accordance with the instructions may cause harmful interference to radio communications However there is no guarantee that interference will not occur in a particular installation If this equipment does cause harmful interference to radio or television reception which can be determined by turning the equipment off and on the user is encouraged t...

Page 82: ...Useful Information 82 For assistance please visit http www panasonic com phonehelp Notice ...

Page 83: ...of their respective owners Operating environment 5 C 40 C 41 F 104 F Frequency 2 402 GHz 2 48 GHz Bluetooth compliance Bluetooth wireless technology 1 2 Dimensions Approx height 53 mm x width 254 mm x depth 140 mm 23 32 inches x 10 inches x 51 2 inches Mass Weight Approx 490 g 1 08 lb Power consumption Standby Approx 3 3 W Maximum Approx 5 5 W Power output 125 mW max Power supply AC adaptor 120 V ...

Page 84: ...ed users can call 1 877 833 8855 TTY users hearing or speech impaired users can call 1 866 605 1277 Purchase Parts Accessories and Instruction Books online for all Panasonic Products by visiting our Web Site at http www pasc panasonic com or send your request by E mail to npcparts us panasonic com You may also contact us directly at 1 800 332 5368 Phone 1 800 237 9080 Fax Only Monday Friday 9 am t...

Page 85: ... Warranty period This Limited Warranty excludes both parts and labor for batteries antennas and cosmetic parts cabinet This Limited Warranty only applies to products purchased and serviced in the United States or Puerto Rico This Limited Warranty is extended only to the original purchaser and only covers products purchased as new Mail In Service For assistance in the continental U S A in obtaining...

Page 86: ...OT LIABLE FOR INCIDENTAL OR CONSEQUENTIAL DAMAGES RESULTING FROM THE USE OF THIS PRODUCT OR ARISING OUT OF ANY BREACH OF THIS LIMITED WARRANTY As examples this excludes damages for lost time lost calls or messages cost of having someone remove or re install an installed unit if applicable travel to and from the servicer The items listed are not exclusive but are for illustration only ALL EXPRESS A...

Page 87: ...ve not registered your cellular phone and or headset to the base unit the marked features cannot be programmed Telephone Feature Feature code Operating unit Default setting Page Auto edit 2 Caller ID number auto edit 2 1 4 Y On 45 Auto talk 2 0 0 Y Off 45 Caller list 2 1 3 Y 32 Customer support 6 8 0 Y 48 Customize ring 1 6 6 Y 42 Date and time 1 1 0 1 Y 12 31 2006 20 Deregistration Deregistering ...

Page 88: ... 1 2 1 2 1 Y 700ms 46 Set line mode 1 2 1 2 2 Y B 47 Set PIN 2 1 3 2 7262 47 Talking CallerID 1 6 2 Y On 45 Time adjustment 1 2 2 2 6 Y Caller ID auto 44 Voice enhancer 2 7 0 Y Off 44 Feature Feature code Operating unit Default setting Page Audio monitor 7 2 2 Y 40 Device name Changing the handset base unit name 1 0 4 Y Handset Handset Base unit Base TH112 44 Monitor access 2 2 0 2 Y Deny 40 Featu...

Page 89: ... Remote code 2 3 0 6 11 57 Ring count 2 2 1 1 4 rings 57 Feature Feature code Operating unit Default setting Page Set Area Code 2 For cellular calls 8 0 0 60 Discoverable 2 Turning on the discoverable mode 6 2 0 Off 66 Ringer tone 2 3 For cellular phones 6 2 9 Y Tone 3 65 Ringer volume 2 3 For cellular phones 6 2 8 Y High 64 TAD cell 2 3 6 3 0 Off 65 TAD ring count 2 3 For cellular phones 6 3 1 4 ...

Page 90: ...king answering calls 61 Registration 59 Ringer tone 65 Ringer volume 64 Transferring a call 66 CID Caller ID 32 Conference calls 37 Connections AC adaptor 9 Noise filter 11 Telephone line cord 9 10 11 Customer support 48 Customize ring 42 D Date and time 20 Deregistration 49 Device name 44 Dialing mode 20 Direct commands 87 Display Contrast 45 Language 19 E Error messages 72 F Flash 24 Flash time ...

Page 91: ...ng count 57 Ringer ID 32 Ringer off 23 41 Ringer tone 41 Ringer volume 41 Rotary service 24 S Soft keys 18 Specifications 83 SP phone 21 T TAD 65 Talking Caller ID 31 45 Time adjustment 44 Toll saver 57 Tone 24 Trademarks 83 Transferring a call 36 Troubleshooting 74 TTY 4 71 84 V VE voice enhancer 25 44 Voice guidance 53 55 Voice Mail service 57 Volume Receiver 21 Ringer 41 Speaker 21 22 W Wall mo...

Page 92: ...o Panasonic Consumer Electronics Company listed below or to executive or regional sales offices These locations do not repair consumer products Panasonic Consumer Electronics Company Division of Panasonic Corporation of North America One Panasonic Way Secaucus New Jersey 07094 Panasonic Puerto Rico Inc San Gabriel Industrial Park Ave 65 de Infantería Km 9 5 Carolina Puerto Rico 00985 Copyright Thi...

Reviews: