75
KX-TG6700BXB/KX-TGA670BXB
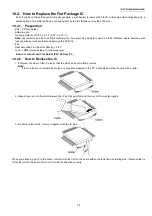
10.2. How to Replace the Flat Package IC
Even if you do not have the special tools (for example, a spot heater) to remove the Flat IC, with some solder (large amount), a
soldering iron and a cutter knife, you can easily remove the ICs that have more than 100 pins.
10.2.1. Preparation
• PbF (: Pb free) Solder
• Soldering Iron
Tip Temperature of 700
°
F ± 20
°
F (370
°
C ± 10
°
C)
Note:
We recommend a 30 to 40 Watt soldering iron. An expert may be able to use a 60 to 80 Watt iron where someone with
less experience could overheat and damage the PCB foil.
• Flux
Recommended Flux: Specific Gravity
→
0.82.
Type
→
RMA (lower residue, non-cleaning type)
Note:
See
About Lead Free Solder (Pbf: Pb free)
10.2.2. How to Remove the IC
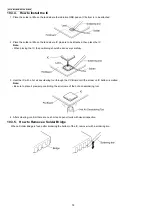
1. Put plenty of solder on the IC pins so that the pins can be completely covered.
Note:
If the IC pins are not soldered enough, you may give pressure to the P.C. board when cutting the pins with a cutter.
2. Make a few cuts into the joint (between the IC and its pins) first and then cut off the pins thoroughly.
3. While the solder melts, remove it together with the IC pins.
When you attach a new IC to the board, remove all solder left on the board with some tools like a soldering wire. If some solder is
left at the joint on the board, the new IC will not be attached properly.
Summary of Contents for KX-TG6700BXB
Page 2: ...2 KX TG6700BXB KX TGA670BXB ...
Page 6: ...6 KX TG6700BXB KX TGA670BXB 3 Specifications ...
Page 35: ...35 KX TG6700BXB KX TGA670BXB 4 11 Signal Route Each signal route is as follows ...
Page 36: ...36 KX TG6700BXB KX TGA670BXB RF part signal route ...
Page 40: ...40 KX TG6700BXB KX TGA670BXB 6 1 2 Connecting the Telephone Line Cord ...
Page 41: ...41 KX TG6700BXB KX TGA670BXB 6 1 2 1 If you subscribe to a DSL service ...
Page 43: ...43 KX TG6700BXB KX TGA670BXB 6 4 1 Battery Level 6 4 2 Panasonic Battery Performance ...
Page 46: ...46 KX TG6700BXB KX TGA670BXB ...
Page 47: ...47 KX TG6700BXB KX TGA670BXB 7 2 2 Programming Using the Direct Commands ...
Page 48: ...48 KX TG6700BXB KX TGA670BXB ...
Page 49: ...49 KX TG6700BXB KX TGA670BXB 7 3 Error Messages ...
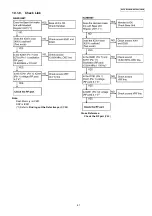
Page 50: ...50 KX TG6700BXB KX TGA670BXB 7 4 Troubleshooting ...
Page 51: ...51 KX TG6700BXB KX TGA670BXB ...
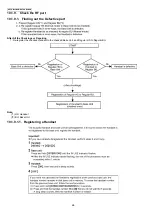
Page 52: ...52 KX TG6700BXB KX TGA670BXB ...
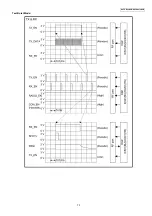
Page 72: ...72 KX TG6700BXB KX TGA670BXB 10 1 9 5 RF DSP Interface Signal Wave Form Test Burst Mode ...
Page 73: ...73 KX TG6700BXB KX TGA670BXB Test Burst Mode ...
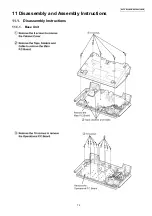
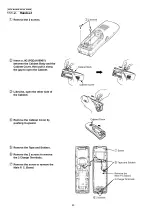
Page 80: ...80 KX TG6700BXB KX TGA670BXB 11 1 2 Handset ...
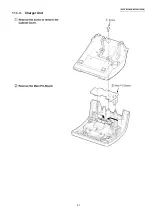
Page 81: ...81 KX TG6700BXB KX TGA670BXB 11 1 3 Charger Unit ...
Page 93: ...93 KX TG6700BXB KX TGA670BXB Memo ...
Page 97: ...97 KX TG6700BXB KX TGA670BXB Memo ...
Page 106: ...106 KX TG6700BXB KX TGA670BXB Memo ...
Page 116: ...116 KX TG6700BXB KX TGA670BXB 15 3 Explanation of IC Terminals RF Part 15 3 1 IC701 ...
Page 117: ...117 KX TG6700BXB KX TGA670BXB 15 3 2 IC801 Backside Terminal GND ...
Page 118: ...118 KX TG6700BXB KX TGA670BXB 15 3 3 IC851 Backside Terminal GND ...
Page 122: ...122 KX TG6700BXB KX TGA670BXB 16 3 Cabinet and Electrical Parts Charger Unit ...
Page 123: ...123 KX TG6700BXB KX TGA670BXB 16 4 Accessories and Packing Materials 16 4 1 KX TG6700BXB ...
Page 124: ...124 KX TG6700BXB KX TGA670BXB 16 4 2 KX TGA670BXB ...

