38
KX-TDE200GR
8.1.1.7.
Utility-Message File Transfer PC to PBX
Transfers Outgoing Message (OGM) files from the PC to the selected MSG card.
This option is only available at Installer level, and requires that at least 1 MSG card is installed. The OPB card that it is mounted
on must be set to OUS status.
Files are stored on the MSG card in the location specified by the file's header information. Uploaded files are automatically
renamed as necessary. If this location already contains an OGM, it will be overwritten by the newly uploaded message.
To transfer OGMs to an MSG card
1. From the Utility menu, select Message File Transfer PC to PBX.
2. Select the target MSG card from the drop-down list, and click OK.
The Open dialog box will be displayed.
3. Select the message files to upload.
It is possible to select multiple files.
4. Click OK.
The files will be uploaded. Files that do not contain message data will be ignored.
When complete, the display will return to the main screen.
8.1.1.8.
Utility-Message File Transfer PBX to PC
Transfers Outgoing Message (OGM) files from the MSG card to the PC.
This option is only available at Installer level, and requires that at least 1 MSG card is installed. The OPB card that it is mounted
on must be set to OUS status.
To transfer OGMs to the PC
1. From the Utility menu, select Message File Transfer PBX to PC.
2. From the upper drop-down list, select the target MSG card.
3. From the lower drop-down list, select the messages to transfer.
• To transfer a certain message, select the number of that message.
• To transfer all messages at once, select "ALL".
The Save dialog box will be displayed.
4. Enter a file name.
5. Click Save.
6. Click OK.
When you choose to transfer all messages, each message is saved as an individual file, with a number appended to the file
name corresponding to that message's location on the MSG card.
When complete, the display will return to the main screen.
Summary of Contents for KX-TDE200GR
Page 7: ...7 KX TDE200GR ...
Page 17: ...17 KX TDE200GR 4 4 5 System Control 4 4 5 1 System Control Block Diagram ...
Page 18: ...18 KX TDE200GR 4 4 5 2 Voice TDM Highway Bus Block Diagram ...
Page 21: ...21 KX TDE200GR 4 4 6 2 EC Bus System Connection Diagram ...
Page 23: ...23 KX TDE200GR 5 Location of Controls and Components 5 1 Name and Locations ...
Page 24: ...24 KX TDE200GR 6 Installation Instructions 6 1 System Overview 6 1 1 System Configurations ...
Page 27: ...27 KX TDE200GR 6 1 3 System Connection Diagram ...
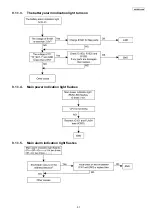
Page 45: ...45 KX TDE200GR 9 Troubleshooting Guide 9 1 IPCMPR Card 9 1 1 Startup ...
Page 46: ...46 KX TDE200GR ...
Page 47: ...47 KX TDE200GR ...
Page 48: ...48 KX TDE200GR ...
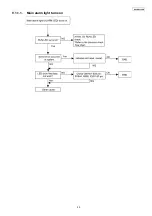
Page 49: ...49 KX TDE200GR 9 1 1 1 Main alarm light turns on ...
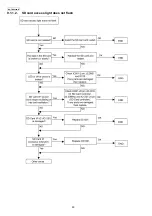
Page 50: ...50 KX TDE200GR 9 1 1 2 SD card access light does not flash ...
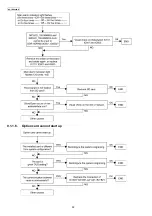
Page 52: ...52 KX TDE200GR 9 1 1 6 Option card cannot start up ...
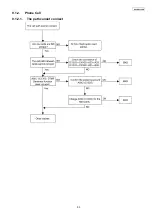
Page 53: ...53 KX TDE200GR 9 1 2 Phone Call 9 1 2 1 The path cannot connect ...
Page 54: ...54 KX TDE200GR 9 1 2 2 Noise is created 9 1 3 Paging 9 1 3 1 The path cannot connect ...
Page 55: ...55 KX TDE200GR 9 1 3 2 Noise is created ...
Page 56: ...56 KX TDE200GR ...
Page 57: ...57 KX TDE200GR ...
Page 58: ...58 KX TDE200GR 9 1 4 Using MOH ...
Page 59: ...59 KX TDE200GR ...
Page 60: ...60 KX TDE200GR ...
Page 61: ...61 KX TDE200GR 9 1 5 LAN 9 1 5 1 LAN Connection ...
Page 62: ...62 KX TDE200GR 9 1 6 SVM 9 1 6 1 SVM function record play ...
Page 63: ...63 KX TDE200GR 9 1 7 RS 232C 9 1 7 1 RS 232C Connection ...
Page 64: ...64 KX TDE200GR 9 1 8 SD card IF ...
Page 65: ...65 KX TDE200GR 9 1 9 Other ...
Page 66: ...66 KX TDE200GR 10 Service Fixture Tools 10 1 Extension Boards for Servicing ...
Page 70: ...70 KX TDE200GR 12 Maintenance 12 1 Terminal Guide of the ICs Transistors and Diodes ...
Page 107: ...107 KX TDE200GR Waveform 7 Waveform 8 Waveform 9 159 984MHz 13 824MHz 16 384MHz ...
Page 120: ...120 KX TDE200GR 16 2 Cabinet and Electric Parts ...
Page 121: ...121 KX TDE200GR ...
Page 122: ...122 KX TDE200GR 16 3 Accessories and Packing Materials ...


