background image

117

■ 

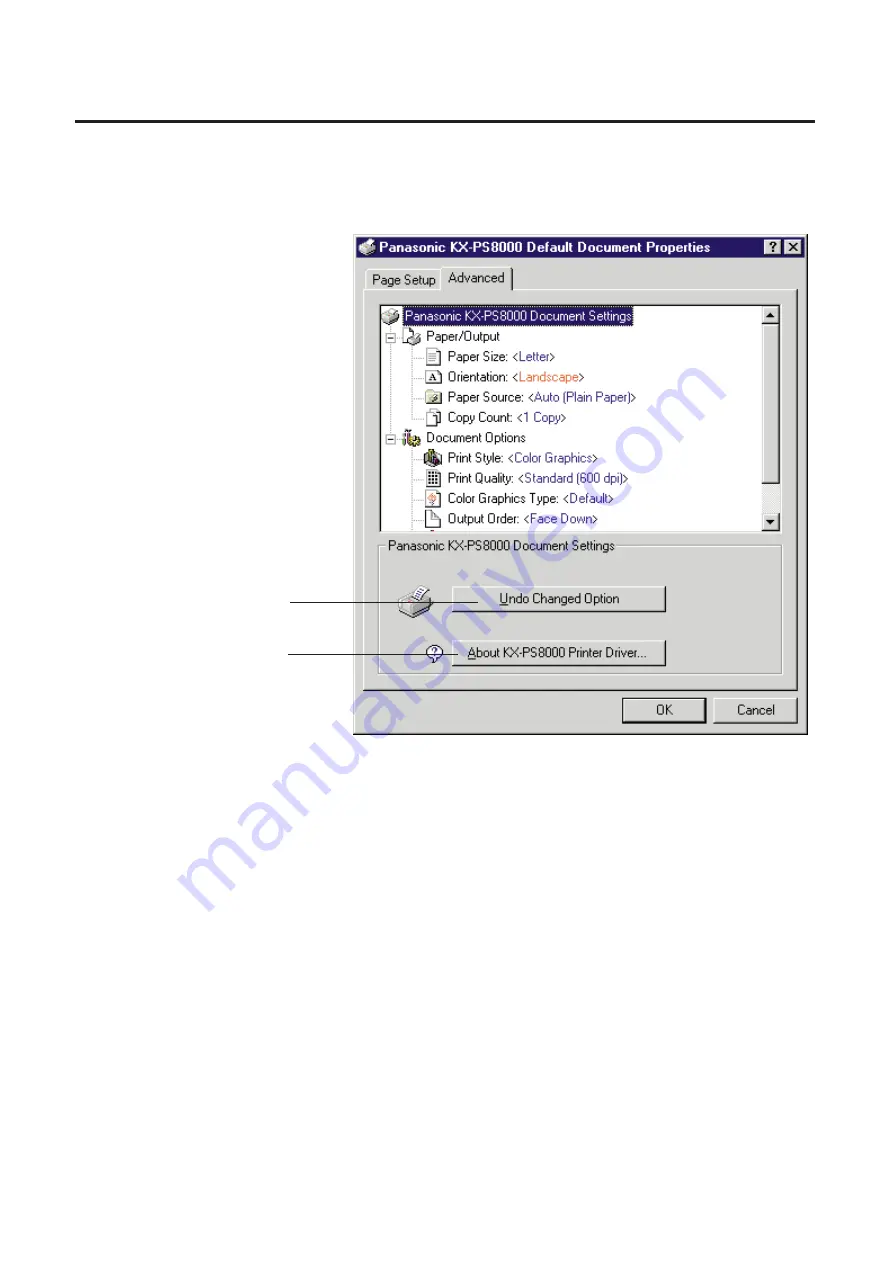
When Panasonic KX-PS8000 Document Settings is
selected

#

Undo Changed Option

Returns the Page Setup and Advanced tab’s settings to the previous

settings.

$

About KX-PS8000 Printer Driver...

Displays the window that contains the program version and copyright

information.

KX-PS8000 Window Overview for Windows NT 4.0

#

$

Summary of Contents for KX-PS8000

Page 1: ...ad the Operating Instructions and the Utilities and Drivers Reference Guide before using the Digital Color Imaging System Keep this CD ROM in the protective case Do not expose the CD ROM to direct sun...

Page 2: ...t explains how to use the print features through the printer drivers Windows 95S1 Windows 3 1S2 Windows NT 4 0S3 Appendix P 134 This section consists of Troubleshooting P 135 Print Quality and Require...

Page 3: ...Enlarged Image on Multiple Pages 19 Shifting an Image 23 Displaying the Shift Window 23 Background Reduction 25 Selecting Print Quality 27 Creating a Mirror Negative Image 29 Creating a Mirror Image...

Page 4: ...51 Moving a Selection Area in the Original Box 54 Resizing a Selection Area 55 Canceling a Selection Area 55 Moving an Image in the Layout Box 56 Resizing an Image in the Layout Box 56 Creating a Mir...

Page 5: ...art Select Programs select KX PS8000 Utilities then click Digital Duplicator Utility The Digital Duplicator Utility main window appears For Windows 3 1 From the Program Manager double click the KX PS8...

Page 6: ...r Utility Window Overview Names and Functions Status display Displays the zoom value currently set When the zoom values of the height and the width are the same one value is displayed If they are diff...

Page 7: ...the multi purpose tray by clicking G or displays the paper size of the selected media tray This is effective only when the multi purpose tray is selected Letter Legal or A4 can be selected Used to se...

Page 8: ...cator will be illuminated Otherwise the red indicator will be illuminated Tray display Digital Duplicator Utility Window Overview Numeric keypad 17 Used to enter the number of duplicates 1 999 Clickin...

Page 9: ...5 Background Reduction button 7 Changes the resolution setting P 27 Quality button 8 Mirror button 9 Creates a negative image of the original P 30 BTo return to the original click this button Negative...

Page 10: ...window also shows immediately how your changes affect the image P 11 11 Used to select a unit of measurement inch or mm P 38 and enable or disable the Jam Recovery function P 39 Other Settings button...

Page 11: ...ndow The Print Preview window allows you to preview the print image of the document Before sending it to the printer all adjustments are shown immediately It is helpful to open this window when you ad...

Page 12: ...er if a document is prescanned from the ADF tray but not duplicated it will remain in the ADF tray To eject the document press the Feed Out button Feed Out button Ejects the document that remains in t...

Page 13: ...e of the Print Preview window Position the cursor on the edge of the window until the mouse pointer changes into a double ended arrow press and hold the mouse button then drag Reduced window Enlarged...

Page 14: ...vided image When the Segment is selected for the enlarged image P 19 the divided multiple images will be displayed in the Print Preview window To view them simultaneously select the smaller zoom value...

Page 15: ...e Basic Tasks Reducing or Enlarging the Output Zoom Displaying the Zoom Window 1 2 Zoom Value box Displays the current zoom value It also allows you to select a zoom value by clicking G P 17 Choosing...

Page 16: ...G W H Uniform Clicking on this check box allows you to set height and width simultaneously by entering zoom value in either of their box To set them independently click off this check box Segment Divi...

Page 17: ...fit A4 Letter fit Letter Letter fit Letter A4 fit Letter Legal fit Legal Legal fit 100 Duplicates the same size as the original If the document size is the same as paper size the edges of the document...

Page 18: ...selection effective The Zoom window is closed 18 Basic Tasks F increases the number of the zoom value maximum 400 G reduces the number of the zoom value minimum 20 Holding down the mouse sequentially...

Page 19: ...sks Printing an Enlarged Image on Multiple Pages You can enlarge the image and print it on multiple pages Each divided image overlaps 0 5 inch Note BThe ADF tray cannot be used when performing a multi...

Page 20: ...20 Example Enlarging a Letter size document to 140 and printing it on multiple pages Click G Option The option buttons appear Click the Zoom button The Zoom window appears 1 2 Basic Tasks...

Page 21: ...nt Size box appears at the bottom of the Zoom window Basic Tasks Note BThe Document Size determines the size of the scanning area The closest size to the document must be selected from the Document Si...

Page 22: ...nd its indicator is lit BIf the Print Preview window is opened the result of the selection is displayed To view the entire image select the smaller zoom value by clicking G of the Preview Zoom Click t...

Page 23: ...to make space on right and or top BLeft Bottom Space Allows you to make space on left and or bottom BRight Bottom Space Allows you to make space on right and or bottom Horizontal Shift box Shifts the...

Page 24: ...ntal Shift box and 0 3 in the Vertical Shift box by clicking F or G The image display reflects the changes Click OK to make the selection effective BTo cancel the selection click Cancel The Shift wind...

Page 25: ...ect visibility of a reverse side print use the Background Reduction function Click G Option The option buttons appear Click the Background Reduction button The Background Reduction window appears Clic...

Page 26: ...background The setting range is 1 8 The effect level is displayed in the Level box and the result of the selection is displayed in the Background Level box Click OK BTo cancel click Cancel The Backgro...

Page 27: ...y 600 300 dpi for Flatbed is the default setting S2 Additional memory SIMM option is required to select these modes P 150 Print Quality and Required Memory To select a mode perform the following steps...

Page 28: ...28 Click the desired mode Click OK BTo cancel the selection click Cancel The Quality window is closed 3 4 Basic Tasks...

Page 29: ...Mirror Image Click G Option The option buttons appear Click the Mirror button The indicator is illuminated and a mirror image of the document is displayed in the Print Preview window BTo return to th...

Page 30: ...ick the Negative Positive button The indicator is illuminated and a negative image of the document is displayed in the Print Preview window BTo return to the original image positive image click the Ne...

Page 31: ...Page Mode and select Odd page Click the Start button Odd pages of the documents will be printed face up Place the printed pages in the multi purpose tray of the printer with the pages face down and to...

Page 32: ...32 Click G of the Media Type and select Paper 2nd Side Click the Start button Even pages will be printed on the back side of the paper 8 Basic Tasks 7 Media Type...

Page 33: ...using the Memorize Settings button Effective Settings for this function are as follows The maximum number of saveable settings is 30 Density P 7 Original Image Type P 7 Monochrome Color P 8 Zoom P 15...

Page 34: ...34 Click G Option The option buttons appear Click the Memorize Settings button The Memorize Settings window appears Click New The Save window appears Basic Tasks Saving the Current Settings 1 2 3...

Page 35: ...e entered Example color zoom 120 Click OK BTo cancel click Cancel The setting will be saved and listed in the Memorize Settings window Click Exit The Memorize Settings window is closed 35 Basic Tasks...

Page 36: ...Settings window appears Click the setting you wish to load from the list Click Load The confirmation message appears Click Yes to load the setting BTo cancel click No The Memorize Settings window is...

Page 37: ...e Memorize Settings window appears Click the setting that is to be deleted from the list Click Delete The confirmation message appears Click Yes BTo cancel click No The setting will be deleted from th...

Page 38: ...Click G Option The option buttons appear Click the Other Settings button The Other Settings window appears Click the desired unit of measure Click OK BTo cancel the selection click Cancel The Other Se...

Page 39: ...be canceled when the printer recovers from the jam condition To enable Jam Recovery ON perform the following steps Click G Option The option buttons appear Click the Other Settings button The Other S...

Page 40: ...e used simultaneously Adjusting the Overall Color of an Image To adjust the overall color of an image perform the following steps Click G Option The option buttons appear Click the Color Adjust Entire...

Page 41: ...mage The setting range is 0 5 to 1 5 Brightness Changes the brightness of the image The setting range is 20 to 20 Reset Returns to the default setting Adjust the color by dragging each slider or click...

Page 42: ...k the Color Adjust Specific Point button The Color Adjust Specific Point window appears Before box Displays the original image Specific color editor box Displays the current color adjustment It also a...

Page 43: ...43 After color adjust box Displays the result of adjustment Zoom Up button Enlarges the displayed image to 100 200 400 Zoom Down button Reduces the displayed image to 400 200 100 Adjusting Colors...

Page 44: ...Before Displays the original color After Displays the changed color Hue Adjusts the hue Chroma Adjusts the chroma Brightness Adjusts the brightness Reset button Returns to the original color Return bu...

Page 45: ...view the change in the After color adjust box Repeat steps 3 to 6 to adjust a specific color A maximum of 40 color adjustment data can be stored in the Specific color editor box Click OK to make all...

Page 46: ...Adjust the color by dragging a slider or clicking I or H in Hue Chroma or Brightness Click OK The color data is modified Program preserves results of the modified color data immediately after you cli...

Page 47: ...After color adjust box Click OK in the Color Adjust Specific Point window The Color Adjust Specific Point window is closed Deleting all color data Click Delete All The confirmation message appears Cli...

Page 48: ...Area duplicate function allows you to select an area of an image then enlarge reduce or create multiple images before printing The desired area of the image can be duplicated Create the desired page...

Page 49: ...e Area Duplicate Window Click G Option The option buttons appear Click the Area Duplicate button The Area Duplicate window appears 1 2 Original box displays the original image Layout box displays the...

Page 50: ...rea in the Original box Delete button Deletes a selection area in the Original box Paste button Pastes a selection area in the Layout box Copy button Used to copy an image in the Layout box Delete but...

Page 51: ...ctangle then release the mouse button The area of the image is selected Pasting an Area of an Image in the Layout Box Area Duplicate Notes BWhen the Area Duplicate window is opened the Create button i...

Page 52: ...lection area in the Layout box by using either procedure A or B Using the Paste button Click the Paste button in the Original box Using the Resize button Click the Resize button in the Original box Po...

Page 53: ...utton is pressed the following error message appears Unable to print more than one area BTo delete the pasted image click the Delete button in the Layout box BTo move the pasted image refer to Moving...

Page 54: ...area click the areas while holding down the Shift key on the keyboard Hold down the mouse button drag the selection area to the desired point then release the mouse button The corresponding image are...

Page 55: ...e selection area in the Original box BTo make the setting effective click OK The Area Duplicate window will be closed Area Duplicate Resizing a Selection Area 1 2 3 4 Canceling a Selection Area Click...

Page 56: ...tton BTo make the setting effective click OK The Area Duplicate window will be closed Resizing an Image in the Layout Box 1 2 3 Z Moving an Image in the Layout Box Click inside an image that is to be...

Page 57: ...by entering digits Click an image that is to be resized in the Layout box Click the Digit button The Digit window appears To use mm instead of inch select mm in the Other Settings window P 38 Area Du...

Page 58: ...the Prev and Next buttons become effective You can select your desired image by clicking Prev or Next button The images are displayed in the order in which you pasted them in the Layout box Click OK T...

Page 59: ...of the original will be displayed in the Layout box BTo cancel the selection click the button Mirror or Negative Positive button again BTo make the setting effective click OK The Area Duplicate windo...

Page 60: ...or G or by typing the number BTo reset the number to 1 click Reset Click OK Multiple images are created in the Layout box Example 4 Area Duplicate Creating Multiple Images in the Layout Box 1 2 3 4 5...

Page 61: ...61 Area Duplicate Layout box BTo make the setting effective click OK The Area Duplicate window will be closed...

Page 62: ...sh to copy in the Layout box Click the Copy button The image is duplicated BTo make the setting effective click OK The Area Duplicate window will be closed Area Duplicate Duplicating an Image in the L...

Page 63: ...to be enlarged in the Layout box Click the Fit To Paper button The image is enlarged BTo make the setting effective click OK The Area Duplicate window will be closed Note BThe Fit To Paper function is...

Page 64: ...to delete in the Layout box Click the Delete button in the Layout box The image is deleted BTo make the setting effective click OK The Area Duplicate window will be closed 1 2 Deleting an Image in th...

Page 65: ...ng Area 79 Moving the Scanning Area 80 Resizing the Scanning Area 81 Image Types 82 Color Depth Full Color 85 Dither Color Black White Halftone 86 Drop Out Color Monochrome 88 Using the Hyper Tetra Ad...

Page 66: ...lowing steps For Windows 95 Windows NT 4 0 Click Start Select Programs select Corel PHOTO PAINT 6 then click Corel PHOTO PAINT 6 The Corel PHOTO PAINT window appears Click the File menu and select Acq...

Page 67: ...ndow appears Click Acquire Image from the File menu then click Select Source The Select Source window appears Select Panasonic KX PS8000 16bit Driver then click Select The Select Source window is clos...

Page 68: ...lect a scanning area and or adjust it in this screen If a document is scanned from the ADF tray the document is fed out completely However if a document is prescanned from the ADF tray but not scanned...

Page 69: ...cans the original with 256 colors BFull Color Scans the original with full color 16 7 million colors Scan Size Displays the size of a scanning area in inch mm or pixel Change the unit of measure by cl...

Page 70: ...e data W H Uniform Clicking on this check box allows you to set the resolution of height and width simultaneously by dragging the slider or clicking I or H To set the resolution of height and width in...

Page 71: ...m 75 100 200 300 400 600 or 1200 lpi lines per inch Higher resolution provides better output quality However the data size will be larger Zoom Selects a zoom value of 25 50 75 100 200 400 600 800 1200...

Page 72: ...ates shades of color by selecting different dot patterns This selection is effective only when the Black White Halftone or Color Halftone image type is selected Selections are BDither A B C Color and...

Page 73: ...es the image lighter or darker The setting range is 127 to 127 Threshold Sets a boundary value that is used to convert image colors to 8 colors or black and white The setting range is 1 to 255 Contras...

Page 74: ...stment window appears by clicking the button For the adjustment refer to Using the Hyper Tetra Adjustment P 89 White Level Strengthens or weakens the white color level of the image This selection is n...

Page 75: ...lt is None This selection makes an image sharper or softer Smoothing Selects a smoothing level from Light Middle or Heavy The default is None This selection reduces an interference pattern Negative Cl...

Page 76: ...vious setting Selects the settings previously used Factory Default Selects the default settings Corel PHOTO PAINT Selects the optimal settings for the use of Corel PHOTO PAINT Save Setting button Disp...

Page 77: ...A maximum of 100 settings can be saved Click Save Setting The Save Setting window appears Enter the saving name A maximum of 31 characters can be entered Click OK BTo cancel click Cancel The Save Sett...

Page 78: ...Window Overview Loading a Setting You can load your favorite settings You can also load the previously used settings factory default settings or the settings for Corel PHOTO PAINT Click G of the Sele...

Page 79: ...area is already selected it can be canceled by clicking anywhere outside the scanning area Hold down the mouse button and drag in any direction to form a rectangle Release the mouse button A scanning...

Page 80: ...nning Area Position the mouse pointer inside the scanning area The shape of mouse pointer changes to Hold down the mouse button and drag the scanning area to anywhere in the Preview Screen Release the...

Page 81: ...and drag the side or corner to obtain the desired size Release the mouse button The scanning area is resized Scanning an Area of an Image Resizing the Scanning Area 3 2 1 Z Scanning area Note BA scan...

Page 82: ...ints for Scanning This section shows how selecting different features affect your original when it is printed This section is helpful when you select one feature from many Original Full Color Image Ty...

Page 83: ...83 Black White Halftone Black White 2colors Color 8colors Black White Photo Hints for Scanning...

Page 84: ...84 Color Photo 256 Color Halftone Hints for Scanning...

Page 85: ...85 Hints for Scanning 4 bit 2 bit Color Depth Full Color 8 bit...

Page 86: ...86 Hints for Scanning Dither B Dither A Dither Color Black White Halftone Dither C Error Diffusion 1...

Page 87: ...87 Error Diffusion 2 Error Diffusion 3 Error Diffusion 4 Hints for Scanning...

Page 88: ...88 Hints for Scanning Red Green Drop Out Color Monochrome Factor Y Blue...

Page 89: ...ck on the Use Hyper Tetra Adjustment check box in the Adjust tab P 73 The Adjustment button becomes effective Click Adjustment The Hyper Tetra Adjustment window appears 89 Adjusting Colors Intensity U...

Page 90: ...ent is selected Hue Changes the aspect of color Chroma Changes the vividness of the image Lightness Changes the brightness of the image The setting range of each option to is from 0 to 255 Apply butto...

Page 91: ...er left or right click I or H or type the numerical value then press the return key Click Apply to see the result of the adjustment in the Preview Screen BTo reset the setting click Reset and Apply Cl...

Page 92: ...or darkens blue A darker level setting provides a stronger yellow The setting range of each option is from 0 to 255 Adjust the color by performing the following steps Drag each slider left or right c...

Page 93: ...a Correction window perform the following steps Click on the Gamma Correction check box in the Adjust tab The Gamma button appears Click the Gamma button The Gamma Correction window appears Adjusting...

Page 94: ...ective only when the Gamma curve customize check box is clicked on Gamma diagram When the Gamma curve customize check box is clicked off Displays the gamma curve according to the current parameter val...

Page 95: ...ical value in the parameter box then pressing the return key The current parameter value appears in the box next to the parameter scroll bar and the gamma curve is modified according to the value Clic...

Page 96: ...he color selection If Red is selected the gamma curve appears in red Place the mouse pointer on one of the control points hold down the mouse button and drag the gamma curve BLight tone Adjusts the li...

Page 97: ...Setup Tab 111 Advanced Tab 113 Displaying the Panasonic KX PS8000 Properties Window 118 Ports Tab 119 Sharing Tab 123 Device Settings Tab 126 Using the Hyper Tetra Adjustment 128 Displaying the Hyper...

Page 98: ...Printers The Printers window appears Click the Panasonic KX PS8000 icon Click the File menu then click Properties The Panasonic KX PS8000 Properties window appears KX PS8000 Window Overview for Window...

Page 99: ...99 Click a tab to view the features Details Tab P 101 Paper Tab P 102 Graphics Color Tab P 104 Option Tab P 107 4 KX PS8000 Window Overview for Windows 95 3 1...

Page 100: ...107 B 2 1 3 4 Note BThe print options in the File menu depend on the Windows application Refer to the application manual For Windows 3 1 Double click the Main icon and Control Panel icon then double...

Page 101: ...nd the print data to the printer via SCSI When you are using parallel interface cable select the port where the cable is connected Note BThis option is available only for Windows 95 For the functions...

Page 102: ...scape Output order Specifies whether the document exits face up or face down into the output tray This selection is not effective when the multi purpose tray MPT Plain Paper MPT Transparency etc is se...

Page 103: ...ard tray BMiddleS1 Prints on media loaded in the upper tray optional feeder BLowerS1 Prints on media loaded in the lower tray optional feeder BMPT Plain Paper MPT Transparency MPT Label MPT Coated Pap...

Page 104: ...e document in black and white Select this for monochrome halftone images BColor Graphics default Prints the document in color Select this for computer graphics color text spreadsheets with color graph...

Page 105: ...style that simulates shades of color by changing the dot patterns You can select a dot pattern from DefaultS1 Dither A or Dither B This selection is effective only when Color Graphics is selected S1...

Page 106: ...a Adjustment Adjusts the brightness contrast hue saturation or red green blue of the image For the adjustment refer to Adjusting Color Intensity P 128 BUse image color matching ICM S1 The printer assi...

Page 107: ...ting a MEMORY OVERFLOW message might be displayed To determine how much memory is installed in the printer print out the Test page Operating Instructions manual As the printer memory increases printin...

Page 108: ...rmance better Sends the data to the printer with the standard level of compression to improve throughput BUse printer memory to make print quality better Sends the data to the printer with a lower lev...

Page 109: ...dows NT 4 0 Click Start select Settings then click Printers The Printers window appears Click the Panasonic KX PS8000 icon Click the File menu then click Document Defaults The Panasonic KX PS8000 Defa...

Page 110: ...ect Accessories then click WordPad The WordPad window appears Click the File menu then click Print The Print window appears Click Properties The Panasonic KX PS8000 Document Properties window appears...

Page 111: ...111 Paper Size Selects a different paper size Letter A4 Legal or Envelope 10 can be selected KX PS8000 Window Overview for Windows NT 4 0 Page Setup Tab...

Page 112: ...BUpper Prints on media loaded in the standard tray BMiddleS1 Prints on media loaded in the upper tray optional feeder BLowerS1 Prints on media loaded in the lower tray optional feeder BMPT Plain Paper...

Page 113: ...ory click on that category Paper Output As for the features of each items Paper Size Orientation Paper Source Copy Count refer to Page Setup Tab P 111 Clicking on an item displays its selections in th...

Page 114: ...n black and white Select this for monochrome halftone images BColor Graphics default Prints the document in color Select this for computer graphics color text spreadsheets with color graphics Small te...

Page 115: ...roughput speed is diminished When Presentation is selected in the Print style print quality cannot be selected and 300 dpi is automatically assigned Color Graphics Type Color Graphics is a print style...

Page 116: ...elected Face up is selected automatically Hyper Tetra Adjustment Adjusts the brightness contrast hue saturation or red green blue of the image For the adjustment refer to Adjusting Color Intensity P 1...

Page 117: ...ted Undo Changed Option Returns the Page Setup and Advanced tab s settings to the previous settings About KX PS8000 Printer Driver Displays the window that contains the program version and copyright i...

Page 118: ...ck Properties The Panasonic KX PS8000 Properties window appears Displaying the Panasonic KX PS8000 Properties Window 2 1 3 KX PS8000 Window Overview for Windows NT 4 0 Click a tab to view the features...

Page 119: ...t Documents will print to the checked port Add Port button Adds a new port P 120 Installing the SCSI port Ports Tab KX PS8000 Window Overview for Windows NT 4 0 Note BThis option is available only for...

Page 120: ...port the access speed between other connected SCSI devices get slower BTo connect the KX PS8000 to your SCSI port a SCSI driver and ASPI Manager need to be installed Refer to your SCSI board manual Cl...

Page 121: ...nto the CD ROM drive Select CD ROM drive Open Drivers WinNT40 Printer then open Monitor inf file Click OK The Printer Ports window appears 121 KX PS8000 Window Overview for Windows NT 4 0 3 4 5 6 7 8...

Page 122: ...lick New Port The Port Name window appears Type the port name for example KXPS8000GDI then click OK The Printer Ports window appears Click Close 122 KX PS8000 Window Overview for Windows NT 4 0 9 10 1...

Page 123: ...red To share the printer over the network For the setup operation refer to Sharing the printer with a client computer P 124 Alternate Drivers To install an alternate driver For the installation refer...

Page 124: ...example KX PS8000 Click OK Installing an alternate driver for example Windows 95 Select Windows 95 then click OK The Insert Disk window appears Click OK The Printer Drivers for Windows 95 window appe...

Page 125: ...supplied KX PS8000 Driver Utility CD ROM into the CD ROM drive Select CD ROM drive Open Drivers Win95 Printer then open Pgdi95 inf file The Printer Drivers for Window 95 window appears Click OK 125 K...

Page 126: ...inter does not match this setting a MEMORY OVERFLOW message might be displayed To determine how much memory is installed in the printer print out the Test page Operating Instructions manual As the pri...

Page 127: ...se printer memory to make print quality better Sends the data to the printer with a lower level of compression or without compression to improve the print quality However the throughput will be dimini...

Page 128: ...er Tetra Adjustment check box in the Graphics Color tab P 104 The Adjustment button becomes effective Click Adjustment The Hyper Tetra Adjustment window appears For Windows NT 4 0 Click on Hyper Tetra...

Page 129: ...the range between the darkest and the lightest shades in the image Hue Changes the aspect of color Saturation Changes the brightness and vividness of color Lower saturation settings provide dull and...

Page 130: ...his window to the default setting s Preview button Allows you to view the result of the adjustment in the Preview box Adjust the color by performing the following steps Drag each slider left or right...

Page 131: ...etting provides a stronger magenta Blue Lightens or darkens blue A darker level setting provides a stronger yellow The setting range of each option is from 0 to 255 Color Balance Preview box Adjust th...

Page 132: ...indows 95 Open document in Word for Windows 95 From the File menu click Print The Print window appears Make sure that Panasonic KX PS8000 is selected in the Printer box then click Properties The Panas...

Page 133: ...window appears Click Properties The Panasonic KX PS8000 window appears Select MPT Paper 2nd Side from the Paper source pop up menu then click OK The Panasonic KX PS8000 window is closed Select Even Pa...

Page 134: ...inter Driver for Windows 3 1 138 Printer Driver for Windows 95 140 Printer Driver for Windows NT 4 0 143 Status Display 145 SCSI 147 Print Quality and Required Memory 150 When Using the Digital Duplic...

Page 135: ...rn it on again The number of displayed colors on the monitor is less than 256 bit Cannot use more than 100 zoom when using ADF Check the connection and turn on the scanner and or printer Click Retry o...

Page 136: ...or scanning Increase the hard disk space then re scan Reinstall the KX PS8000 software Click Yes or No on the message window Yes Makes the width of the scan area smaller so that it can be scanned No T...

Page 137: ...trols the scanner BClose the application turn off the system scanner printer computer then turn it on again PTAB3D DLL was not found Power Off or Cable Error Check that the scanner is powered on and t...

Page 138: ...ion Abort printing Reinstall the KX PS8000 software 1 16 compression table is not found Check the cable connection of the printer or turn on the printer The printer connected with the parallel cable i...

Page 139: ...ions except for the one which controls the printer then print again BTurn off the computer then turn it on again The computer s internal memory for printing is insufficient Printing aborted for occurr...

Page 140: ...SCSI board and its driver are not installed correctly BCable connection is improper or printer is not ready BThe terminator setting is improper The ASPI manager installed on this PC does not support...

Page 141: ...Follow the procedure below to make the setting effective 1 Click Start select Settings then click Printers 2 Click the Panasonic KX PS8000 icon 3 Click the File menu then click Properties 4 Click Deta...

Page 142: ...wing procedure 1 Confirm that the terminator is correctly set 2 Confirm that the printer is ready 3 Confirm that the printer is correctly connected with a SCSI cable 4 Turn off the computer then turn...

Page 143: ...d with a SCSI cable 4 Turn off the computer then turn it on again The ASPI for Windows installed on this PC does not have expected function Install newer version of ASPI for Windows The ASPI for Windo...

Page 144: ...system is running low on virtual memory Increase the virtual memory by following the procedure below 1 Click Start Settings then click Control Panel 2 Double click the System icon 3 Click the Performa...

Page 145: ...the SCSI section of Troubleshooting P 147 Correctly set the SCSI board in the computer Refer to the instructions manual of the SCSI board For any other trouble related to SCSI refer to the SCSI sectio...

Page 146: ...not be used Because ASPI dll file is not exist or doesn t match Confirm that the SCSI board is correctly installed in the computer and it is correctly set Refer to the instructions manual of the SCSI...

Page 147: ...fer to the SCSI host adapter users manual Confirm that the EZ SCSI is installed in Windows 3 1 If Adaptec EZ SCSI program group does not exist install SCSI driver using EZ SCSI refer to SCSI host adap...

Page 148: ...with the exclamation mark SCSI driver is not installed correctly Reinstall the SCSI driver refer to SCSI host adapter users manual If the SCSI driver is installed correctly confirm that the printer a...

Page 149: ...l Panel If the SCSI host adapter does not exist SCSI driver is not installed correctly Reinstall the SCSI driver refer to SCSI host adapter users manual If the SCSI driver is installed correctly confi...

Page 150: ...rd More than 48 MB Add more than 32 MB Letter A4 LegalS1 Letter A4 Legal Letter A4 Legal 300 x 300 dpi Letter A4 Legal Letter A4 LegalS1 When Using the Digital Duplicator Utility Standard 300 x 300 dp...

Page 151: ...Standard 600 dpi Letter A4 S1 Letter A4 Legal Letter A4 Legal Fast 300 dpi Standard 600 dpi High Quality 1200 dpi Letter A4 Legal Letter A4 S1 S1 Documents can be printed on Legal size paper when the...

Page 152: ...25 Black monochrome color 8 Black White 2colors image type 69 72 74 83 Black White Halftone image type 69 72 83 Black White Photo image type 69 72 83 Black Text print style 104 114 Blue Color Balance...

Page 153: ...messages 135 146 Even Page 7 31 F Factor Y Drop Out Color 72 88 Fast print quality 106 115 151 Feed Out 12 50 68 Fine print quality 27 150 Filter tab scanner function 75 Form to Tray Assignment 127 Fu...

Page 154: ...03 112 Ports tab printer function 119 Presentation print style 104 114 Prescan 12 50 68 Preview 130 Preview Zoom 12 14 Print as a mirror image 106 116 Print Preview 10 11 14 Resizing 13 Print quality...

Page 155: ...inter 124 Sharing tab printer function 123 Shift Direction 23 24 Shifting an image 9 23 24 Sleep mode 8 Smoothing 75 Specific color editor 42 46 Standard print quality 27 106 108 115 150 151 Start but...

Reviews: