


Phonebook
You can add 300 names (16 characters max.)
and phone numbers (24 digits max.) to the
phonebook, and assign each phonebook entry
to the desired group.
The total number of entries that can be stored
varies depending on how many phone
numbers you have stored for each entry.
Total number of entries is shown below
1 name + 1 phone number: 300 entries
1 name + 2 phone numbers: 150 entries
1 name + 3 phone numbers: 100 entries
*1 Up to 3 phone numbers for each entry
can be stored.
Important:
R
All entries can be shared by any registered
handset.
Adding phonebook entries
1
MWN
or
MFN
W
a
M
Menu
N
2
MbN
:
“
Add new entry
”
a
M
Select
N
3
MbN
:
“
(Name)
”
a
M
Select
N
4
Enter the party’s name.
a
M
OK
N
5
MbN
:
“
(Phone no. 1)
”
a
M
Select
N
R
You can store up to 3 phone numbers
for each entry.
6
Enter the party’s phone number.
a
M
OK
N
7
MbN
:
“
Group 1
”
a
M
Select
N
8
MbN
: Select the desired group.
a
M
Select
N
9
M
Save
N
a
M
OFF
N
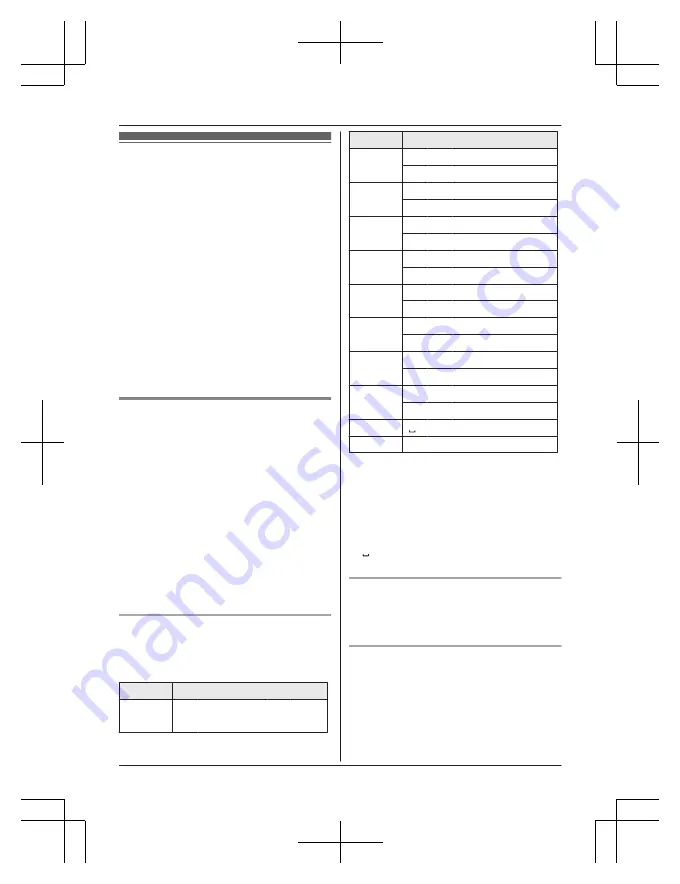
Character table for entering names
While entering characters, you can switch
between uppercase and lowercase by
pressing
*
(A
®
a).
Key
Character
1
&
’
(
)
H
,
–
.
/
1
Key
Character
2
A
B
C
2
a
b
c
2
3
D
E
F
3
d
e
f
3
4
G
H
I
4
g
h
i
4
5
J
K
L
5
j
k
l
5
6
M
N
O
6
m
n
o
6
7
P
Q
R
S
7
p
q
r
s
7
8
T
U
V
8
t
u
v
8
9
W
X
Y
Z
9
w
x
y
z
9
0
0
#
#
R
To enter another character that is located
on the same dial key, first press
MEN
to
move the cursor to the next space.
R
If you do not press any dial key within 5
seconds after entering a character, the
character is fixed and the cursor moves to
the next space.
R
in the above table represents a single
space.
Erasing the character or number
Press
MFN
or
MEN
.
a
M
Clear
N
R
Press and hold
M
Clear
N
to erase all
characters or numbers.
Storing a redial list number to the
phonebook
1
MEN
REDIAL
2
MbN
: Select the desired phone number.
a
M
Detail
N
a
M
Save
N
3
To store the name, continue from step 3,
“Editing entries”, page 18.
For assistance, please visit http://www.panasonic.com/help
17
Phonebook
PRS120(en)_0122_ver110.pdf 17
2014/01/22 10:09:30


