background image

5

(ENG) SQT0251

Conforms to UL STD 60065.
Certified to CAN/CSA STD C22.2 No.60065.

THE FOLLOWING APPLIES ONLY IN THE U.S.A.

THE FOLLOWING APPLIES ONLY IN CANADA.

Product Identification Marking is located on the bottom of the unit.

Contains FCC ID: VPYLBVX532

FCC WARNING
Changes or modifications not expressly approved by the party responsible for compliance could 
void the user's authority to operate the equipment.

This transmitter must not be co-located or operated in conjunction with any other antenna or 
transmitter.

This equipment complies with FCC radiation exposure limits set forth for an uncontrolled 
environment and meets the FCC radio frequency (RF) Exposure Guidelines in Supplement C to 
OET65.
This equipment has very low levels of RF energy that are deemed to comply without testing of 
specific absorption ratio (SAR).

Contains IC: 772C-LBVX604

This device complies with RSS-210 of the IC Rules.
Operation is subject to the following two conditions:
(1)This device may not cause harmful interference,
(2)This device must accept any interference received,
including interference that may cause undesired operation of the device.

This equipment complies with IC radiation exposure limits set forth for an uncontrolled 
environment and meets RSS-102 of the IC radio frequency (RF) Exposure rules.
This equipment has very low levels of RF energy that are deemed to comply without testing of 
specific absorption ratio (SAR).

A lithium ion battery that is recyclable powers the product 
you have  purchased. Please call 1-800-8-BATTERY for information 
on how to recycle this battery.

U.S.A./CANADA CONSUMERS:  ATTENTION:

HX-A500-SQT0251_mst.book  5 ページ  2014年4月14日 月曜日 午後6時15分

Summary of Contents for HX-A500

Page 1: ...the Owner s Manual PDF format You can download and install a version of Adobe Reader that you can use with your OS from the following website As of April 2014 http www adobe com products acrobat reads...

Page 2: ...ose accessories battery pack battery charger AC adaptor SD memory card and etc to rain moisture dripping or splashing Do not place objects filled with liquids such as vases on accessories Use only the...

Page 3: ...ceiving antenna Increase the separation between the equipment and receiver Connect the equipment into an outlet on a circuit different from that to which the receiver is connected Consult the dealer o...

Page 4: ...d grounding prong The wide blade or the third prong are provided for your safety If the provided plug does not fit into your outlet consult an electrician for replacement of the obsolete outlet 10 Pro...

Page 5: ...This equipment has very low levels of RF energy that are deemed to comply without testing of specific absorption ratio SAR Contains IC 772C LBVX604 This device complies with RSS 210 of the IC Rules Op...

Page 6: ...nit for a long time Before cleaning pull the USB cable from the PC and then wipe this unit with a soft dry cloth Use of benzine paint thinner alcohol or dishwashing liquid may alter the camera body or...

Page 7: ...selection 19 Formatting 19 Basic Before recording 20 Wearing this unit 20 Recording 24 Changing the Recording Mode 24 Playback using a smartphone 25 Wi Fi Wi Fi function 26 Install the Image App 26 Us...

Page 8: ...e to the inner side of the side cover around the rubber seal or connecting terminals when the side cover is opened or closed in places with sand or dust etc If you close the side cover with foreign ob...

Page 9: ...matter adhering to the unit remove it Be extremely careful to remove any sand etc that may adhere to the sides and corners of the rubber seal Wipe it off with a dry soft cloth if there is any liquid...

Page 10: ...will deteriorate the waterproof performance or cause failure due to deformation Do not use chemicals such as benzine thinner alcohol or cleanser soap or detergents 4 Confirm that there are no water dr...

Page 11: ...before recording l 18 For the purposes of this owner s manual Pictures may be slightly different from the original Depending on the firmware version you are using captured screens described in this ow...

Page 12: ...s of April 2014 These may be subject to change For information on how to assemble the Head Mount refer to page 22 Tap Touch the screen lightly and release your finger Drag Move your finger while still...

Page 13: ...Menu settings l 19 Wi Fi Connection with a smartphone Playback l 25 Deletion Copy Remote operation l 27 Wi Fi Connection with a wireless access point Live broadcasting Using the LUMIX CLUB and USTREAM...

Page 14: ...2 Connect the USB terminal of this unit to a PC with the USB cable supplied Insert the USB cable securely all the way The Power lamp will flash red at an interval of 2 seconds approximately 1 second o...

Page 15: ...The power lamp flashes Flashing with approx 1 second period off for approx 0 5 second on for approx 0 5 second when the remaining battery time becomes low The main unit heats up after use or charging...

Page 16: ...g in approx 4 second intervals until charging is completed depending on the conditions of use Off Charging has finished This unit can record motion pictures or still pictures to a microSD card Cards t...

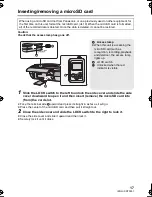
Page 17: ...the side cover and slide the LOCK switch to the right to lock it Close the side cover and slide it upward and then lock it Securely lock it until it clicks When using a microSD card not from Panasoni...

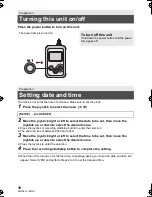
Page 18: ...000 and 2039 3 Move the joystick right or left to select the time to be set then move the joystick up or down to select the desired value Press the joystick to enter the selection 4 Press the recordin...

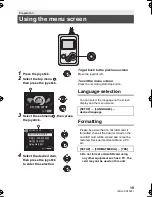
Page 19: ...atting Preparation Using the menu screen RECORD SETUP EXIT RECORD SETUP RECORDING MODE PIXELS FRAME RATE ANGLE OF VIEW Delay Start REC EXIT 1 3 You can select the language on the screen display and th...

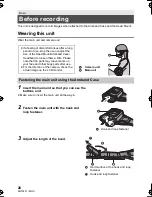
Page 20: ...the length of the band Basic Before recording If a feeling of discomfort arises after a long period of use stop the use or adjust the size of the Head Mount Armband Case Headband to loosen them a lit...

Page 21: ...The camera unit can be stored in the camera pocket B and the camera main unit connection cable can be bundled with the band A When fastening to your arm remove the camera unit from the Armband Case Wh...

Page 22: ...djust the direction as shown in the illustration and tighten the adjustment knob again 1 Insert the camera unit until it clicks into place Insert the camera unit so that the microphone faces inward 2...

Page 23: ...ightly and tighten it after adjusting the direction of the lens If the camera unit is shaky tighten the adjustment knob How to remove the camera Hold the camera holder as shown in the figure and remov...

Page 24: ...CORDING a still picture will be recorded Once recording starts the LCD monitor will turn off approximately 30 seconds later To turn it on again operate the joystick A When you begin recording a motion...

Page 25: ...The playback screen will be displayed If you have tapped a still picture you can play back the previous or next picture by dragging swiping the screen left or right 4 For playing back motion pictures...

Page 26: ...re current as of April 2014 and subject to change Use the latest version The service may not be able to be used properly depending on the type of smartphone being used For information on the Image App...

Page 27: ...YES press the joystick and then touch the smartphone on of this unit again If the unit is not recognized even when touching the smartphone change positions and try again You cannot set up a connectio...

Page 28: ...he Wi Fi connection setting of the smartphone but it is not a malfunction This unit is not displayed in the Wi Fi setting screen of the smartphone Try switching the on off of the Wi Fi function in the...

Page 29: ...using time becomes shorter If the operating time is very short even after the battery has been recharged sufficiently the battery has worn out Consult with your dealer The power lamp flashes for appr...

Page 30: ...tc Do not heat in microwaves or ovens etc Do not charge use or leave in hot places such as next to fires or in extremely hot weather Do not put into water This may cause leaking overheating fire or ru...

Page 31: ...emove the circuit board on the front side button side of this unit 3 Pull out the flexible circuit board B and pull out the speaker connector C upwards 4 Remove the 4 screws indicated in the figure be...

Page 32: ...stance Approx 50 cm 1 When ANGLE OF VIEW is set to WIDE PIXELS FRAME RATE is set to 1920k1080 30p and RECORDING MODE is set to NORMAL SHOOTING 2 When ANGLE OF VIEW is set to WIDE and RECORDING MODE is...

Page 33: ...P58 Battery operation time See page 15 Wireless transmitter Compliance standard IEEE802 11b g n Frequency range used Central frequency 2412 MHz to 2462 MHz 11ch Encryption method Wi Fi compliant WPA W...

Page 34: ...Wi Fi CERTIFIED Logo is a certification mark of the Wi Fi Alliance The Wi Fi Protected Setup Mark is a mark of the Wi Fi Alliance Wi Fi Wi Fi Protected Setup WPA and WPA2 are marks or registered mark...

Page 35: ...LESSER General Public License Version 2 1 LGPL V2 1 and or 5 open source software other than the software licensed under the GPL V2 0 and or LGPL V2 1 The software categorized as 3 5 are distributed i...

Page 36: ...IONAL PARTS CENTER 20421 84th Avenue South Kent WA 98032 Ship To Mr Mrs Ms First Last Street Address City State Zip Phone Day Night 4 Shipping information UPS delivery requires complete street address...

Page 37: ...and labor for non rechargeable batteries antennas and cosmetic parts cabinet This warranty only applies to products purchased and serviced in the United States This warranty is extended only to the o...

Page 38: ...e Parts and Accessories or make Customer Service and Literature requests by visiting our Web Site at http www panasonic com support or contact us via the web at http www panasonic com contactinfo For...

Page 39: ...djustment of consumer controls improper maintenance improper batteries power line surge lightning damage modification introduction of sand humidity or liquids commercial use such as hotel office resta...

Page 40: ...Panasonic Corporation of North America Two Riverfront Plaza Newark NJ 07102 5490 Panasonic Canada Inc 5770 Ambler Drive Mississauga Ontario L4W 2T3 Panasonic Corporation 2014 Printed in Japan...

Reviews: