background image

33

RQT6536

Advanced Operations

32

RQT6536

Advanced Operations

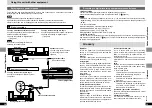
Preparations
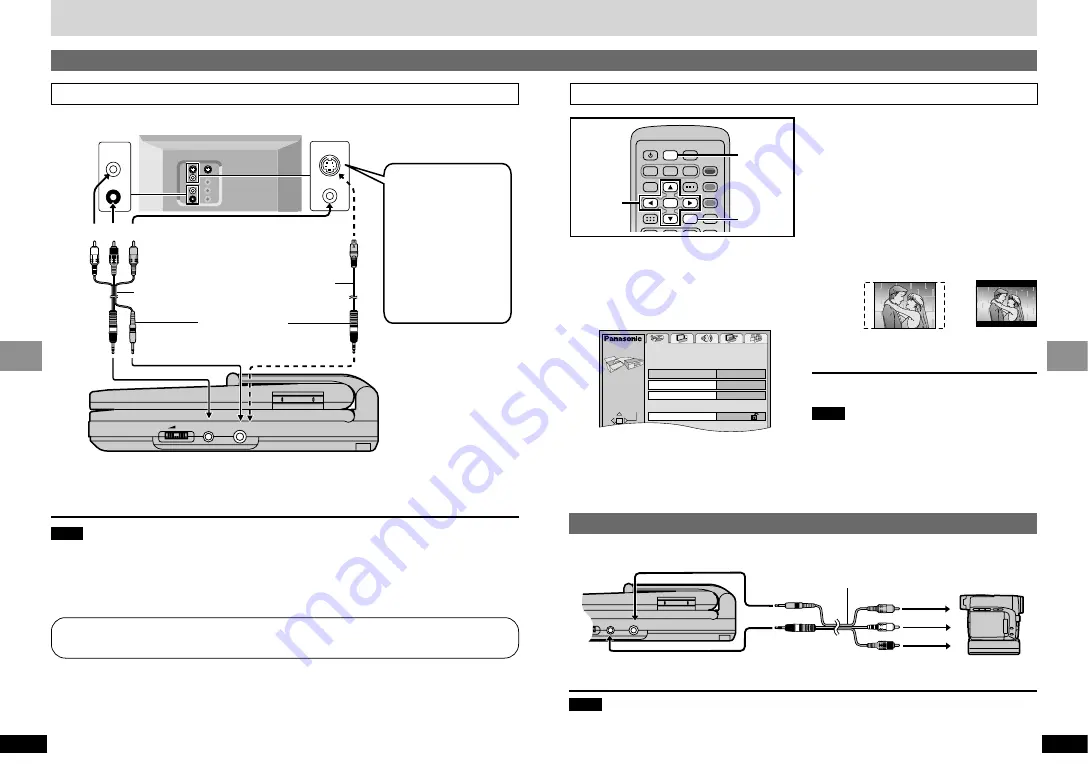
Turn on your television and switch the video
input mode on the television to suit the connec-
tion for the unit.

1

Press [SETUP] to show the
menus.

Disc

SELECT

Audio

Subtitle

Menus

Ratings

English

English

Automatic

Level 8

SETUP

TAB

4

Press [

3

4

] to select the item

and press [ENTER].

4:3 Pan & Scan

Regular television (to view 16:9 software
in the pan and scan style 

a

).

4:3 Letterbox

Regular television (to view 16:9 software
in the letterbox style 

b

).

16:9 (factory preset)

Wide-screen television.

Use the television’s screen modes to
change the way the picture is shown.

5

Press [SETUP] to end the 
settings.

To return to the previous menu
Press [RETURN].

Note

Press [MENU] on the main unit to access 
the SETUP menus while stopped (unless a 
DVD-RAM is loaded).

16:9 software prohibited from being shown in
the Pan & Scan style will appear in the letterbox
style despite the setting here.

a

b

;

1

A.SRD

SETUP

ENTER

PLAY MODE

SUBTITLE

DISPLAY

TOP MENU

AUDIO

ANGLE

RETURN

MENU

CANCEL

3

,

4

,

2

1

,

ENTER

SETUP

RETURN

Using this unit with other equipment

Using this unit with a television

VIDEO

VOL

AUDIO

OPT OUT

AUDIO IN

L

R

VIDEO

S VIDEO

 VIDEO

Television

Audio/video cable
(included)

S video cable

§

black

yellow

yellow

white

Either of these

red

This unit (Right side)

S VIDEO input terminal:
achieves a more vivid
picture than the VIDEO
input terminal.

When making this
connection, ensure you
connect the audio
cables to the
corresponding audio
input terminals on the
television.

§

S video cable is not included

§

Available from Panasonic dealers. Part number: RFX4139

Note

The unit’s speaker does not have magnetic shielding. Do not place the unit near televisions, 
personal computers or other devices easily influenced by magnetism. Do not keep this unit and 
magnetized cards (bank cards, commuter passes, etc.) close together.

Volume may be lower when playing DVDs than when playing other discs or during TV broadcasts. If
you turn the volume up, reduce it again so that a sudden increase in output does not occur.

Do not connect the player through your video cassette recorder
The picture may not be played back correctly due to the copy guard.

Selecting TV screen type

Connection

2

Press [

2

1

] to select the

Video tab.

3

Press [

3

4

] to select “TV

Aspect” and press [ENTER].

Watching video from a video camera

1

Connect the video camera to this unit.

VIDEO

VOL

AUDIO

OPT OUT

2

Press [DVD/SD/AUX] to select “AUX”.

Note

“AUX” mode is canceled when this unit is turned off.

Auto standby function (

page 13) does not work while the “AUX” mode is on. Turn the unit off when

you have finished using it.

yellow

yellow

black

white

red

Audio/video cable
(included)

This unit (Right side)

Video camera

Summary of Contents for DVDLV65PPS

Page 1: ...located to DVD players and software according to where they are sold The region number of this player is 1 The player will play DVD Video marked with labels containing 1 or ALL RQT6536 Y F0502MF0 1 ALL 2 4 1 Example Dear customer Thank you for purchasing this product For optimum performance and safety please read these instructions carefully Before connecting operating or adjusting this product pl...

Page 2: ...y be of sufficient magnitude to constitute a risk of electric shock to persons The exclamation point within an equilateral triangle is intended to alert the user to the presence of im portant operating and maintenance servicing instructions in the litera ture accompanying the appliance The following mark and symbols are located on bottom of the unit Marking sign is located on bottom of the unit Ba...

Page 3: ...ct 1 800 332 5368 or web site http www panasonic com For Canada To order accessories call the dealer from whom you have made your purchase Remote control 1 N2QAHC000012 Button type battery 1 for remote control for replacement see right Audio video cable 1 RJL3X001X15 AC adaptor 1 DE 891AA AC power supply cord 1 RJA0065 A Rechargeable battery pack 1 for replacement see right CD ROM 1 SD MovieStage ...

Page 4: ...amage Avoid the following Spraying flammable insecticides near the unit Pressing the LCD Touching the lens and other parts of the laser pickup Do not use the unit in the following places Where the temperature is below 5 oC 41 oF or above 35 oC 95 oF Operating the unit be yond this range can cause the protection circuitry to function and render the unit inoperable Sandy places such as beaches On to...

Page 5: ...R and DVD RAM in all cases due to the type of disc or condition of the recording To clean discs DVD Video CD Video CD Wipe with a damp cloth and then wipe dry DVD RAM DVD R Clean only with DVD RAM PD disc cleaner available as an optional accessory part number LF K200DCA1 Never use cloths or cleaners for CDs etc Handling precautions Do not write on the label side with a ball point pen or other writ...

Page 6: ...the AC power supply cord from the AC outlet Recharging and play times Times shown are approximate Actual times depend on operating conditions Times for the optional rechargeable battery pack are shown in parentheses Recharging at 20 oC 68 oF 4 6 hours Play in hours Í goes out CHG lights Recharging is complete when CHG goes out Í lights Disconnect the AC power supply cord and AC adaptor To change t...

Page 7: ...arry by the LCD Compact viewing Adjusting the angle of the LCD Change the angle of the LCD to suit your viewing style 3 Adjust the volume Using headphones Turn down the volume before connection and then adjust the level When a menu screen appears DVD V VCD Press the numbered buttons to select an item To select a 2 digit number e g 25 S10 2 5 When playing DVDs you can also use 3 4 2 1 to select ite...

Page 8: ...IC Title Artist Up to nineteen characters 3 Time and date of recording 4 Status 1 Playing Paused 6 5 Search l Repeat play SKIP Skipping to another position SLIDE 1 Slideshow ACCESS While waiting for a still picture to appear 5 MPEG4 MUSIC VOICE Elapsed playing time PICTURE Number of pixels to a line e g UXGA 640 Slideshow show still pictures one after another 1 Select a still picture in step 4 2 s...

Page 9: ... than six You can select with the numbered buttons remote control To enter a 2 digit number e g 25 S10 2 5 3 Press ENTER to start play To display information about a play list 1 Select the play list and move the cursor jockey 1 2 Use 3 4 to select Contents and press ENTER 3 Use 2 1 to show other play lists To clear the play list screen Press MENU The unit returns to the condition it was in before ...

Page 10: ...hapter Preview see below This only works if the disc s elapsed play time is shown in the on screen menu icons page 27 It is cleared if you open the disc lid The unit saves the position even when you switch the unit to standby Press to clear the position Repeat play RAM DVD V CD VCD Do steps 1 to 4 on page 26 to select the desired repeat play mode e g DVD V RAM Program PG Entire disc A OFF J During...

Page 11: ...16 MP3 music 001 My favorite 001 Brazilian pops 002 Chinese pops 003 Czech pops 004 Hungarian pops 005 Liner notes 006 Japanese pops 007 Mexican pops 008 Philippine pops 009 Swedish pops 001 Momoko 002 Standard number 001 Piano solo 002 Vocal SELECT ENTER RETURN G 8 T 14 Total 123 SELECT NUMBER 0 9 FILE LIST 002 001 001 001 mp3 002 mp3 003 mp3 003 001 mp3 002 mp3 003 mp3 001 mp3 002 mp3 003 mp3 00...

Page 12: ...nly Press the numbered buttons to select a title DVD Video or group MP3 discs Some items cannot be selected Changing the play sequence PROGRAM Choose a track then press ENTER No Time Track Total Time Press PLAY to start Play Clear Clear all 0 00 SELECT ENTER RETURN 1 SELECT NUMBER 0 9 3 Press the numbered buttons to select a track CD or VCD or chapter DVD Video MP3 discs only and press ENTER Repea...

Page 13: ...h 2 speakers SP on other equipment or headphones HP If the disc has surround effects the effect is broad ened and sound seems to come from virtual speakers on either side SP Dolby Digital DTS MPEG LPCM 2 channel or over only HP Dolby Digital MPEG LPCM 2 channel or over only Preparation Turn off the surround effects on the other equipment and reduce the volume on this unit to minimum page 13 Press ...

Page 14: ... Center 2 Front leftiFront right 3 Front leftiFront rightiCenter On Screen Menu Icons contain information about the disc or unit These menus allow you to perform operations by changing this information Common procedures RAM DVD V CD VCD 1 Press DISPLAY Each time you press the button Disc information Progress indicator Original display Unit information step 2 Unit information only While the leftmos...

Page 15: ...you have connected digital equipment Bitstream Factory preset for Dolby Digital Select if the equipment can decode the signal PCM Factory preset for DTS Digital Surround Select if the equipment cannot decode the signal IMPORTANT If the equipment cannot decode the signal the setting must be changed to PCM If not signals the equipment cannot process will be output causing high levels of noise which ...

Page 16: ...t viewing Audio during Search Choose whether to have sound during search Options English French Spanish Original 1 Other 2 Automatic 3 English French Spanish Other 2 English French Spanish Other 2 Setting ratings When level 8 is selected 8 No Limit 1 to 7 4 0 Lock All Changing ratings When level 0 7 is selected Unlock Player Change Level Change Password Temporary Unlock 4 3 Pan Scan 4 3 Letterbox ...

Page 17: ...yellow yellow white Either of these red This unit Right side S VIDEO input terminal achieves a more vivid picture than the VIDEO input terminal When making this connection ensure you connect the audio cables to the corresponding audio input terminals on the television S video cable is not included Available from Panasonic dealers Part number RFX4139 Note The unit s speaker does not have magnetic s...

Page 18: ...d on CDs Playback control PBC If a Video CD has playback control you can select scenes and information with menus Recording to digital recording equipment or cassette tapes Digital recording You can record the digital signal directly to digital recording equipment Connect the recording equipment with an optical fiber cable A page 34 Note With DVD the following conditions must be met a the disc doe...

Page 19: ...lve the problem In the U S A contact the Panasonic Customer Call Center at 1 800 211 7262 or e mail consumerproducts panasonic com or web site http www panasonic com In Canada contact Panasonic Canada Inc Customer Care Centre at 1 800 561 5505 web site www panasonic ca or an authorized Servicentre closest to you Reference pages are shown as black circled numbers Troubleshooting Guide Problem No po...

Page 20: ...o clean this unit Before using chemically treated cloth read the instructions that came with the cloth carefully Displays Maintenance of the lens Remove dust carefully with an air blower for camera lenses optional Recommended product Lens cleaner kit SZZP1038C Available from Panasonic dealers Be careful not to touch the lens with your fingers Problem The LCD is dark The picture is disrupted during...

Page 21: ...ot exclusive but are for illustration only ALL EXPRESS AND IMPLIED WARRANTIES INCLUDING THE WAR RANTY OF MERCHANTABILITY ARE LIMITED TO THE PERIOD OF THE LIMITED WARRANTY Some states do not allow the exclusion or limitation of incidental or consequential damages or limitations on how long an implied warranty lasts so the exclusions may not apply to you This warranty gives you specific legal rights...

Page 22: ...Playback SD Memory Card only MPEG2 AAC MP3 Sampling frequency 32 kHz 44 1 kHz 48 kHz Signal system NTSC LCD screen 5q α Si TFT wide screen LCD Video output input Output input level 1 Vp p 75 Output input terminal Mini jack Number of terminals 1 system output input selectable S video output Y output level 1 Vp p 75 C output level 0 286 Vp p 75 Output terminal Mini jack Number of terminals 1 system ...

Reviews: