26
6.2.
ICS (Indication of additional Camera Settings when picture was taken)
function
1. General description
This unit is equipped with ICS (ICS
:
I
ndication of additional
C
amera
S
ettings when picture was taken) function by playing back the
concerned picture on the LCD display.
(This function is achieved by utilizing "maker note" data stored in Exif data area of recorded picture file.)
To proceed failure diagnosis, use this ICS function together with "displaying the recorded picture with picture information" function.
NOTE:
*.The ICS function operates with a picture which is only taken with the same model. (It may not be displayed when the picture
was taken with other model.)
*.Since Exif data is not available after the picture is edited by PC, the ICS function may not be activated.
2. How to display
The ICS data is displayed by ordering the following procedure:
•
Preparation:
1.Attach the Battery or AC Adaptor with a DC coupler to the unit.
NOTE:
*Set the mode dial other than "CLIPBOARD (memo) "mode (such as normal picture / iA / Sports / Snow / SCN) to display the
ICS data.
•
Step 1. The temporary cancellation of "INITIAL SETTINGS":
While keep pressing "UP of Cursor button" and DISPLAY button simultaneously, turn the Power on.
•
Step 2. Execute the ICS display mode:
Press the PLAYBACK button.
Select the concerned picture by pressing the "LEFT and RIGHT of Cursor button".
Press the "LEFT of Cursor button", MENU/SET button and DISPLAY button simultaneously.
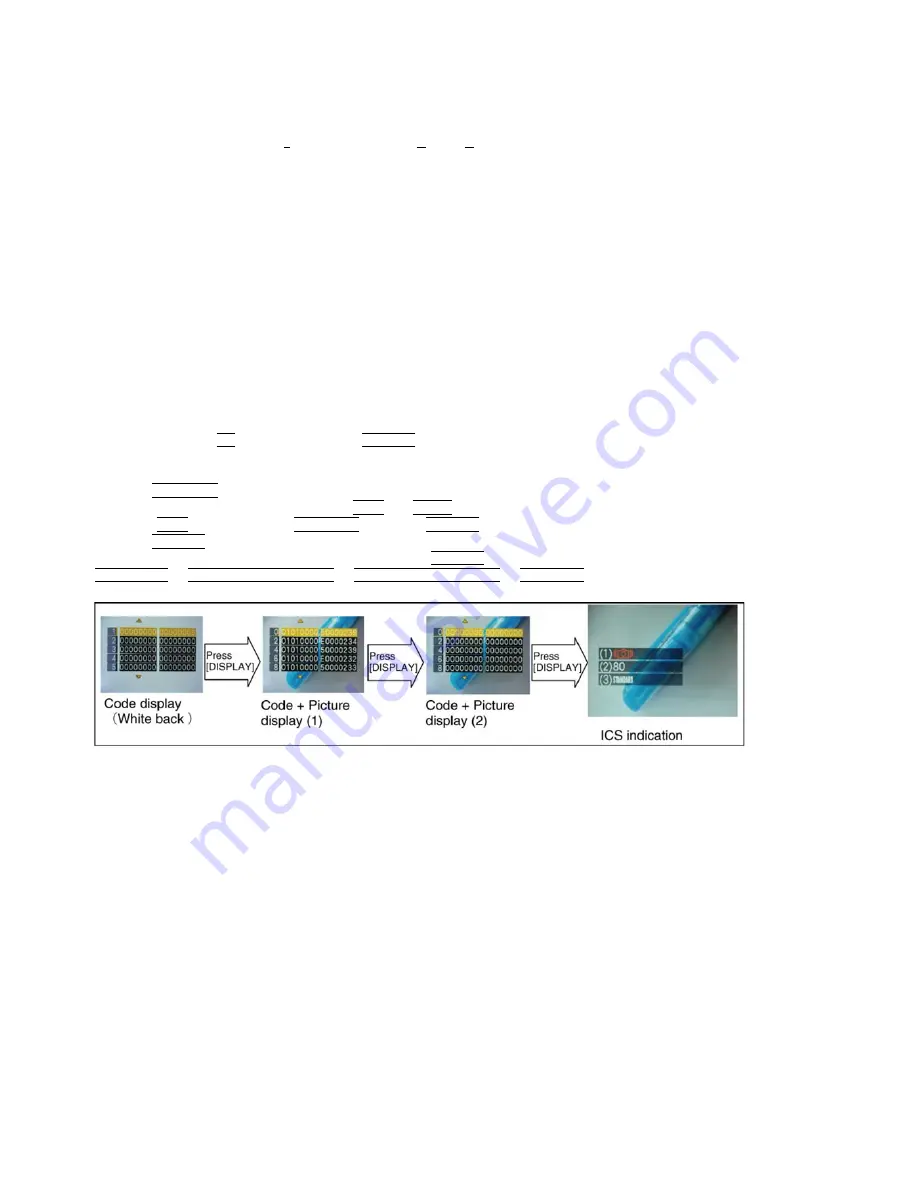
Press the DISPLAY button, 3 times.
The display condition is changed as shown below when the DISPLAY button is pressed.
Code display
→
Code + Picture display (1)
→
Code + Picture display (2)
→
ICS display
→
.....
Summary of Contents for DMC-FT1EB
Page 15: ...15 4 Specifications ...
Page 16: ...16 ...
Page 18: ...18 ...
Page 19: ...19 ...
Page 20: ...20 ...
Page 21: ...21 5 Location of Controls and Components ...
Page 22: ...22 ...
Page 31: ...31 7 2 Air leak Test ...
Page 32: ...32 7 3 Air leak Test Inspection ...
Page 33: ...33 ...
Page 37: ...37 9 Disassembly and Assembly Instructions 9 1 Disassembly Flow Chart 9 2 PCB Location ...
Page 39: ...39 9 3 2 Removal of Top Ornament Fig D2 Fig D3 ...
Page 40: ...40 9 3 3 Removal of Rear Case Unit Fig D4 Fig D5 ...
Page 42: ...42 Fig D7 9 3 5 Removal of Main P C B Battery Case Fig D8 ...
Page 43: ...43 Fig D9 9 3 6 Removal of Main P C B Fig D10 ...
Page 44: ...44 Fig D11 9 3 7 Removal of Flash P C B Fig D12 ...
Page 45: ...45 9 3 8 Removal of Top P C B Fig D13 Fig D14 ...
Page 46: ...46 9 3 9 Removal of Rear Operation P C B Fig D15 Fig D16 ...
Page 47: ...47 Fig D17 9 3 10 Removal of LCD Unit Fig D18 ...


