background image

78

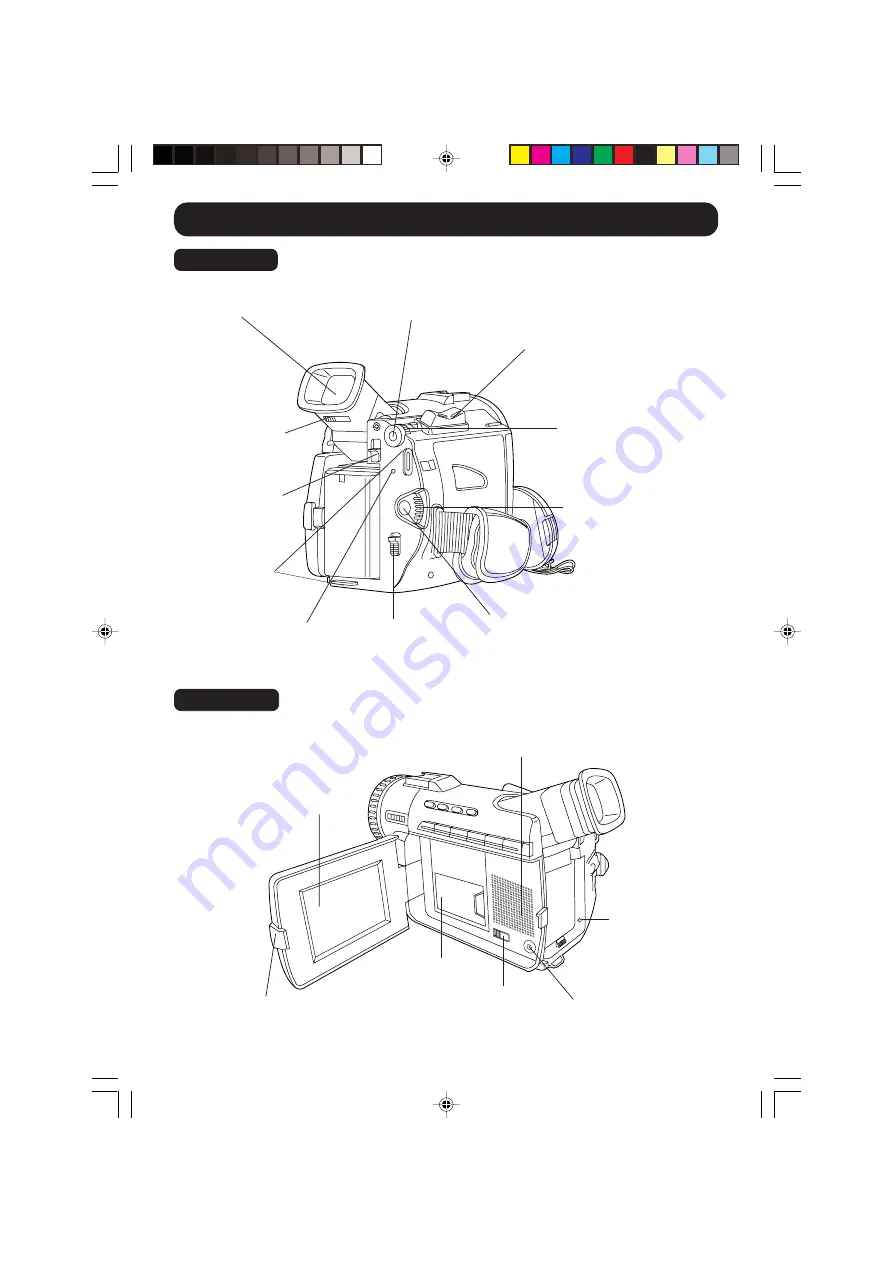
POWER ZOOM
Switch

pages 51, 56

JOG KEY

pages 19, 20

VOLUME KEY

page 35

Menu Button

pages 19, 20

Electronic Viewfinder (EVF)

pages 8, 9, 26, 27, 28, 29

Vision Adjustment
Control

pages 9, 30

Shoulder Strap
Attachment Ring

page 17

Index of Controls

POWER Switch

pages 8, 9, 10

Rear View

TAPE/M-CARD
Switch

pages 8, 9, 41,
42, 43, 48

REC/PAUSE
Button

pages 9, 30

Battery Release
Button

pages 12, 13

POWER Lamp

page 30

LCD (Liquid Crystal
Display) Monitor

pages 9, 10, 26, 27,
28, 29

LCD-OPEN Button

pages 9, 10, 35

Built-in Speaker

page 35

Rear View

TO PC Connector

page 64

M-CARD Door

page 9

CARD EJECT
Switch

page 9

DC IN Terminal

page 13

200_400-K.71-78.p65

00/06/14, 13:14

78

Summary of Contents for Digital Palmcorder PalmSight PV-DV200-K

Page 1: ...ese instructions thoroughly R LSQT0229B Models No PV DV200 K PV DV400 K Digital Video Camcorder Operating Instructions MC Mini R PV DV400 K shown PV DV200 K PV DV400 K For assistance please call 1 800 561 5505 or visit us at www panasonic ca 200_400 K 1 9 p65 00 06 14 13 09 1 ...

Page 2: ...ed properly we re sure it will bring you and your family years of enjoyment Please take time to fill in the information below The serial number is on the tag located on the underside of your Palmcorder Be sure to retain this manual as your convenient Palmcorder information source 1 pc A V Cable LSJA0280 1 pc PC Connection Cable for Windows LSJA0276 1 pc MultiMediaCard LSFT0198 1 pc PHOTOVU LINK DR...

Page 3: ...ING TO QUALIFIED SERVICE PERSONNEL Things You Should Know The above markings are located on the appliance bottom cover SafetyPrecautions WARNING TO PREVENT FIRE OR SHOCK HAZARD DO NOT EXPOSE THIS EQUIPMENT TO RAIN OR MOISTURE Your Mini Palmcorder is designed to record and play back in Standard Play SP mode and Long LP mode It is recommended that only cassette tapes that have been tested and inspec...

Page 4: ...tained for future reference 3 Heed Warnings All warnings on the unit and in the operating instructions should be adhered to 4 Follow Instructions All operating and maintenance instructions should be followed 5 Cleaning Unplug this video unit from the wall outlet before cleaning Do not use liquid or aerosol cleaners Use a dry cloth for cleaning 6 Attachments Do not use attachments not recommended b...

Page 5: ...electric shock or other hazards 21 Safety Check Upon completion of any service or repairs to this video unit ask the service technician to perform safety checks to determine that the video unit is in safe operating order USE LOCATION TO AVOID SHOCK HAZARD Your Camcorder and power supply should not be exposed to rain or moisture Do not connect the power supply or operate your Camcorder if it gets w...

Page 6: ... Format the MultiMediaCard 47 Photo Title 48 Dual Digital Electronic Image Stabilization System D E I S 50 Zoom 51 Digital PhotoShot 52 Index Search 52 White Balance 53 Recording Still Pictures 53 IR FILTER PV DV400 K only 53 Program AE 54 Other Digital Functions 55 Focus 56 Audio Video Fade In Out 57 Backlight 57 High Speed Shutter 58 Audio Dubbing using the External or Built in Microphone 59 Mem...

Page 7: ...designed for use with models PV DV200 K and PV DV400 K The PV DV400 K is the model used for illustrative purposes Features may vary so please read carefully Differences between models Model Number LCD Monitor Viewfinder IR FILTER Switch WIND CUT PV DV200 K 63 5 mm 2 5 inch Liquid Crystal Display Black and White No No PV DV400 K 76 2 mm 3 0 inch Liquid Crystal Display Colour Yes Yes 200_400 K 1 9 p...

Page 8: ...Set POWER Switch to VCR or CAMERA 3 Insert a cassette with its window side facing up Make sure the record tab is closed page 15 2 Slide TAPE EJECT Switch to open the Cassette Compartment Cover 1 2 3 TAPE M CARD When using a Tape you must set TAPE M CARD Switch to TAPE Protection Film Note Remove the Protection Film before use Protection Film Note Remove the Protection Film before use 4 Press PUSH ...

Page 9: ... again to pause recording 1 Press LCD OPEN Button to unlock the LCD monitor Swing it fully open and adjust the angle 3 Insert the MultiMediaCard Be sure to insert the MultiMediaCard before using the PhotoShot Card page 41 LCD Monitor LCD Monitor 2 Slide CARD EJECT Switch to open M CARD door TAPE M CARD When using a MultiMediaCard you must set TAPE M CARD Switch to M CARD 3 Adjust the Vision Adjust...

Page 10: ...R Switch to VCR 2 Press LCD OPEN Button to unlock the LCD monitor Swing it fully open and adjust the angle 3 Press REW Button to rewind the tape 4Press PLAY Button to start playback 5 Press STOP Button to stop playback When the LCD monitor is fully open the Viewfinder automatically turns OFF 180 90 200_400 K 10 19 p65 00 06 14 13 09 10 ...

Page 11: ...been charged When all three lamps are lit charging is finished The Charge Lamps give a good approximate indication of the charging condition under normal ambient temperature However when charging at high or low temperature the charge lamps may differ considerably from the actual charging condition Battery Charging Confirmation Marker Use this marker as a reminder to yourself when the battery is fu...

Page 12: ...he Battery To avoid damage to the Battery Do not drop or jar the Battery Use the Battery with specified models only If the Battery is used in extremely high temperatures a safety device will automatically prevent operation To insure longer battery life While not in use remove Battery from the Palmcorder and AC Adaptor and store in a cool dark dry place If you leave the Battery in the Palmcorder or...

Page 13: ...ed DC IN Terminal AC Adaptor BATTERY RELEASE Switch Note 1 2 1 2 3 POWER Lamp 1 Slide the Battery upward while sliding the BATTERY RELEASE to remove the Battery page 12 2 Insert the DC Cable into the DC IN Terminal 3 Connect the other end of the DC Cable to the AC Adaptor as shown 4 Plug in the AC Adaptor The POWER Lamp of the AC Adaptor lights up DC IN Terminal 200_400 K 10 19 p65 00 06 14 13 10 ...

Page 14: ...r 2 Pull the cassette tape straight out Hint for recording position when inserting Cassette When you insert a cassette that is partially recorded use the Edit Search Function to search for the position from which you want to record again Especially when you want to record again on a cassette that is already fully recorded be sure to first locate the position where you want to add the new recording...

Page 15: ...assette type 60 minutes 45 minutes SP LP 90 minutes 30 minutes Record Speed Playback time AY DVM80EA 80 minutes 120 minutes Mini RecordSpeed PlaybackTime Use only those tapes having the logo indicating the 6 35mm digital standard EraseProtection Cassettes have a sliding record tab to ensure recordings are not accidentally erased record tab 200_400 K 10 19 p65 00 06 14 13 10 15 ...

Page 16: ...tton LIGHT RELEASE Button Using the Light Using the light will reduce battery operating time If using the enhancement Light for an extended period of time be sure to provide ventilation when using it in a hot environment Be sure LIGHT is set to OFF when not in use Do not attempt to lift or carry the Palmcorder by holding the Enhancement Light If light bulb needs to be replaced take Light to your n...

Page 17: ...gth 1 2 1 Undo the two strap ends from their buckles 2 Remove the buckles from one end of the strap 3 Thread the strap with no buckle through the Light Holder so that it faces outward Then reinsert the buckle 4 Thread the strap ends through the Strap Attachment Rings 5 Reinsert the strap ends through their buckles Make sure the straps are not twisted 2 1 3 200_400 K 10 19 p65 00 06 14 13 10 17 ...

Page 18: ... Strap Remove the Hand Strap from the front clasp and run the Strap through the Lens Cap Loop Reattach the Hand Strap Hand Strap Lens Cap Attach the Light Optional 1 Insert the Light into the Light Holder for Storage 2 To remove the Light press LIGHT RELEASE and slide Light out from the holder LIGHT RELEASE Button Light Holder 200_400 K 10 19 p65 00 06 14 13 10 18 ...

Page 19: ...e year month day hour and minute If you should pass the current year continue pressing down on the JOG KEY until the year appears again A built in battery maintains clock operation If the Palmcorder is not connected to a power source for a few months the built in battery may discharge and CLOCK BATTERY indication appears page 29 When time setting is completed press the MENU to start the clock DATE...

Page 20: ... R PLAY D EFFECT STRETCH S L I M MONO OFF STROBE MIRROR MOSAIC T R A I L S E P I A F U N C T I O N OFF D FUNCTION PUSH MENU PUSH E X I T SET JOG JOG KEY KEY KEY SELECT ROTATE V C R PLAY STRETCH S L I M MONO OFF STROBE MIRROR MOSAIC T R A I L S E P I A F U N C T I O N OFF D FUNCTION D EFFECT PUSH MENU PUSH E X I T SET JOG JOG KEY KEY KEY SELECT ROTATE CAMERA A D J U S T S E T T I N G S E T T I N G ...

Page 21: ...nly LCD EVF SETTING menu is displayed To select LCD BRIGHTNESS LCD COLOR or EVF BRIGHTNESS 6 LCD SETTING PV DV200 K only LCD SETTING menu is displayed To select LCD BRIGHTNESS or LCD COLOR 7 PHOTO TITLE PHOTO TITLE menu is displayed To select TITLE or MODE MENU OSD VCRMENU 1 PLAY FUNCTION 2 REC MODE 3 PLAY MODE 4 DISPLAY SETTING 5 LCD EVF SETTING VCR MENU 1 PLAY FUNCTION VCR PLAY FUNCTION menu is ...

Page 22: ...orded in the 16 bit 48 kHz high quality mode INDEX page 39 DAY An index signal is recorded when recording is restarted after the date has changed since the last recording 2 HOUR An index signal is recorded when recording is restarted after a lapse of more than 2 hours MENU OSD CAMERAFUNCTION D FUNCTION OFF MIRROR STROBE MOSAIC SLIM TRAIL STRETCH GAIN UP WIPE MIX CAMERAADJUST PROG AE OFF W BALANCE ...

Page 23: ...ual conditions occur To cancel the beep set to OFF Palmcorder will beep Once when you start recording Twice when you stop recording Repeatedly when warning of unusual conditions pages 28 29 IR COLOR PV DV400 K only page 53 To select one of the 3 IR COLOUR modes slide IR FILTER Switch to ON DISPLAY SETTING DISPLAY page 26 To select the desired type of display and counter indication displayed on the...

Page 24: ...lect one of the 2 Photo Title modes VCR PLAY FUNCTION DIGITAL FUNCTION page 55 To select one of the 6 digital functions Setting to OFF cancels the previously selected digital function D EFFECT page 55 To select one of the 2 digital picture effects for playing back Setting to OFF cancels the previously selected digital effect VCR REC MODE REC SPEED page 15 SP Normal recording speed mode LP Recordin...

Page 25: ...d type of display and counter indication displayed on the LCD Monitor or in the viewfinder C RESET page 26 Setting to ON resets the counter to zero DATE TIME page 27 The date and time can be set and displayed on the screen CLOCK SET page 19 When set to ON the date and time can be set on the screen LCD EVF SETTING PV DV400 K only LCD EVF SETTING page 31 Setting to ON displays the menu for adjusting...

Page 26: ...This display appears when the digital zoom function has been activated d Playback Effect page 55 This display appears when SEPIA or MONO is selected in VCR menu e Tape Speed Indication page 22 Indicates the tape speed SP or LP f DisplayOn OffandCounter TimeCode The indication switches as shown below when the desired DISPLAY mode is selected from the menu pages 23 25 When selecting OFF all displays...

Page 27: ...g PLAY Playback R Repeat Playback CHK Recording Check FF Fast forward REW Rewind FF Search REW Search BLANK Blank Search SEARCH Index Search Mirror feature recording Paused during Mirror feature recording l Digital EIS Indications page 50 m Zoom Magnification Level page 51 n Manual Focus Indication page 56 o White Balance Indication page 53 p PROGRAM AE Indication page 54 q Backlight Indication pa...

Page 28: ...e sliding record tab is open or a blank portion of tape is detected will flash and CANNOT REC will appear for 5 seconds When the tape is about to end in REC mode END will flash and TAPE END will appear for 5 seconds When an incompatible tape is detected INCOMPATIBLE TAPE will appear for 5 seconds If the video heads require cleaning NEED HEAD CLEANING will appear for 5 seconds When the Palmcorder a...

Page 29: ...tery connect the AC Adaptor to the Palmcorder Recharging takes approx 4 hours Reset the clock after charging If you play a tape recorded in a format other than NTSC or you try to copy a copy protected tape INCOMPATIBLE DATA will continuously appear This message also appears if REC is pressed when DV is input and the copy of copyrighted information is prohibited This message also appears when a cop...

Page 30: ...nly to ON see WIND CUT on page 23 Record Pause mode Camera Recording EVF To conserve power After5minutes theRecord Pausemodewill automaticallychangetoStandbymode To resume recording set POWER to OFF andthenONagain When the Palmcorder is aimed at excessively bright objects or bright lights a vertical bar may appear in the picture This is a normal characteristic of the CCD pick up device Try to avoi...

Page 31: ...N E S S SETTING H I G H LOW EVF PUSH MENU PUSH E X I T SET JOG JOG KEY KEY KEY SELECT ROTATE LCD B R I G H T N E S S Note LCD H I G H H I G H LOW LOW LCD COLOR SETTING PUSH MENU PUSH E X I T SET JOG JOG KEY KEY KEY SELECT ROTATE LCD B R I G H T N E S S PV DV200 K PV DV400 K 180 90 90 If you adjust the LCD Brightness or colour 1 Press MENU to display the main menu screen 2 Rotate JOG KEY to select ...

Page 32: ...s the recording to eliminate distortion during edit search Press EDIT SEARCH briefly in the recording Pause Mode The CHK indication appears After checking the Movie Camera returns to the Recording Pause Mode For Recording Check the Movie Camera must be in the same mode SP or LP as used for recording otherwise the playback picture is distorted EDIT SEARCH RECORD PAUSE Button POWER Switch Recording ...

Page 33: ...page 52 Display On TV page 40 Counter Time Code page 26 Audio Dubbing page 59 Record page 62 Menu page 20 Play page 35 FF Search page 36 REW Search page 36 Pause Select pages 20 36 Stop Set pages 20 35 Slow Frame Advance Forward pages 36 38 Slow Frame Advance Backward pages 36 38 Index Search Forward page 39 Index Search Backward page 39 Speaker Volume page 35 2 0 0 0 2 J A N R 0 1 2 BLANK LP 0h10...

Page 34: ...EARCH SLOW F ADV PAUSE SEL SLOW F ADV REW PLAY FF SPKR VOL T W INDEX SEARCH REC CAMCORDER CAMERA DISPLAY ONTV COUNTER TC RESET For VCR 2 Press these buttons at the same time For VCR 1 Press these buttons at the same time Remote Controlling Two Palmcorders Optional Replace the Battery Optional REMOTE 1Set the POWER to VCR or CAMERA The POWER lamp lights red Be sure POWER is fully turned to VCR or C...

Page 35: ... to make the volume setting screen disappear Adjust the picture on the LCD monitor if needed page 31 4 Press STOP to stop playback When the tape reaches its beginning during rewind or rewind search it will stop automatically If you press PLAY for more than 5 seconds the Palmcorder will start the Repeat Playback mode when the tape reaches its end The letter R will appear in the EVF and LCD monitor ...

Page 36: ...tion for more than 10 minutes During slow motion playback picture may move up and down This is normal When you start or stop slow motion playback the picture may become bluish for an instant Sound is muted during all special effects ADuring playback hold down FAST FORWARD SEARCH or REWIND SEARCH The search will continue for as long as the button is held down OR BPress FAST FORWARD SEARCH or REWIND...

Page 37: ... continue at normal speed The Variable Speed Search function offers a choice of six playback speeds 1 5x 1x 2x 5x 10x 20x both in forward and reverse directions The review playback at the 1x speed is playback in reverse direction During the Variable Speed Search at a speed other than 1x mosaic like patterns will appear in the picture During the Variable Speed Search sound is muted Fast Forward Rew...

Page 38: ...inuous series of still images at a slower speed than normal slow mode During frame by frame advance a few frames may move automatically and the picture may become bluish for an instant Jog Frame by Frame Search Palmcorder only During Still mode rotate the JOG KEY to advance or reverse the picture one frame at a time Note JOG KEY DATE TIME PHOTO SHOT REC PAUSE A DUB MENU STOP SET INDEX SEARCH SLOW ...

Page 39: ... button and change in the scene number is quite slow Do not press the INDEX SEARCH rapidly and continuously During Reverse Index Search playback will not begin until a tape rewinds all the way to the beginning Optional Remote Control Only page 71 Search for a particular scene by using the electronic index marks placed at the beginning of each recording 1Set the POWER to VCR The POWER lamp lights r...

Page 40: ...Make sure the Palmcorder and TV are turned off while connecting CATV System Installer This reminder is provided to call the CATV system installer s attention to Article 820 40 of the NEC in USA and to the Canadian Electrical Code in Canada that provides guidelines for proper grounding and in particular specifies that the cable ground shall be connected to the grounding system of the building as cl...

Page 41: ...4 5 6 A M 6 0 C O M P L E T E D F I N E PHOTO 2 0 0 0 2 JAN 1 2 3 4 5 6 A M Image Resolution and Capacity 8MB MultiMediaCard REC Mode FINE NORMAL Image Resolution 640 x 480 320 x 240 Capacity Approx 60 images Approx 240 images The number of images given for each mode applies when all images are taken in same mode You can change recording modes at any time before capturing an image The number of im...

Page 42: ...mode To playback the images of the MultiMediaCard see page 43 When Variable Speed Search is done page 37 this feature can not be used 6 Repeat steps 4 5 to record another image to the MultiMediaCard 6 0 P R O C E S S I N G F I N E PHOTO Recording Images From a Tape PHOTO 6 0 F I N E LP LP F I N E CARD NORMAL SETTING PUSH MENU PUSH E X I T SET JOG KEY KEY MODE REC JOG KEY You can record still image...

Page 43: ...e Rotate JOG KEY to scroll through Multi image screen pages each page contains 6 images The selected image is underlined in green The colour of image numbers is white for FINE mode and green for NORMAL mode Press MENU for the display CARD SETTING menu screen Press M STOP to return to the Card PhotoShot REC Mode page 41 C A R D S E T T I N G D I S P L A Y PUSH MENU PUSH E X I T SET D C F NO JOG JOG...

Page 44: ...n off the power or subject it to vibrations and shocks Do not leave the MultiMediaCard in a place with high temperature exposed to direct sunlight or where electromagnetic waves and static electricity can be generated Electromagnetic waves static electricity malfunction of the Digital Video Palmcorder or of the MultiMediaCard itself could erase the data recorded on it To prevent the loss of pictur...

Page 45: ...begin Connect the Palmcorder to a power source pages 12 13 InsertarecordedMultiMediaCard page41 DELETE FORMAT ALL PUSH STOP PUSH PAGE SET JOG JOG KEY KEY KEY SELECT CANCEL ROTATE PUSH STOP E X I T SET JOG JOG KEY KEY SELECT ROTATE 1 2 3 4 6 PAGE DELETE P U S H P U S H YES STOP DEL KEY KEY CANCEL 1 2 3 4 5 6 PAGES DELETE SURE ARE YOU POWER Switch JOG KEY M DEL Button M STOP Button You can delete un...

Page 46: ... U S H P U S H YES STOP M KEY KEY CANCEL 1 2 3 4 5 6 D E L DELETE ALL ARE YOU SURE STOP E X I T D E L E T E P I C T U R E N O M DEL 6 0 F I N E P H O T O POWER Switch JOG KEY You can delete all images from a MultiMediaCard easily with this operation Warning Once deleted images cannot be restored M DEL Button M STOP Button Before you begin Connect the Palmcorder to a power source pages 12 13 Insert...

Page 47: ... M PLAY Button DELETE FORMAT ALL PUSH STOP PUSH PAGE SET JOG JOG KEY KEY KEY SELECT CANCEL ROTATE Before you begin Connect the Palmcorder to a power source pages 12 13 InsertarecordedMultiMediaCard page41 You can easily format your MultiMediaCard using this operation Warning Formatting permanently removes all image data P U S H P U S H YES STOP M KEY KEY CANCEL 1 2 3 4 5 6 C A R D FORMAT SURE ARE ...

Page 48: ... L E T I T L E MODE PUSH STOP E X I T SET JOG JOG KEY KEY SELECT ROTATE 1 2 3 4 5 6 POWER Switch TAPE M CARD Switch JOG KEY MENU Button Note Before you begin Connect the Palmcorder to a power source pages 12 13 InsertarecordedMultiMediaCard page41 1Set POWER to CAMERA The POWER lamp lights red Be sure POWER is fully turned to CAMERA position 2Set TAPE M CARD to TAPE page 8 3Press MENU to display t...

Page 49: ... screen 7 Press REC PAUSE to start recording with Photo Title WIPE or MIX screen is displayed at beginning of next recording Then the Photo Title setting will be cleared automatically Photo Title SET PHOTO T I T L E W I P E L P 1 2 3 4 5 PAU S E WIPE or MIX RECORD PAUSE Button 200_400 K 40 49 p65 00 06 14 13 12 49 ...

Page 50: ...ight level is inadequate Turn D E I S OFF during recording when using a tripod 3 Press REC PAUSE to start recording 4 Press EIS again to cancel Be sure that D E I S is turned off when not needed Camera mode VCR mode 1 Set POWER Switch to VCR The POWER lamp lights red Be sure POWER is fully turned to VCR position 2 Press PLAY to start playback 3 Press EIS to stabilize the picture 4 Press EIS again ...

Page 51: ...ation levels are used When the level falls below 18x the normal zooming function will resume Focus distance becomes 4 feet 1 2m if the lens is in full telephoto 1 Set POWER to CAMERA The POWER lamp lights red Be sure POWER is fully turned to CAMERA position 2 Press D ZOOM to select D ZOOM1 or D ZOOM2 once D ZOOM1 from 18x to 36x twice D ZOOM2 from 18x to 300x three times Turn off D ZOOM 3 Press RE...

Page 52: ...NDEX SEARCH REC CAMCORDER CAMERA DISPLAY ONTV COUNTER TC RESET The picture quality will deteriorate slightly The tape remaining indicator will not appear while the PHOTOSHOT feature is used In the Photo Scene Index Search mode the shutter sound effect may not be able to be heard even when SHUTTER is set to ON Photo Index Search may fail to detect a recorded PhotoShot image if the image is 3 second...

Page 53: ...Recording Still Pictures Auto White Balance automatically maintains optimum colour balance in most lighting conditions However when using Digital Functions etc you may get better results using the manual adjustment 1 While in RECORD mode press STILL and hold for 2 seconds to capture still picture The captured still picture will be recorded together with the sound 2 Press STILL once again to releas...

Page 54: ...not come out properly SPOT LIGHTmode If the recorded subject is extremely bright the picture may appear whitish SURF SNOW mode If the recorded subject is extremely bright the picture may appear whitish It is not possible to select the SPORTS mode and PORTRAIT mode together with the GAIN UP in the Digital function camera menu Note 1 Set POWER to CAMERA The POWER lamp lights red Be sure POWER is ful...

Page 55: ... The picture is expanded vertically TRAIL The subject being recorded creates a trail when in motion STRETCH The picture is expanded horizontally GAIN UP Not available during playback Picture sensitivity is increased Only Manual Focus is available WIPE Successive scenes are separated in a way which simulates the drawing of a curtain MIX The current scene is mixed in with the following scene during ...

Page 56: ...OOM to the T side Full Telephoto until the lens is zoomed in all the way subject at maximum size 3 Turn MANUAL FOCUS control wheel until the picture is in focus It may be necessary to back away from the subject to focus the image properly 4 Press POWER ZOOM to W or T as desired The subject will remain in focus over the entire zooming range It may be necessary to back away from the subject to focus...

Page 57: ...ecording EVF or LCD monitor indication Press BACK LIGHT to activate the Backlight feature The Indicator will appear in the EVF or LCD monitor Press BACK LIGHT again to cancel the Backlight feature F a d e O u t F a d e I n FADE Button Backlight Use when recording a subject that is darker than the surrounding scene in a shadowed area or when the light source is behind your subject Audio Video Fade ...

Page 58: ... indication in the EVF and LCD monitor the Camcorder will automatically adjust the shutter speed up to 1 350 AUTO mode is automatically selected whenever the POWER Switch is set to CAMERA S P E E D S H U T T E R S H U T T E R MENU PUSH E X I T JOG KEY KEY SELECT ROTATE 1 4 0 0 0 1 60 AUTO 1 100 1 250 1 500 1 4000 1 2000 1 1000 1 8000 For proper colour reproduction it is recommended that you use th...

Page 59: ...ound Select 12 bit if you do not want the original sound to be completely replaced during an audio dub If you dub over a tape which has both 12 bit and 16 bit audio recordings on it keep in mind that the original 16 bit audio portion will be completely replaced The original sound can be replaced with new sound using the built in Palmcorder microphone or an external microphone AudioDubbingusingthe ...

Page 60: ... dubbing gets too near the speaker of your TV a howling noise feedback may occur If the tape position lies or starts in a blank section you cannot use the A DUB feature RESET Button Memory Stop Editing Optional Remote Control Only page 71 Optional A DUB 16 bit dubbed sound completely erases the original 16 bit recorded sound If you select 12 bit AUDIO recording and dubbed the sound with the AUDIO ...

Page 61: ...fore you begin ConnectbothPalmcorderandVCRtotheir power sources Connect the Palmcorder to a VCR as illustratedbelow Turn ON both units Set the recording VCR s Input Signal Selector to LINE SetthePalmcorderPOWERSwitchtoVCR 1 Insert a pre recorded tape into the source playing Palmcorder and a blank tape with record tab in place into the target VCR Recorder 2 Press PLAY on the Palmcorder When the tap...

Page 62: ...nt to start dubbing press PAUSE 4 Hold down REC and press PLAY on the target recording Palmcorder or on the remote control optional page 71 Press PAUSE to pause the tape at the starting point of the dub 5 Simultaneously press PAUSE on both units to begin the dubbing 6 Press STOP on the recording unit and then press STOP on the playing unit to end dubbing When two Palmcorders are used for dubbing i...

Page 63: ...ormerly Radius Canopus or Pinnacle Using these products allows you to capture live images onto your PC edit the captured image etc Note For more detailed information please consult the Digital Origin Canopus or Pinnacle web site at http www digitalorigin com http www justedit com http www pinnaclesys com pdv offer For assistance on Digital Origin products call 1 800 572 3487 For assistance on Cano...

Page 64: ...g device RS 232C D Sub 9 pin Default is COM1 PC Connecting Cable for Windows Supplied An image stored in the DV Tape can be transferred to your PC Personal Computer Connection 1 Turn off your PC 2 Connect the Digital Video Camcorder to your PC Windows using the RS 232C PC connecting cable supplied Before connecting the Palmcorder to the PC make sure the PC power is off to insure that images are tr...

Page 65: ...CARD LINK DRIVER Disk Windows 95 98 into a floppy disk drive 3 Click on Start then Run 4 Type in a setup exe and click OK If your 3 5 inch floppy disk drive is not A use the appropriate letter 5 Follow the instructions as they appear on the PC screen until the installation is complete Setup window will disappear when the installation is complete 200_400 K 64 70 p65 00 06 14 13 14 65 ...

Page 66: ...oCAMERA SetTAPE M CARDSwitchtoM CARD page9 1 Click on Start Programs panasonic then CARD LINK 2 CARD LINK is opened COM Port and Baud rate are automatically selected Refer to Help for information about application operations and other Error messages Note CARD LINK You can transfer images between the MultiMediaCard and your PC 200_400 K 64 70 p65 00 06 14 13 14 66 ...

Page 67: ...elected image will be under lined in green 4 Click on Transfer The picture image is transferred to your PC and displayed Transfer Dialog will appear on the PC The image is captured when the full screen image appears on the PC Delete Confirmation Dialog will appear on the PC Click OK An image from the MultiMediaCard is deleted Save The picture image is transferred to your PC and displayed The save ...

Page 68: ...RtoCAMERA SetTAPE M CARDSwitchtoM CARD page9 1 Repeat steps 1 and 2 on page 66 to run the Software 2 Preview Window screen appears automatically 3 Click on File then Click on Open At your computer please select and open the data jpg or bmp you want to transfer to the Camcorder 4 Click on File then select Data out to camera then select Fine or Normal mode DATA TRANSFER screen appears Your computer ...

Page 69: ...SwitchtoTape page8 1 Click on Start Programs panasonic then PHOTOVU LINK 2 PHOTOVU LINK is opened COM Port and Baud rate are automatically selected Refer to Help for information about application operations and other Error messages in the PHOTOVU LINK Software when installed on the PC Note PHOTOVU LINK You can transfer images from your Camcorder tape to a PC 200_400 K 64 70 p65 00 06 14 13 14 69 ...

Page 70: ...e you want to transfer to your PC using VCR Operation Buttons on the Preview Window screen Then click on Transfer to transfer the selected image from the camcorder to Preview Window in PLAY or STILL mode 4Save Transferred image to PC Click on File then Save As Note If while transferring the image to your PC the displayed picture appears abnormal close PHOTOVU LINK turn the Camcorder POWER off rese...

Page 71: ...ame as PV DBP9 K DBP9A K CGR D815A 1B PV DDC9 K PV DLT9 K PV DRC9 K Description AC Adaptor with AC Cable and DC Cable 800mAh 1 h 15 min Battery Pack 1600mAh 2 h 50 min Battery Pack 5300mAh 9 h Battery Pack DV Interface Cable 4 pin to 4 pin Colour Enhancement Light IR Remote Control Figure 200_400 K 71 78 p65 00 06 14 13 14 71 ...

Page 72: ... Eyepiece with the grooves inside the EVF shaft and attach Turn it clockwise 1 8 of a turn to lock in place 6Replace the EVF Eyepiece screws and tighten with a screwdriver If you lose an EVF Eyepiece screw order Part No XQN2 BV4FXK PV DV400 K 1 Turn the Eyepiece counterclockwise 1 8 of a turn 2 Pull the Eyepiece free Remove any lint or dust particles with a soft clean cloth being careful not to sc...

Page 73: ... in clear weather at midday Average sunlight in clear weather Sunlight 2 hours after sunrise and before sunset Sunlight 40 min after sunrise and before sunset Sunlight 30 min after sunrise and before sunset Sunlight 20 min after sunrise and before sunset Amber Filter Range 10 000 8 000 7 000 6 500 6 000 5 500 5 000 4 500 4 000 3 500 3 200 2 800 2 000 AUTO Notes On Operations Approximate Brightness...

Page 74: ...2 mm Electronic Viewfinder PV DV200 K 0 44 inch 11 2 mm Liquid Crystal Electronic Viewfinder PV DV400 K LCD Monitor 2 5 inch 63 5 mm Liquid Crystal Display PV DV200 K 3 0 inch 76 2 mm Liquid Crystal Display PV DV400 K Minimum Illumination Required 5 lux F1 1 6 0 5 footcandles 0 lux IR Filter ON PV DV400 K only Operating Temperature 32 F 104 F 0 C 40 C Operating Humidity 10 75 Weight Digital Video ...

Page 75: ...tom occurs Refer servicing to qualified service personnel Before Requesting Service Clogged Video When you go from function to function PLAY FF REW etc please note that the unit will not accept a new function operation until the previous operation is complete The POWER Button and all function buttons PLAY FF REW etc are only operational after the tape has been completely loaded With a Wide or Tele...

Page 76: ...Cap is removed p 30 Make sure the Power Source is connected pp 12 13 Video cassette can t be removed Insert the cassette with the window side facing up p 8 No operation starts when operation buttons are pressed Make sure the Power Source is connected pp 12 13 Check the Dew Indicator p 29 Make sure the record tab is closed p 15 Check the Battery Indicator p 26 Recording cannot be done Make sure the...

Page 77: ...GHT Terminal page 16 Hand Strap page 18 Cassette Compartment Cover page 8 Front View Side View D ZOOMButton page 51 EIS Button page 50 PHONE Jack page 35 DVInput Output i LINK Connector pages 62 63 A V Output Connector page 61 S VIDEOOutput Connector page 61 TAPE EJECT Switch pages 8 14 Lens Cap pages 18 30 IR FILTER Switch PV DV400 K only page 53 Photo Shot Button pages 41 42 200_400 K 71 78 p65 ...

Page 78: ...ex of Controls POWER Switch pages 8 9 10 Rear View TAPE M CARD Switch pages 8 9 41 42 43 48 REC PAUSE Button pages 9 30 Battery Release Button pages 12 13 POWER Lamp page 30 LCD Liquid Crystal Display Monitor pages 9 10 26 27 28 29 LCD OPEN Button pages 9 10 35 Built in Speaker page 35 Rear View TO PC Connector page 64 M CARD Door page 9 CARD EJECT Switch page 9 DC IN Terminal page 13 200_400 K 71...

Page 79: ...side View Side View REW Button pages 10 35 STOP Button pages 10 35 M STOP Button pages 43 44 45 46 47 PLAY Button pages 10 35 M PLAY Button pages 42 43 45 46 47 FF Button pages 10 35 PAUSE Button pages 59 60 61 62 REC Button pages 61 62 M DEL Button pages 45 46 47 200_400 K 79 84 p65 00 06 14 13 15 79 ...

Page 80: ...ge 16 LIGHT Button page 16 This unit will operate on 110 120 220 240V AC An AC plug adaptor may be required for voltages other than 120V AC Please contact either a local or foreign electrical parts distributor for assistance in selecting an alternate AC plug We recommend using the accessory power plug adaptor VJSS0070 in an area which has special AC outlets Index of Controls 200_400 K 79 84 p65 00...

Page 81: ...pages 33 62 POWER ZOOM Switch pages 33 51 SPKR VOL pages 33 35 REC PAUSE Button pages 30 33 PHOTOSHOTButton pages 33 52 DATE TIMEButton pages 27 33 DISPLAY ON TV Button pages 33 40 FAST FORWARD SEARCH Button pages 33 36 REVERSE INDEX SEARCH Button pages 33 39 52 REVERSE SLOW F ADV Button pages 33 34 36 37 STOP Button pages 33 34 35 SET Button pages 19 20 33 PAUSE Button pages 33 36 SEL Button page...

Page 82: ... nor does it cover any product which is used commercially Dry cell batteries are also excluded from coverage under this warranty This warranty is extended to the original end user purchaser only A purchase receipt or other proof of date of original purchase is required before warranty service is performed THIS EXPRESS LIMITEDWARRANTY IS IN LIEU OF ALL OTHER WARRANTIES EXPRESS OR IMPLIED EXCLUDING ...

Page 83: ...Dubbing over Audio Microphone 59 60 DV Interface Cable 62 63 71 E Edit Search 32 Erase Protection Tab 15 EVF LCD Monitor Indications 26 27 28 29 F Fade In Out 57 H Hand Strap 18 High Speed Shutter 58 I IR Filter Switch PV DV400 K only 53 J Jog Search 38 L Lens Cap 2 18 30 M Macro Focus 56 Manual Focus 56 Memory Counter 26 MENU OSD 21 22 23 24 25 MultiMediaCard 2 9 M CARD Door 9 P PC Connection 63 ...

Page 84: ...4 5010 www panasonic ca R Montréal 3075LouisA Amos Lachine QuébecH8T1C4 514 633 8684 Toronto 5770AmblerDrive Mississauga OntarioL4W2T3 905 238 2181 Calgary 68358thStreetN E Calgary AlbertaT2E7H7 403 295 3922 Vancouver 13131BathgatePlace Richmond BCV6V1Z3 604 278 4211 K 200_400 K 79 84 p65 00 06 14 13 15 84 ...

Reviews: