background image

66

RQT8850

Glossary

Bitstream

This is a signal compressed and converted into digital form. It is 
converted back to a multi-channel audio signal, e.g., 5.1-channel, by 
a decoder.

CPRM (Content Protection for Recordable Media)

CPRM is technology used to protect broadcasts that are allowed to 
be recorded only once. Such broadcasts can be recorded only with 
CPRM-compatible recorders and discs.

Decoder

A decoder restores the coded audio signals on DVDs to normal. This 
is called decoding.

Dolby Digital

This is a method of coding digital signals developed by Dolby
Laboratories. Apart from stereo (2-channel) audio, these signals can
also be multi-channel audio. A large amount of audio information can
be recorded on one disc using this method.

Down-mixing

This is the process of remixing the multi-channel audio found on 
some discs into two channels. It is useful when you want to listen to 
the 5.1-channel audio recorded on DVDs through your TV’s speakers. 
Some discs prohibit down-mixing. If this is the case, this unit can only 
output the front two channels.

DTS (Digital Theater Systems)

This surround system is used in many movie theaters. There is good
separation between the channels, so realistic sound effects are 
possible.

Dynamic range

Dynamic range is the difference between the lowest level of sound 
that can be heard above the noise of the equipment and the highest 
level of sound before distortion occurs. Dynamic range compression 
means reducing the gap between the loudest and softest sounds. 
This means you can hear dialog clearly at low volume.

Film and Video

DVD-Video are recorded using either film or video. The unit can 
determine which type has been used, then uses the most suitable 
method of progressive output.
Film is 24 or 30 frames per second, with motion picture film generally 
being 24 frames per second.
Video is 60 fields per second (2 fields making up 1 frame).

Finalize

A process that makes play of a recorded CD-R, CD-RW, DVD-R, etc. 
possible on equipment that can play such media. You can finalize 
DVD-R, DVD-R DL, DVD-RW (DVD-Video format), +R,and +R DL on 
the unit. After finalizing, the disc becomes play-only and you can no 
longer record or edit. However, finalized DVD-RW can be formatted to 
become recordable.

Formatting

Formatting is the process of making media such as DVD-RAM 
recordable on recording equipment.
You can format DVD-RAM, DVD-RW (only as DVD-Video format) and 
+RW on this unit.
Formatting irrevocably erases all contents.

Frame and field

Frame refers to the single images that constitute the video you see 
on your TV. Each frame consists of 2 fields.

u

r

Frame

Field

Field

A frame still shows 2 fields, so there may be some blurring between 
them, but picture quality is generally better.
A field still shows less picture information so it may be rougher, but 
there is no blurring.

JPEG (Joint Photographic Experts Group)

This is a system used for compressing/decoding color still pictures. If 
you select JPEG as the storage system on digital cameras, etc., the 
data will be compressed to 1/10-1/100 of its original size. The benefit 
of JPEG is less deterioration in picture quality considering the degree 
of compression.

MP3 (MPEG Audio Layer 3)

An audio compression method that compresses audio to 
approximately one-tenth of its size without any significant loss of 
audio quality. You can play MP3s you have recorded onto CD-R and 
CD-RW.

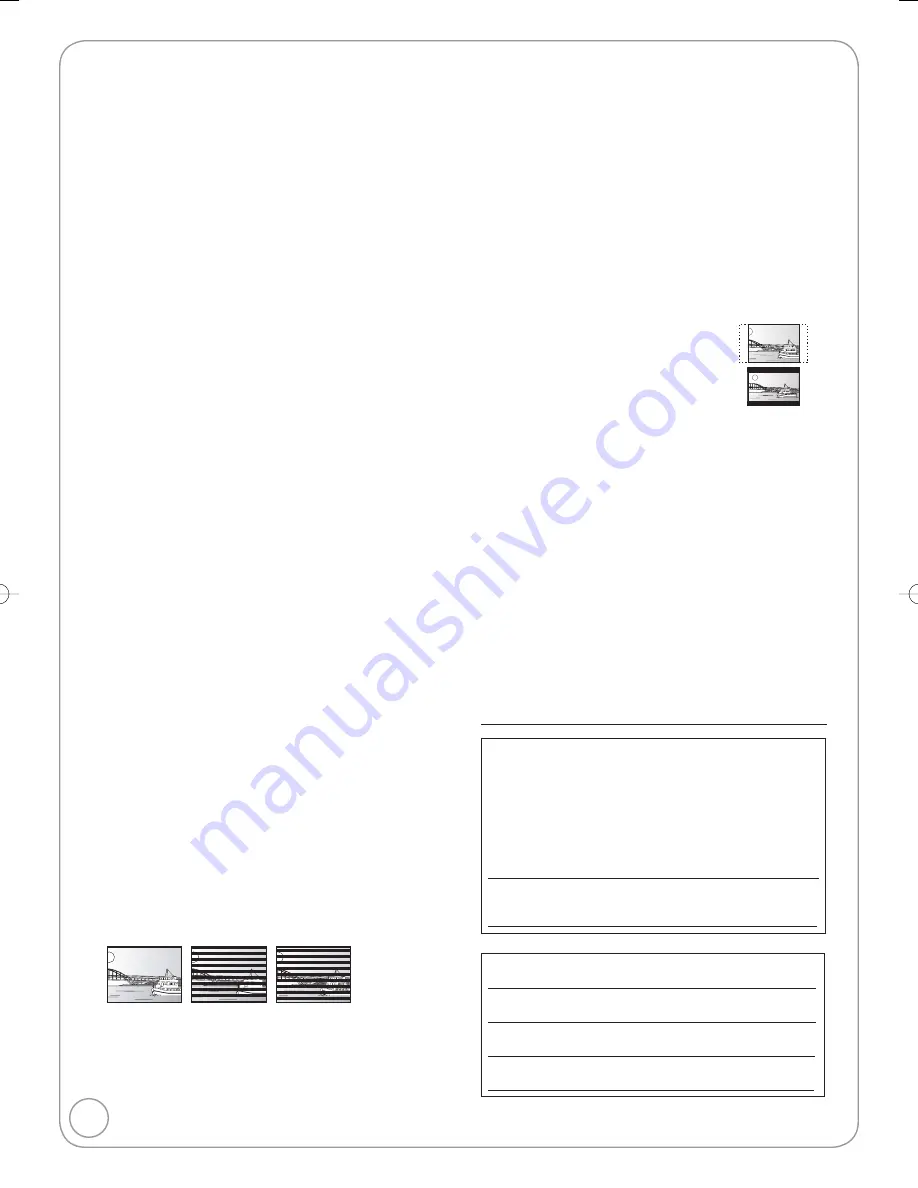
Pan & Scan/Letterbox

In general, DVD-Video are produced with the intention that they will 
be viewed on a widescreen TV (16:9 aspect ratio), so images often 
don’t fit regular TVs (4:3 aspect ratio). 2 styles of picture, “Pan & 
Scan” and “Letterbox”, deal with this problem.

Pan & Scan: The sides are cut off so the picture 

fills the screen.

Letterbox: 

Black bands appear at the top and 
bottom of the picture so the picture 
itself appears in an aspect ratio of 16:9.

Progressive/Interlace

NTSC, the video signal standard, has 480 interlaced (i) scan lines, 
whereas progressive scanning uses twice the number of scan lines. 
This is called 480p.
Using progressive output, you can enjoy the high-resolution video 
recorded on media such as DVD-Video.
Your TV must be compatible to enjoy progressive video.

Protection

You can prevent accidental erasure by setting writing protection or 
erasure protection.

Sampling frequency

Sampling is the process of converting the heights of sound wave 
(analog signal) samples taken at set periods into digits (digital 
encoding). Sampling frequency is the number of samples taken per 
second, so larger numbers mean more faithful reproduction of the 
original sound.

Thumbnail

This refers to a miniature representation of a picture used to display 
multiple pictures in the form of a matrix.

The model number and serial number of this product 
can be found on either the back or the bottom of the 
unit.
Please note them in the space provided below and 
keep for future reference.
MODEL NUMBER 

DMR-EZ17

SERIAL NUMBER 

User memo:
DATE OF PURCHASE 

DEALER NAME 

DEALER ADDRESS 

TELEPHONE NUMBER 

RQT8850-P.indb   66

RQT8850-P.indb   66

2007/01/26   13:22:05

2007/01/26   13:22:05

Summary of Contents for Diga DMR-EZ17

Page 1: ...is manual for future reference The illustrations in these Operating Instructions show images of the silver model of this unit Region number supported by this unit Region numbers are allocated to DVD players and DVD Video according to where they are sold The region number of this unit is 1 The unit will play DVDs marked with labels containing 1 or ALL Example 1 ALL 2 4 1 If you have any questions c...

Page 2: ... cable ground shall be connected to the grounding system of the building as close to the point of cable entry as practical The socket outlet shall be installed near the equipment and easily accessible The mains plug of the power supply cord shall remain readily operable To completely disconnect this apparatus from the AC Mains disconnect the power supply cord plug from AC receptacle FCC Note This ...

Page 3: ... into the apparatus the apparatus has been exposed to rain or moisture does not operate normally or has been dropped Unit Care The precision parts in the unit are readily affected by the environment especially temperature humidity and dust Cigarette smoke also can cause malfunction or breakdown To clean the unit wipe with a soft dry cloth Never use alcohol thinner or benzine to clean the unit Befo...

Page 4: ...a DV Camcorder 23 Advanced Editing Recordings Editing 24 Accessing the Recording View 24 Editing Operations to Recordings 24 Chapters Creating Editing 26 Accessing the Chapter View 26 Chapter Operations 26 Setting Menus DVD Management 27 Accessing the Management Menus 27 Setting On Screen Menus 30 Accessing the On Screen Menus 30 Changing the Unit s Settings 32 Accessing the Setup menu 32 Summary ...

Page 5: ...t parts Product numbers correct as of December 2006 These may be subject to change To order accessories refer to Accessory Purchases on page 67 1 Remote control EUR7659T50 2 Batteries for remote control 1 75 Ω coaxial cable K2KZ2BA00001 1 Audio video cable K2KA6BA00003 1 AC power supply cord K2CB2CB00018 For use with this unit only Do not use it with other equipment Also do not use cords for other...

Page 6: ...layback 16 to 17 for detail information on playback RAM R R DL RW V R R DL RW DVD V RW VR CD to turn the unit on to open the tray Button located on front of the unit Insert a disc The tray closes and play begins Stopping Play Press g STOP The stopped position is memorized The stopped position is cleared when you press g STOP several times Pausing Play Press h PAUSE Press again to restart play Tips...

Page 7: ...e Cable TV Mode TV REC P TV REC P To select with the numbered buttons 6 When no channel setting is performed on the unit and broadcast is recorded directly from the cable box or satellite receiver select a channel on the connected equipment and press INPUT SELECT to select IN1 or IN2 to select the recording mode Recording mode 11 TV REC REC REC P Remaining time to start recording TV REC P Pausing ...

Page 8: ...aption Preview of selected channel S SUB MENU SCHEDULED RECORDING Channel Input Date Frequency On Off Mode ENTER RETURN Name Number 0 9 4 1 4 1 KPO SD Remaining RecordingTime 3 26 Tue 12 53 PM 1 58 SP DVD Cancel Set Channel Input Repeat steps 2 4 to program other recordings when you have finished programming z lights on the unit s display Notes Be sure to perform step 5 before the scheduled record...

Page 9: ...1 1 SUN S SUB MENU Select Next Previous e r w q to select the recording then w to select Delete then Tips To return to the previous screen Press RETURN To view other pages Press e r w q to select Previous or Next and press ENTER You can also press u i to view other pages Multiple editing Select with e r w q and press h PAUSE Repeat A check mark appears Press h PAUSE again to cancel Delete Recordin...

Page 10: ... R DL RW V R R DL The disc must be finalized after recording 29 It is necessary to finalize DVD R etc on this unit after recording You can then play them in the same manner as a commercially sold DVD Video However the discs become play only and you can no longer record You can record again if you format DVD RW CHG SEARCH ENTER OFF MENU RETURN TOP MENU DISPLAY VOL ON A SURROU ND MONITOR MODE PICTUR...

Page 11: ...lay 6H than when using EP Extended Play 8H 3 Refer to Recording to DVD R DL and R DL 10 EP 6H 2 EP 8H LP SP XP Recording time Picture quality Notes This unit uses variable bit rate VBR recording which varies the amount of data recorded to suit the images so actual recording times and remaining recording times shown by the unit will be different R DL R DL The difference will be especially noticeabl...

Page 12: ...t before finalizing Refer to Finalizing 29 for more detail of finalizing Selecting Audio Channels to record When receiving an analog broadcast R R DL RW V R R DL RW Select the audio Main or SAP in Multi channel TV Sound Analog in the Setup menu 34 RAM to select the audio Stereo SAP Mono Changing during recording changes the recorded sound Stereo Main audio stereo If the broadcast is Mono SAP audio...

Page 13: ...de Max recording time 8 Hour 0 Min 8 Hour 0 Min Cancel Start Set recording time w q to select Hour and Min and e r to set the recording time When you want to start recording w q e r to select Start then Recording starts Tips To exit the screen Press RETURN To stop recording partway Press g STOP To show the remaining recording time Press STATUS to show the remaining recording time Rec 0 59 Stereo D...

Page 14: ...aneous Record and Playback RAM Allows playback of a previous recording while recording something else During recording w q e r to select the recording to play then Tips To stop play Press g STOP To exit the DIRECT NAVIGATOR screen Press DIRECT NAVIGATOR To stop recording After play stops 1 Press DIRECT NAVIGATOR to exit screen 2 Press g STOP Notes During playing while you are recording you cannot ...

Page 15: ...ppears when setting parental ratings 36 Unless you enter the correct password recording the program with parental ratings may fail Tips You can enter up to 16 programs a month in advance Schedule list Remaining RecordingTime 3 26 Tue 12 53 PM 1 58 SP DVD Channel No Date On New Scheduled Recording Off Mode Check A B A Schedule list screen icons Currently recording W Programs are overlapped Recordin...

Page 16: ...ous or Next and press ENTER You can also press u i to view other pages To exit the DIRECT NAVIGATOR screen Press DIRECT NAVIGATOR DIRECT NAVIGATOR screen icons Protected Not recorded due to recording protection Digital broadcasts etc It cannot be played because data is damaged Currently recording One time only recording restriction 66 CPRM Search During playback or There are 5 search speeds Each p...

Page 17: ... R DL RW V R R DL RW RW VR Skips 1 minute forward with each press During playback Create Chapters RAM During playback Tips You can skip to the start of a chapter by pressing u i Changing Audio during Playback to select the audio Available audio will differ based on disc type See below RAM RW VR Stereo Mono L Mono R e g RAM Stereo is selected Play Stereo DVD RAM RAM RW VR When playing an analog MTS...

Page 18: ...IONS ENTER 1 Press ENTER to exit the screen 2 Press FUNCTIONS 3 Press e r to select Menu then press ENTER 4 Press e r to select Pictures then press ENTER Selecting Still Pictures in Another Folder From the Picture JPEG View screen e r w q to select Folder then CD JPEG Pictures Menu Folder ENTER CD RW for Check JPEG JPEG JPEG1 JPEG JPEG2 MP3 MP3 MP3 group1 MP3 MP3 group2 WMA MP3 MP3 group3 Layer MP...

Page 19: ...te 2 3 4 Total Track Tree G 1 T 1 Total 1 111 Menu Group No No 0 9 A B C Selected group e r to select a track then to play Tips indicates the track currently playing To stop playing Press g STOP To exit the menu screens Press DIRECT NAVIGATOR To view other pages Press u i To select the track with the numbered buttons e g 5 0 0 5 15 0 1 5 Using the Tree Screen to Find a Group From the track list q ...

Page 20: ...CTIONS Cartridge Protection Off Disc Protection Off DVD RAM ENTER e r to select Playlists then e r w q to select the playlist to play then Playlist Properties After selecting a playlist step 4 e r to select Properties then Playlist information e g length and date is shown View Chapters After selecting a playlist step 4 e r to select View Chapters then e r w q to select the chapter then Tips To ret...

Page 21: ...ing mode 7 Elapsed recording time and recording mode Only displayed when receiving a digital broadcast 8 Channel 9 Current program 10 Parental Rating of the program 37 11 Channel caption 12 Next program 13 Start and finish times of the program Status Messages Entering Text When viewing the Name screen _ Recording Name 1 2 3 4 5 A B C a D E F d G H I N O g J K L j M m 6 7 8 9 0 b c e f h i k l n _ ...

Page 22: ...tected release protection 27 When recording MTS Multi channel TV Sound broardcasts 10 Insert a disc to select the recording mode 11 e r to select the input where your external device is connected then Front panel inputs are IN2 1 ENTER TV 2 IN1 3 IN2 4 DV Input Select 1 ENTER TV 2 IN1 3 IN2 4 DV Input Select Start play on the external device at the point you want to start recording to the disc Tip...

Page 23: ...orded select the kind of audio for Select Audio Channel For DV Input in the Setup menu 34 RAM Programs are recorded as a single item breaks in the images create chapters If you use video camcorders from other manufacturers these are not guaranteed to work It is not possible to operate the unit from the connected DV equipment The DV equipment name may not be shown correctly Date and time informatio...

Page 24: ...ight Notes You cannot edit during recording R R DL Management information is recorded in unused sections when you edit discs The available space on these discs decreases each time you edit their contents Tips To exit the menu screens Press DIRECT NAVIGATOR To view other pages Press e r w q to select Previous or Next and press ENTER You can also press u i to view other pages Multiple editing Select...

Page 25: ...17 to find the desired point To skip to the start or end of a recording press u start or i end For better precision use Slow motion 17 and Frame by Frame 17 Divide Recording Perform steps 1 3 of Accessing the Recording View 24 RAM Once divided recordings cannot be recombined e r to select Divide Recording then DVD RAM DIRECT NAVIGATOR Divide Recording 0 00 11 Divide 08 Divide Exit Play Preview ENT...

Page 26: ... with e r w q and press h PAUSE Repeat A check mark appears Press h PAUSE again to cancel Chapter Operations Create Chapter Perform steps 1 6b of Accessing the Chapter View left e r to select Create Chapter then DVD RAM DIRECT NAVIGATOR Create Chapter Create Exit 0 43 21 Play 08 ENTER 8 at the point you want to divide 9 e r to select Exit then Notes A short portion of the recording just after the ...

Page 27: ... R R DL RW V R R DL RW Perform preparation steps 1 3 of Accessing the Management Menus left e r select Disc Name then You can give a name for the disc 21 Tips The disc name is displayed in the DVD MANAGEMENT window With a finalized discs and RW the name is displayed on the Top Menu Setting Protection RAM Perform preparation steps 1 3 of Accessing the Management Menus left e r select Disc Protectio...

Page 28: ...atting This can render the disc unusable When a disc has been formatted using this unit it may not be possible to use it on any other equipment R R DL R R DL CD Formatting cannot be performed RW V RW VR You can format only as DVD Video format on this unit RAM Pressing RETURN during format will cancel the process The disc must be reformatted if you do this RAM The disc cannot be formatted if the wr...

Page 29: ...tting although it becomes play only after finalizing The disc finalized on the unit may not be playable on other players depending on the condition of the recording There is a pause of several seconds between recordings and chapters during playback Recordings are divided into about 5 minute chapters R R DL 8 minutes This time varies greatly depending on the condition and mode of recording Tips Aft...

Page 30: ... on off information cannot be recorded using this unit If the subtitles overlap the closed captions recorded on discs turn the subtitles off DVD V Turn the subtitle on off and select the language below Sound track Subtitle language Audio channel RAM RW VR Changing Audio during Playback 17 Angle DVD V Change the number to select an angle Sound track Subtitle language CES Czech MAL Malay CHI Chinese...

Page 31: ...Auto2 When using Auto1 and video content is distorted as shown below Line in NR Only when IN1 or IN2 is selected Reduces video tape noise during recording Depending on the video signal jittering may occur On Noise reduction works for any video input Off Noise reduction is off Select when you want to record input as is Audio Menu RAM R R DL RW V R R DL RW DVD V RW VR V Surround Sound Dolby Digital ...

Page 32: ...al Settings for closed captions in digital broadcasts Digital Setting Detailed settings for closed captions CC reset Resets settings for closed captions For details 35 Setting the Closed Caption Audio Language Setting Select the preferred digital broadcast language English French Spanish Setup Off Timer Select how long the unit remains on when it is not being used 2 Hours 6 Hours Off Remote Contro...

Page 33: ...n the password screen is shown Do not forget your password Setting ratings When level 8 is selected 8 No Limit All DVD Video can be played 1 to 7 Prohibits play of DVD Video with corresponding ratings recorded on them 0 Lock All Prohibits play of all DVD Video Changing ratings When level 0 to 7 is selected Unlock Recorder Change Password Change Level Temporary Unlock Audio Language English French ...

Page 34: ...2 Records added audio such as narration L2 R2 subsequent to original recording Mix Records both Stereo 1 and Stereo 2 Incorrect settings can cause noise to be output which can be harmful to your ears and speakers and audio will not be recorded properly on media such as mini discs Display Status Messages Choose whether to show status messages automatically or not Automatic Off On screen Language Ch...

Page 35: ...aption to select Digital then to select the item then Primary Primary Language Secondary Secondary Language Service 3 Service 3 Language Service 4 Service 4 Language Service 5 Service 5 Language Service 6 Service 6 Language Detailed settings for closed captions in digital broadcasts Perform steps 1 5 of Setting the Closed Caption to select Digital Setting then to select the item then Size Text siz...

Page 36: ...uttons and Setup Channel Setup Disc Video Audio Display TV Screen Ratings Password 0 9 ENTER SELECT RETURN Enter a 4 digit password then press ENTER to store Number A screen appears advising that you have set a password Press ENTER If you select Off for Set A screen appears advising that you haven t set a rating Press ENTER To change the password Perform steps 1 3 of Setting the Parental Rating En...

Page 37: ...r 17 requires accompanying parent or adult guardian NC 17 No one 17 and under admitted X Adults only CELR Rating Canadian English Ratings E Viewable Blocked Exempt Exempt programming includes news sports documentaries and other information programming talk shows music videos and variety programming CELR Off CELR Rating is set to off C Programming intended for children under age 8 No offensive lang...

Page 38: ... TV Rear of this unit AUDIO IN R L VIDEO IN step 3 step 1 step 2 step 4 Red White Yellow Red White Yellow Cable from the wall or antenna signal To a household AC outlet AC 120V 60 Hz Coaxial cable from the wall or antenna signal to the RF IN on the unit Coaxial cable included from the RF OUT on the unit to the VHF UHF RF IN on the TV Audio video cable included from the OUT on the unit to the AV IN...

Page 39: ...N R L VIDEO IN step 3 step 1 step 2 step 6 Red White Yellow Red White Yellow step 4 step 5 Red White Yellow Red White Yellow Rear of Cable Box Rear of TV Rear of this unit Cable from the wall To a household AC outlet AC 120V 60 Hz Coaxial cable from the wall to the RF IN on the unit Coaxial cable included from the RF OUT on the cable box to the VHF UHF RF IN on the TV Audio video cable included fr...

Page 40: ...step 2 step 5 Red White Yellow Red White Yellow step 4 Red White Yellow Red White Yellow step 1 Rear of Satellite Receiver Rear of TV Rear of this unit VHF UHF To a household AC outlet AC 120V 60 Hz Satellite antenna Coaxial cable from the satellite antenna to the SATELLITE IN on the satellite receiver Coaxial cable included from the RF OUT on the satellite receiver to the VHF UHF RF IN on the TV ...

Page 41: ...nit RF Modulator step 2 Cable from the wall or antenna signal Connecting to a Television with a Video Cassette Recorder or a Cable Box or Satellite Receiver Connect cables in steps and same as those on page 39 or 40 as follows AUDIO IN R L VIDEO IN RF IN RF OUT VHF UHF RF IN step 3 Red White Yellow Red White Yellow Rear of TV Rear of this unit Rear of Video Cassette Recorder or Cable Box or Satell...

Page 42: ...ble Box and a VCR Perform step on page 39 Coaxial cable from the RF OUT on the unit to the RF IN on the VCR Coaxial cable from the RF OUT on the VCR to the RF IN on the cable box Audio video cable from the AV OUT on the VCR to the IN2 on the unit Perform step on page 39 AUDIO OUT L R VIDEO OUT RF IN RF OUT RF IN step 4 Yellow White Red Yellow White Red step 2 step 3 Rear of VCR Rear of Cable Box R...

Page 43: ...ded Component video cables not included Leave the yellow cable unconnected You can enjoy better quality sound by changing the audio cable connection between this unit and your TV on pages 38 to 40 as follows Using an Audio Cable for Better Sound Use this connection to play sound through speakers connected to an amplifier or system component Rear of Amplifier or System Component Rear of this unit A...

Page 44: ...bout 1 second Please note that Quick Start mode slightly increases power consumption when the unit is off See Operation Instructions for details Turn Quick Start on On Off Automatic Clock and Channel Setting e r to select Yes or No then When connecting the cable from the wall cable TV or antenna to the unit s RF IN Select Yes The unit then displays the source selection screen 45 When not connectin...

Page 45: ...cancel in the middle Press RETURN Notes Conditions of the received channel may cause automatic channel clock setting to take extra time Manual Clock Setting Perform steps 1 5 on page 44 w q to select the item you want to change Set Clock Manually SAT AM DST EST 1 1 2000 12 Off Time Zone EST 00 Month Day Year Hour Minute e r to change the setting Repeat steps 6 7 to change other items 8 to confirm ...

Page 46: ...s A Z a z 0 9 _ space Adding and Deleting Channels To add channels delete undesired channels or channels that have poor reception Perform steps 1 3 of Setting Channel Captions e r to select channel then w q to select the Add Del column e r to select Added or Deleted then Selecting Television Type This setting does not need to be changed when connected to a 4 3 standard aspect TV that is not compat...

Page 47: ...ight or Set Clock Manually 32 Tips To cancel in the middle Press RETURN The unit then displays Set Clock Manually screen 45 Manual Clock Setting Time Zone Time Zone shows the time difference from Greenwich Mean Time GMT EST Eastern Standard Time GMT 5 CST Central Standard Time GMT 6 MST Mountain Standard Time GMT 7 PST Pacific Standard Time GMT 8 AST Alaska Standard Time GMT 9 HST Hawaii Standard ...

Page 48: ...236 0270 0280 0282 0463 0623 Envision 0030 0813 Epson 0833 0840 Fisher 0154 0159 Fujitsu 0179 0186 0683 0809 0853 GE 0021 0027 0029 0047 0051 0055 0135 0138 0174 0178 0251 0279 0282 0451 0747 1347 1447 Go Video 0886 Haier 0768 1034 Hannspree 1348 1351 1352 Hewlett Packard 1088 1089 1101 1494 1502 Hisense 0748 Hitachi 0016 0032 0038 0056 0095 0097 0145 0151 0173 0227 0279 0409 0413 1145 In Focus 07...

Page 49: ...0775 1005 1170 1505 1775 Dishpro 0775 1005 1505 1775 Echostar 0775 1005 1170 1505 1775 Expressvu 0775 1775 GE 0392 0566 General Instrument 0869 GOI 0775 1775 Goodmans 1246 Hisense 1535 Hitachi 0819 1250 HTS 0775 1775 Hughes 0749 1442 1749 Hughes Network Systems 0749 1142 1442 1443 1444 1749 Satellite Receiver Continued Manufacturer Code iLo 1535 Janeil 0152 Jerrold 0869 JVC 0775 1170 1775 LG 1226 ...

Page 50: ...48 bp Channel select 6 bq Input select TV IN1 IN2 DV 22 br Sub channel access for digital broadcasts 6 bs Delete items 9 bt Skip 1 minute forward 17 ck Show scheduled recording list 8 cl Show FUNCTIONS window below cm Return to previous screen cn Show setup menu 32 co Create chapters 17 cp Show status messages 21 cq Start Flexible Recording 13 FUNCTIONS Window By using the FUNCTIONS window you may...

Page 51: ...tton 6 7 6 Play 1 3 button 6 7 Reset button 55 8 Start recording 7 9 Disc tray open close button 6 The Unit s Display 1 2 3 4 5 1 Recording indicator 2 Main display section 3 Disc indicator This indicator lights up when a disc that is supported by this unit is inserted 4 Scheduled recording indicator 8 On When a scheduled recording program is registered and a recordable disc is inserted Flashes Th...

Page 52: ...er information 10 Important Notes for Recording Use of Panasonic discs is recommended For available recording times for different discs under different recording modes see Recording Modes and Durations on page 11 Formatting and or recording initializing constraints may prevent you from playing or recording certain discs Please see specifications 65 for compatible disc versions and recording speeds...

Page 53: ...ding The producer of the disc can control how discs are played So you may not always be able to control play as described in these operating instructions Read the disc s instructions carefully Inserting Discs to open the tray Insert a disc Insert label up to close the tray Notes When using 8 cm 3 DVD RAM or 8 cm 3 DVD R remove the disc from the cartridge It is not possible to record or play contin...

Page 54: ...c numerals are displayed correctly Other characters may not display correctly The display order on this unit may differ from how the order is displayed on a computer Depending on how you create the disc writing software files tracks and folders groups may not play in the order you number them This unit is not compatible with packet write format Depending on the recording conditions the disc may no...

Page 55: ...ormation and the clock settings On the main unit Press and hold both buttons for about 5 seconds To reset the ratings level settings You can reset both parental rating 36 and DVD Video rating 33 With the unit stopped to open the disc tray On the main unit REC Press and hold both buttons for about 5 seconds To restore the unit if it freezes On the main unit Press and hold for more than 10 seconds T...

Page 56: ... The display is dim Change Front Display in the Setup menu 34 12 00A is flashing on the unit s display Set the clock 32 47 The recording time display and the displayed recording times of MP3s are different from the actual time Times shown may disagree with actual times R R DL R R DL The remaining capacity does not increase even if recordings are deleted Available space on a DVD RW DVD Video format...

Page 57: ... may have been activated Reset the unit as follows Press POWER 8 on the main unit to switch to off If the unit doesn t switch to off reset the unit 55 To restore the unit if it freezes U88 is displayed and the disc cannot be ejected The unit is carrying out the recovery process Do the following to eject the disc 1 Press POWER 8 on the main unit to switch to off If the unit doesn t switch to off re...

Page 58: ...rent change in picture quality when making adjustments in the Video menu using the on screen menus The effect cannot be seen with certain types of video Playback Issues Sound Page No sound Low volume Distorted sound Cannot hear the desired audio type Check the connections and the Digital Audio Output settings Check the input mode on the amplifier if you have connected one 34 38 to 43 Check audio v...

Page 59: ...d This function depends on software availability Angles can only be changed during scenes where different angles are recorded You have forgotten your ratings password With the tray open press and hold REC and q on the main unit simultaneously for about 5 or more seconds 55 Quick View does not work This does not work when audio is other than Dolby Digital This does not work while recording in XP or...

Page 60: ... correctly connected 22 23 The proper external input channel IN1 IN2 or DV is not selected Press INPUT SELECT to change 22 The DV Camcorder recording function does not work If images cannot be recorded or if the recording is aborted check the connections and the DV equipment settings 23 You cannot start recording until the images from the DV equipment appear on the television Recording may not be ...

Page 61: ... the video standard is NTSC However you cannot play DVD Video if its region number does not include 1 or ALL Cover Can a DVD Video that does not have a region number be played Discs either without region number or region number 1 or All will not play on this unit What are the constraints regarding DVD R DVD R DL DVD RW R R DL and RW compatibility with the unit The unit records and plays DVD R DVD ...

Page 62: ...order using the DV automatic recording function however is recorded digitally Can a digital audio signal from the unit be recorded to other equipment You can record if using the PCM signal When recording DVD change the Digital Audio Output settings to the following via the Setup menu PCM Down Conversion On Dolby Digital PCM DTS PCM However only As long as digital recording from the disc is permitt...

Page 63: ... scheduled recording programs Delete unnecessary scheduled recording programs 15 UNSUPPORT UNSUP and POrt are alternately displayed You have inserted a disc the unit cannot play or record on 53 UNFORMAT UNFOr and MAt are alternately displayed You have inserted a new DVD RW RW or a DVD RAM DVD RW DVD Video format recorded on other equipment You can format the disc when the format confirmation scree...

Page 64: ...clock The clock is not set when recording programs or setting scheduled recording Set the clock 32 47 This is a non recordable disc The unit cannot record on the disc you inserted Insert a DVD RAM or unfinalized DVD R DVD R DL DVD RW DVD Video format R R DL or RW disc 52 The disc may be incompatible or of poor quality 53 This disc is not formatted properly You inserted an unformatted DVD RAM DVD R...

Page 65: ...rotection Television system TV system NTSC system 525 lines 60 fields Antenna reception input Analog TV Channel 2 to 69 ch Analog CATV Channel 1 to 135 ch Digital TV Channel 2 to 69 ch Digital CATV Channel 1 to 135 ch RF converter output Not provided Quick Start for Recording Quick Start ON 1 Sec Quick Start for Recording on DVD RAM From the power off state recording on DVD RAM starts about 1 seco...

Page 66: ...VD Video format and RW on this unit Formatting irrevocably erases all contents Frame and field Frame refers to the single images that constitute the video you see on your TV Each frame consists of 2 fields u r Frame Field Field A frame still shows 2 fields so there may be some blurring between them but picture quality is generally better A field still shows less picture information so it may be ro...

Page 67: ...to acts of God THERE ARE NO EXPRESS WARRANTIES EXCEPT AS LISTED UNDER LIMITED WARRANTY COVERAGE THE WARRANTOR IS NOT LIABLE FOR INCIDENTAL OR CONSEQUENTIAL DAMAGES RESULTING FROM THE USE OF THIS PRODUCT OR ARISING OUT OF ANY BREACH OF THIS WARRANTY As examples this excludes damages for lost time travel to and from the servicer loss of media or images data or other recorded content The items listed...

Page 68: ...jo Blanco Amarillo Rojo Blanco Amarillo A la toma de corriente de CA 120 V CA 60 Hz Cable de la pared o señal de antena Uso del modulador RF en el caso de que su televisión carezca de terminales de audio vídeo Conecte los cables en el paso y paso como se menciona anteriormente como se indica a continuación VHF UHF RF IN RF OUT AUDIO IN R L VIDEO IN RF IN RF OUT Paso 3 Modulador RF Paso 2 Panel tra...

Page 69: ... e r para seleccionar la función de inicio rápido Act o Desactivado luego e r para seleccionar si desea o no recibir señal de TV del terminal RF IN de la unidad y luego Cuando seleccione No la unidad entonces mostrará la pantalla Ajuste manual del reloj derecha e r para seleccionar Antena o Cable luego para iniciar el ajuste automático de canales reloj 8 Confirmar hora luego HL horario de verano m...

Page 70: ...ción Oprima g STOP La posición de detención se memoriza La posición de detención se borra al oprimir g STOP varias veces Pausar la reproducción Oprima h PAUSE Oprima de nuevo para reiniciar la reproducción Selección de grabaciones para reproducir RAM R R DL RW V R R DL RW RW VR Realice los pasos 1 y 2 de Reproducción de discos izquierda 1 Oprima DIRECT NAVIGATOR 2 e r w q para seleccionar la graba...

Page 71: ...recuencia Act Des Modo ENTER RETURN Nombre Número 0 9 4 1 Tiempo grabación restante 3 26 Vie 12 53 PM 1 58 SP DVD Cancelar Repita los pasos 2 a 4 para programar otras grabaciones cuando haya finalizado los cambios de programación El indicador z se enciende en el visualizador de la unidad Importante una vez borrados los contenidos no podrán recuperarse Borrado de grabaciones con el navegador de bor...

Page 72: ...udio Language Setting 32 CChange Thumbnail 25 Channel adding deleting 46 audio 30 captions 46 Set Channels Automatically 32 Chasing Playback 14 Cleaning disc 53 lens 3 main unit 3 Clock Settings 47 Closed Caption 35 CM Skip 17 Connection amplifier system component 43 antenna 38 39 40 41 55 cable box 39 DV IN terminal 23 satellite receiver 40 television 38 39 40 41 42 video cassette recorder 22 42 ...

Reviews: